jni是java调用本地方法(c、c++写的),android 下用JNI需要.so文件,NDK就是能够方便快捷开发.so文件的工具。使用NDK的基本思路就是将本地代码(native code)编译成函数库,然后就可以在Java代码中使用它。(当java程序在虚拟机中执行时,当执行native的函数时,虚拟机的“native引擎”会根据包名、函数名和参数来决定调用哪个本地函数(c中函数),所以在调用本地函数之前,必须把C所生成的动态库装载到虚拟机,否则java中的native函数就会因找不到本地实现而报错。Native引擎中AndroidRuntime类提供了一个registerNativeMethods()函数,它实现了java native函数和c中本地函数的映射关系。)
JNI的编写步骤
1)编写带有native 声明的java类.
2)编译java文件成class类(eclipse可自动生成)
3)编译成.h文件
4)使用C/C++编写代码
5)编写makefile文件,将.h和.c(.cpp)文件编译成.dll(.so)文件
6)将.dll(.so)文件提供给项目,用system.loadLibrary方法调用.
一、 开发环境的搭建
Step1安装Cygwin
Step2安装Android NDK
二、代码的编写(参考android-ndk-r8d\samples\hello-jni)
Step1 建立项目编写java代码
HelloJni.java :
/*
 * Copyright (C) 2009 The Android Open Source Project
 *
 * Licensed under the Apache License, Version 2.0 (the "License");
 * you may not use this file except in compliance with the License.
 * You may obtain a copy of the License at
 *
 *      http://www.apache.org/licenses/LICENSE-2.0
 *
 * Unless required by applicable law or agreed to in writing, software
 * distributed under the License is distributed on an "AS IS" BASIS,
 * WITHOUT WARRANTIES OR CONDITIONS OF ANY KIND, either express or implied.
 * See the License for the specific language governing permissions and
 * limitations under the License.
 */
package com.example.hellojni;

import android.app.Activity;
import android.widget.TextView;
import android.os.Bundle;


public class HelloJni extends Activity
{
    /** Called when the activity is first created. */
    @Override
    public void onCreate(Bundle savedInstanceState)
    {
        super.onCreate(savedInstanceState);

        /* Create a TextView and set its content.
         * the text is retrieved by calling a native
         * function.
         */
        TextView  tv = new TextView(this);
        tv.setText( stringFromJNI() );
        setContentView(tv);
    }

    /* A native method that is implemented by the
     * 'hello-jni' native library, which is packaged
     * with this application.
     */
    public native String  stringFromJNI();

    /* This is another native method declaration that is *not*
     * implemented by 'hello-jni'. This is simply to show that
     * you can declare as many native methods in your Java code
     * as you want, their implementation is searched in the
     * currently loaded native libraries only the first time
     * you call them.
     *
     * Trying to call this function will result in a
     * java.lang.UnsatisfiedLinkError exception !
     */
    public native String  unimplementedStringFromJNI();

    /* this is used to load the 'hello-jni' library on application
     * startup. The library has already been unpacked into
     * /data/data/com.example.HelloJni/lib/libhello-jni.so at
     * installation time by the package manager.
     */
    static {
        System.loadLibrary("hello-jni");
    }
}
程序开始运行的时候会加载hello-jni, static区声明的代码会先于onCreate方法执行。如果你的程序中有多个类,而且HelloJni这个类不是你应用程序的入口,那么 hello-jni(完整的名字是libhello-jni.so)这个库会在第一次使用HelloJni这个类的时候加载。
public native String stringFromJNI();
public native String unimplementedStringFromJNI();
可以看到这两个方法的声明中有 native 关键字, 这个关键字表示这两个方法是本地方法,也就是说这两个方法是通过本地代码(C/C++)实现的,在java代码中仅仅是声明。
eclipse自动编译该工程,生成相应的.class文件,这步必须在下一步之前完成,因为生成.h文件需要用到相应的.class文件。
Step2编写相应的C/C++代码
利用javah这个工具生成相应的.h文件,然后根据这个.h文件编写相应的C/C++代码。
2.1 生成相应.h文件:
2.1.1首先我们在工程目录下建立一个jni文件夹:
2.2.2以生成相应的.h文件:
项目路径$ javah -classpath bin/classes -d jni com.example.hellojni.HelloJni
-classpath bin/classes:表示类的路径
-d jni: 表示生成的头文件存放的目录
com.example.hellojni.HelloJni 则是完整类名
这一步的成功要建立在已经在 bin/com/example/hellojni/ 目录下生成了 HelloJni.class的基础之上。
现在可以看到jni目录下多了个.h文件
 /* DO NOT EDIT THIS FILE - it is machine generated */
#include <jni.h>
/* Header for class com_example_test_MainActivity */

#ifndef _Included_com_example_test_MainActivity
#define _Included_com_example_test_MainActivity
#ifdef __cplusplus
extern "C" {
#endif
#ifdef __cplusplus
}
#endif
#endif
2.2 编写相应的.c文件
hello-jni.c :
/*
 * Copyright (C) 2009 The Android Open Source Project
 *
 * Licensed under the Apache License, Version 2.0 (the "License");
 * you may not use this file except in compliance with the License.
 * You may obtain a copy of the License at
 *
 *      http://www.apache.org/licenses/LICENSE-2.0
 *
 * Unless required by applicable law or agreed to in writing, software
 * distributed under the License is distributed on an "AS IS" BASIS,
 * WITHOUT WARRANTIES OR CONDITIONS OF ANY KIND, either express or implied.
 * See the License for the specific language governing permissions and
 * limitations under the License.
 *
 */
#include <string.h>
#include <jni.h>

/* This is a trivial JNI example where we use a native method
 * to return a new VM String. See the corresponding Java source
 * file located at:
 *
 *   apps/samples/hello-jni/project/src/com/example/HelloJni/HelloJni.java
 */
jstring
Java_com_example_hellojni_HelloJni_stringFromJNI( JNIEnv* env,
                                                  jobject thiz )
{
    return (*env)->NewStringUTF(env, "Hello from JNI !");
}
2.3. 编译c文件生成相应的库
2.3.1 编写Android.mk文件
在jni目录下(即hello-jni.c 同级目录下)新建一个Android.mk文件,Android.mk 文件是Android 的 makefile文件,内容如下:
# Copyright (C) 2009 The Android Open Source Project
#
# Licensed under the Apache License, Version 2.0 (the "License");
# you may not use this file except in compliance with the License.
# You may obtain a copy of the License at
#
#      http://www.apache.org/licenses/LICENSE-2.0
#
# Unless required by applicable law or agreed to in writing, software
# distributed under the License is distributed on an "AS IS" BASIS,
# WITHOUT WARRANTIES OR CONDITIONS OF ANY KIND, either express or implied.
# See the License for the specific language governing permissions and
# limitations under the License.
#
LOCAL_PATH := $(call my-dir)

include $(CLEAR_VARS)

LOCAL_MODULE    := hello-jni
LOCAL_SRC_FILES := hello-jni.c

include $(BUILD_SHARED_LIBRARY)
除去模块名(hello-jni)外,文件中其它东西都不用关心 对NDK的build过程来说,Android.mk至关重要,它用来区分NDK模块。在我们这个例子中,模块的名字是hello-jni,它告诉build工具它包含了一个源文件hello-jni.c我们到jni文件夹里创建hello-jni
2.3.2 生成.so共享库文件
运行:$NDK/ndk-build。
注意:该命令$NDK和/ndk-build是连接到一起的,中间没有空格,实际使用时输入完整命令$NDK/ndk-build,不能只输入ndk-build。$NDK/ndk-build成功运行后,将会在项目libs/armeabi/ 目录下创建一个.so文件。这个.so文件就是二进制库,它将被包含到应用的.apk包中,并可以被Java代码链接。在Eclipse中,你只需要在选中项目根节点后,按F5键,就可以将在Cygwin控制台中所做的更改,更新到Eclipse项目中。
Step3优化
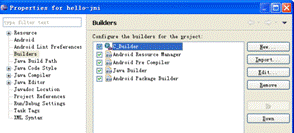
每次修改了之后都要手动进行编译,这样比较麻烦,下面介绍一种简单的方法(增加一个C-Builer):
i. 右击项目选择properties,出现下面
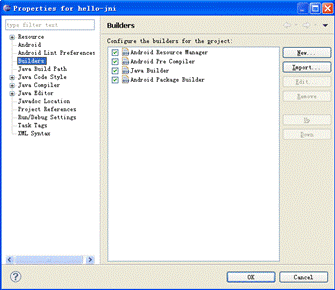
ii.在左边选择Builders,在右边点击New这个按钮,出现

iii.选择Program,点击OK,出现配置编译器对话框:
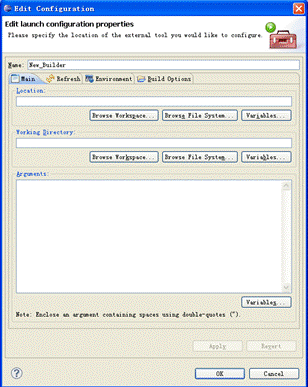
iv. name改为C_Builder
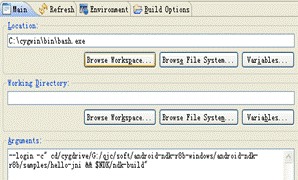
v. 设置Location:<你cygwin安装路径>\bin\bash.exe,如:C:\cygwin\bin\bash.exe
vi. 设置Arguments:
(这是我的目录,自己的需要适当修改,不能改动的,--login –c 是神马意思我也不懂,为了方便表示,上面字符串中的4个@其实是空格,输入的时候请换为空格)
Arguments这串参数实际是 给bash.exe命令行程序传参数,进入要编译的程序目录,然后运行ndk-build编译程序
vii.接着切换到Refresh选项卡,给Refresh resources upon completion打上钩

viii.然后切换到Build Options选项卡,勾选上最后三项

ix.之后点击Specify Resources按钮,选择资源目录,勾选你的项目目录即可
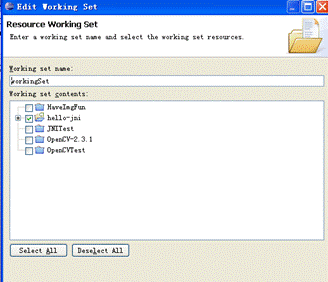
x.最后点击Finish,注:如果你配置的编译器在其它编译器下边,记得一定要点Up按钮,把它排到第一位,否则C代码的编译晚于Java代码的编译,会造成你的C代码要编译两次才能看到最新的修改
