学成在线(第10天)课程发布及ElasticSearch
课程发布
需求分析
课程发布后将生成正式的课程详情页面,课程发布后用户即可浏览课程详情页面,并开始课程的学习。
课程发布生成课程详情页面的流程与课程预览业务流程相同,如下:
1、用户进入教学管理中心,进入某个课程的管理界面
2、点击课程发布,前端请求到课程管理服务
3、课程管理服务远程调用CMS生成课程发布页面,CMS将课程详情页面发布到服务器
4、课程管理服务修改课程发布状态为 “已发布”,并向前端返回发布成功
5、用户在教学管理中心点击“课程详情页面”链接,查看课程详情页面内容

CMS 一键发布接口
根据需求分析内容,需要在 cms服务增加页面发布接口供课程管理服务调用,此接口的功能如下:
1、接收课程管理服务发布的页面信息
2、将页面信息添加到 数据库(mongodb)
3、对页面信息进行静态化
4、将页面信息发布到服务器
接口定义
1、创建响应结果类型
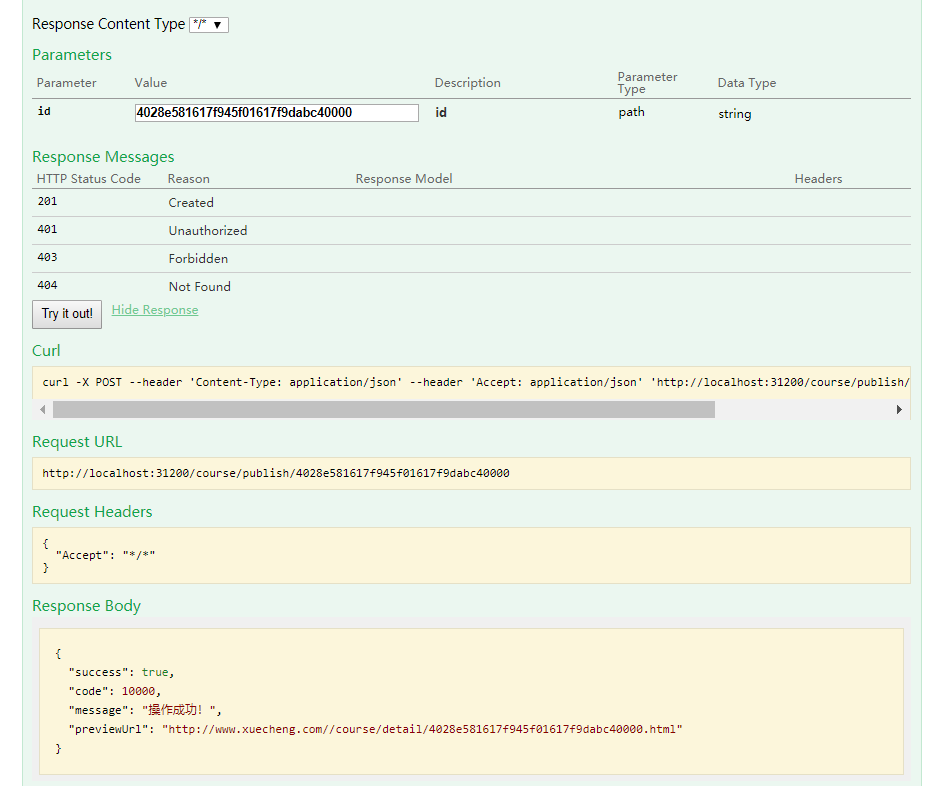
页面发布成功cms返回页面的url
页面Url= cmsSite.siteDomain+cmsSite.siteWebPath+ cmsPage.pageWebPath + cmsPage.pageName
@Data
@NoArgsConstructor//无参构造器注解
public class CmsPostPageResult extends ResponseResult  {
    String pageUrl;
    public CmsPostPageResult(ResultCode resultCode,String pageUrl) {
        super(resultCode);
        this.pageUrl = pageUrl;
    }
}
2、在api工程定义页面发布接口
@ApiOperation("一键发布页面")
public CmsPostPageResult postPageQuick(CmsPage cmsPage);
Dao
1、站点dao
接口中需要获取站点的信息(站点域名、站点访问路径等
public interface CmsSiteRepository extends MongoRepository<CmsSite,String> {
}
Service
1、添加页面,如果已存在则更新页面
//添加页面,如果已存在则更新页面
public CmsPageResult save(CmsPage cmsPage){
    //校验页面是否存在,根据页面名称、站点Id、页面webpath查询
    CmsPage cmsPage1 =
cmsPageRepository.findByPageNameAndSiteIdAndPageWebPath(cmsPage.getPageName(),
cmsPage.getSiteId(), cmsPage.getPageWebPath());
    if(cmsPage1 !=null){
        //更新
        return this.update(cmsPage1.getPageId(),cmsPage);
    }else{
        //添加
        return this.add(cmsPage);
    }
}
2、页面发布方法


//一键发布页面
    public CmsPostPageResult postPageQuick(CmsPage cmsPage){
        //添加页面
        CmsPageResult save = this.save(cmsPage);
        if(!save.isSuccess()){
            return new CmsPostPageResult(CommonCode.FAIL,null);
        }
        CmsPage cmsPage1 = save.getCmsPage();
        //要布的页面id
        String pageId = cmsPage1.getPageId();
        //发布页面
        ResponseResult responseResult = this.postPage(pageId);
        if(!responseResult.isSuccess()){
            return new CmsPostPageResult(CommonCode.FAIL,null);
        }
        //得到页面的url
        //页面url=站点域名+站点webpath+页面webpath+页面名称
        //站点id
        String siteId = cmsPage1.getSiteId();
        //查询站点信息
        CmsSite cmsSite = findCmsSiteById(siteId);
        //站点域名
        String siteDomain = cmsSite.getSiteDomain();
        //站点web路径
        String siteWebPath = cmsSite.getSiteWebPath();
        //页面web路径
        String pageWebPath = cmsPage1.getPageWebPath();
        //页面名称
        String pageName = cmsPage1.getPageName();
        //页面的web访问地址
        String pageUrl = siteDomain+siteWebPath+pageWebPath+pageName;
        return new CmsPostPageResult(CommonCode.SUCCESS,pageUrl);
    }
//根据id查询站点信息
    public CmsSite findCmsSiteById(String siteId){
        Optional<CmsSite> optional = cmsSiteRepository.findById(siteId);
        if(optional.isPresent()){
            return optional.get();
        }
        return null;
    }
Controller
@Override
@PostMapping("/postPageQuick")
public CmsPostPageResult postPageQuick(@RequestBody CmsPage cmsPage) {
    return pageService.postPageQuick(cmsPage);
}
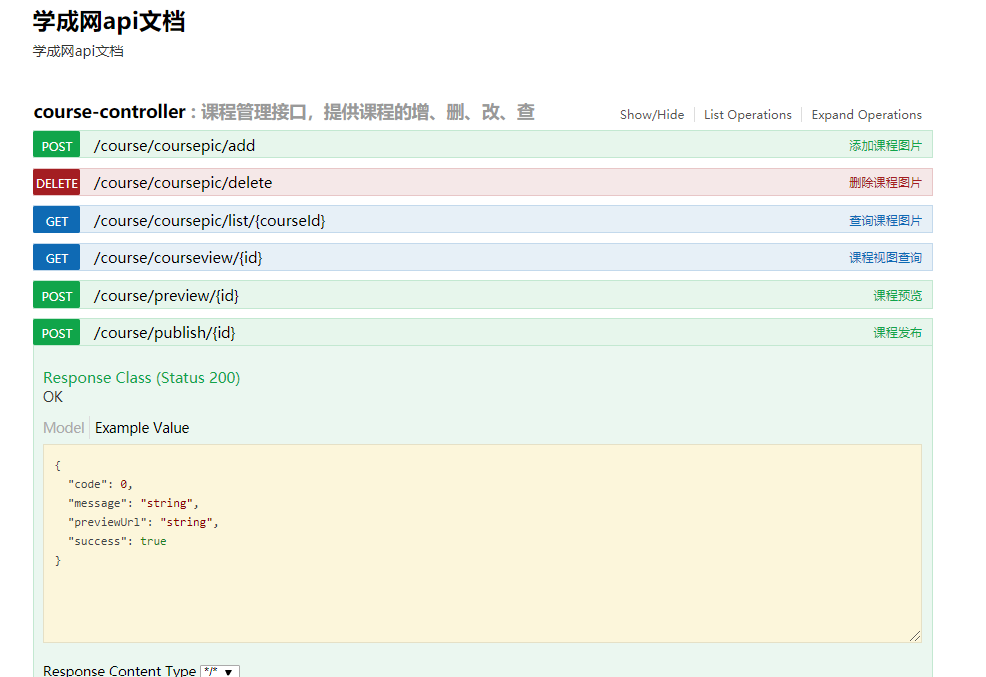
课程发布接口
Api接口
此Api接口由课程管理提供,由课程管理前端调用此Api接口,实现课程发布。
在api工程下课程管理包下定义接口:
@ApiOperation("发布课程")
public CoursePublishResult publish(@PathVariable String id);
创建Feign Client
在课程管理工程创建CMS服务页面发布的Feign Client
@FeignClient(value = XcServiceList.XC_SERVICE_MANAGE_CMS)
public interface CmsPageClient {
    //一键发布页面
    @PostMapping("/cms/page/postPageQuick")
    public CmsPostPageResult postPageQuick(CmsPage cmsPage);
}
Service
1、配置课程发布页面参数
在application.yml中配置
course‐publish:
  siteId: 5b30cba5f58b4411fc6cb1e5
  templateId: 5ad9a24d68db5239b8fef199
  previewUrl: http://www.xuecheng.com/cms/preview/
  pageWebPath: /course/detail/
  pagePhysicalPath: /course/detail/
  dataUrlPre: http://localhost:31200/course/courseview/
siteId:站点id
templateId:模板id
dataurlPre:数据url的前缀
pageWebPath: 页面的web访问路径
pagePhysicalPath:页面的物理存储路径。
2、Service方法如下
@Value("${course‐publish.dataUrlPre}")
private String publish_dataUrlPre;
@Value("${course‐publish.pagePhysicalPath}")
private String publish_page_physicalpath;
@Value("${course‐publish.pageWebPath}")
private String publish_page_webpath;
@Value("${course‐publish.siteId}")
private String publish_siteId;
@Value("${course‐publish.templateId}")
private String publish_templateId;
@Value("${course‐publish.previewUrl}")
private String previewUrl;
@Autowired
CmsPageClient cmsPageClient;
 //课程发布
    @Transactional
    public CoursePublishResult publish(String courseId){
        //课程信息
        CourseBase one = this.findCourseBaseById(courseId);
        //发布课程详情页面
        CmsPostPageResult cmsPostPageResult = publish_page(courseId);
        if(!cmsPostPageResult.isSuccess()){
            ExceptionCast.cast(CommonCode.FAIL);
}
        //更新课程状态
        CourseBase courseBase = saveCoursePubState(courseId);
        //课程索引...
        //课程缓存...
        //页面url
        String pageUrl = cmsPostPageResult.getPageUrl();
        return new CoursePublishResult(CommonCode.SUCCESS,pageUrl);
    }
    //更新课程发布状态
    private CourseBase saveCoursePubState(String courseId){
        CourseBase courseBase = this.findCourseBaseById(courseId);
        //更新发布状态
        courseBase.setStatus("202002");
        CourseBase save = courseBaseRepository.save(courseBase);
        return save;
    }
    //发布课程正式页面
    public CmsPostPageResult publish_page(String courseId){
        CourseBase one = this.findCourseBaseById(courseId);
        //发布课程预览页面
        CmsPage cmsPage = new CmsPage();
        //站点
        cmsPage.setSiteId(publish_siteId);//课程预览站点
        //模板
        cmsPage.setTemplateId(publish_templateId);
        //页面名称
        cmsPage.setPageName(courseId+".html");
        //页面别名
        cmsPage.setPageAliase(one.getName());
        //页面访问路径
        cmsPage.setPageWebPath(publish_page_webpath);
        //页面存储路径
        cmsPage.setPagePhysicalPath(publish_page_physicalpath);
        //数据url
        cmsPage.setDataUrl(publish_dataUrlPre+courseId);
        //发布页面
        CmsPostPageResult cmsPostPageResult = cmsPageClient.postPageQuick(cmsPage);
        return cmsPostPageResult;
    }
Controller
@Override
    @PostMapping("/publish/{id}")
    public CoursePublishResult publish(@PathVariable String id) {
        return courseService.publish(id);
    }
新增站点和模板
1、新增课程详情页面的站点信息
如果已增加课程详情页面的站点则忽略此步骤。
向cms_site中新增如下信息
{
    "_id" : ObjectId("5b30b052f58b4411fc6cb1cf"),
    "_class" : "com.xuecheng.framework.domain.cms.CmsSite",
    "siteName" : "课程详情站点",
    "siteDomain" : "http://www.xuecheng.com",
    "sitePort" : "80",
    "siteWebPath" : "",
    "siteCreateTime" : ISODate("2018‐02‐03T02:34:19.113+0000")
}
2、新增课程详情模板信息
可直接使用前边章节制作的课程详情信息模板。
可以GridFS的测试代码添加模板,如果已添加则不用重复添加。
使用测试GridFS Api将模板文件存储到mongodb:
//文件存储2
@Test
public void testStore2() throws FileNotFoundException {
    File file = new File("C:\\Users\\admin\\Desktop\\coursedetail_t.html");
    FileInputStream inputStream = new FileInputStream(file);
    //保存模版文件内容
    GridFSFile gridFSFile = gridFsTemplate.store(inputStream, "测试文件","");
    String fileId = gridFSFile.getId().toString();
    System.out.println(fileId);
}
单元测试
1、启动RabbitMQ服务
2、启动cms服务
3、启动cms_client,注意配置routingKey和队列名称
xuecheng:
  mq:
  #cms客户端监控的队列名称(不同的客户端监控的队列不能重复)
    queue: queue_cms_postpage_03
    routingKey: 5b30b052f58b4411fc6cb1cf  #此routingKey为门户站点ID

全文检索 Elasticearch 研究
ElasticSearch 介绍
1、elasticsearch是一个基于Lucene的高扩展的分布式搜索服务器,支持开箱即用。
2、elasticsearch隐藏了Lucene的复杂性,对外提供Restful 接口来操作索引、搜索。
突出优点:
1. 扩展性好,可部署上百台服务器集群,处理PB级数据。
2.近实时的去索引数据、搜索数据。
es和solr选择哪个?
1.如果你公司现在用的solr可以满足需求就不要换了。
2.如果你公司准备进行全文检索项目的开发,建议优先考虑elasticsearch,因为像Github这样大规模的搜索都在用
它。
es在项目中的应用方式:
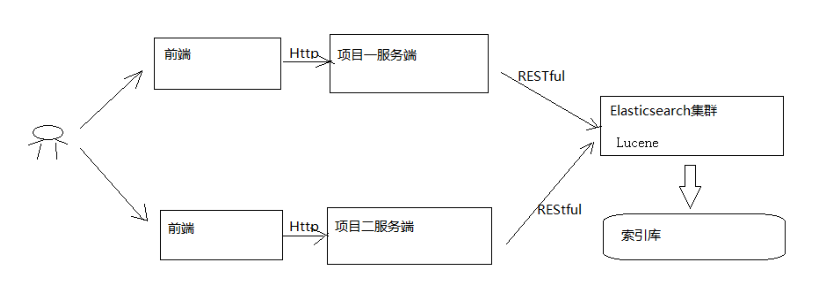
1)用户在前端搜索关键字
2)项目前端通过http方式请求项目服务端
3)项目服务端通过Http RESTful方式请求ES集群进行搜索
4)ES集群从索引库检索数据。
ES 快速入门
创建索引库
ES的索引库是一个逻辑概念,它包括了分词列表及文档列表,同一个索引库中存储了相同类型的文档。它就相当于
MySQL中的表,或相当于Mongodb中的集合。
关于索引这个语:
索引(名词):ES是基于Lucene构建的一个搜索服务,它要从索引库搜索符合条件索引数据。
索引(动词):索引库刚创建起来是空的,将数据添加到索引库的过程称为索引。
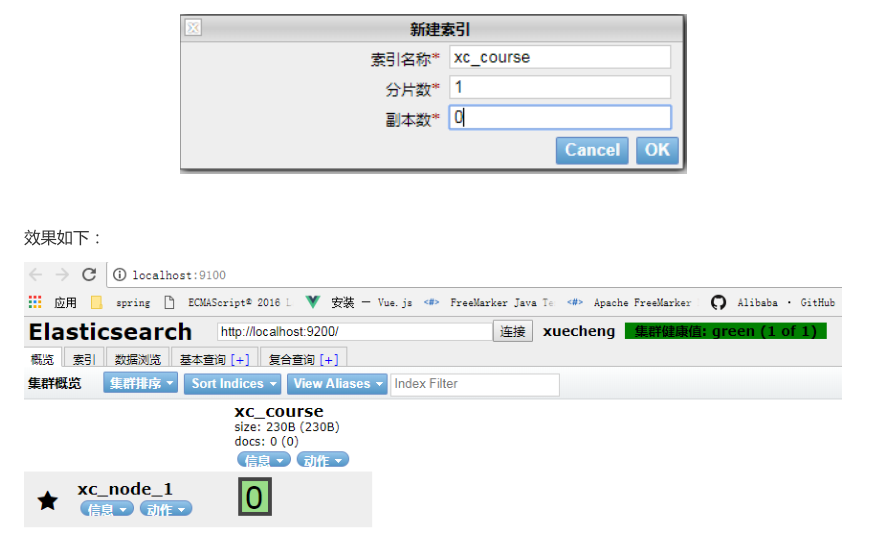
1)使用postman或curl这样的工具创建:
put http://localhost:9200/索引库名称
{
  "settings":{
  "index":{
      "number_of_shards":1,
      "number_of_replicas":0
   }
  }
}
number_of_shards:设置分片的数量,在集群中通常设置多个分片,表示一个索引库将拆分成多片分别存储不同
的结点,提高了ES的处理能力和高可用性,入门程序使用单机环境,这里设置为1。
number_of_replicas:设置副本的数量,设置副本是为了提高ES的高可靠性,单机环境设置为0.

2)使用head插件创建
创建映射
在索引中每个文档都包括了一个或多个field,创建映射就是向索引库中创建field的过程,下边是document和field
与关系数据库的概念的类比:
文档(Document)----------------Row记录
字段(Field)-------------------Columns 列
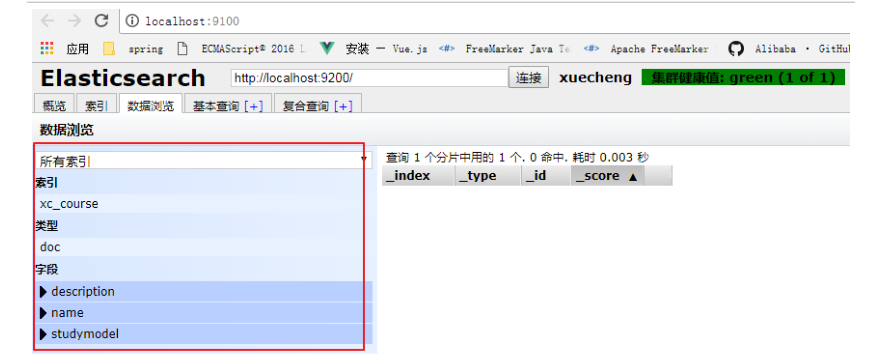
我们要把课程信息存储到ES中,这里我们创建课程信息的映射,先来一个简单的映射,如下:
发送:post http://localhost:9200/索引库名称 /类型名称/_mapping
创建类型为xc_course的映射,共包括三个字段:name、description、studymondel
由于ES6.0版本还没有将type彻底删除,所以暂时把type起一个没有特殊意义的名字。
post 请求:http://localhost:9200/xc_course/doc/_mapping
表示:在 xc_course索引库下的doc类型下创建映射。doc是类型名,可以自定义,在ES6.0中要弱化类型的概念,
给它起一个没有具体业务意义的名称。
{
  "properties": {
           "name": {
              "type": "text"
           },
           "description": {
              "type": "text"
           },
           "studymodel": {
              "type": "keyword"
           }
        }
}
映射创建成功,查看head界面:
创建文档
ES中的文档相当于MySQL数据库表中的记录。
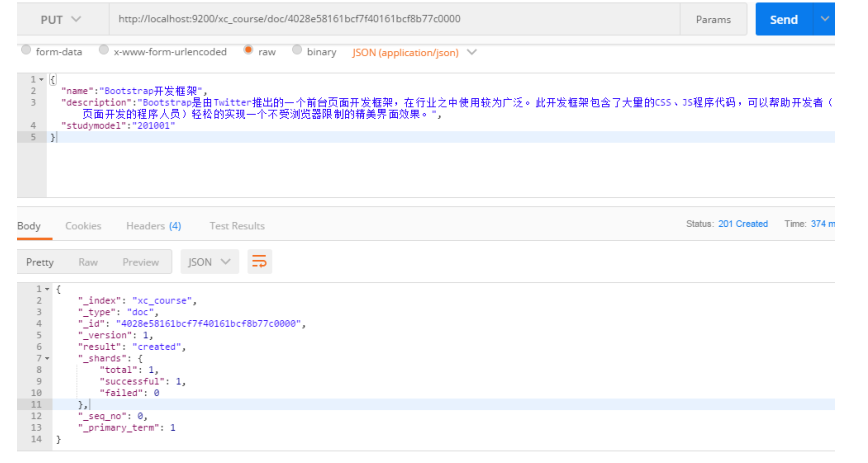
发送:put 或Post http://localhost:9200/xc_course/doc/id值
(如果不指定id值ES会自动生成ID)
http://localhost:9200/xc_course/doc/4028e58161bcf7f40161bcf8b77c0000
{
  "name":"Bootstrap开发框架",
  "description":"Bootstrap是由Twitter推出的一个前台页面开发框架,在行业之中使用较为广泛。此开发框架包
含了大量的CSS、JS程序代码,可以帮助开发者(尤其是不擅长页面开发的程序人员)轻松的实现一个不受浏览器限制的
精美界面效果。",
  "studymodel":"201001"
}
使用postman测试:
搜索文档
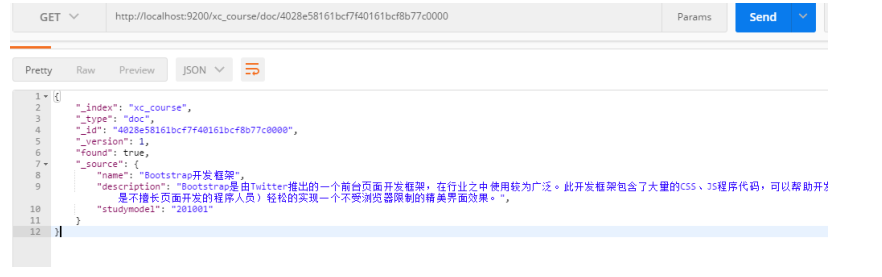
1、根据课程id查询文档
发送:get http://localhost:9200/xc_course/doc/4028e58161bcf7f40161bcf8b77c0000
使用 postman测试:
IK 分词器
在添加文档时会进行分词,索引中存放的就是一个一个的词(term),当你去搜索时就是拿关键字去匹配词,最终
找到词关联的文档。
测试当前索引库使用的分词器:
post 发送:localhost:9200/_analyze
{"text":"测试分词器,后边是测试内容:spring cloud实战"}
结果如下:

会发现分词的效果将 “测试” 这个词拆分成两个单字“测”和“试”,这是因为当前索引库使用的分词器对中文就是单字
分词。
两种分词模式
ik分词器有两种分词模式:ik_max_word和ik_smart模式。
1、ik_max_word
会将文本做最细粒度的拆分,比如会将“中华人民共和国人民大会堂”拆分为“中华人民共和国、中华人民、中华、
华人、人民共和国、人民、共和国、大会堂、大会、会堂等词语。
2、ik_smart
会做最粗粒度的拆分,比如会将“中华人民共和国人民大会堂”拆分为中华人民共和国、人民大会堂。
测试两种分词模式:
发送: post localhost:9200/_analyze
{"text":"中华人民共和国人民大会堂","analyzer":"ik_smart" }
索引管理
搭建工程
ES客户端
本教程准备采用 Java High Level REST Client,如果它有不支持的功能,则使用Java Low Level REST Client。
添加依赖:
<dependency>
    <groupId>org.elasticsearch.client</groupId>
    <artifactId>elasticsearch‐rest‐high‐level‐client</artifactId>
    <version>6.2.1</version>
</dependency>
<dependency>
    <groupId>org.elasticsearch</groupId>
    <artifactId>elasticsearch</artifactId>
    <version>6.2.1</version>
</dependency>
创建搜索工程
创建搜索工程(maven工程):xc-service-search,添加RestHighLevelClient依赖及junit依赖。
pom.xml
<?xml version="1.0" encoding="UTF‐8"?>
<project xmlns="http://maven.apache.org/POM/4.0.0"
         xmlns:xsi="http://www.w3.org/2001/XMLSchema‐instance"
 xsi:schemaLocation="http://maven.apache.org/POM/4.0.0
http://maven.apache.org/xsd/maven‐4.0.0.xsd">
    <parent>
        <artifactId>xc‐framework‐parent</artifactId>
        <groupId>com.xuecheng</groupId>
        <version>1.0‐SNAPSHOT</version>
        <relativePath>../xc‐framework‐parent/pom.xml</relativePath>
    </parent>
    <modelVersion>4.0.0</modelVersion>
    <artifactId>xc‐service‐search</artifactId>
    <dependencies>
        <dependency>
            <groupId>com.xuecheng</groupId>
            <artifactId>xc‐framework‐model</artifactId>
            <version>1.0‐SNAPSHOT</version>
        </dependency>
        <dependency>
            <groupId>com.xuecheng</groupId>
            <artifactId>xc‐framework‐common</artifactId>
            <version>1.0‐SNAPSHOT</version>
        </dependency>
        <dependency>
            <groupId>com.xuecheng</groupId>
            <artifactId>xc‐service‐api</artifactId>
            <version>1.0‐SNAPSHOT</version>
        </dependency>
        <dependency>
            <groupId>org.springframework.boot</groupId>
            <artifactId>spring‐boot‐starter‐web</artifactId>
        </dependency>
        <dependency>
            <groupId>org.springframework.boot</groupId>
            <artifactId>spring‐boot‐starter‐web</artifactId>
        </dependency>
        <dependency>
            <groupId>org.elasticsearch.client</groupId>
            <artifactId>elasticsearch‐rest‐high‐level‐client</artifactId>
            <version>6.2.1</version>
        </dependency>
        <dependency>
            <groupId>org.elasticsearch</groupId>
            <artifactId>elasticsearch</artifactId>
            <version>6.2.1</version>
        </dependency>
        <dependency>
            <groupId>org.springframework.boot</groupId>
            <artifactId>spring‐boot‐starter‐test</artifactId>
            <scope>test</scope>
        </dependency>
        <dependency>
            <groupId>com.alibaba</groupId>
            <artifactId>fastjson</artifactId>
 </dependency>
        <dependency>
            <groupId>org.apache.commons</groupId>
            <artifactId>commons‐io</artifactId>
        </dependency>
        <dependency>
            <groupId>org.apache.commons</groupId>
            <artifactId>commons‐lang3</artifactId>
        </dependency>
    </dependencies>
</project>
2、配置文件
application.yml
server:
  port: ${port:40100}
spring:
  application:
    name: xc‐search‐service
xuecheng:
  elasticsearch:
    hostlist: ${eshostlist:127.0.0.1:9200} #多个结点中间用逗号分隔
3、配置类
创建com.xuecheng.search.config包
在其下创建配置类
package com.xuecheng.search.config;
import org.apache.http.HttpHost;
import org.elasticsearch.client.RestClient;
import org.elasticsearch.client.RestHighLevelClient;
import org.springframework.beans.factory.annotation.Value;
import org.springframework.context.annotation.Bean;
import org.springframework.context.annotation.Configuration;
@Configuration
public class ElasticsearchConfig {
    @Value("${xuecheng.elasticsearch.hostlist}")
    private String hostlist;
    @Bean
    public RestHighLevelClient restHighLevelClient(){
//解析hostlist配置信息
        String[] split = hostlist.split(",");
        //创建HttpHost数组,其中存放es主机和端口的配置信息
        HttpHost[] httpHostArray = new HttpHost[split.length];
        for(int i=0;i<split.length;i++){
            String item = split[i];
            httpHostArray[i] = new HttpHost(item.split(":")[0], Integer.parseInt(item.split(":")
[1]), "http");
        }
        //创建RestHighLevelClient客户端
        return new RestHighLevelClient(RestClient.builder(httpHostArray));
    }
//项目主要使用RestHighLevelClient,对于低级的客户端暂时不用
    @Bean
    public RestClient restClient(){
        //解析hostlist配置信息
        String[] split = hostlist.split(",");
        //创建HttpHost数组,其中存放es主机和端口的配置信息
        HttpHost[] httpHostArray = new HttpHost[split.length];
        for(int i=0;i<split.length;i++){
            String item = split[i];
            httpHostArray[i] = new HttpHost(item.split(":")[0], Integer.parseInt(item.split(":")
[1]), "http");
        }
        return RestClient.builder(httpHostArray).build();
    }
}
4、启动类
@SpringBootApplication
@EntityScan("com.xuecheng.framework.domain.search")//扫描实体类
@ComponentScan(basePackages={"com.xuecheng.api"})//扫描接口
@ComponentScan(basePackages={"com.xuecheng.search"})//扫描本项目下的所有类
@ComponentScan(basePackages={"com.xuecheng.framework"})//扫描common下的所有类
public class SearchApplication {
    public static void main(String[] args) throws Exception {
        SpringApplication.run(SearchApplication.class, args);
    }
}
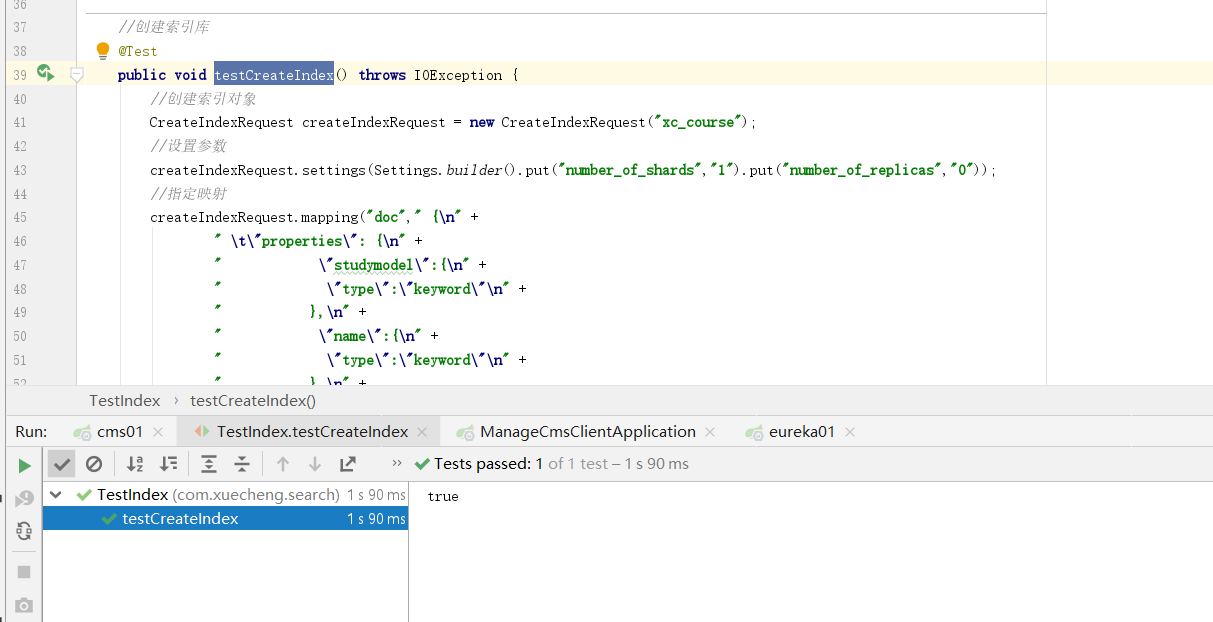
创建索引库
Java Client
@SpringBootTest
@RunWith(SpringRunner.class)
public class TestIndex {
    @Autowired
    RestHighLevelClient client;
    @Autowired
    RestClient restClient;
   //创建索引库
    @Test
    public void testCreateIndex() throws IOException {
        //创建索引请求对象,并设置索引名称
        CreateIndexRequest createIndexRequest = new CreateIndexRequest("xc_course");
        //设置索引参数
        createIndexRequest.settings(Settings.builder().put("number_of_shards",1)
                                            .put("number_of_replicas",0));
        //设置映射
        createIndexRequest.mapping("doc"," {\n" +
                " \t\"properties\": {\n" +
                "           \"name\": {\n" +
                "              \"type\": \"text\",\n" +
                "              \"analyzer\":\"ik_max_word\",\n" +
                "              \"search_analyzer\":\"ik_smart\"\n" +
                "           },\n" +
                "           \"description\": {\n" +
                "              \"type\": \"text\",\n" +
                "              \"analyzer\":\"ik_max_word\",\n" +
                "              \"search_analyzer\":\"ik_smart\"\n" +
                "           },\n" +
                "           \"studymodel\": {\n" +
                "              \"type\": \"keyword\"\n" +
                "           },\n" +
                "           \"price\": {\n" +
                "              \"type\": \"float\"\n" +
                "           }\n" +
                "        }\n" +
                "}", XContentType.JSON);
        //创建索引操作客户端
        IndicesClient indices = client.indices();
        //创建响应对象
        CreateIndexResponse createIndexResponse = indices.create(createIndexRequest);
        //得到响应结果
        boolean acknowledged = createIndexResponse.isAcknowledged();
        System.out.println(acknowledged);
    }
    //删除索引库
    @Test
    public void testDeleteIndex() throws IOException {
        //删除索引请求对象
DeleteIndexRequest deleteIndexRequest = new DeleteIndexRequest("xc_course");
        //删除索引
        DeleteIndexResponse deleteIndexResponse = client.indices().delete(deleteIndexRequest);
        //删除索引响应结果
        boolean acknowledged = deleteIndexResponse.isAcknowledged();
        System.out.println(acknowledged);
    }
}

添加文档
//添加文档
    @Test
    public void testAddDoc() throws IOException {
       //准备json数据
        Map<String, Object> jsonMap = new HashMap<>();
        jsonMap.put("name", "spring cloud实战");
        jsonMap.put("description", "本课程主要从四个章节进行讲解: 1.微服务架构入门 2.spring cloud
基础入门 3.实战Spring Boot 4.注册中心eureka。");
        jsonMap.put("studymodel", "201001");
        SimpleDateFormat dateFormat =new SimpleDateFormat("yyyy‐MM‐dd HH:mm:ss");
        jsonMap.put("timestamp", dateFormat.format(new Date()));
        jsonMap.put("price", 5.6f);
        //索引请求对象
        IndexRequest indexRequest = new IndexRequest("xc_course","doc");
        //指定索引文档内容
        indexRequest.source(jsonMap);
        //索引响应对象
        IndexResponse indexResponse = client.index(indexRequest);
//获取响应结果
        DocWriteResponse.Result result = indexResponse.getResult();
        System.out.println(result);
    }

查询文档
//查询文档
@Test
public void getDoc() throws IOException {
    GetRequest getRequest = new GetRequest(
            "xc_course",
            "doc",
            "4028e581617f945f01617f9dabc40000");
    GetResponse getResponse = client.get(getRequest);
    boolean exists = getResponse.isExists();
    Map<String, Object> sourceAsMap = getResponse.getSourceAsMap();
    System.out.println(sourceAsMap);
}


 浙公网安备 33010602011771号