
Core篇——初探Core的认证,授权机制
目录
1、Cookie-based认证的实现
2、Jwt Token 的认证与授权
3、Identity Authentication + EF 的认证
Cookie-based认证的实现
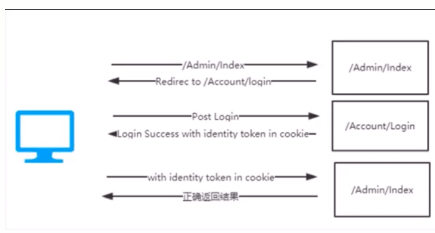
cookie认证方式如下图所示,当我们访问一个网页(Admin/Index)时候,这时候系统会检查你是否有权限,假如没有权限,便会我当前Url重定向到登陆页面(/Account/Login),在登陆成功后,系统会返回一个cookie保存在浏览器,此时再带着这个cookie去重新访问你最开始要访问的页面(Admin/Index)。如下图所示。
我们在.net core 中,也有一套基于cookie-basic的认证方式。
首先,创建一个Core 2.0的MVC项目,添加两个控制器AdminController代表我们要认证后才能访问的资源,AccountController,模拟登陆。在AccountController中,
 1 [Authorize]
 2     public class AdminController : Controller
 3     {
 4         public IActionResult Index()
 5         {
 6             return View();
 7         }
 8     }
 9
10 AdminController
 1 public class AccountController : Controller
 2     {
 3         public async Task<IActionResult> MakeLogin()
 4         {
 5             var claims = new List<Claim>
 6             {
 7                 new Claim(ClaimTypes.Name,"lmc"),
 8                 new Claim(ClaimTypes.Role, "admin")
 9             };
10             var claimsIdentity = new ClaimsIdentity(
11                 claims,
12                 CookieAuthenticationDefaults.AuthenticationScheme
13                 );
14             await HttpContext.SignInAsync(CookieAuthenticationDefaults.AuthenticationScheme,
15                 new ClaimsPrincipal(claimsIdentity),
16                 new AuthenticationProperties {
17                     IsPersistent=true,                              //cookie过期时间设置为持久
18                     ExpiresUtc= DateTime.UtcNow.AddSeconds(20)      //设置过期20秒
19                 });
20             return Ok();
21         }
22         public async Task<IActionResult> Logout()
23         {
24             await HttpContext.SignOutAsync(
25     CookieAuthenticationDefaults.AuthenticationScheme);
26             return Ok();
27         }
28     }
29
30 AccountController
然后我们配置Startup,将认证服务加入到DI容器&&引用认证中间件。
public void ConfigureServices(IServiceCollection services)
        {
            services.AddAuthentication(CookieAuthenticationDefaults.AuthenticationScheme)
                .AddCookie(config=>
                {
                    config.LoginPath = "/Account/MakeLogin";    //未认证导向登陆的页面,默认为/Account/Login
                    config.Cookie.Name = "lmccookie";           //设置一个cookieName

                });
            services.AddMvc();
        }

 public void Configure(IApplicationBuilder app, IHostingEnvironment env)
        {
            if (env.IsDevelopment())
            {
                app.UseDeveloperExceptionPage();
                app.UseBrowserLink();
            }
            else
            {
                app.UseExceptionHandler("/Home/Error");
            }

            app.UseStaticFiles();
            app.UseAuthentication(); //加入认证中间件
                ...//// other code
        }
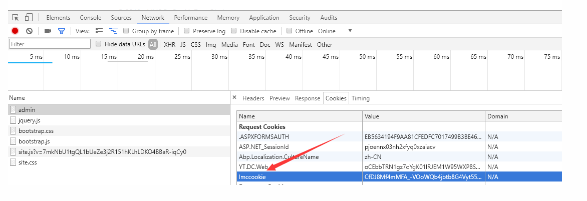
测试下。 直接访问 Admin/Index被重定向到Login并返回我们定义的cookie,我们再带着cookie再次访问Admin/Index


Jwt Token 的认证
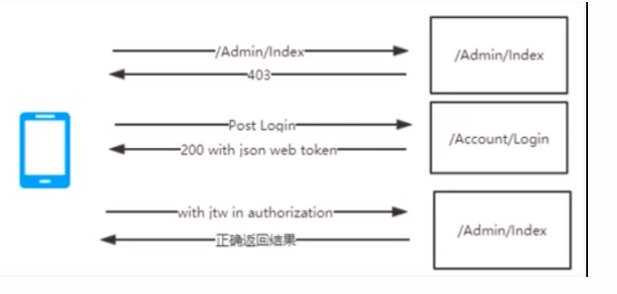
JwtToken 一般用于一些前后端分离的项目或者是移动端的项目。大体流程是用户首先访问目标资源(例如这里的api/values),然后服务器返回一个401或者是403的响应码标识未授权登陆。这时用户应该重新登陆获取token (例如这里的api/token),拿到token以后,请求头里面带着token再去访问目标资源。
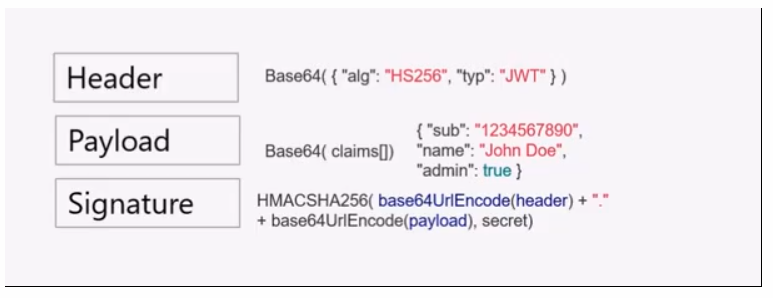
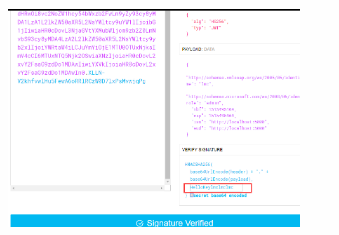
JwtToken 由三部分构成 首先是HEADER,这里面包含了Base64加密过的 加密算法和token的类型;PAYLOAD ,这里包含了一个Base64加密过的 Claims数组;SIGNATURE,包含了使用你的加密算法把加密过后的 HEADER ‘. ’ 和 PAYLOAD 加一个自定义的密钥。
我们在.net core 中实现下Jwttoken的验证。
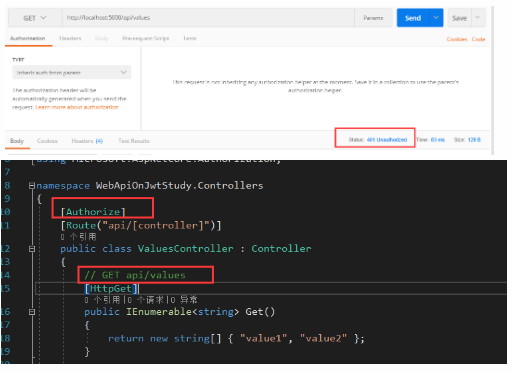
我们在ValuesController 打上[Authorize] 标签。配置我们的startup,在startup ConfigureServices方法中注入认证服务,Configure方法中添加中间件。 此时我们访问api/values=》返回401 的http状态码。
public void ConfigureServices(IServiceCollection services)
        {
            services.Configure<JwtSettings>(Configuration.GetSection("JwtSettings")); //appsettings中读取到jwtsettings节点
            var jwtSetting = new JwtSettings();
            Configuration.Bind("JwtSettings", jwtSetting);
            services.AddAuthentication(options =>
            {                                   // 添加认证头
                options.DefaultAuthenticateScheme = JwtBearerDefaults.AuthenticationScheme;
                options.DefaultChallengeScheme = JwtBearerDefaults.AuthenticationScheme;
            })
            .AddJwtBearer(jo => jo.TokenValidationParameters = new Microsoft.IdentityModel.Tokens.TokenValidationParameters()
            {
                ValidIssuer = jwtSetting.Issuer,                    //使用者
                ValidAudience = jwtSetting.Audience,                //颁发者
                IssuerSigningKey = new SymmetricSecurityKey(Encoding.UTF8.GetBytes(jwtSetting.SecreKey)) //加密方式
            });
            services.AddMvc();
        }
public void Configure(IApplicationBuilder app, IHostingEnvironment env)
        {
            if (env.IsDevelopment())
            {
                app.UseDeveloperExceptionPage();
            }
            app.UseAuthentication();      //注意加入中间件

Startup
public class JwtSettings
    {
        public string Issuer { get; set; }   //办法token的人
        public string Audience { get; set; } //token使用者
        public string SecreKey { get; set; } //token加密钥
    }

JwtSettings
{
  "Logging": {
    "IncludeScopes": false,
    "Debug": {
      "LogLevel": {
        "Default": "Warning"
      }
    },
    "Console": {
      "LogLevel": {
        "Default": "Warning"
      }
    }
  },
  "JwtSettings": {
    "Audience": "http://localhost:5000",
    "Issuer": "http://localhost:5000",
    "SecreKey": "HelloKeylmclmclmc"
  }
}

appsettings
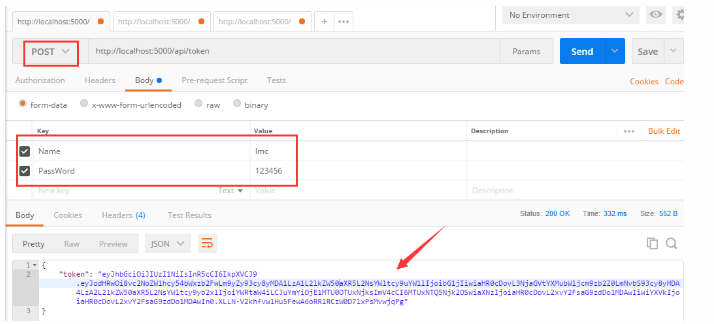
接下来需要生成token,添加一个AuthorizeController,通过构造函数把jwtsettings 注入进来,添加一个Index的Action 用来生成我们的token。我们需要一个验证下登录用户的用户名密码,所以还需要添加一个ViewModel
public class LoginViewModel
    {
        [Required]
        public string Name { get; set; }
        [Required]
        public string PassWord { get; set; }
    }

LoginViewModel
private JwtSettings _jwtSettings;
        public AuthorizeController(IOptions<JwtSettings> options)       //构造函数注入,拿到appsettings 里面的jwtsettings
        {
            _jwtSettings = options.Value;
        }
        [Route("api/token")]
        [HttpPost]
        public IActionResult Index(LoginViewModel loginViewModel)
        {
            if (!ModelState.IsValid)
                return BadRequest();
            if (!(loginViewModel.Name == "lmc" && loginViewModel.PassWord == "123456"))
                return BadRequest();
            var claims = new Claim[]                //实例化一个Claim
            {
                new Claim(ClaimTypes.Name,"lmc"),
                new Claim(ClaimTypes.Role, "admin")
            };
            var key = new SymmetricSecurityKey(Encoding.UTF8.GetBytes(_jwtSettings.SecreKey));  //将appsettings里面的SecreKey拿到
            var creds = new SigningCredentials(key, SecurityAlgorithms.HmacSha256);             //使用HmacSha256 算法加密
            //生成token,设置过期时间为30分钟, 需要引用System.IdentityModel.Tokens.Jwt 包
            var token = new JwtSecurityToken(_jwtSettings.Issuer, _jwtSettings.Audience, claims, DateTime.Now, DateTime.Now.AddMinutes(30), creds);
            //将token返回
            return Ok(new { token = new JwtSecurityTokenHandler().WriteToken(token) });
        }

AuthorizeController
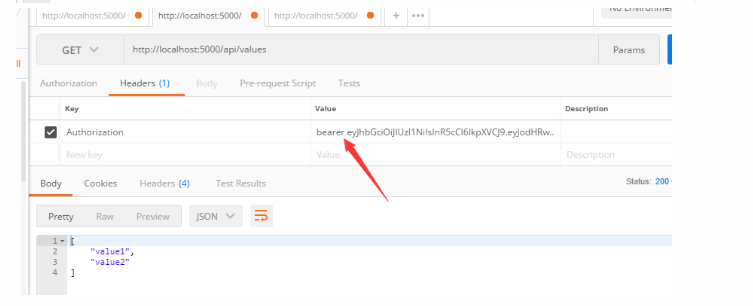
一切准备就绪,拿到Token。带着token来访问 /api/values,注意token需要带这常量 bearer 。
带着我们的加密钥来jwt官网验证一下。
基于角色(Role),Claim/Policy 的授权:
在我们返回token的时候,实例化过一个Claim数组,其中,Role是admin。我们修改ValuesController的Authorize特性标签( [Authorize(Roles = "user")])。
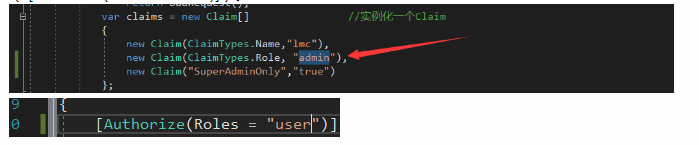
当我们带着token再去验证时候。然后我们把Claim数组的Role那一项的Value 改为user 便会正常认证。

基于Claim的验证我们需要做的事在StartUp的ConfigureServices方法中,将授权模块加入到DI容器中。这里我们添加了一个SuperAdminOnlyd的Policy

此时,我们需要在AuthorizeController控制器返回Token的时候,需要在Claim数组中添加一个新的Claim,表示我们的Policy。

此时,再修改我们的ValuesController控制器的Authorize特性标签。

PostMan 走一波===》

Identity +EF Authentication 的认证
首先,使用net core 的脚手架命令创建一个自带Identity 的mvc项目。然后根据appseetings的数据库配初始化数据库(默认数据库实例是(localdb)\\mssqllocaldb,因为我装vs时候没装这个,所以我换成了.) 。


还原完了数据库,就可以把项目跑起来了,可以根据右上角注册,登录下==》 (其中代码可以自行观看)
然后让我们来自己从头开始实现下这个过程:
可以在上文中Cookie认证的项目中完成,也可以新建一个空的MVC core项目。添加一个Account控制器,其中存在三个方法(action),注册、登录,登出。
using System;
using System.Collections.Generic;
using System.Linq;
using System.Threading.Tasks;
using Microsoft.AspNetCore.Mvc;
using System.Security.Claims;
using Microsoft.AspNetCore.Authentication.Cookies;
using Microsoft.AspNetCore.Authentication;
using MVCOnCookieBaseStudy.ViewModel;
using Microsoft.AspNetCore.Identity;
using MVCOnCookieBaseStudy.Models;

namespace MVCOnCookieBaseStudy.Controllers
{
    public class AccountController : Controller
    {
        private UserManager<ApplicationUser> _userManager; //加入Identity自带的注册使用的Manager
        private SignInManager<ApplicationUser> _signInManager; //加入Identity自带的登录使用的Manager

        public AccountController(UserManager<ApplicationUser> userManager, SignInManager<ApplicationUser> signInManager)
        {
            _userManager = userManager;
            _signInManager = signInManager;
        }
        /// <summary>
        /// 注册页面
        /// </summary>
        /// <returns></returns>
        public IActionResult Register(string returnUrl = "/Home/Index")
        {
            ViewData["ReturnUrl"] = returnUrl;
            return View();
        }
        [HttpPost]
        public async Task<IActionResult> Register(RegisterViewModel registerViewModel, string returnUrl = "/Home/Index")
        {
            ViewData["ReturnUrl"] = returnUrl;
            if (ModelState.IsValid)  //model 验证
            {
                ApplicationUser identityUser = new ApplicationUser
                {
                    Email = registerViewModel.Email,
                    UserName = registerViewModel.Email,
                    NormalizedUserName = registerViewModel.Email
                };
                var result = await _userManager.CreateAsync(identityUser, registerViewModel.Password);
                if (result.Succeeded)
                {
                    await _signInManager.SignInAsync(identityUser, new AuthenticationProperties { IsPersistent = true });
                    return Redirect(returnUrl);
                }
                else
                {
                    foreach(var err in result.Errors)
                    {
                        ModelState.AddModelError("", err.Description);
                    }
                }
            }

            return View();
        }
        /// <summary>
        /// 登录页面
        /// </summary>
        /// <returns></returns>
        public IActionResult Login(string returnUrl = "/Home/Index")
        {
            ViewData["ReturnUrl"] = returnUrl;
            return View();
        }
        [HttpPost]
        public async Task<IActionResult> Login(RegisterViewModel LoginViewModel, string returnUrl = "/Home/Index")
        {
            ViewData["ReturnUrl"] = returnUrl;
            var loginUser = await _userManager.FindByEmailAsync(LoginViewModel.Email);
            if (loginUser == null)
            {
                return View();
            }

            await _signInManager.SignInAsync(loginUser, new AuthenticationProperties { IsPersistent = true });
            return Redirect(returnUrl);
        }
        /// <summary>
        /// 原来的Cookie登录
        /// </summary>
        /// <returns></returns>
        public async Task<IActionResult> MakeLogin()
        {
            var claims = new List<Claim>
            {
                new Claim(ClaimTypes.Name,"lmc"),
                new Claim(ClaimTypes.Role, "admin")
            };
            var claimsIdentity = new ClaimsIdentity(
                claims,
                CookieAuthenticationDefaults.AuthenticationScheme
                );
            await HttpContext.SignInAsync(CookieAuthenticationDefaults.AuthenticationScheme,
                new ClaimsPrincipal(claimsIdentity),
                new AuthenticationProperties {
                    IsPersistent=true,                              //cookie过期时间设置为持久
                    ExpiresUtc= DateTime.UtcNow.AddSeconds(20)      //设置过期20秒
                });
            return Ok();
        }
        /// <summary>
        /// 登出
        /// </summary>
        /// <returns></returns>
        public async Task<IActionResult> Logout()
        {
            await _signInManager.SignOutAsync();
            return Redirect("/Home/Index");
        }
    }
    //覆盖默认验证
    public class MyCookieTestAuthorize: CookieAuthenticationEvents
    {
        public override Task ValidatePrincipal(CookieValidatePrincipalContext context)
        {
            return base.ValidatePrincipal(context);
        }
    }
}

AccountController
@using MVCOnCookieBaseStudy.ViewModel
@model RegisterViewModel
@{
    ViewData["Title"] = "Register";
}

<h2>@ViewData["Title"]</h2>

<div class="row">
    <div class="col-md-4">
        <form asp-route-returnUrl="@ViewData["ReturnUrl"]" method="post">
            <h4>Create a new account.</h4>
            <hr />
            <div asp-validation-summary="All" class="text-danger"></div>
            <div class="form-group">
                <label asp-for="Email"></label>
                <input asp-for="Email" class="form-control" />
                <span asp-validation-for="Email" class="text-danger"></span>
            </div>
            <div class="form-group">
                <label asp-for="Password"></label>
                <input asp-for="Password" class="form-control" />
                <span asp-validation-for="Password" class="text-danger"></span>
            </div>
            <div class="form-group">
                <label asp-for="ConfirmPassword"></label>
                <input asp-for="ConfirmPassword" class="form-control" />
                <span asp-validation-for="ConfirmPassword" class="text-danger"></span>
            </div>
            <button type="submit" class="btn btn-default">Register</button>
        </form>
    </div>
</div>

@section Scripts {
    @await Html.PartialAsync("_ValidationScriptsPartial")
}

注册的View
@using MVCOnCookieBaseStudy.ViewModel
@model RegisterViewModel
@{
    ViewData["Title"] = "Login";
}

<h2>Login</h2>


<div class="row">
    <div class="col-md-4">
        <section>
            <form asp-route-returnurl="@ViewData["ReturnUrl"]" method="post">
                <h4>Use a local account to log in.</h4>
                <hr />
                <div asp-validation-summary="All" class="text-danger"></div>
                <div class="form-group">
                    <label asp-for="Email"></label>
                    <input asp-for="Email" class="form-control" />
                    <span asp-validation-for="Email" class="text-danger"></span>
                </div>
                <div class="form-group">
                    <label asp-for="Password"></label>
                    <input asp-for="Password" class="form-control" />
                    <span asp-validation-for="Password" class="text-danger"></span>
                </div>
                <div class="form-group">
                    <button type="submit" class="btn btn-default">Log in</button>
                </div>
            </form>
        </section>
    </div>
</div>
@section Scripts{
    @await Html.PartialAsync("_ValidationScriptsPartial");  @*前端验证,需要引用jquery.validate.min.js*@
}

登录的View
这个过程中需要使用到一个ViewModel,用来传递登录数据
using System;
using System.Collections.Generic;
using System.ComponentModel.DataAnnotations;
using System.Linq;
using System.Threading.Tasks;

namespace MVCOnCookieBaseStudy.ViewModel
{
    public class RegisterViewModel
    {
        [Required]
        [EmailAddress]
        [Display(Name = "Email")]
        public string Email { get; set; }

        [Required]
        [DataType(DataType.Password)]
        [StringLength(100, ErrorMessage = "The {0} must be at least {2} and at max {1} characters long.", MinimumLength = 6)]
        [Display(Name = "Password")]
        public string Password { get; set; }

        [DataType(DataType.Password)]
        [Display(Name = "Confirm password")]
        [Compare("Password", ErrorMessage = "The password and confirmation password do not match.")]
        public string ConfirmPassword { get; set; }
    }
}

RegisterViewModel
添加集成自Identity的User 和 Role还有数据库链接上下文
public class ApplicationUserRole: IdentityRole
    {
    }
    public class ApplicationUser:IdentityUser
    {
    }

Role&&User
public class ApplicationDbContext:IdentityDbContext<ApplicationUser,ApplicationUserRole,string>
    {
        public ApplicationDbContext(DbContextOptions<ApplicationDbContext> options) : base(options)
        {

        }
    }

数据库链接上下文
接下来配置我们的StartUp,在ConfigureServices方法中 将数据库连接上下文加入DI容器,Identity服务加入DI容器,重新配置下我们的密码规则。(注意在Configure加入认证中间件)
public void ConfigureServices(IServiceCollection services)
        {
            //连接数据库服务加入DI容器
            services.AddDbContext<ApplicationDbContext>(option =>
            {
                option.UseSqlServer(Configuration.GetConnectionString("DefaultConnection"));
            });
            //将Identity服务加入DI容器
            services.AddIdentity<ApplicationUser, ApplicationUserRole>()
                .AddEntityFrameworkStores<ApplicationDbContext>()
                .AddDefaultTokenProviders();
            //设置注册密码的规则
            services.Configure<IdentityOptions>(options =>
            {
                options.Password.RequireLowercase = false;
                options.Password.RequireNonAlphanumeric = false;
                options.Password.RequireUppercase = false;
            });

            services.AddAuthentication(CookieAuthenticationDefaults.AuthenticationScheme)
                .AddCookie(config=>
                {
                    config.LoginPath = "/Account/Login";    //未认证导向登陆的页面,默认为/Account/Login
                    config.Cookie.Name = "lmccookie";           //设置一个cookieName

                });
            services.AddMvc();
        }

Startup ConfigServices

来源 https://www.cnblogs.com/liumengchen-boke/p/8243393.html

