Python:核岭回归预测,KRR
结合实用数据分析该书,整理了下代码,记录以作备忘和分享:
注:其中用到mlpy(机器学习库),安装会出现问题,可参考文末引用文章的处理方法。
1 # -*- coding: utf-8 -*-
2 """
3 Created on Wed Oct 17 21:14:44 2018
4
5 @author: Luove
6 """
7 # KRR适合分类和回归训练集很少时,非线性方法
8 import os
9 import numpy as np
10 import matplotlib.pyplot as plt
11 import dateutil.parser as dparser # dateutil模块主要有两个函数,parser和rrule。parser是根据字符串解析成datetime,而rrule是则是根据定义的规则来生成datetime;https://blog.csdn.net/cherdw/article/details/55224341
12 from pylab import * # 将matplotlib和numpy封装在一起,模拟MATLAB编程环境
13 from sklearn.cross_validation import train_test_split
14 from sklearn import linear_model
15 from sklearn import datasets
16 import mlpy
17 from mlpy import KernelRidge
18
19 # np.hamming 汉明窗,构造一个函数(仅处理窗内数据)。这个函数在某一区间有非零值,而在其余区间皆为0.汉明窗就是这样的一种函数
20 # 阶梯图,又叫瀑布图,可以用于企业成本、销售等数据的变化和构成情况的分析;plot.step()
21 x1 = np.linspace(1,100,500)
22 x2 = np.linspace(1,100,50)
23 y1 = np.cos(x1)
24 y2 = np.cos(x2)
25
26 axs1 = plt.subplot(211)
27 axs2 = plt.subplot(212)
28 axs1.step(x1,y1)
29 axs2.step(x2,y2)
30 plt.show()
31
32
33 goldfile = "D:\Analyze\Python Matlab\Python\BookCodes\PDA_Book-master\PDA_Book-master\Chapter7\Gold.csv"
34 # tsa,时间序列分析,将时间序列平滑化,(本身包含:趋势T,季节性/周期性S,波动性V)
35 def smooth(x,window_length):
36 s = np.r_[2*x[0]-x[window_length-1::-1], x, 2*x[-1]-x[-1:-window_length:-1]]
37 w = np.hamming(window_length)
38 y = np.convolve(w/w.sum(), s, mode='same') # 卷积函数,移动平均滤波(平滑方法),第一个参数长度要大于等于第二参数长度,否则会交换位置;mode={'full','same','valid'},默认full
39 return y[window_length:-window_length+1]
40
41 # 金价走势,注意下面dtype变化:日期用object,值用None(各列内容识别,)
42 x = np.genfromtxt(goldfile,dtype='object',delimiter=',',skip_header=1,usecols=(0),converters={0:dparser.parse}) # 第一列日期,dateutil.parser.parse,字符串中解析出日期
43 y = np.genfromtxt(goldfile,dtype=None,delimiter=',',skip_header=1,usecols=(1)) # 获取第二列
44 y_smoothed = smooth(y,len(y))
45 plt.step(x,y,'r*',label='raw data')
46 plt.step(x,y_smoothed,label='smoothed data')
47 plt.legend()
48 #x = [2,3,9,634,32,4,676,4,234,43,7,-13,0]
49 #x = np.array(x)
50 #np.round(smooth(x,len(x)))
51 #[ 33., 80., 124., 165., 189., 199., 192., 169., 137., 104., 66., 35., 16.]
52 #plt.plot(x)
53 #plt.plot(np.round(smooth(x,len(x)))) # 加载pylab,不必plt.show()?
54 ##plt.show()
55 #window_length=x.shape[0]
56
57 house = datasets.load_boston()
58 houseX = house.data[:,np.newaxis] # 添加一个新轴,添加一维度,由(506, 13)转成(506, 1,13)
59 houseX_temp = houseX[:,:,2]
60
61 x_train,xtest,ytrain,ytest=train_test_split(houseX_temp,house.target,test_size=1.0/3)
62 lreg = linear_model.LinearRegression()
63 lreg.fit(x_train,ytrain)
64 plt.scatter(xtest,ytest,color='green')
65 plt.plot(xtest,lreg.predict(xtest),color='blue',linewidth=2)
66
67 np.random.seed(0)
68 targetvalues = np.genfromtxt(goldfile,skip_header=1,dtype=None,delimiter=',',usecols=(1)) # usecols筛选感兴趣列
69 type(targetvalues)
70 trainingpoints = np.arange(125).reshape(-1,1) # transform ,转换成一列,行自适应
71 testpoint = np.arange(126).reshape(-1,1)
72 knl = mlpy.kernel_gaussian(trainingpoints,trainingpoints,sigma=1) # 训练核矩阵,对称半正定,(125, 125)
73 knltest = mlpy.kernel_gaussian(testpoint,trainingpoints,sigma=1) # 测试核矩阵,(126, 125)
74
75 knlridge = KernelRidge(lmb=0.01)
76 knlridge.learn(knl,targetvalues)
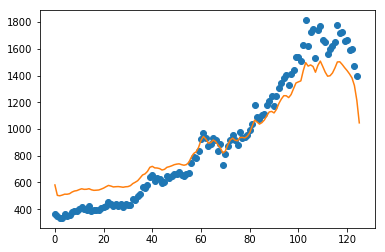
77 resultpoints = knlridge.pred(knltest)
78
79 fig = plt.figure(1)
80 plt.plot(trainingpoints,targetvalues,'o')
81 plt.plot(testpoint,resultpoints)
82 #plt.show()
83 len(resultpoints)
84 resultpoints[-5:-1]
85
86 # 采用平滑后的数据,即smooth后的targetvalues
87 targetvalues_smoothed = smooth(targetvalues,len(targetvalues))
88 knlridge.learn(knl,targetvalues_smoothed)
89 resultpoints_smoothed = knlridge.pred(knltest)
90 plt.step(trainingpoints,targetvalues_smoothed,'o')
91 plt.step(testpoint,resultpoints_smoothed)
92 #plt.show()
93 len(resultpoints_smoothed)
94 resultpoints_smoothed[-5:-1] # 平滑前126期预测值:1389.8;平滑后126期预测值1388.6
95 #x = np.arange(0, 2, 0.05).reshape(-1, 1) # training points
96 #y = np.ravel(np.exp(x)) + np.random.normal(1, 0.2, x.shape[0]) # target values
97 #xt = np.arange(0, 2, 0.01).reshape(-1, 1) # testing points
98 #K = mlpy.kernel_gaussian(x, x, sigma=1) # training kernel matrix
99 #Kt = mlpy.kernel_gaussian(xt, x, sigma=1) # testing kernel matrix
100 #krr = KernelRidge(lmb=0.01)
101 #krr.learn(K, y)
102 #yt = krr.pred(Kt)
103 #fig = plt.figure(1)
104 #plot1 = plt.plot(x[:, 0], y, 'o')
105 #plot2 = plt.plot(xt[:, 0], yt)
106 #plt.show()
其中,mlpy.KernelRidge模型参数lmb(正则化参数),设定越小,拟合趋势和原趋势基本一致,如下图:分别是lmb=0.01,lmb=1(默认)

而正则化参数意义文档中解释不清,详细可参考引用的文章,解释比较好,摘取部门截图如下:

Ref:
Windows下Python模块-----mlpy(机器学习库)的安装(本文未按此操作,有用的可以给咱交流下啊)
pip安装MLPY库 (安装推荐按此操作)
《实用数据分析》:文中数据及mlpy文档需要可自取:https://github.com/Luove/Data

 浙公网安备 33010602011771号