pip和pyinstaller
- pyinstaller命令demo
pyinstaller -F -w d:\HelpTool\HelpTool.py -i d:\HelpTool\resources\images\help_tool.ico -n HelpTool
- pyinstaller将模块打包在依赖中
pyinstaller D:\projects\BatchOss\login.py -F -p D:\Python3.5.2\Lib\site-packages
-
生成requirements.txt文件
- 全量生成所有pip安装过的模块
pip freeze > requirements.txt- 生成某个项目所使用的模块
- 需要先安装pipreqs命令
- 进入到项目目录执行命令
pipreqs ./ --encoding=utf-8 -
使用requirements.txt文件
pip install -r requirements.txt
- 指定内网地址安装
pip3 install cffi --index-url=http://192.168.5.59:8000/simple --trusted-host 192.168.5.59
-
pyinstaller打包编译为pyd防止反编译
- 安装Cython
pip install Cython- 编写打包配置文件build_pyd.py
# -*- coding: utf-8 -*-
from distutils.core import setup
from Cython.Build import cythonize

setup(
  name = 'any words.....',
  ext_modules = cythonize(["mylib.py",
                           ]
  ),
)
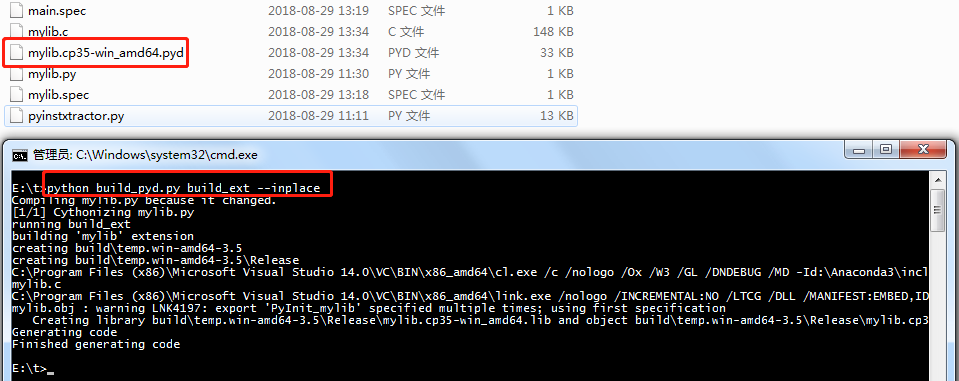
执行cmd命令
python build_pyd.py build_ext --inplace
此时,我们删除build、disk文件夹,重复步骤二,再次编译为exe即可。注意:编译需要相关的VC环境,因为python3.5是基于 VS14版本的,所以我这里安装的也是。不安装是无法编译的。
-
pip指定阿里云镜像源安装模块
pip3 install flask -i http://mirrors.aliyun.com/pypi/simple/ --trusted-host mirrors.aliyun.com
- python命令运行时如何不生成__pycache__文件
方式一:设置环境变量(最常用的)
  export PYTHONDONTWRITEBYTECODE=1
方式二:使用 -B参数
  python -B test.py
方式三:在导入的地方写
  import sys
  sys.dont_write_bytecode = True
狭路相逢勇者胜!


 浙公网安备 33010602011771号