开发第一个chrome扩展
 图示:page action、browser action与content scripts的区分
如何开始
第一步
根据使用的用途和产品特征,来选择扩展的表现形式:
| 接口 | 表现 | 介绍 |
| page action | 地址栏图标,点击打开新tab页面或内容注入 | 适用于只对少数页面有意义的特征(比如RSS订阅)。 |
| browser action | 工具栏图标,点击打开一个popup层或新tab页面 | 适用于多数页面有意义的特征(比如我常用代码格式化工具jsbeautifier)。 |
| app | 应用程序列表,点击打开内置tab页面或任意域名的新网页 | 为了获得最佳体验(比如全屏、桌面快捷方式、任务栏图标),或者兼容其他浏览器(部署到自己的服务器上,比如'wordsquared.com'应用)。 |
* 关于google官方推荐用browser action的原因是如果把扩展脚本注入到所有页面,将会显著影响原有页面的性能。
** 另外,更主要的原因是,chrome扩展目前没有提供没有类似于firefox的,可以上所有页面上悬浮的widget层。
*** browser action的popup.html限制了展示大小,只能约为800x600像素。
第二步
建立扩展所需的文件夹,在下面放置manifest.json文件——里面申明插件的表现形式,依赖文件等等。
page action的示例:
{
  "name": "My Extension",
  "version": "0.4.0",
  "icons" : {
      "16": "icon.png",
      "48": "icon48.png",
      "128": "icon128.png"
  },
  "description": "My first chrome extension.",
  "page_action": {
      "default_title": "在些页面启用",
      "default_icon": "foo.png",
      "default_popup": "html/popup.html"
  },
  "background_page": "html/background.html",
  "options_page": "options/index.html",
  "content_scripts": [
    {
      "matches": ["http://*/*", "https://*/*"],
      "run_at": "document_idle",
      "css": ["css/style.css"],
      "js": ["js/foo.js","js/bar.js"]
    }
  ],
  "permissions": [
    "tabs",
    "notifications",
    "idle",
    "http://*/",
    "https://*/"
  ]
}
你的目录对应的是浏览器中的 'chrome-extension://{extensionId}/'根目录。
content scripts是page action将注入到特定页面中的脚本,permissions授权它可以在哪些条件下执行。
options page是扩展的设置页面。
对于扩展,background page 定义的html页面必须的并且是最重要的。在浏览器开启后,扩展本身在这个后台页面上运行。
backgroun page可以使用所有的chrome.* api,在它之外的扩展页面需要使用 chrome.extension.getBackgroundPage() 来与它通讯;而浏览器中页面不能访问它,只有content scripts可以通过chrome.extension.sendRequest()与它通讯。
图示1:page action、browser action与content scripts的区分

* content scripts被注入了原有页面中,修改了DOM。
图示2:dom、原有脚本与content scripts联系示意
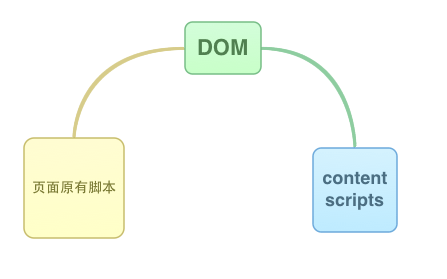
* 原有脚本与content scripts在不同的环境中,不能直接通讯;可能存在多个content scripts(不同扩展注入的),它们互相也是隔离的;但是DOM是共享的,因此可以由DOM来共享数据、共享事件通知。
第三步
搭建完扩展的基础结构之后,就可以在chrome中测试它。
点击chrome的“选项/工具/扩展程序”,在新打开的页面中,打开“开发人员模式”,然后就出现了:“载入正在开发的扩展程序...”按钮,点击它即可选择你的扩展目录以开始测试。
Snippets
-
如何保持打开的tab唯一
var option_url = chrome.extension.getURL('options/index.html'); chrome.tabs.getAllInWindow(null,function(tabs){ var option_tab = tabs.filter(function(t) { return t.url === option_url }); if(option_tab.length){ // 已经打开,直接激活 chrome.tabs.update(option_tab[0].id,{selected:true}); }else{ chrome.tabs.create({url:option_url,selected:true}) } }); -
回到指定窗口的指定tab:
// todo: 保存一个tab引用,或者仅仅是tabId和windowId
var tab = foo;
chrome.windows.get(tab.windowId,function(win) {
	chrome.windows.update(win.id,{focused:true});
	chrome.tabs.update(tab.id,{selected:true});
})
前台tab页面通知backgroundPage:
var key = 'some_method',parameters = {};
chrome.extension.sendRequest({ report : key, parameters : parameters }, callback);
backgroundPage通知tab页面方式,脚本注入:
// 执行一个文件
chrome.tabs.executeScript(tabId, { file: 'foo.js' });
// 一段代码
chrome.tabs.executeScript(tabId, { code: 'alert(1)'} );
// 另,插入CSS方法,参数与上面类似
chrome.tabs.insertCSS(tabId, { file: 'foo.css' });
通过localStorage存储扩展配置
localStorage['member'] = JSON.stringify({username:'ambar'})
往特定tab页中的扩展发送一个请求:
// 第二个参数完全自定义
chrome.tabs.sendRequest(tab.id, { foo:true, any_other_params:'' });
桌面通知有两种格式:HTML和纯文件,具体API
// html式,可以简单的用查询变量传递参数
var notify_html = function(icon,title,message) {
    var encode = encodeURIComponent;
    var notification = webkitNotifications.createHTMLNotification(
        chrome.extension.getURL(
            'html/notification.html?message='+encode(message)
            +'&title='+encode(title)
            +'&icon='+encode(icon)
        )
    );

    notification.show();
};

// 文本格式,可以设置一个图标和标题
var notify_plain = function(icon,title,message) {
    var notification = webkitNotifications.createNotification(
        chrome.extension.getURL('notification.png')
        ,title
        ,message
    );
    notification.show();
    // 显示完之后5秒关闭
    notification.ondisplay = function(e) {
        setTimeout(function() { notification.cancel(); }, 5000);
    }
}
