Windows Hello 浅尝(1)
什么是Windows Hello
Windows Hello是windows 10 中提供的使用生物识别来解锁windows的一个框架。
如果你拥有人脸识别的摄像头或者指纹识别器亦或者是windows 手环的话是可以在系统中直接开启的。
事情的起因
有一次看 “科技美学” 的时候的 那岩提到windows红石更新之后 可以使用小米手环解锁小米的笔记本,我立马意识到这可能就是使用了Windows Hello 框架。
但是前些日子比较忙,最近才开始有空好好探讨一下。
目标
我手头有一个小米手环2,所以我的目标就是当笔记本检测到我的小米手环的时候可以直接解锁我的Windows。
项目地址: http://git.oschina.net/alwaysking/MyHelloWin
Let's Start
第一件事情自然就是google相关的内容啦,我找到一个windows 的例子
Demo: https://github.com/Microsoft/companion-device-framework/tree/master/CDFSampleApp
找到了这个例子,其实Windows Hello的使用方法就已经全部展现在眼前了。
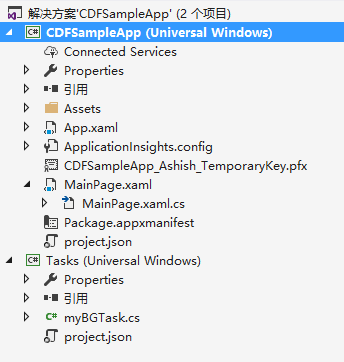
我简单介绍一下这个项目的结构,这是一个UWP应用

其中包含两个项目。
CDFSampleApp是界面应用

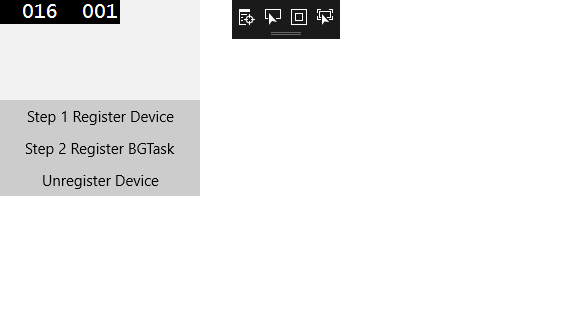
包含三个功能对应三个按钮
1. 注册设备
2. 启动后台应用
3. 注销设备
启动后台应用启动的就是第二个项目Tasks
Task的作用就是接受系统的通知来使用Windows Hello 解锁Windows
接下分析一下具体的代码实现
主要是通过 SecondaryAuthenticationFactorRegistration 类来实现功能的,
1. 首先注册一个用于解锁Windows的虚拟设备,这个设备是和Windows账号绑定的
// 我的代码为了演示的精简,删除辅助和错误判断的代码,使用的时候请参考源代码。
// 生成设备的ID,用于唯一表示一个设备
String deviceId = System.Guid.NewGuid().ToString();

// 随机生成了密码
IBuffer deviceKey = CryptographicBuffer.GenerateRandom(32);
IBuffer authKey = CryptographicBuffer.GenerateRandom(32);

// 设备的相关名称
String deviceFriendlyName = "Test Simulator";
String deviceModelNumber = "Sample A1";

// 注册设备
SecondaryAuthenticationFactorDeviceCapabilities capabilities = SecondaryAuthenticationFactorDeviceCapabilities.SecureStorage;
SecondaryAuthenticationFactorRegistrationResult registrationResult = await SecondaryAuthenticationFactorRegistration.RequestStartRegisteringDeviceAsync(deviceId,
        capabilities,
             deviceFriendlyName,
             deviceModelNumber,
             deviceKey,
             authKey);
// 完成设备的注册
// IBuffer deviceConfigData;
// 示例为了方便,他将 deviceKey authKey 存储到了 deviceConfigData 中
await registrationResult.Registration.FinishRegisteringDeviceAsync(deviceConfigData);
2. 启动后台任务,这个后台任务就是实际完成解锁的程序,她将在windows正在解锁的时候收到通知。
// 创建后台时间注册类
BackgroundTaskBuilder taskBuilder = new BackgroundTaskBuilder();
// 后台事件的名称
taskBuilder.Name = myBGTaskName;
// 这是一个触发器,这个触发器决定了,windows在是时候运行这个后程序
// 显然这个程序就是指定在windows需要进行Windows Hello 认证的时候触发啦
SecondaryAuthenticationFactorAuthenticationTrigger myTrigger = new SecondaryAuthenticationFactorAuthenticationTrigger();
// 任务的入口点
taskBuilder.TaskEntryPoint = "Tasks.myBGTask";
// 将触发器注册到任务
taskBuilder.SetTrigger(myTrigger);
// 向windows注册任务
BackgroundTaskRegistration taskReg = taskBuilder.Register();
完成上面的操作之后Windows就会在解锁的使用启动你的Task。
3. 编写你的Task
// 你的任务的入口类必须继承自IBackgroundTask
// 并且重载public void Run(IBackgroundTaskInstance taskInstance)接口
public sealed class myBGTask : IBackgroundTask
{
        public void Run(IBackgroundTaskInstance taskInstance)
        {
           。。。。。。
        }
}
4. 处理Windows解锁事件
public void Run(IBackgroundTaskInstance taskInstance)
{
  // 标记需要延迟完成,否则这个程序可能还没结束就会被Windows强X?
   var deferral = taskInstance.GetDeferral();
  // 创建一个事件,当功能完成的时候事件会被触发
  opCompletedEvent = new ManualResetEvent(false);
  // 注册用于接受Windows解锁变化的函数
  SecondaryAuthenticationFactorAuthentication.AuthenticationStageChanged += OnStageChanged;
  // 等待事件的完成
  opCompletedEvent.WaitOne();
  // 通知windows这个Task完成了,这个实现这个程序会被挂起
  deferral.Complete();
}

async void OnStageChanged(Object sender, SecondaryAuthenticationFactorAuthenticationStageChangedEventArgs args)
{
    // 进入锁屏状态的时候
    if (args.StageInfo.Stage == SecondaryAuthenticationFactorAuthenticationStage.WaitingForUserConfirmation)
    {
      // 通过这个函数你可以在锁屏界面显示你想给出的提示内容
      // 这个提示内容是定制的,你只能自定义一部份
          // 使用什么样子的格式你可以通过改变枚举SecondaryAuthenticationFactorAuthenticationMessage的值来控制
      String deviceName = "自定义的提示内容";
      await SecondaryAuthenticationFactorAuthentication.ShowNotificationMessageAsync(
          deviceName,
          SecondaryAuthenticationFactorAuthenticationMessage.SwipeUpWelcome);
    }
    else if (args.StageInfo.Stage == SecondaryAuthenticationFactorAuthenticationStage.CollectingCredential)
    {
      // 正在解锁的中
      PerformAuthentication();
    }
    else
    {
      // 其他情况
      if (args.StageInfo.Stage == SecondaryAuthenticationFactorAuthenticationStage.StoppingAuthentication)
      {
        SecondaryAuthenticationFactorAuthentication.AuthenticationStageChanged -= OnStageChanged;
        opCompletedEvent.Set();
      }

      SecondaryAuthenticationFactorAuthenticationStage stage = args.StageInfo.Stage;
    }
}
5. 解锁设备
//Get the selected device from app settings
var localSettings = Windows.Storage.ApplicationData.Current.LocalSettings;
String m_selectedDeviceId = localSettings.Values["SelectedDevice"] as String;

// 再次判断当前状态
SecondaryAuthenticationFactorAuthenticationStageInfo authStageInfo = await SecondaryAuthenticationFactorAuthentication.GetAuthenticationStageInfoAsync();
if (authStageInfo.Stage != SecondaryAuthenticationFactorAuthenticationStage.CollectingCredential)
{
    throw new Exception("Unexpected!");
}

// 获取所有注册的设备
IReadOnlyList <SecondaryAuthenticationFactorInfo> deviceList = await SecondaryAuthenticationFactorRegistration.FindAllRegisteredDeviceInfoAsync(
        SecondaryAuthenticationFactorDeviceFindScope.AllUsers);

if (deviceList.Count == 0)
{
    throw new Exception ("Unexpected exception, device list = 0");
}

// 获取第一个注册的设备
SecondaryAuthenticationFactorInfo deviceInfo = deviceList.ElementAt(0);
m_selectedDeviceId = deviceInfo.DeviceId;

//a nonce is an arbitrary number that may only be used once - a random or pseudo-random number issued in an authentication protocol to ensure that old communications cannot be reused in replay attacks.
// 计算一个通讯用的密码,用于防止被重播攻击等
IBuffer svcNonce = CryptographicBuffer.GenerateRandom(32);  //Generate a nonce and do a HMAC operation with the nonce

//In real world, you would need to take this nonce and send to companion device to perform an HMAC operation with it
//You will have only 20 second to get the HMAC from the companion device
// 标记开始识别了,这个时候解锁界面会显示一个笑脸的解锁标志
SecondaryAuthenticationFactorAuthenticationResult authResult = await SecondaryAuthenticationFactorAuthentication.StartAuthenticationAsync(
        m_selectedDeviceId, svcNonce);
if (authResult.Status != SecondaryAuthenticationFactorAuthenticationStatus.Started)
{
    throw new Exception("Unexpected! Could not start authentication!");
}

// 这里需要使用注册时候的密码
IBuffer deviceKey = 。。。;
IBuffer authKey = 。。。;

// 接下来是一些列密码加密过程
// Calculate the HMAC
MacAlgorithmProvider hMACSha256Provider = MacAlgorithmProvider.OpenAlgorithm(MacAlgorithmNames.HmacSha256);

CryptographicKey deviceHmacKey = hMACSha256Provider.CreateKey(deviceKey);
IBuffer deviceHmac = CryptographicEngine.Sign(deviceHmacKey, authResult.Authentication.DeviceNonce);

// sessionHmac = HMAC(authKey, deviceHmac || sessionNonce)
IBuffer sessionHmac;
byte[] deviceHmacArray = { 0 };
CryptographicBuffer.CopyToByteArray(deviceHmac, out deviceHmacArray);

byte[] sessionNonceArray = { 0 };
CryptographicBuffer.CopyToByteArray(authResult.Authentication.SessionNonce, out sessionNonceArray);

byte[] combinedDataArray = new byte[deviceHmacArray.Length + sessionNonceArray.Length];
for (int index = 0; index < deviceHmacArray.Length; index++)
{
    combinedDataArray[index] = deviceHmacArray[index];
}
for (int index = 0; index < sessionNonceArray.Length; index++)
{
    combinedDataArray[deviceHmacArray.Length + index] = sessionNonceArray[index];
}

// Get a Ibuffer from combinedDataArray
IBuffer sessionMessage = CryptographicBuffer.CreateFromByteArray(combinedDataArray);

// Calculate sessionHmac
CryptographicKey authHmacKey = hMACSha256Provider.CreateKey(authKey);
sessionHmac = CryptographicEngine.Sign(authHmacKey, sessionMessage);

// 然后使用密码去尝试解锁
SecondaryAuthenticationFactorFinishAuthenticationStatus authStatus = await authResult.Authentication.FinishAuthenticationAsync(deviceHmac,
    sessionHmac);

if (authStatus != SecondaryAuthenticationFactorFinishAuthenticationStatus.Completed)
{
    throw new Exception("Unable to complete authentication!");
}
完整的流程就是这样。
其中有几个需要解释的点
可以使用如下代码来获取所有已注册的设备
IReadOnlyList<SecondaryAuthenticationFactorInfo> deviceList = await SecondaryAuthenticationFactorRegistration.FindAllRegisteredDeviceInfoAsync(SecondaryAuthenticationFactorDeviceFindScope.User);
其中SecondaryAuthenticationFactorInfo的定义如下
    //
    // 摘要:
    //     包含提供有关配套设备的信息的属性。
    [ContractVersion(typeof(UniversalApiContract), 196608)]
    [DualApiPartition(version = 167772162)]
    [MarshalingBehavior(MarshalingType.Agile)]
    [Threading(ThreadingModel.Both)]
    public sealed class SecondaryAuthenticationFactorInfo : ISecondaryAuthenticationFactorInfo
    {
        //
        // 摘要:
        //     获取设备配置数据。
        //
        // 返回结果:
        //     设备配置数据。
        public IBuffer DeviceConfigurationData { get; }
        //
        // 摘要:
        //     获取设备的友好名称。
        //
        // 返回结果:
        //     设备的友好名称。
        public string DeviceFriendlyName { get; }
        //
        // 摘要:
        //     获取设备 ID。
        //
        // 返回结果:
        //     设备 ID。
        public string DeviceId { get; }
        //
        // 摘要:
        //     获取设备型号。
        //
        // 返回结果:
        //     设备型号。
        public string DeviceModelNumber { get; }
    }
这些参数都是在注册的时候就指定了的。而其中的 DeviceConfigurationData 参数是可以在后期使用如下函数进行更新。
SecondaryAuthenticationFactorRegistration.UpdateDeviceConfigurationDataAsync(string deviceId, IBuffer deviceConfigurationData);
这个例子中Windows为了演示方便就是直接使用 DeviceConfigurationData 变量存储了 两个密码DeviceKey 和 AuthKey.
还有一点就是注册的时候的DevieID,必须是GUID。
好的,这个例子就暂时先分析道这里


 浙公网安备 33010602011771号