用 IDEA 部署一个 Servlet 用户登录的 JavaWeb 项目到远程 Tomcat 服务器(虚拟机 Ubuntu 环境)
这是一篇记录模拟远程部署用户登录项目的笔记。这是一个测试项目,目的是熟悉相关部署流程,并没有使用真实的服务器做项目部署,而是以虚拟机 Ubuntu 系统作为服务端。在本地(主机)的 IDEA 上远程部署项目到远程(虚拟机Ubuntu) 的 Tomcat 服务器上。环境配置为:
- 本地环境:Windows 10、Tomcat 8.5.34、Java 11.0.13、IDEA 2020.2.3
- 服务器环境: Ubuntu 18.04.6 LTS、Tomcat 8.5.34、Java 11.0.13、MySQL 8.0
注意:须保证本地环境中的 Tomcat 版本和服务器环境中一致,来自 IDEA 官方提醒(When working with a remote server, the same server version must be available locally.)且 Tomcat 须在 5 或以上的版本才能支持远程部署(Deployment Tab-Note that deployment to a remote server is supported only for Tomcat 5 or later versions.)。Java 版本也最好保持一致会少踩很多坑。
1. 配置与启动 Tomcat
远程部署需要修改配置,找到 Tomcat 的安装路径(.../apache-tomcat-8.5.34),在该路径下的 bin 目录下,找到 catalina.sh 脚本,这就是远程部署需要的 Tomcat 启动脚本( 不需要远程部署的情况下一般是通过执行 startup.sh 脚本启动 Tomcat)。

接下来需要向 catalina.sh 添加配置,IDEA 官方文档中同样给出了说明(Deployment Tab- Also note that to be able to deploy applications to a remote Tomcat server, enable JMX support on the server. To do that, pass the following VM options to the server Java proces),配置如下。
CATALINA_OPTS="-Dcom.sun.management.jmxremote \
-Dcom.sun.management.jmxremote.port=1099 \
-Dcom.sun.management.jmxremote.ssl=false \
-Dcom.sun.management.jmxremote.authenticate=false \
-Djava.rmi.server.hostname=<IPAddress>"
export CATALINA_OPTS
其中 netstat命令查看netstat -tunlp | grep 1099,如果被占用则换其他端口号。注意使用\连接换行的字符串,表示它们属于名为 CATALINA_OPTS 的同一段字符串。
我们可以直接将这段代码写到 catalina.sh 脚本文件中,就像下面这样,
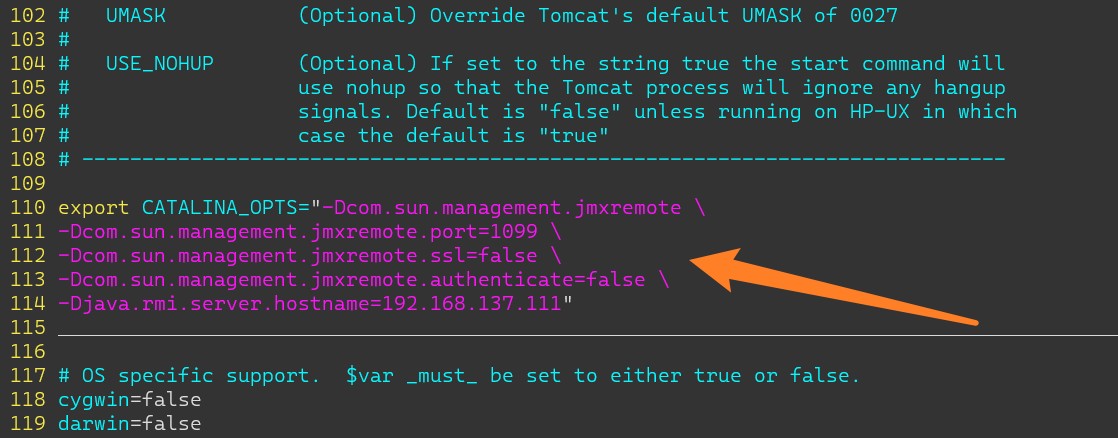
不过在 catalina.sh 中的说明文本中给出了配置环境变量的建议方式:不要直接放在该脚本中,为了分开自定义配置,应该将你的配置代码放在 CATALINA_BASE/bin 路径下的 setenv.sh 脚本中,其中CATALINA_BASE 变量在默认情况下指的就是 Tomcat 的安装路径,如下图。
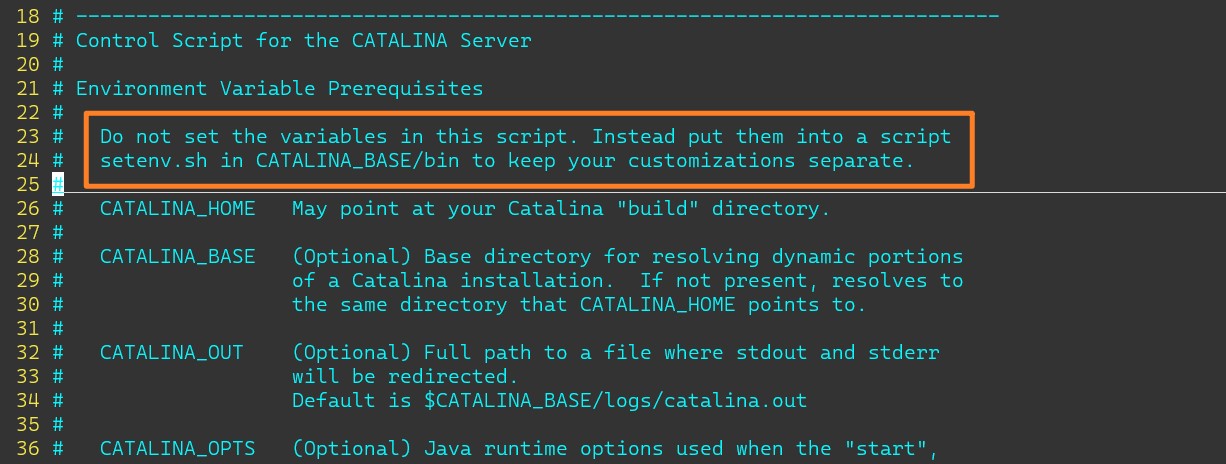
默认情况下在 bin 目录下没有 setenv.sh 脚本,那么直接创建一个就好,注意添加可执行权限(chmod),并将上面的配置代码复制到该脚本文件中,使 catalina.sh 脚本保持其默认内容。

这样就配置好了,接下来执行 catalina.sh 脚本启动 Tomcat,启动命令为:
./catalina.sh run > /dev/null 2>&1 &
其中> /dev/null 2>&1 &的作用是把标准输出和出错处理都丢弃掉,这样就免得一大堆输出占领你的屏幕。我们可以使用 jps 命令查看当前 Java 进程,检查是否启动成功。

此时说明启动成功了,这是就可以到本地(主机)浏览器中输入“http://192.168.137.111:8080”访问 Tomcat 主页,这样就可以看到了那只小公猫了。

2. 项目资源准备(数据库、网页、Servlet)
其实不一定要等到项目资源都准备好了才进行远程部署,可以先部署一个简单的静态网页,然后再慢慢添加功能。所以可以先跳到第 3 步做远程部署配置,配置好了再回来准备项目资源。
2.1 数据库(MySQL)
使用 IDEA 远程连接服务端 MySQL,为此需要先创建一个数据库新用户 dabule 用于远程登录,然后在数据库 testdb 中创建一个 users 表存放登录信息(账号和密码),并给予 dabule 操作 users 表的查询权限。
CREATE USER dabule@'%' IDENTIFIED BY 'your password';
GRANT SELECT ON testdb.users TO dabule;
这样就可以远程通过 dabule 用户访问数据库中 users 表中的账户信息数据,在收到前端的登录请求时,比对账号密码确定登录是否有效,并返回前端登录结果(成功或失败)。
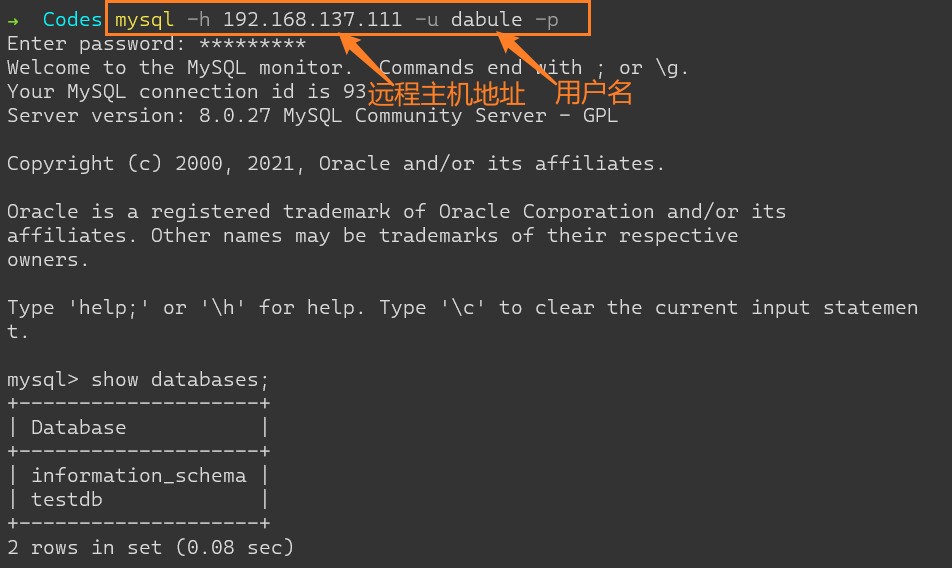
我们可以从本地环境的命令行中登录 MySQL 测试远程连接的有效性,如下图,
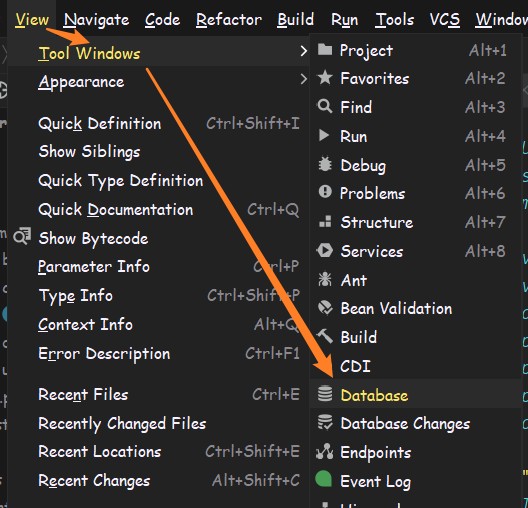
也可以从本地 IDEA 中配置并数据库连接,这样可以很方便地在 IDEA 中测试 SQL 语句,配置过程如下图,
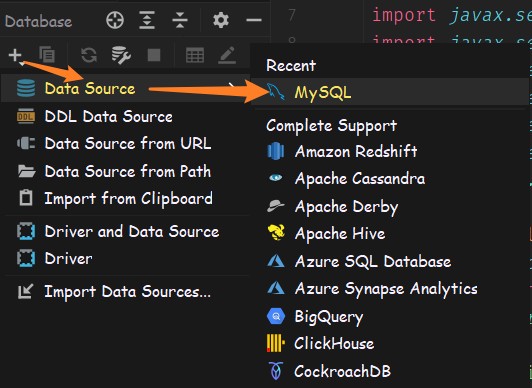
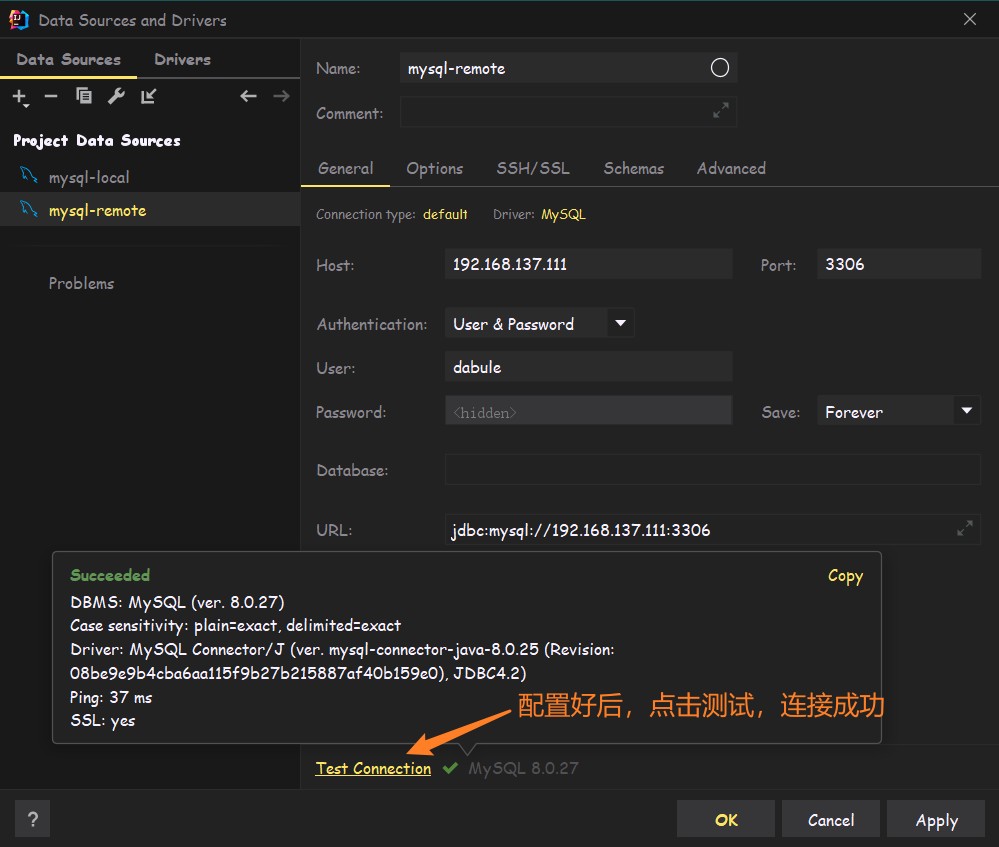
数据库连接失败可以参考文末的链接进行检查。接下来就可以在 IDEA 中测试数据库语句了,点击这里即可,

接下里就可以使用 JDBC 建立数据库访问模块,确保 JDBC 驱动版本同样也是 8.x 版本的,否则很可能会出现驱动加载问题。驱动配置文件 db.properties 内容如下:
driverclass=com.mysql.cj.jdbc.Driver
url=jdbc:mysql://192.168.137.111:3306/testdb?serverTimezone=UTC&characterEncoding=utf-8&userSSL=false
username=dabule
password=xxxxxxx
接下来编写 JDBC 与数据库的连接程序,
public class DBUtils {
    // 1. 定义变量
    private static String url;
    private static String username;
    private static String password;
    private Connection connection;
    private PreparedStatement pps;
    private ResultSet resultSet;

    // 2. 加载驱动
    static {
        try {
            InputStream is = DBUtils.class.getClassLoader().getResourceAsStream("db.properties");
            Properties properties = new Properties();
            properties.load(is);
            String driverName = properties.getProperty("driverclass");
            url = properties.getProperty("url");
            username = properties.getProperty("username");
            password = properties.getProperty("password");
            Class.forName(driverName);
        } catch (ClassNotFoundException | IOException e) {
            e.printStackTrace();
        }
    }

    // 3. 获得连接
    protected Connection getConnection() throws SQLException {
        connection = DriverManager.getConnection(url, username, password);
        return connection;
    }

    // 4. 得到预状态通道
    protected void getPreparedStatement(String sql) throws SQLException {
        pps = getConnection().prepareStatement(sql);
    }

    // 5. 确定参数
    protected void setParameters(List list) throws SQLException {
        if (list != null && list.size() != 0) {
            for (int i = 0; i < list.size(); i++) {
                pps.setObject(i + 1, list.get(i));
            }
        }
    }

    // 7. 查询
    protected ResultSet query(String sql, List list) throws SQLException {
        getPreparedStatement(sql);
        setParameters(list);
        resultSet = pps.executeQuery();
        return resultSet;
    }

    // 8. 关闭资源
    protected void closeAll(){
        try {
            Objects.requireNonNull(resultSet).close();
            Objects.requireNonNull(pps).close();
            Objects.requireNonNull(connection).close();
        } catch (SQLException e) {
            // e.printStackTrace();
            System.out.println("Closing failed!");
        } catch (NullPointerException ignored) {
        }
    }
}
在 DBUtils 类的基础上,编写获取用户信息的数据访问对象(DAO)如下,
public class UserInfoDaoImpl extends DBUtils implements UserInfoDao {
    @Override
    public User getUserInfoByName(String name, String password) {
        try {
            String sql = "select * from users where username=? and password=?";
            List<Object> list = Arrays.asList(name, password);
            ResultSet res = query(sql, list);
            if (res.next()) {
                return new User(res.getInt("user_id"), name, res.getString("password"));
            }
            return null;
        } catch (SQLException e) {
            // e.printStackTrace();
            System.out.println("Querying failed!");
        } finally {
            closeAll();
        }
        return null;
    }
    @Override
    public User getUesrInfoByTele(String telephoneNo, String password) {
        ...
    }
	@Override
    public User getUesrInfoByEmail(String emailAddress, String password) {
       	...
    }
}
public interface UserInfoDao {
    User getUserInfoByName(String name, String password);
    User getUesrInfoByTele(String telephoneNo, String password);
    User getUesrInfoByEmail(String emailAddress, String password);
}
UserInfoDaoImpl 中的三个方法实现方式基本相同,差别只在查询语句和返回的 User 对象包含的信息。User 类是一个简单的 Java 对象(POJO),即只包含属性及其 getter/setter 方法的类。
关于数据库连接方面的其他可能出现的问题以及在 Ubuntu 上 MySQL 的卸载与安装(8.x)可以参考文末的链接。
2.2 前端网页
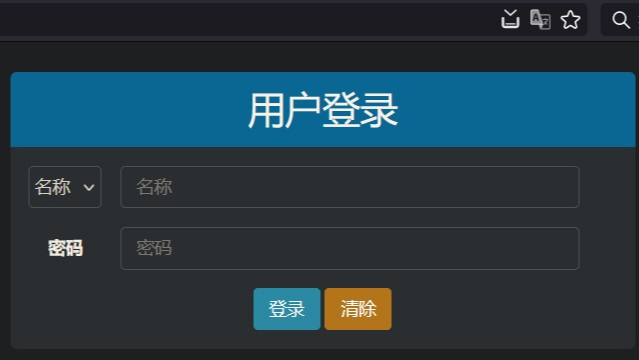
编写一个简单的登录页面,像这样,

当用户填写账号(名称/电话/邮箱)和密码,点击登录后,后端会返回简单的登录结果,像这样,

或者像这样,

登录页 index.jsp 如下:
<%@ page contentType="text/html;charset=UTF-8" language="java" %>
<html>
    <head>
        <title>用户登录</title>
        <script src="./js/jquery-1.11.1.js"></script>
        <script type="text/JavaScript" src="./js/bootstrap.js"></script>
        <script src="./js/loginValidation.js"></script>
        <link rel="stylesheet" href="./css/bootstrap.css" />
        <link rel="stylesheet" href="./css/login.css" />
    </head>

    <body>
        <div class="container login" style="width: 500px; margin: 24px auto">
        <div class="form-group">
        	<h2 class="title">用户登录</h2>
        </div>
        <form id="regForm" class="form-horizontal" role="form" action="login_request"
            method="post" autocomplete="on">
            <div class="form-group">
                <div class="col-sm-2 col-xs-2" style="padding: 0 0 0 30px">
                    <select id="ac_type" class="form-control input-element"
                    style="padding: 6px 0" name="account_type">
                    <option value="0">名称</option>
                    <option value="1">电话</option>
                    <option value="2">邮箱</option>
                    </select>
                </div>
                <div class="col-sm-9 col-xs-6">
                    <input id="ac" class="form-control input-element" type="text"
                    name="account" placeholder="名称" />
                </div>
            </div>
            <div class="form-group">
                <label class="col-sm-2 col-xs-2 control-label" for="ps">密码</label>
                <div class="col-sm-9 col-xs-6">
                	<input id="ps" class="form-control input-element" type="password"
                name="password" placeholder="密码" />
                </div>
            </div>
            <div class="form-group item-align">
                <button type="submit" class="btn btn-info" value="登录">登录</button>
                <button name="clear" class="btn btn-warning" value="清除">清除</button>
            </div>
        </form>
        </div>
    </body>
</html>
自定义样式文件 ./css/login.css 代码如下:
a {
    text-decoration: none;
    color: grey;
    font-size: 16px;
}

.login {
    padding: 0 0;
    background-color: rgb(235, 235, 235);
    border-radius: 5px;
}

.title {
    height: 60px;
    line-height: 60px;
    margin: 0 auto;
    padding: 0;
    color: #2c2c2c;
    text-align: center;
    background-color: rgb(127, 214, 255);
    border-radius: 5px 5px 0 0;
}

.select-font {
    font-size: 16px;
}

.input-element {
    background: rgb(235, 235, 235);
}

.item-align {
    text-align: center;
}

button:hover {
    font-size: large;
}

.text-format {
    display: block;
    /* width: 20%; */
    margin: 0 auto;
    font-size: 16px;
    text-align: center;
}

.text-format:hover {
    color: rgb(88, 173, 145);
    font-size: 18px;
}
自定义 JavaScript 文件 ./js/loginValidation.js 代码如下:
function addErrorStyle(ele) {
    ele.css("color", "red");
    ele.parent().parent().addClass("has-error");
}
function rmErrorStyle(ele) {
    ele.parent().parent().removeClass("has-error");
    ele.css("color", "#666666");
}

const acInvalid = "不能为空!";
let isAcWrong = false; // 账号信息为空时,认为信息错误
function inputAccount() {
    const account = $(this);
    if (isAcWrong) {
        isAcWrong = false;
        account.val("");
        account.attr("placeholder", $("#ac_type option[value="+acTypeVal+"]").text());
        rmErrorStyle(account);
    }
}
function isValidAccount() {
    const account = $("#ac");
    if (account.val() === "") {
        isAcWrong = true;
        account.attr("placeholder", $("#ac_type option[value="+acTypeVal+"]").text()+acInvalid);
        addErrorStyle(account);
        return false;
    }
    return !isAcWrong;
}

let acTypeVal = 0;
function changeAcType() {
    const acType = $("#ac_type");
    acTypeVal = acType.val();
    const option = acType.find("option[value=" + acTypeVal + "]");
    $("#ac").attr("placeholder", option.text());
}

const psInvalid = "密码不能为空!";
let isPsWrong = false; // 密码为空时,认为出现错误
function inputPassword() {
    const password = $(this);
    if (isPsWrong) {
        isPsWrong = false;
        password.val("");
        password.attr("placeholder", "密码");
        rmErrorStyle(password);
    }
}
function isValidPassword() {
    const password = $("#ps");
    if (password.val() === "") {
        isPsWrong = true;
        password.attr("placeholder", psInvalid);
        addErrorStyle(password);
        return false;
    }
    return !isPsWrong;
}

const regForTelCode = /^1[0-9]{10}$/;
const regForEmail = /^\w+@[a-zA-Z0-9]{2,10}(?:\.[a-z]{2,4}){1,3}$/;
function isTeleCode(str) {
    return regForTelCode.test(str)
}
function isEmailAdress(str) {
    return regForEmail.test(str);
}

$(function() {
    const acType = $("#ac_type");
    const account = $("#ac");
    const password = $("#ps");
    acType.change(changeAcType);
    acType.blur(isValidAccount);
    account.click(inputAccount);
    account.blur(isValidAccount);
    password.click(inputPassword);
    password.blur(isValidPassword);
    $("#regForm").submit(function() {
        if (!isValidAccount() || !isValidPassword()) {
            return false;
        }
        if (isTeleCode(acVal)) {
            $("#ps").val("T-" + password.val());
        } else if (isEmailAdress(acVal)) {
            $("#ps").val("E-" + password.val());
        }
        return true;
    });
    $("button[name='clear']").click(function() {
        acType.get(0).selectedIndex = acTypeVal;
        account.val("");
        password.val("");
        rmErrorStyle(account);
        rmErrorStyle(password);
    });
});
2.3 Servlet 使用
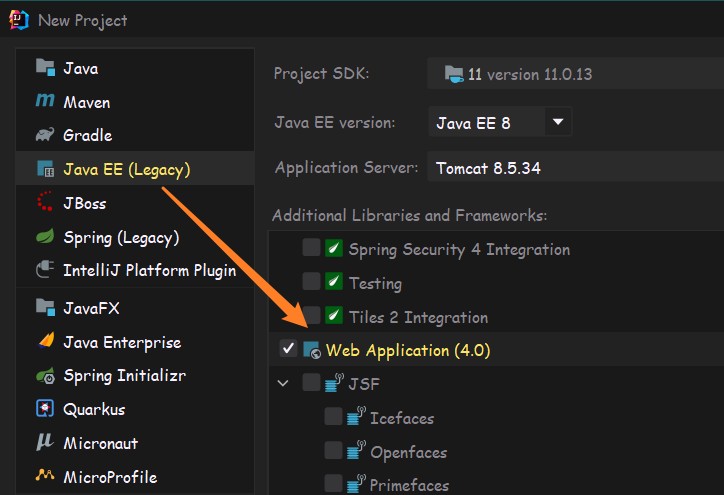
前面准备好了数据库的连接程序和前端网页文件,现在需要将他们放到一个 Java 项目中,并使用 Servlet 将它们关联起来。在 IDEA 中通过创建一个 JavaWeb 项目的方式将它们整合在一起。但较新版本 IDEA 的 New Project 中默认情况下没有创建 Web Application 项目的选项,这是需要将其重新加入到项目类型列表中,方法如下图,到 Help->Find Action 中输入 “Maintenance”(可以看到由相应的快捷键ctrl+alt+shift+/),勾选图中项,就可以创建 Web Application 项目了。


得到的项目相比于普通的 Java 项目多出了一个 web 目录,像这样,

接下来将之前的文件加入到项目中,数据库访问类仍然放到 src 目录下,网页文件放入 web 目录下,如下图,
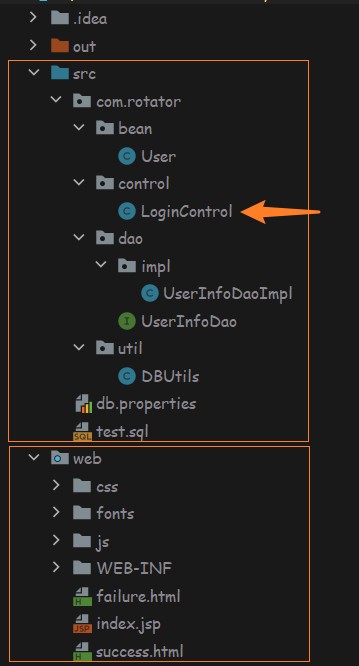
其中 control 目录下的 LoginControl 类中实现了 Servlet 的请求处理,即接收前端请求,访问数据库,实现请求处理与返回逻辑,代码如下,
@WebServlet(urlPatterns="/login_request",
            initParams = {@WebInitParam(name="encoding", value="utf-8")}
)
public class LoginControl extends HttpServlet {
    private final UserInfoDao uid;
    private String encoding;

    public LoginControl() {
        uid = new UserInfoDaoImpl();
    }

    @Override
    public void init(ServletConfig config) {
        encoding = config.getInitParameter("encoding");
    }

    @Override
    protected void doGet(HttpServletRequest req, HttpServletResponse resp) throws ServletException, IOException {
        super.doGet(req, resp);
    }

    @Override
    protected void doPost(HttpServletRequest req, HttpServletResponse resp) throws IOException {
        req.setCharacterEncoding(encoding);
        User user;
        String account = req.getParameter("account");
        String password = req.getParameter("password");
        int accountType = Integer.parseInt(req.getParameter("account_type"));
        if (accountType == 1) {
            // 客户端输入的是电话号码
            user = uid.getUesrInfoByTele(account, password);
        } else if(accountType == 2) {
            // 客户端输入的是邮箱
            user = uid.getUesrInfoByEmail(account, password);
        } else  {
            // accountType == 0,客户端输入的是用户名
            user = uid.getUserInfoByName(account, password);
        }
        if (user == null) {
            resp.sendRedirect("./failure.html");
        } else {
            resp.sendRedirect("./success.html");
        }
    }
}
这里采取了 @WebServlet 注解的方式配置 Servlet,还有一种方式是使用 web.xml 文件进行配置,它在 web/WEB_INF 目录下,
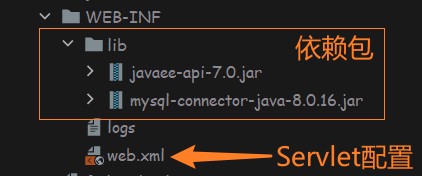
上面的注解配置等价于在 web.xml 中进行如下 6~17 行的配置,
<?xml version="1.0" encoding="UTF-8"?>
<web-app xmlns="http://xmlns.jcp.org/xml/ns/javaee"
         xmlns:xsi="http://www.w3.org/2001/XMLSchema-instance"
         xsi:schemaLocation="http://xmlns.jcp.org/xml/ns/javaee http://xmlns.jcp.org/xml/ns/javaee/web-app_4_0.xsd"
         version="4.0">
    <servlet>
        <servlet-name>name1</servlet-name>
        <servlet-class>xxx.LoginControl</servlet-class>
        <context-param>
            <param-name>encoding</param-name>
            <param-value>utf-8</param-value>
    	</context-param>
    </servlet>
    <servlet-mapping>
        <servlet-name>name1</servlet-name>
        <url-pattern>/login_request</url-pattern>
    </servlet-mapping>
</web-app>
两者可以同时存在,当在 metadata-complete="true"属性值时,web.xml 就会不支持同时使用注释配置,该参数不些的情况些默认为 “false”。
注意到上图中 Servlet 和 JDBC 的依赖包被添加到了 WEB_INF 目录下,这样做可以避开一个在 Servlet 中使用 JDBC 出现找不到 Driver 的异常,详情参考这里。当然移动依赖包后记得在项目配置一下依赖路径,像这样:
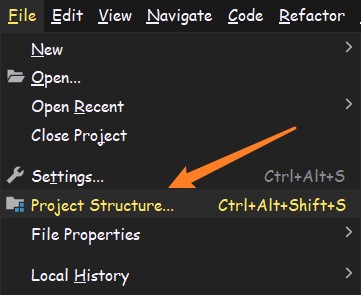
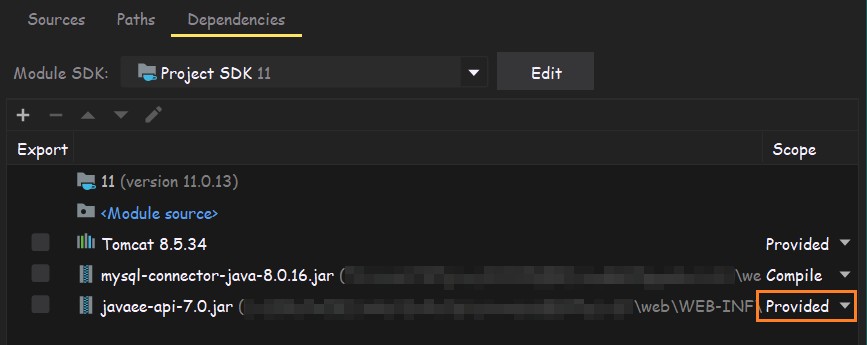
3. IDEA 远程部署 Tomcat 项目
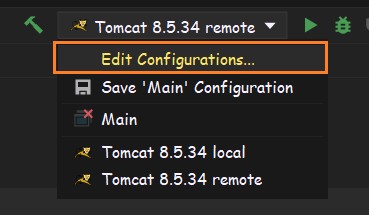
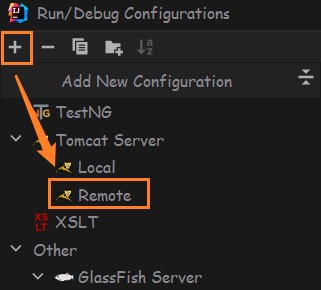
项目文件准备好了,接下来就剩下部署了。进入 IDEA 的 Run/Debug Configuration 配置 Tomcat 远程服务器,进入后选择添加远程 Tomcat,如下图:
然后开始在 Run/Debug Configuration->Server 中配置具体内容,如下图;
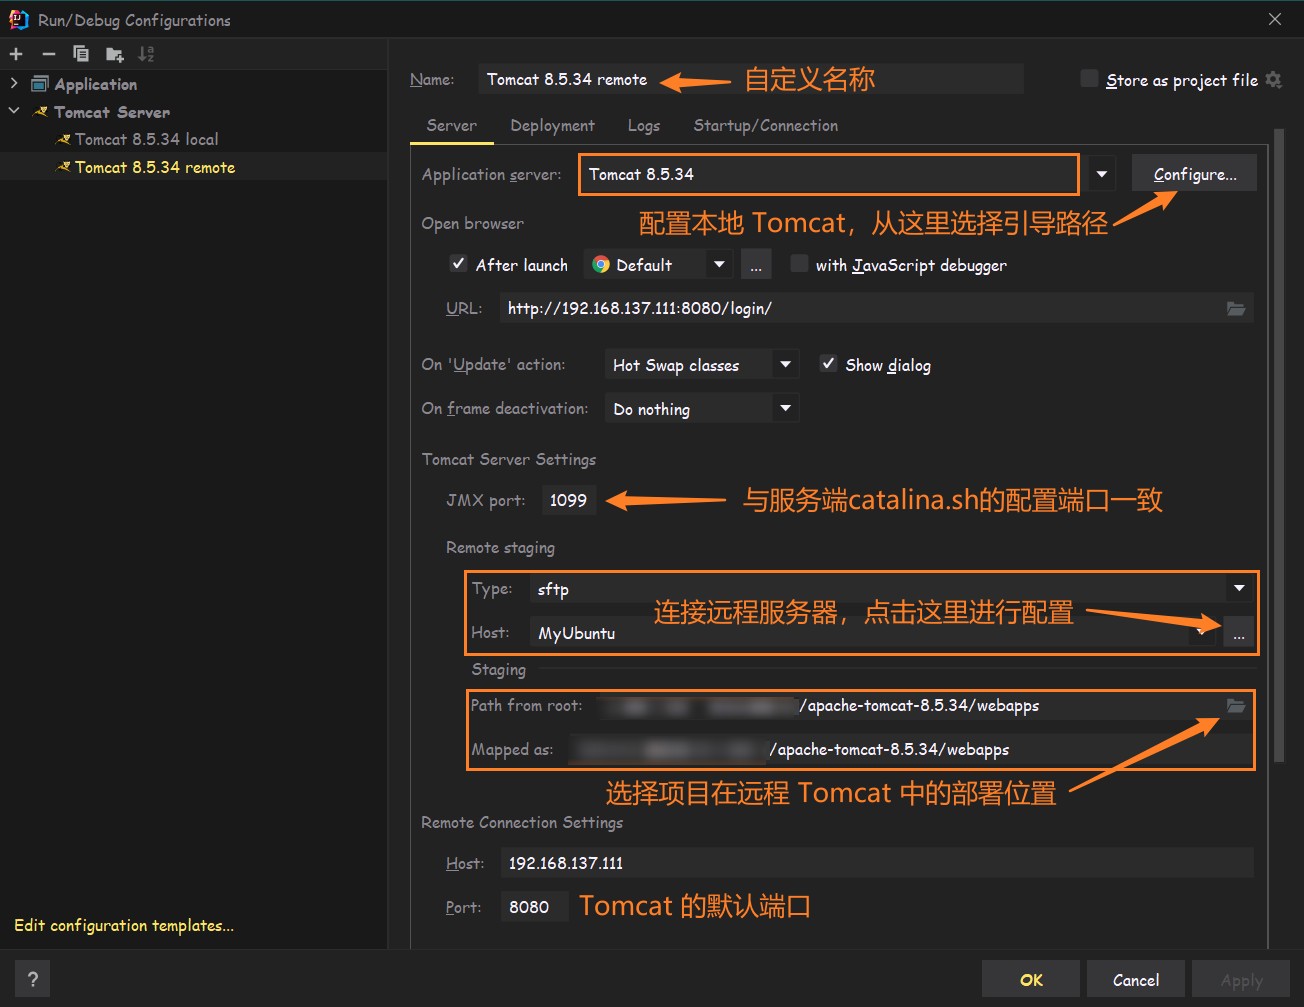
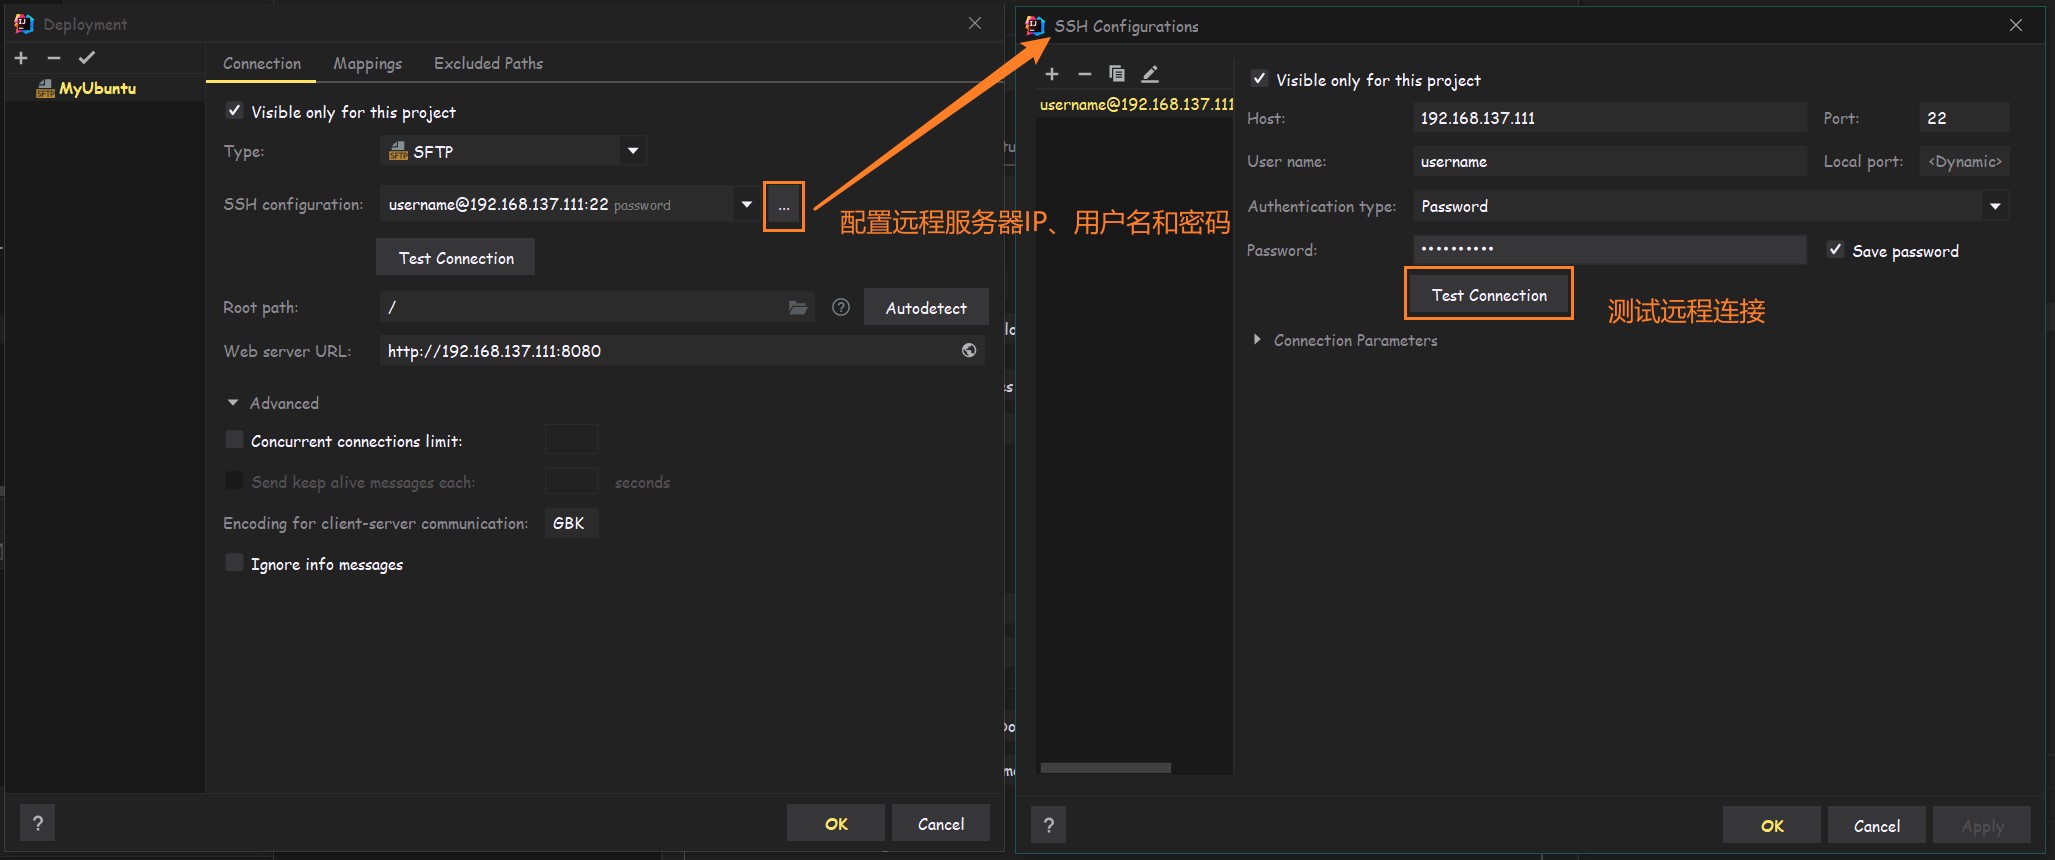
其中,点击 Remote staging->Host 后面的配置键,进入远程服务器连接的配置,如下图。选择 SFTP 连接(基于 SSH 协议),正确填入你的远程服务器 IP 地址、用户名以及登录密码,点击 Test Connection 测试连接,弹窗提示成功连接就 OK 了。
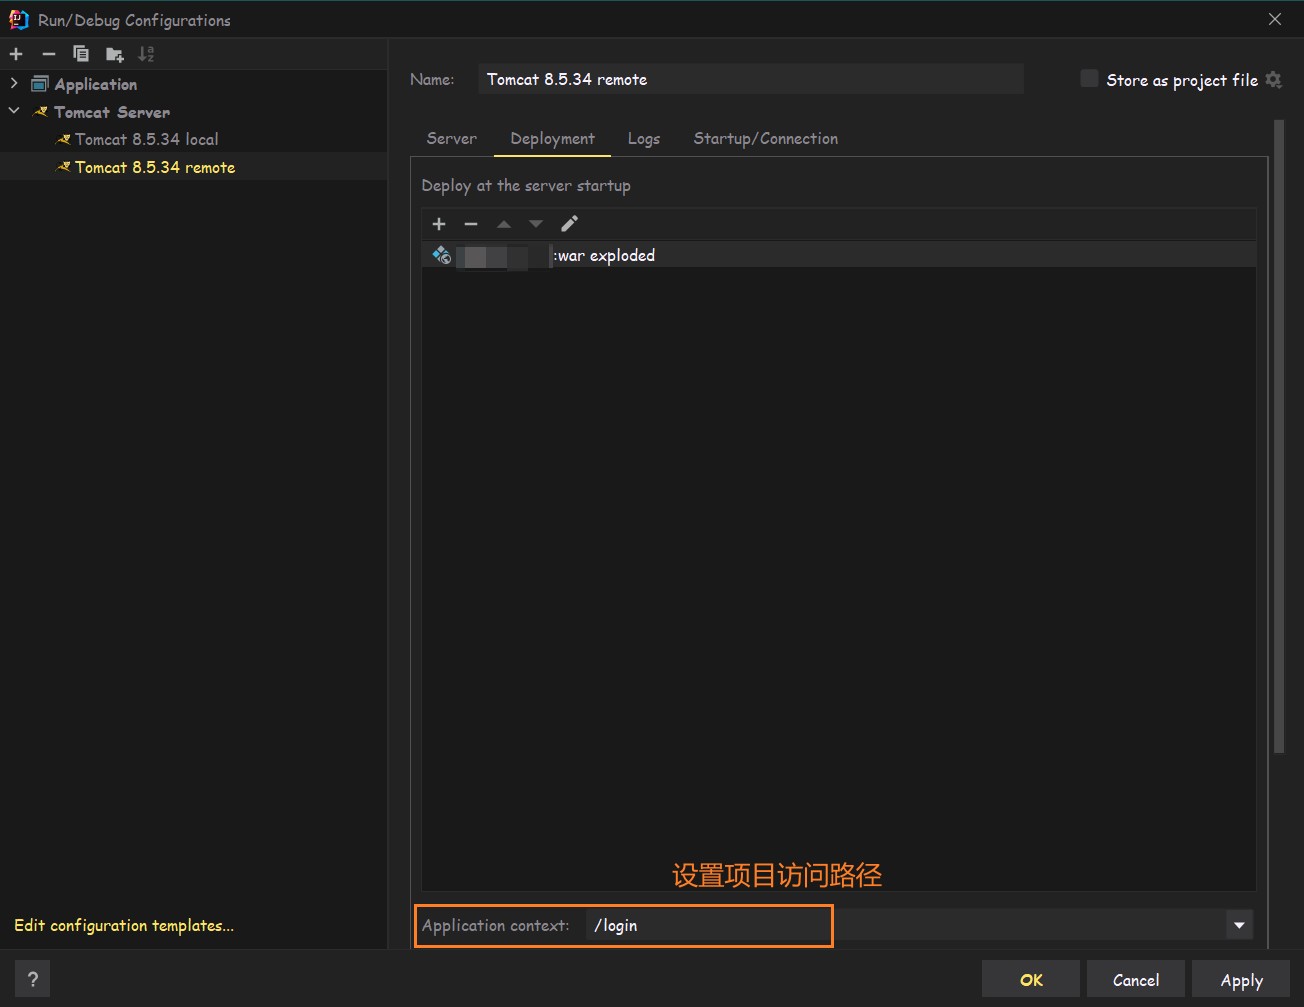
接下来到 Run/Debug Configuration->Deployment 中配置需要部署的项目包,本地项目文件通过 war 包的发送到远程 Tomcat 服务器中的指定位置,即 Run/Debug Configuration->Server 中配置的 webapps 路径下。
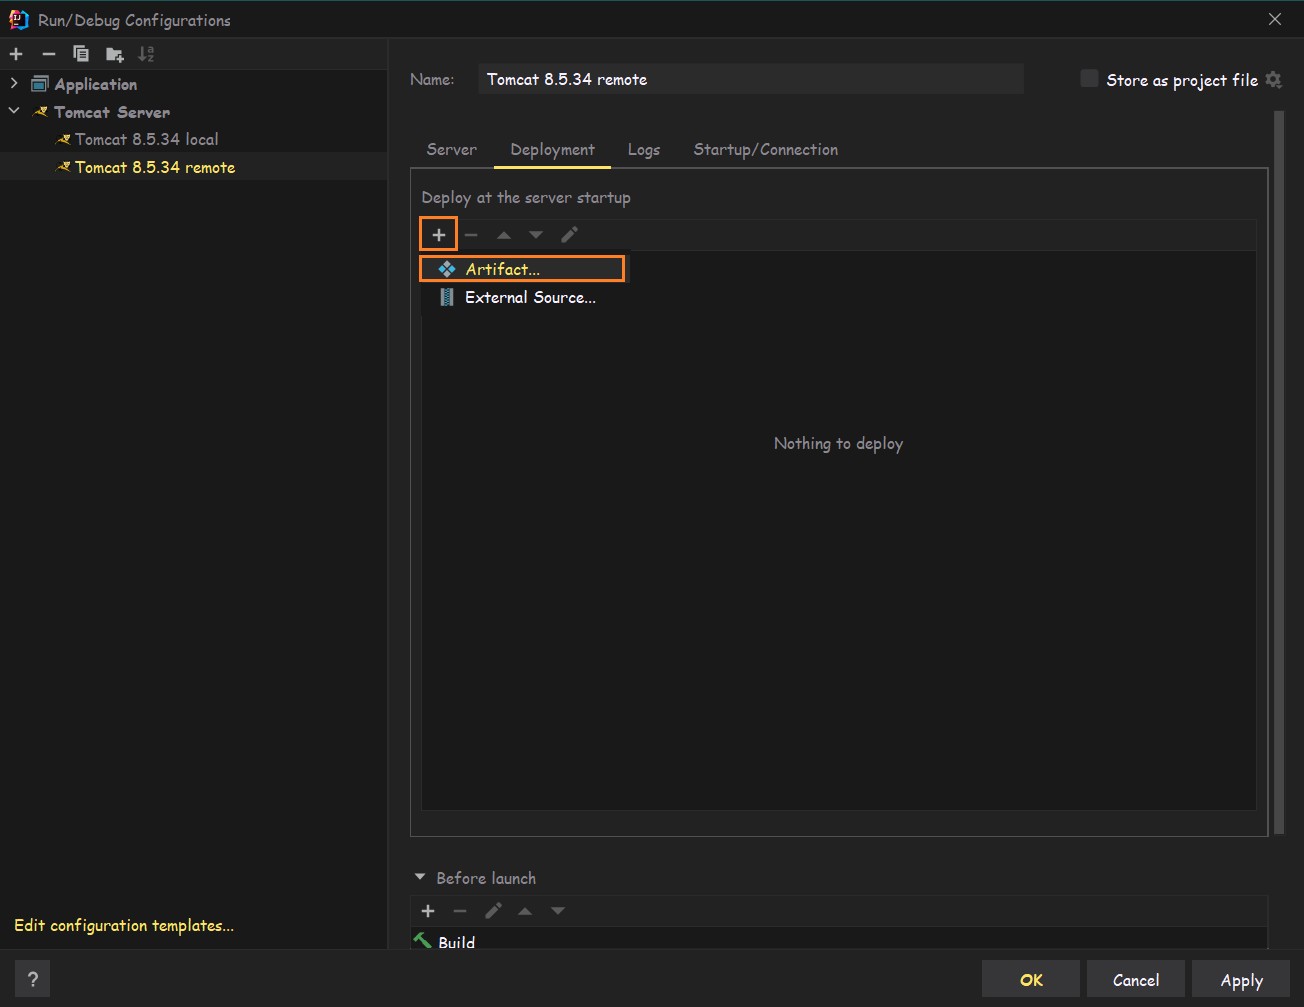
在这里我们可以设置项目的访问路径,它会被添加在在“http://192.168.137.111:8080”后面,组成完整的外部访问路径,默认情况为 IDEA 项目的名称,这里我配置为“/login”表示这是一个登录入口。当只有一个项目需要部署时,可以直接简化为“/”或空字符串,这样“http://192.168.137.111:8080”访问到的就是我们的项目主页而不是之前的 Tomcat 默认主页了。
最后,来看看部署到远程 Tomcat 服务器上的项目文件结构是什么样的,
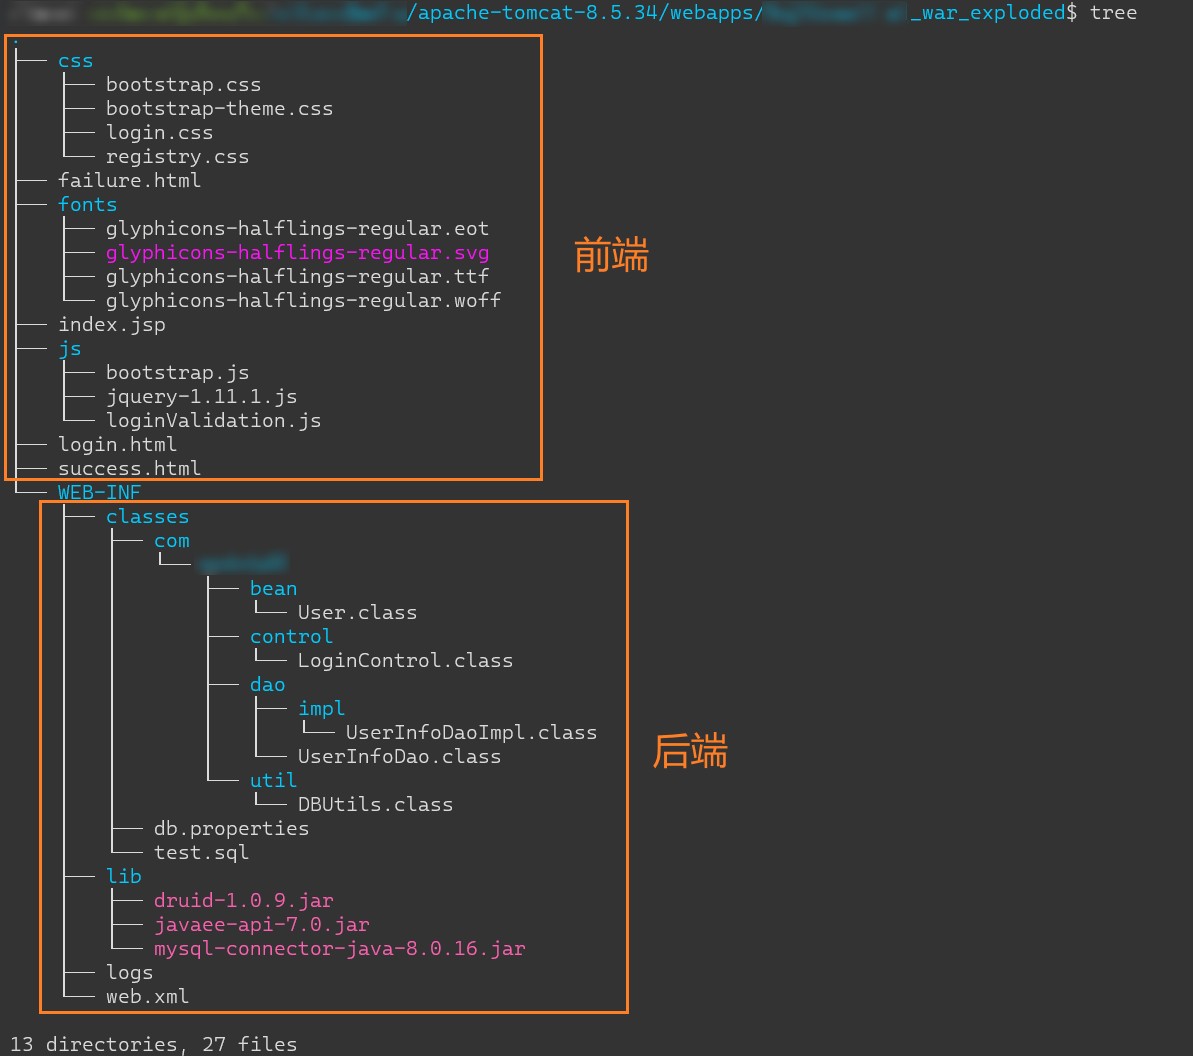
可以看到原本的项目结构被调整了,前端页面被放到了一级目录下,后端文件被放到了 WEB_INF 目录下。
参考
-
Run/Debug Configuration: Tomcat Server
这是官方帮助文档,根据 IDEA 的版本有所区别,可以到自己 IDEA 的 Run/Debug Configuration 界面的点击下方❔(help)到对应版本的帮助页,或者直接把连接中的 2021.2 改成需要的版本号即可。
-
The last packet sent successfully to the server was 0 milliseconds ago. The driver has not received
-
tomcat上运行servlet使用jdbc java.lang.ClassNotFoundException: com.mysql.jdbc.Driver


 这是一篇记录模拟远程部署用户登录项目的笔记。这是一个测试项目,目的是熟悉相关部署流程,并没有使用真实的服务器做项目部署,而是以虚拟机 Ubuntu 系统作为服务端。在本地(主机)的 IDEA 上远程部署项目到远程(虚拟机Ubuntu) 的 Tomcat 服务器上。

