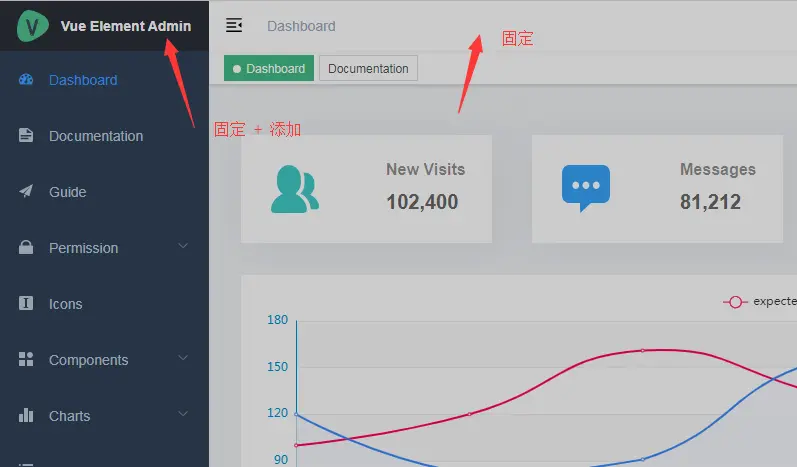
vue element Admin - 修改浏览器标签名 + 添加tagView标签 +固定导航头部 + 添加侧边栏Logo
1 、修改浏览器标签名称:
修改浏览器标签名称在文件:\src\settings.js

2 、修改固定头部Header和侧边栏 Logo:
1)侧边栏文件在:\src\layout\components\Sidebar\index.vue, Sidebar组件中

2)修改侧边栏Log和标题在文件:src\layout\components\Sidebar\Logo.vue

3) 控制showLogo字段在文件 \src\settings.js中 【需要修改这个文件】
fixedHeader:true ==>为true则固定头部,为false则滚动,
sidebarLogo: true ==>为true则显示侧边栏logo,为false则隐藏
module.exports = {
  title: 'Vue Admin Template',

  /**
   * @type {boolean} true | false
   * @description Whether fix the header
   */
  fixedHeader: true,

  /**
   * @type {boolean} true | false
   * @description Whether show the logo in sidebar
   */
  sidebarLogo: true
}
注意:固定头部除了需要改变fixedHeader:true 属性值外,还需要在\src\layout\components\AppMain.vue添加样式,内边距增高

样式代码
<style lang="scss" scoped>
.app-main {
  /*50 = navbar  */
  min-height: calc(100vh - 50px);
  width: 100%;
  position: relative;
  overflow: hidden;
}
.fixed-header+.app-main {
  padding-top: 50px;
}

.hasTagsView {
  .app-main {
    /* 84 = navbar + tags-view = 50 + 34 */
    min-height: calc(100vh - 84px);
  }

  .fixed-header+.app-main {
    padding-top: 84px;
  }
}
</style>

<style lang="scss">
// fix css style bug in open el-dialog
.el-popup-parent--hidden {
  .fixed-header {
    padding-right: 15px;
  }
}
</style>
3 、添加标签导航栏
文档见:https://panjiachen.github.io/vue-element-admin-site/zh/guide/essentials/tags-view.html
- 在setting.js中设置变量tagsView为true,控制tagView是否显示
文件路径:src\settings.js
 /**
   * @type {boolean} true | false
   * @description Whether show the logo in sidebar
   */
  tagsView: true,
- 通过store - setting.js文件控制变量 tagsView
文件路径:src\store\modules\settings.js
添加引入变量
const { showSettings, tagsView, fixedHeader, sidebarLogo } = defaultSettings

const state = {
  showSettings: showSettings,
  fixedHeader: fixedHeader, // 控制是否固定导航
  sidebarLogo: sidebarLogo, // 控制头部logo是否显示
  tagsView: tagsView  // 控制tagsView导航标签栏是否显示
}
3)此步骤可忽略
在store-index.js中暴露settings
文件路径:src\store\index.js
import Vue from 'vue'
import Vuex from 'vuex'
import settings from './modules/settings'

Vue.use(Vuex)

const store = new Vuex.Store({
  modules: {
    settings
  },
  getters
})

export default store
4)拷贝组件tagViews
至文件路径:src\layout\components\TagsView\index.vue

若是无权限路由则修改文件:src\layout\components\TagsView\index.vue里代码,因为admin版本是权限路由,获取路由方式不一样,代码 return this.$router.options.routes

5)添加拷贝状态管理文件 store

5.1)拷贝此文件
\src\store\modules\tagsView.js
5.2)在getter.js中添加抛出字段
文件路径:src\store\getters.js
visitedViews: state => state.tagsView.visitedViews,
cachedViews: state => state.tagsView.cachedViews,

5.3) 引入tagView文件
文件路径:\src\store\index.js

import Vue from 'vue'
import Vuex from 'vuex'
import tagsView from './modules/tagsView'

Vue.use(Vuex)

const store = new Vuex.Store({
  modules: {
    tagsView
  },
  getters
})

export default store
以上为引入,下面开始使用
6) 在layout - component - index.js文件中添加 引入tagViews组件
文件路径:src\layout\components\index.js
export { default as TagsView } from './TagsView/index.vue'
7)添加keep-alive缓存路由
文件路径:@/layout/components/AppMain.vue
<section class="app-main">
    <transition name="fade-transform" mode="out-in">
      <keep-alive :include="cachedViews">
        <router-view :key="key" />
      </keep-alive>
    </transition>
  </section>
修改js文件
computed: {
   cachedViews() {
     return this.$store.state.tagsView.cachedViews
   },
   key() {
     console.log(this.$route.path)
     return this.$route.path
   }
 }
8) 修改index.js文件
文件路径:\src\layout\components\index.js

export { default as TagsView } from './TagsView/index.vue'
文件路径:src\layout\index.vue

<template>
  <div :class="classObj" class="app-wrapper">
    <div v-if="device==='mobile'&&sidebar.opened" class="drawer-bg" @click="handleClickOutside" />
    <sidebar class="sidebar-container" />
    <div class="main-container">
      <div :class="{'fixed-header':fixedHeader}">
        <navbar />
        <tags-view v-if="needTagsView" />
      </div>
      <app-main />
    </div>
  </div>
</template>
import { Navbar, Sidebar, AppMain, TagsView } from './components'
import ResizeMixin from './mixin/ResizeHandler'

export default {
  name: 'Layout',
  components: {
    Navbar,
    Sidebar,
    AppMain,
    TagsView
  },
  mixins: [ResizeMixin],
  computed: {
    needTagsView() {
      console.log(this.$store.state.settings.tagsView)
      return this.$store.state.settings.tagsView
      // return true
    },
    sidebar() {
      return this.$store.state.app.sidebar
    },
    device() {
      return this.$store.state.app.device
    },
    fixedHeader() {
      return this.$store.state.settings.fixedHeader
    },
    classObj() {
      return {
        hideSidebar: !this.sidebar.opened,
        openSidebar: this.sidebar.opened,
        withoutAnimation: this.sidebar.withoutAnimation,
        mobile: this.device === 'mobile'
      }
    }
  },
-
修改原有的dashboard为home(路由里的名称及跳转路径)
文件路径:src\router\index.js
注意:当在声明路由是 添加了 Affix 属性,则当前tag会被固定在 tags-view中(不可被删除)。
添加:affix: true

10)修改文件dashboard为home
文件路径:tests\unit\components\Breadcrumb.spec.js
最重要的一点:自己编写的vue文件里面的name一定要和router/index.js里面的name一致,否则缓存不会生效
参考资料:https://www.jianshu.com/p/cff91fcfe861

 浙公网安备 33010602011771号