使用资源编排 ROS 轻松部署单点网站——以 WordPress 为例
介绍
WordPress是一款免费开源的网站内容管理系统(CMS),它可以帮助用户简单快捷地创建和管理自己的网站,包括博客、新闻网站、电子商务网站、社交网络等等。WordPress 有丰富的主题和插件库,使得用户可以轻松地为网站定制外观和功能。WordPress 的易用性和可扩展性使其成为世界上最受欢迎的网站建设工具之一。
资源编排服务(Resource Orchestration Service, ROS)是阿里云提供基于基础设施即代码(Infrastructure as Code, IaC) 理念的自动化部署服务,我们可以通过定义一个 JSON/YAML/Terraform 模板,轻松部署一套云上单点网站环境。比如部署一套 WordPress 环境,包括创建 VPC、ECS 等云资源,在 ECS 实例中安装 PHP、MySQL 和 WordPress 等。
部署步骤
- 登录ROS 控制台-WordPress 部署页面
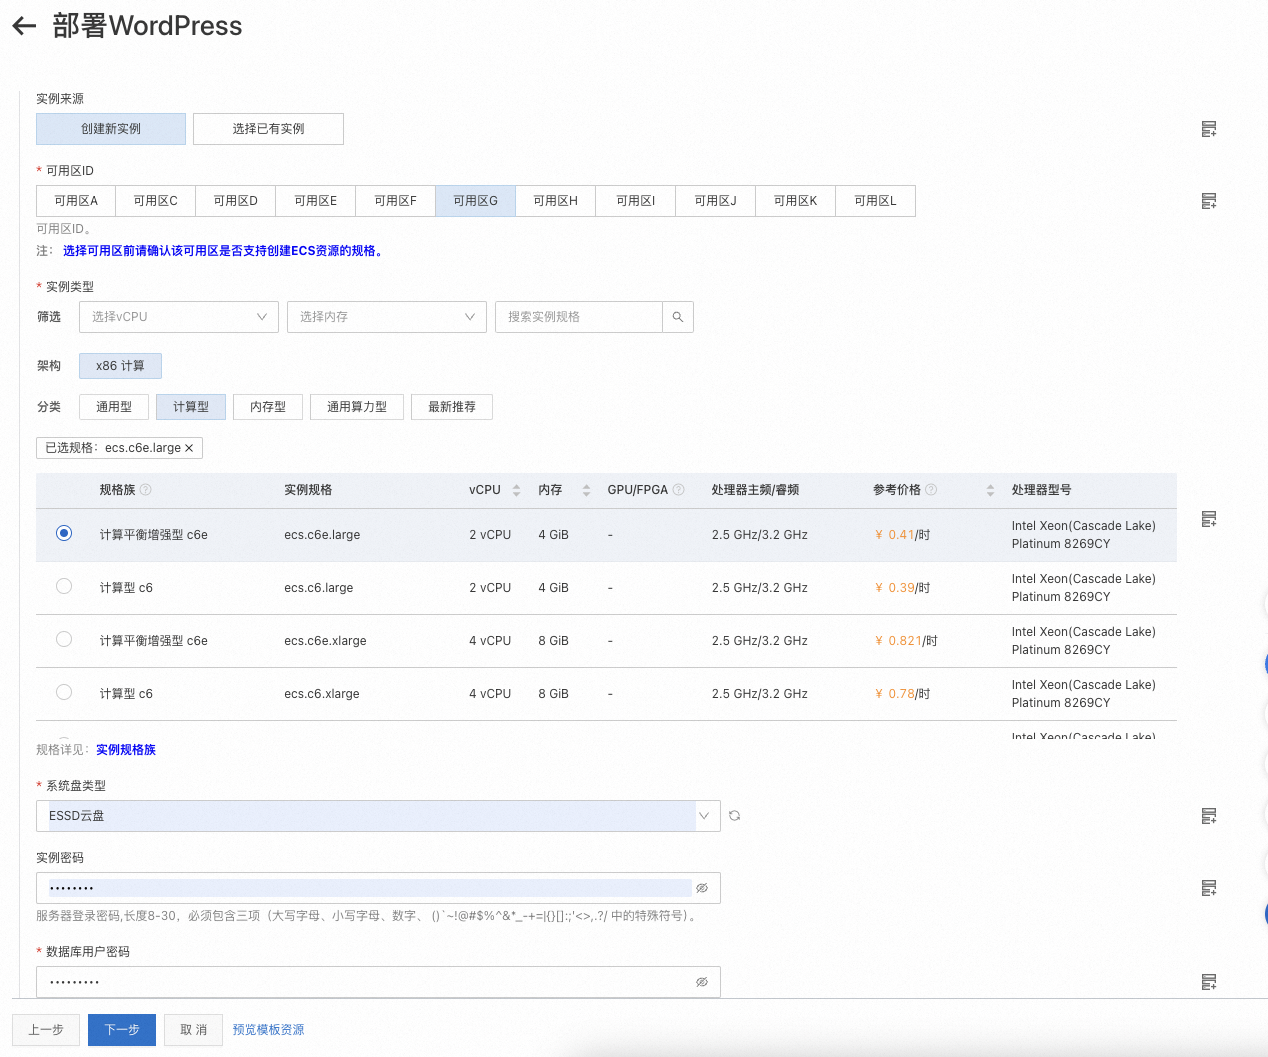
- 配置模板参数:选择 ECS 实例的可用区、实例类型、系统盘类型、实例密码、数据库用户密码

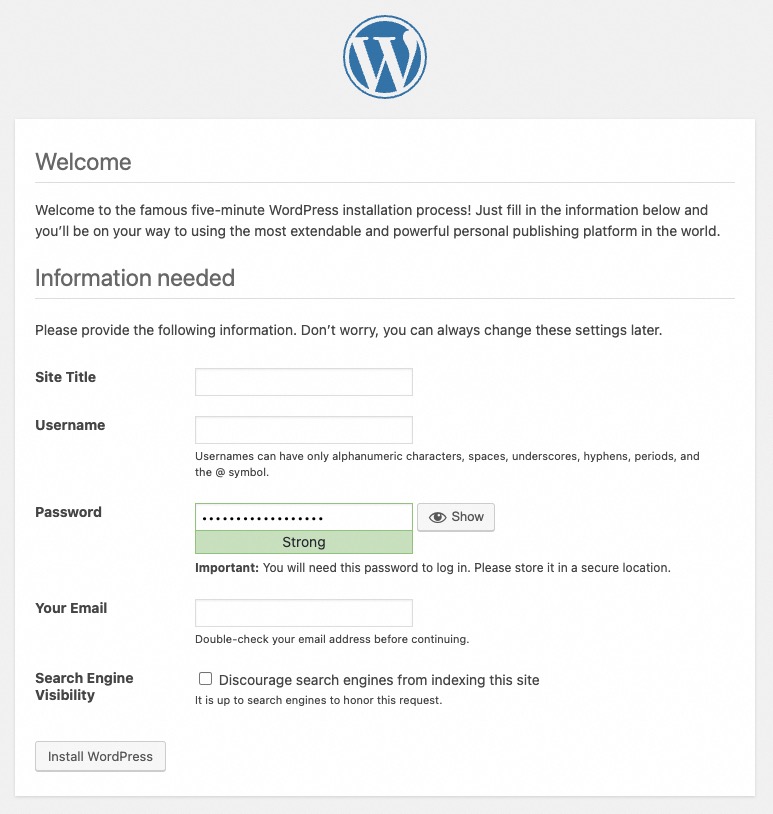
- 点击【下一步】,然后【创建】。部署完成后,点击资源栈的输出,即可看到 WordPress 服务的地址。点击链接即可体验 WordPress 的功能。


部署原理
我们可以看到通过 ROS 可以非常快捷地部署阿里云上的各种云资源(比如 VPC、VSwitch、ECS 实例等)和应用程序(比如 WordPress)。如果想了解是如何做到的,那么可以阅读此章节。
- 编写 ROS 模板。在如下模板中定义了:
Resources:定义了 VPC、VSwitch、ECS 实例、安全组、安全组规则以及安装 WordPress 的命令执行。Parameters:定义了常用的参数,比如可用区、ECS 实例类型类型。Outputs:定义了自定义输出,比如 WordPress 服务的地址。
ROSTemplateFormatVersion: "2015-09-01"
Description:
en: Manually build a WordPress website on a CentOS 7 ECS instance.
zh-cn: 在ECS实例(CentOS 7)上搭建WordPress。
Conditions:
CreateInstance:
Fn::Equals:
- Ref: InstanceSource
- CreateNew
Parameters:
InstanceSource:
Type: String
Default: CreateNew
Label:
zh-cn: 实例来源
en: Instance Source
AllowedValues:
- CreateNew
- UseExisted
AssociationPropertyMetadata:
ValueLabelMapping:
CreateNew:
zh-cn: 创建新实例
en: Create New Instance
UseExisted:
zh-cn: 选择已有实例
en: Select Existed Instance
InstanceId:
Type: String
Label:
en: Existing ECS Instance
zh-cn: 已创建ECS实例
Description:
en: Select an ECS instance with the CentOS 7.9 64-bit operating system.
zh-cn: 选择已存在操作系统为CentOS 7.9 64位的ECS实例。
AssociationProperty: ALIYUN::ECS::Instance::InstanceId
AssociationPropertyMetadata:
Visible:
Condition:
Fn::Equals:
- ${InstanceSource}
- UseExisted
Default: Null
ZoneId:
Type: String
Label:
en: VSwitch Availability Zone
zh-cn: 可用区ID
Description:
en: Availability Zone ID,<br><b>note: <font color='blue'>Before selecting, please confirm that the Availability Zone supports the specification of creating ECS resources.</font></b>
zh-cn: 可用区ID。<br><b>注: <font color='blue'>选择可用区前请确认该可用区是否支持创建ECS资源的规格。</font></b>
Required: true
AssociationProperty: ALIYUN::ECS::Instance:ZoneId
AssociationPropertyMetadata:
ZoneId: ZoneId
Visible:
Condition:
Fn::Equals:
- ${InstanceSource}
- CreateNew
Default: Null
InstanceType:
Type: String
Label:
en: Instance Type
zh-cn: 实例类型
Description:
en: "See detail: <a href='https://www.alibabacloud.com/help/en/doc-detail/25378.html' target='_blank'><b><font color='blue'>Instance Specification Family</font></a></b>"
zh-cn: 规格详见:<a href='https://help.aliyun.com/document_detail/25378.html' target='_blank'><b><font color='blue'>实例规格族</font></a></b>
Required: true
AssociationProperty: ALIYUN::ECS::Instance::InstanceType
AssociationPropertyMetadata:
DefaultValueStrategy: recent
ZoneId: ZoneId
Visible:
Condition:
Fn::Equals:
- ${InstanceSource}
- CreateNew
Default: ecs.c5.large
SystemDiskCategory:
Type: String
Label:
en: System Disk Type
zh-cn: 系统盘类型
Required: true
AssociationProperty: ALIYUN::ECS::Disk::SystemDiskCategory
AssociationPropertyMetadata:
AutoSelectFirst: true
AutoChangeType: false
LocaleKey: DiskCategory
InstanceType: ${InstanceType}
ZoneId: ZoneId
Visible:
Condition:
Fn::Equals:
- ${InstanceSource}
- CreateNew
Default: cloud_essd
InstancePassword:
Type: String
Label:
en: Instance Password
zh-cn: 实例密码
Description:
en: Server login password, Length 8-30, must contain three(Capital letters, lowercase letters, numbers, ()`~!@#$%^&*_-+=|{}[]:;'<>,.?/ Special symbol in).
zh-cn: 服务器登录密码,长度8-30,必须包含三项(大写字母、小写字母、数字、 ()`~!@#$%^&*_-+=|{}[]:;'<>,.?/ 中的特殊符号)。
ConstraintDescription:
en: Length 8-30, must contain three(Capital letters, lowercase letters, numbers, ()`~!@#$%^&*_-+=|{}[]:;'<>,.?/ Special symbol in).
zh-cn: 长度8-30,必须包含三项(大写字母、小写字母、数字、 ()`~!@#$%^&*_-+=|{}[]:;'<>,.?/ 中的特殊符号)。
AllowedPattern: '[0-9A-Za-z\_\-\&:;''<>,=%`~!@#\(\)\$\^\*\+\|\{\}\[\]\.\?\/]+$'
AssociationPropertyMetadata:
Required: true
Visible:
Condition:
Fn::Equals:
- ${InstanceSource}
- CreateNew
MinLength: 8
MaxLength: 30
NoEcho: true
Default: Null
DbPassword:
Type: String
Label:
en: DB User Password
zh-cn: 数据库用户密码
Description:
en: |-
The password must be 8 to 32 characters in length. <br>
It must contain the following character types: uppercase letters, lowercase letters, digits, and special characters. <br>
Special characters include <span style="background:#E7E9EB;"><b>!@#$%^&*()_+-=</b></span>.<br>
<b>If you repeatedly provision in this tutorial on the same ECS instance, make sure that the MySQL database password is exactly the same as the password set when the template was executed for the first time. Otherwise, the result of provisioning is unavailable.</b>
zh-cn: |-
长度为8~32位,需包含大写字母、小写字母、特殊字符和数字,允许的特殊字符包括<span style="background:#E7E9EB;"><b>!@#$%^&*()_+-=</b></span>。<br>
<b>如果您在同一台ECS实例上重复执行本教程的一键配置模板,请确保MySQL数据库密码和第一次执行模板时设置的密码完全一致。否则一键配置结果不可用。</b>
ConstraintDescription:
en: |-
The password must be 8 to 32 characters in length. <br>
It must contain the following character types: uppercase letters, lowercase letters, digits, and special characters. <br>
Special characters include <span style="background:#E7E9EB;"><b>!@#$%^&*()_+-=</b></span>.<br>
<b>If you repeatedly provision in this tutorial on the same ECS instance, make sure that the MySQL database password is exactly the same as the password set when the template was executed for the first time. Otherwise, the result of provisioning is unavailable.</b>
zh-cn: 长度为8~32位,需包含四项大写字母、小写字母、特殊字符和数字,允许的特殊字符包括<span style="background:#E7E9EB;"><b>!@#$%^&*()_+-=</b></span>。
AllowedPattern: ^(?=.*[a-z])(?=.*[A-Z])(?=.*[0-9])((?=.*[!@#\$%\^&\*\(\)\-\+])|(?=.*[_\.,:;\-\?]))[a-zA-Z0-9!@#\$%\^&\*\(\)\-\+_\.,:;\-\?]{8,32}$
Required: true
NoEcho: true
Resources:
Vpc:
Type: ALIYUN::ECS::VPC
Condition: CreateInstance
Properties:
CidrBlock: 192.168.0.0/16
VSwitch:
Type: ALIYUN::ECS::VSwitch
Condition: CreateInstance
Properties:
ZoneId:
Ref: ZoneId
VpcId:
Ref: Vpc
CidrBlock: 192.168.0.0/24
SecurityGroup:
Type: ALIYUN::ECS::SecurityGroup
Condition: CreateInstance
Properties:
VpcId:
Ref: Vpc
SecurityGroupIngress_22:
Type: ALIYUN::ECS::SecurityGroupIngress
Properties:
SecurityGroupId:
Fn::Jq:
- First
- .[0].SecurityGroupIds[0]
- Fn::GetAtt:
- DS_Instances
- Instances
SourceCidrIp: 0.0.0.0/0
IpProtocol: tcp
NicType: intranet
PortRange: 22/22
SecurityGroupIngress_80:
Type: ALIYUN::ECS::SecurityGroupIngress
Properties:
SecurityGroupId:
Fn::Jq:
- First
- .[0].SecurityGroupIds[0]
- Fn::GetAtt:
- DS_Instances
- Instances
SourceCidrIp: 0.0.0.0/0
IpProtocol: tcp
NicType: intranet
PortRange: 80/80
SecurityGroupIngress_443:
Type: ALIYUN::ECS::SecurityGroupIngress
Properties:
SecurityGroupId:
Fn::Jq:
- First
- .[0].SecurityGroupIds[0]
- Fn::GetAtt:
- DS_Instances
- Instances
SourceCidrIp: 0.0.0.0/0
IpProtocol: tcp
NicType: intranet
PortRange: 443/443
WaitConditionHandle:
Type: ALIYUN::ROS::WaitConditionHandle
Properties: {}
RosWaitCondition:
Type: ALIYUN::ROS::WaitCondition
Properties:
Count: 1
Handle:
Ref: WaitConditionHandle
Timeout: 7200
DS_Instances:
Type: DATASOURCE::ECS::Instances
Properties:
InstanceIds:
Fn::If:
- CreateInstance
- Fn::GetAtt:
- InstanceGroup
- InstanceIds
- - Ref: InstanceId
InstanceGroup:
Type: ALIYUN::ECS::InstanceGroup
Condition: CreateInstance
Properties:
VpcId:
Ref: Vpc
VSwitchId:
Ref: VSwitch
SecurityGroupId:
Ref: SecurityGroup
ImageId: centos_7_8
InstanceType:
Ref: InstanceType
SystemDiskCategory:
Ref: SystemDiskCategory
Password:
Ref: InstancePassword
IoOptimized: optimized
MaxAmount: 1
InstallWordpress:
Type: ALIYUN::ECS::RunCommand
Properties:
InstanceIds:
Fn::If:
- CreateInstance
- Fn::GetAtt:
- InstanceGroup
- InstanceIds
- - Ref: InstanceId
Type: RunShellScript
Sync: true
Timeout: 7200
CommandContent:
Fn::Sub:
- |-
#!/bin/bash
if [ ! -f .ros.provision ]; then
echo "Name: 手动搭建WordPress(CentOS 7)" > .ros.provision
fi
name=$(grep "^Name:" .ros.provision | awk -F':' '{print $2}' | sed -e 's/^[[:space:]]*//' -e 's/[[:space:]]*$//')
if [[ "$name" != "手动搭建WordPress(CentOS 7)" ]]; then
echo "当前实例已使用过\"$name\"教程的一键配置,不能再使用本教程的一键配置"
${WaitConditionHandle.CurlCli} --data-binary "{\"status\": \"FAILURE\", \"reason\": \"The current instance has already applied the configuration of the \\\"$name\\\" tutorial, and the configuration of this tutorial can no longer be applied.\"}"
exit 0
fi
echo "#########################"
echo "# Check Network"
echo "#########################"
ping -c 2 -W 2 aliyun.com > /dev/null
if [[ $? -ne 0 ]]; then
echo "当前实例无法访问公网"
${WaitConditionHandle.CurlCli} --data-binary "{\"status\": \"FAILURE\", \"reason\": \"The current instance cannot access the public network.\"}"
exit 0
fi
if ! grep -q "^Step1: Prepare Environment$" .ros.provision; then
echo "#########################"
echo "# Prepare Environment"
echo "#########################"
systemctl status firewalld
systemctl stop firewalld
echo "Step1: Prepare Environment" >> .ros.provision
else
echo "#########################"
echo "# Environment has been ready"
echo "#########################"
fi
if ! grep -q "^Step2: Install Nginx$" .ros.provision; then
echo "#########################"
echo "# Install Nginx"
echo "#########################"
yum -y install nginx
nginx -v
echo "Step2: Install Nginx" >> .ros.provision
else
echo "#########################"
echo "# Nginx has been installed"
echo "#########################"
fi
if ! grep -q "^Step3: Install MySQL$" .ros.provision; then
echo "#########################"
echo "# Install MySQL"
echo "#########################"
rpm -Uvh https://dev.mysql.com/get/mysql57-community-release-el7-9.noarch.rpm
yum -y install mysql-community-server --nogpgcheck
mysql -V
systemctl start mysqld
systemctl enable mysqld
systemctl daemon-reload
echo "Step3: Install MySQL" >> .ros.provision
else
echo "#########################"
echo "# MySQL has been installed"
echo "#########################"
fi
if ! grep -q "^Step4: Install PHP$" .ros.provision; then
echo "#########################"
echo "# Install PHP"
echo "#########################"
yum install -y \
https://mirrors.aliyun.com/ius/ius-release-el7.rpm \
https://mirrors.aliyun.com/epel/epel-release-latest-7.noarch.rpm
yum -y install php-devel php php-cli php-common php-gd php-ldap php-mbstring php-mcrypt php-pdo php-fpm php-opcache php-pecl-redis php-pecl-mongodb php-mysqlnd
php -v
echo "Step4: Install PHP" >> .ros.provision
else
echo "#########################"
echo "# PHP has been installed"
echo "#########################"
fi
if ! grep -q "^Step4: Config Nginx$" .ros.provision; then
echo "#########################"
echo "# Config Nginx"
echo "#########################"
cp /etc/nginx/nginx.conf /etc/nginx/nginx.conf.bak
cat > /etc/nginx/nginx.conf << \EOF
# For more information on configuration, see:
# * Official English Documentation: http://nginx.org/en/docs/
# * Official Russian Documentation: http://nginx.org/ru/docs/
user nginx;
worker_processes auto;
error_log /var/log/nginx/error.log;
pid /run/nginx.pid;
# Load dynamic modules. See /usr/share/doc/nginx/README.dynamic.
include /usr/share/nginx/modules/*.conf;
events {
worker_connections 1024;
}
http {
log_format main '$remote_addr - $remote_user [$time_local] "$request" '
'$status $body_bytes_sent "$http_referer" '
'"$http_user_agent" "$http_x_forwarded_for"';
access_log /var/log/nginx/access.log main;
sendfile on;
tcp_nopush on;
tcp_nodelay on;
keepalive_timeout 65;
types_hash_max_size 4096;
include /etc/nginx/mime.types;
default_type application/octet-stream;
# Load modular configuration files from the /etc/nginx/conf.d directory.
# See http://nginx.org/en/docs/ngx_core_module.html#include
# for more information.
include /etc/nginx/conf.d/*.conf;
server {
listen 80;
listen [::]:80;
server_name _;
root /usr/share/nginx/html/wordpress;
# Load configuration files for the default server block.
include /etc/nginx/default.d/*.conf;
location / {
index index.php index.html index.htm;
}
location ~ .php$ {
root /usr/share/nginx/html/wordpress; # 将/usr/share/nginx/html替换为您的网站根目录,本文使用/usr/share/nginx/html作为网站根目录。
fastcgi_pass 127.0.0.1:9000; # Nginx通过本机的9000端口将PHP请求转发给PHP-FPM进行处理。
fastcgi_index index.php;
fastcgi_param SCRIPT_FILENAME $document_root$fastcgi_script_name;
include fastcgi_params; # Nginx调用fastcgi接口处理PHP请求。
}
error_page 404 /404.html;
location = /404.html {
}
error_page 500 502 503 504 /50x.html;
location = /50x.html {
}
}
# Settings for a TLS enabled server.
#
# server {
# listen 443 ssl http2;
# listen [::]:443 ssl http2;
# server_name _;
# root /usr/share/nginx/html;
#
# ssl_certificate "/etc/pki/nginx/server.crt";
# ssl_certificate_key "/etc/pki/nginx/private/server.key";
# ssl_session_cache shared:SSL:1m;
# ssl_session_timeout 10m;
# ssl_ciphers HIGH:!aNULL:!MD5;
# ssl_prefer_server_ciphers on;
#
# # Load configuration files for the default server block.
# include /etc/nginx/default.d/*.conf;
#
# error_page 404 /404.html;
# location = /40x.html {
# }
#
# error_page 500 502 503 504 /50x.html;
# location = /50x.html {
# }
# }
}
EOF
systemctl start nginx
systemctl enable nginx
echo "Step4: Config Nginx" >> .ros.provision
else
echo "#########################"
echo "# Nginx has been configured"
echo "#########################"
fi
if ! grep -q "^Step6: Config MySQL$" .ros.provision; then
echo "#########################"
echo "# Config MySQL"
echo "#########################"
export MYSQL_PWD=`grep "temporary password" /var/log/mysqld.log | awk '{print $NF}'`
mysqladmin -uroot password '${DbPassword}'
export MYSQL_PWD='${DbPassword}'
mysql -uroot -e "GRANT ALL PRIVILEGES ON *.* TO 'root'@'%' IDENTIFIED BY '${DbPassword}'"
echo CREATE DATABASE wordpress\; >> /tmp/setup.mysql
echo CREATE user "user"@"localhost" identified by '"${DbPassword}"'\; >> /tmp/setup.mysql
echo GRANT ALL privileges ON wordpress.* TO "user"@"localhost" IDENTIFIED BY '"${DbPassword}"'\; >> /tmp/setup.mysql
echo FLUSH privileges\;>> /tmp/setup.mysql
chmod 400 /tmp/setup.mysql
mysql -u root --password='${DbPassword}' < /tmp/setup.mysql
echo "Step6: Config MySQL" >> .ros.provision
else
echo "#########################"
echo "# MySQL has been configured"
echo "#########################"
fi
if ! grep -q "^Step7: Config PHP$" .ros.provision; then
echo "#########################"
echo "# Config PHP"
echo "#########################"
echo "<?php phpinfo(); ?>" > /usr/share/nginx/html/phpinfo.php
systemctl start php-fpm
systemctl enable php-fpm
echo "Step7: Config PHP" >> .ros.provision
else
echo "#########################"
echo "# PHP has been configured"
echo "#########################"
fi
if ! grep -q "^Step8: Install wordpress$" .ros.provision; then
echo "#########################"
echo "# Install wordpress"
echo "#########################"
yum -y install wordpress
echo "Step8: Install wordpress" >> .ros.provision
else
echo "#########################"
echo "# wordpress has been installed"
echo "#########################"
fi
if ! grep -q "^Step9: Config wordpress$" .ros.provision; then
echo "#########################"
echo "# Config wordpress"
echo "#########################"
mv /usr/share/wordpress /usr/share/nginx/html/wordpress
cd /usr/share/nginx/html/wordpress
ln -snf /etc/wordpress/wp-config.php wp-config.php
sed -i "s/database_name_here/wordpress/" wp-config.php
sed -i "s/username_here/user/" wp-config.php
sed -i "s/password_here/${DbPassword}/" wp-config.php
echo "Step9: Config wordpress" >> .ros.provision
else
echo "#########################"
echo "# wordpress has been configured"
echo "#########################"
fi
systemctl restart nginx
${WaitConditionHandle.CurlCli} --data-binary '{"status": "SUCCESS"}'
- IP:
Fn::Jq:
- First
- if .[0].PublicIpAddress != [] then .[0].PublicIpAddress[0] else .[0].EipAddress.IpAddress end
- Fn::GetAtt:
- DS_Instances
- Instances
DependsOn:
- SecurityGroupIngress_22
- SecurityGroupIngress_443
- SecurityGroupIngress_80
Outputs:
WordPressUrl:
Description:
zh-cn: WordPress 地址
en: WordPress Address
Value:
Fn::Sub:
- http://${IP}
- IP:
Fn::Jq:
- First
- if .[0].PublicIpAddress != [] then .[0].PublicIpAddress[0] else .[0].EipAddress.IpAddress end
- Fn::GetAtt:
- DS_Instances
- Instances
Metadata:
ALIYUN::ROS::Interface:
ParameterGroups:
- Parameters:
- InstanceSource
- InstanceId
- ZoneId
- InstanceType
- SystemDiskCategory
- InstancePassword
- DbPassword
Label:
default: ECS
TemplateTags:
- acs:example:web:搭建WordPress(CentOS 7)
- 在 ROS 控制台中使用此模板创建资源栈。ROS 会自动解析出模板中资源的依赖关系,按照资源依赖顺序创建云资源。如果资源间没有依赖,则会并发创建,从而提升部署效率。ROS 会把这次创建的所有资源存放到一个“资源栈”中,后续可以方便地管理这组资源集合。比如:
- 将新模板应用到这个“资源栈”中,从而更新里面的资源。
- 删除这个“资源栈”,从而把所有的资源删掉。
总结
基于 IaC 的理念,通过定义一个模板,使用 ROS 进行自动化部署,可以非常高效快捷地部署任意云资源和应用(比如 WordPress 服务)。相比于手动部署或者通过 API、SDK 的部署方式,有着高效、稳定等诸多优势,也是服务上云的最佳实践。


