如何搭建SCVMM+Hyper-V
前提准备
服务器, 预控,SQL+SCVMM安装的机子
安装SQL
这里我们的操作系统是Windows Server 2012 R2,已经默认自带了.NET Framework 4.6
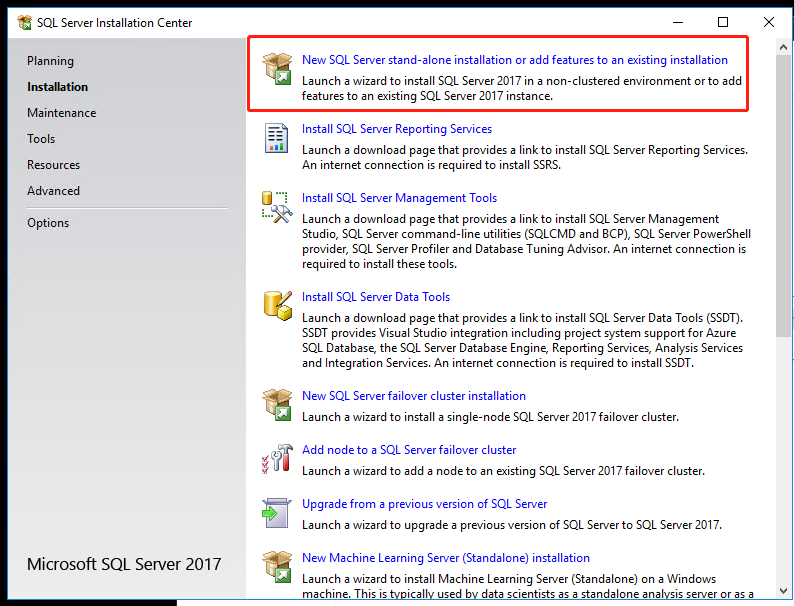
- 挂载SQL镜像,进入安装界面
- 选择installation tab 点击全新安装或向现有安装添加功能
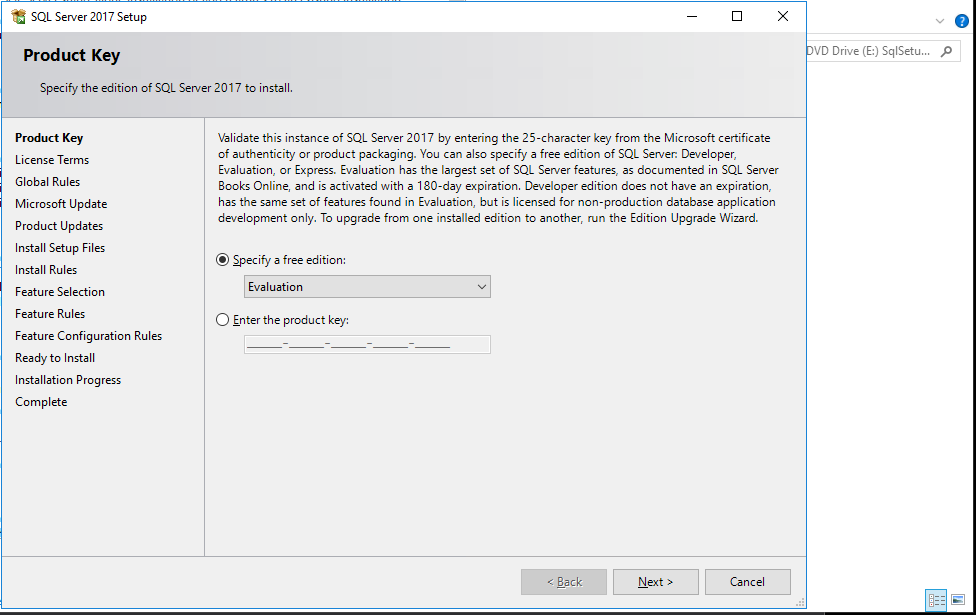
- 选择SQL版本类型,不要选择express
![]()
-
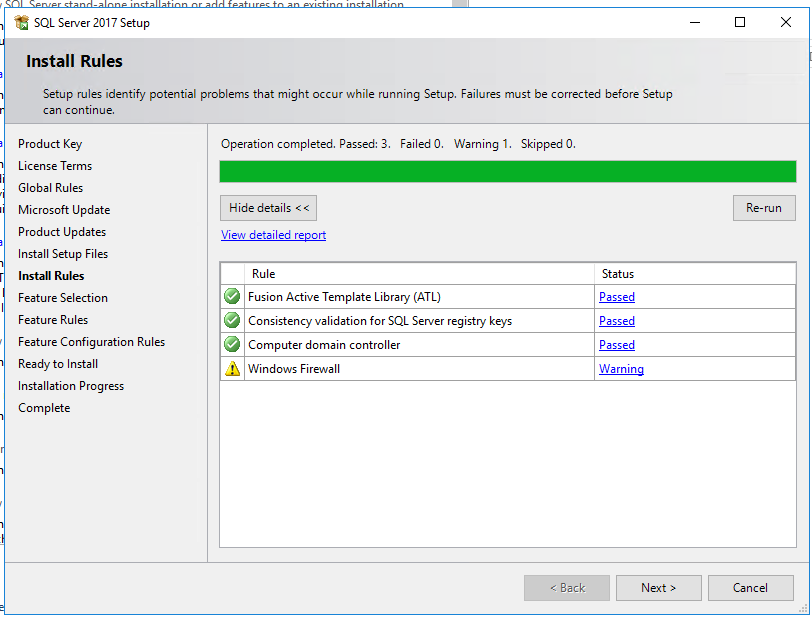
扫描主机,这个步骤看起来跟刚才在准备过程中的一样,都是扫描本机,防止在安装过程中出现异常。现在并不是在重复刚才的步骤,从下图明显看出这次扫描的精度更细,扫描的内容也更多。
在这个步骤中,一定不要忽略“Windows防火墙”这个警告,因为如果在Windows2008操作系统中安装SQL Server,操作系统不会在防火墙自动打开TCP1433这个端口。开启TCP1433端口的方法在后面会提到。
扫描结果为已通过,点“下一步”继续
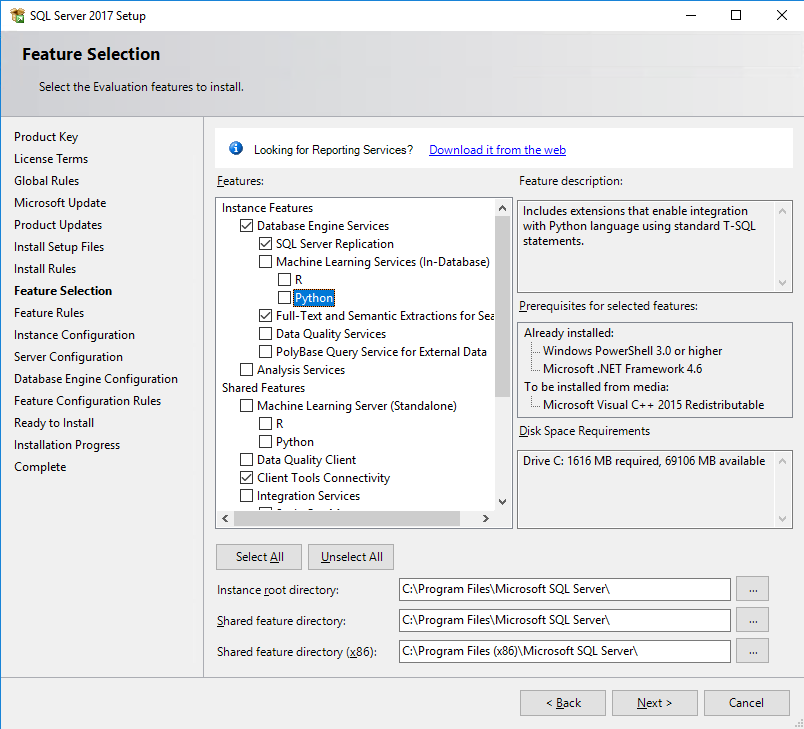
- 勾选需要安装的组件,选择安装路径,下一步
![]()
-
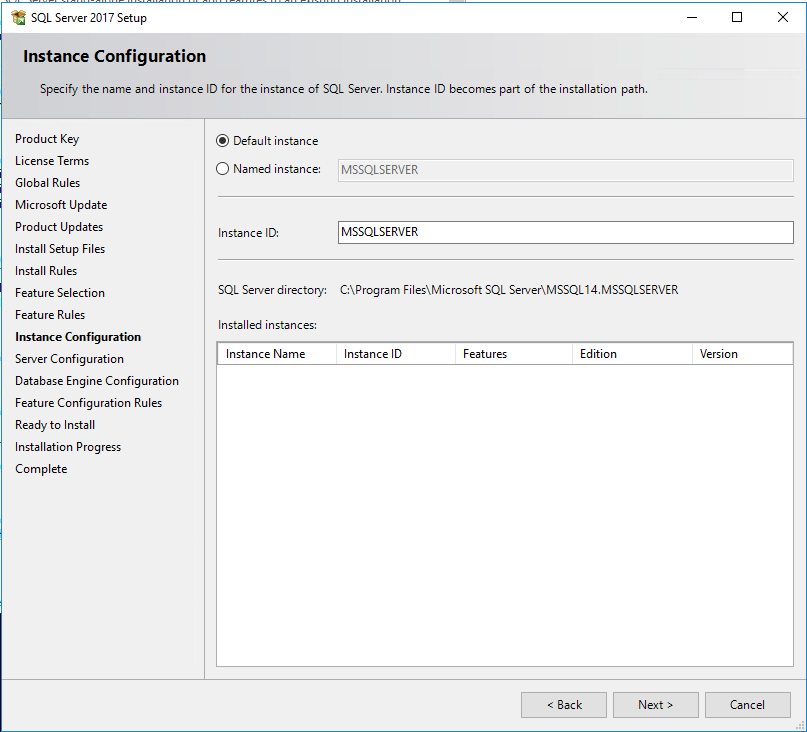
选择默认实例
![]()
-
保持默认
-
![]()
-
windows验证,添加当前用户
![]()
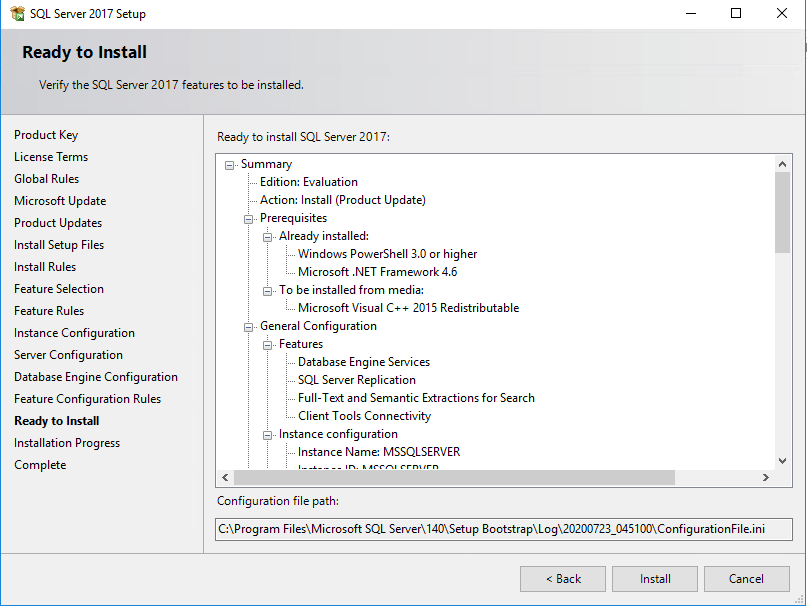
- 点击安装按钮
![]()
-
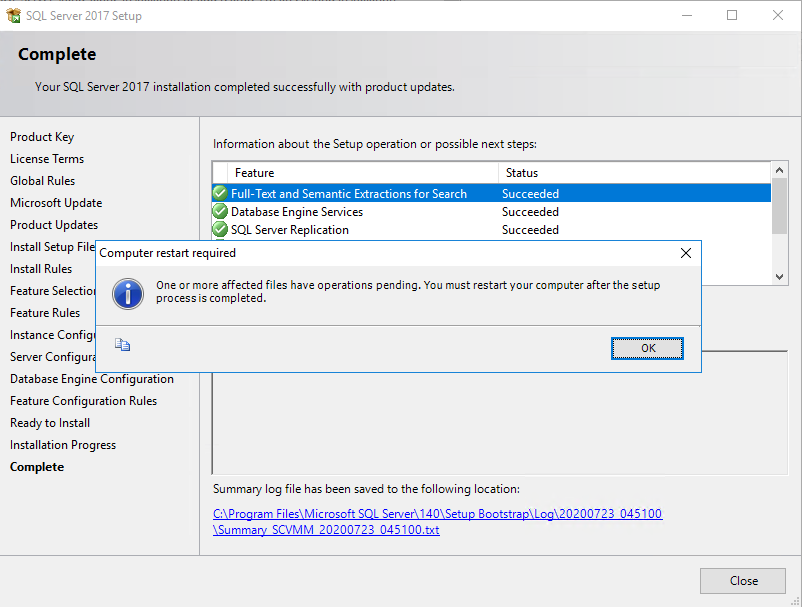
显示安装进度,直到最后,出现下面的画面,安装完成,点OK 重启机器
![]()
打开防火墙1433端口
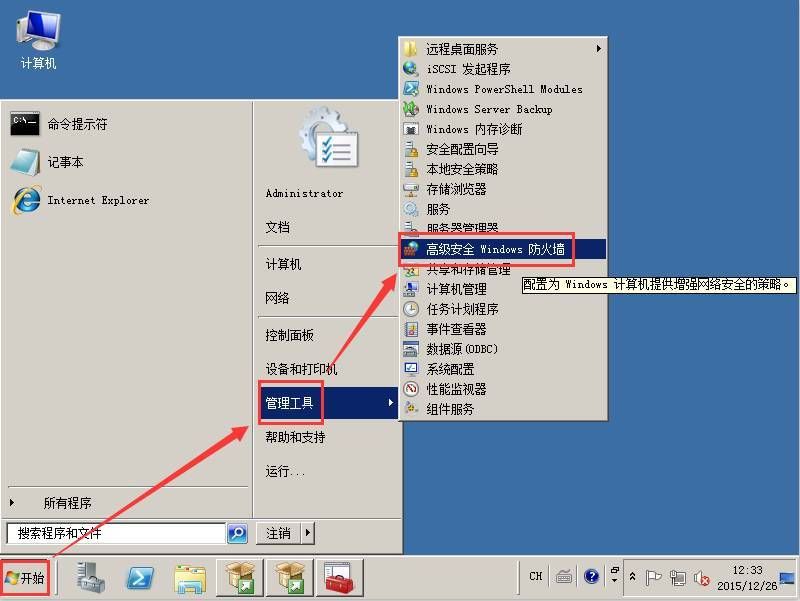
1) 依次单击“开始”、“管理工具”、“高级安全 Windows 防火墙”。
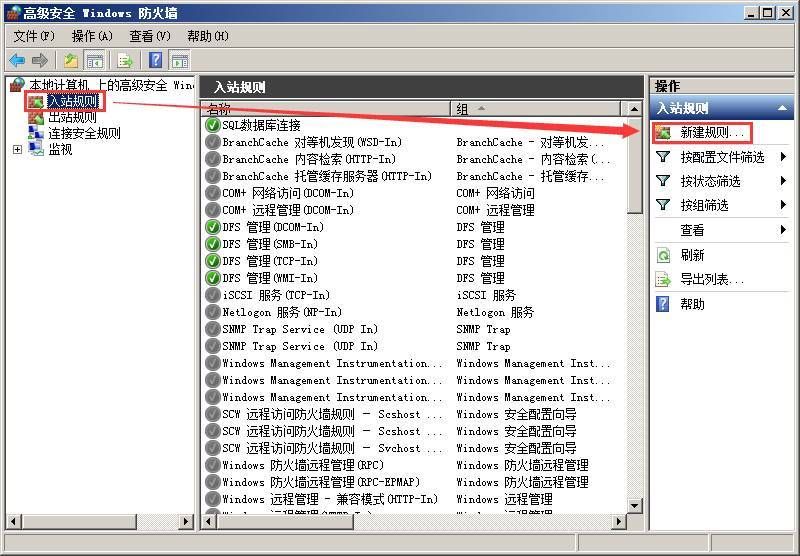
2) 右键单击“入站规则”,然后单击“新建规则”。
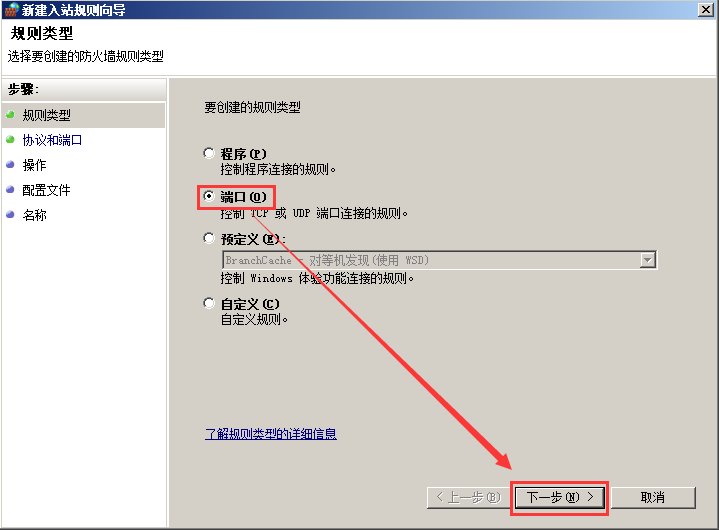
3) 在“新建入站规则向导”对话框中的“规则类型”页上单击“端口”,然后单击“下一步”。
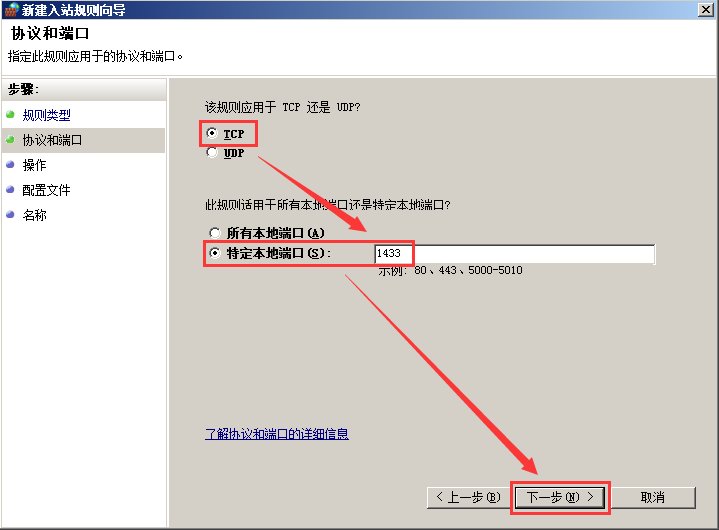
4) 在“协议和端口”页上单击“TCP”,单击“特定本地端口”,键入 1433,然后单击“下一步”。
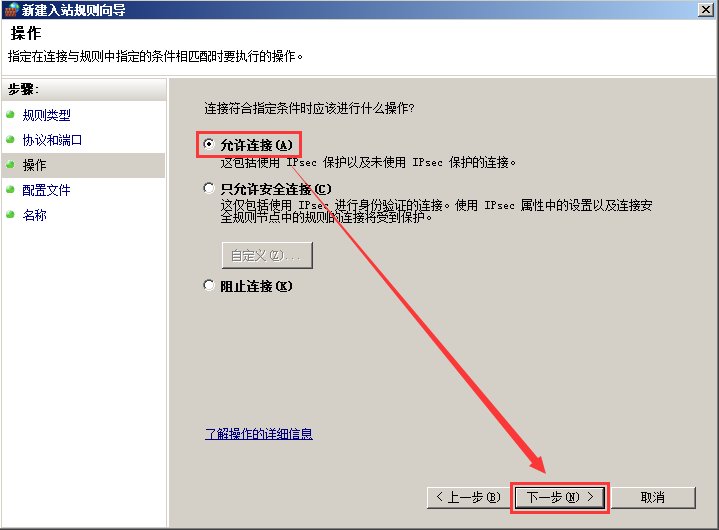
5) 在“操作”页上单击“允许连接”,然后单击“下一步”。
6) 在“配置文件”页上执行所有下列操作:
全选。
单击“下一步”。
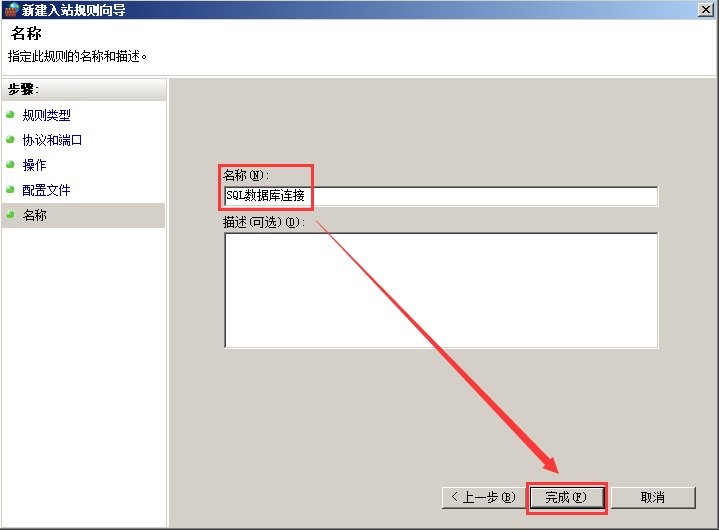
7) 在“名称”页为新的入站规则键入一个有意义的名称。然后单击“完成”。
数据库准备
1) 确认数据库服务已全部运行正常:
点“开始”-“所有程序”-“Microsoft SQL Server 2012 R2”-“配置工具”-“SQL Server配置管理器”,点“SQL Server服务”,将全部的服务启动,并将启动模式改为“自动”
如果安装了SQL的Report Services报表服务,并且准备将数据库和vCenter装在同一台Server上,此时需要将Report Services报表服务关闭,因为Report Services的默认端口为80,与vCenter冲突,当然也可以修改Report Services的默认端口



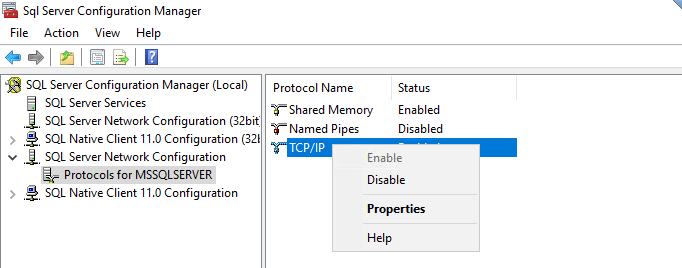
2) 依次单击“SQL Server 网络配置”-“MSSQLSERVER的协议”,右击“TCP/IP”,在弹出菜单单击“属性”
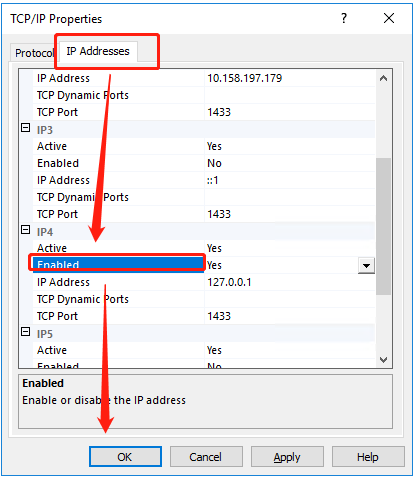
3) Install SQL Studio
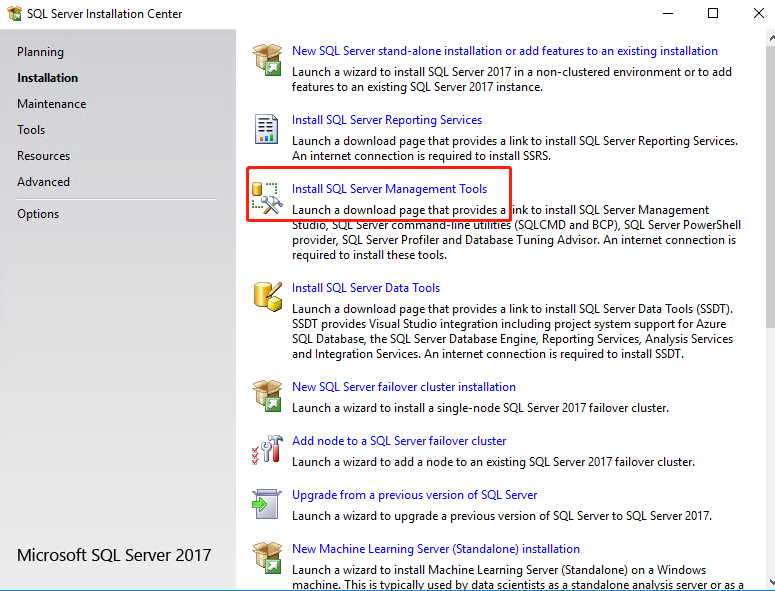
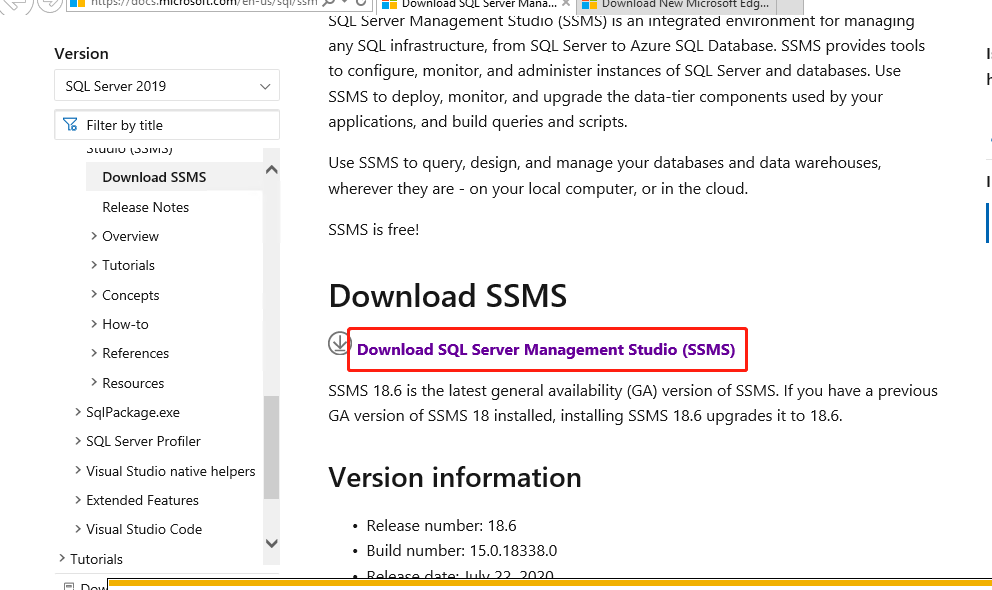
4) 在Windows开始菜单中,打开数据库管理工具
输入登录的服务器名称,身份验证为“Windows身份验证”,连接数据库,出现下面的界面
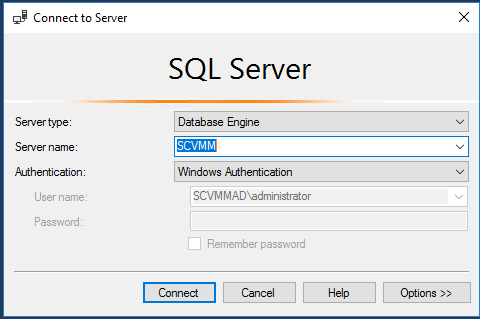
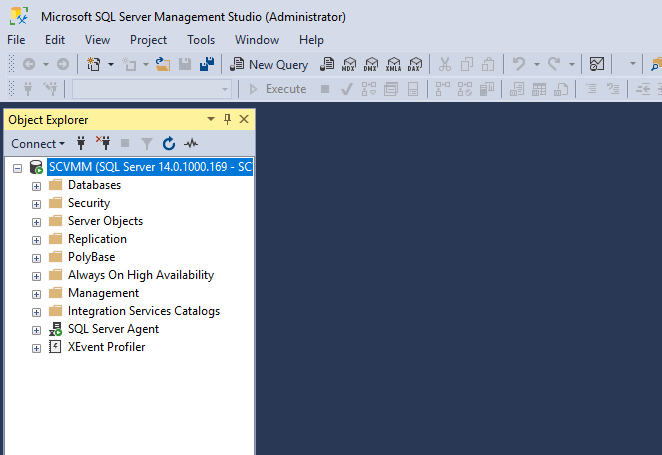
创建一个用于vCenter Server的数据库:在“数据库”一栏点右键,新建数据库
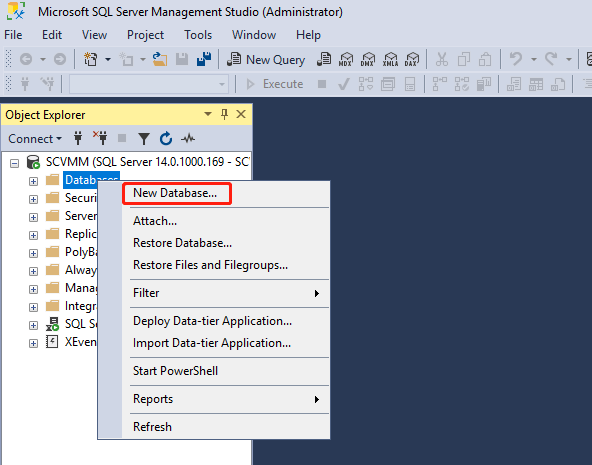
输入数据库名称,点击确定

开始菜单中搜索ODBC
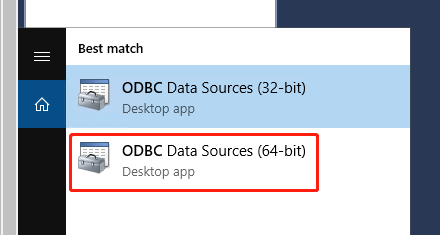
系统DNS下,点击add

选择SQLServer Native Client 11.0

开始创建scvmm Server数据源,输入数据源名称、描述和数据库服务器,单击“下一步”

选择验证方式,保持默认即可,单击“下一步”

选择“更改默认的数据库为”,选择刚创建好的vCenterDB数据库,单击“下一步”
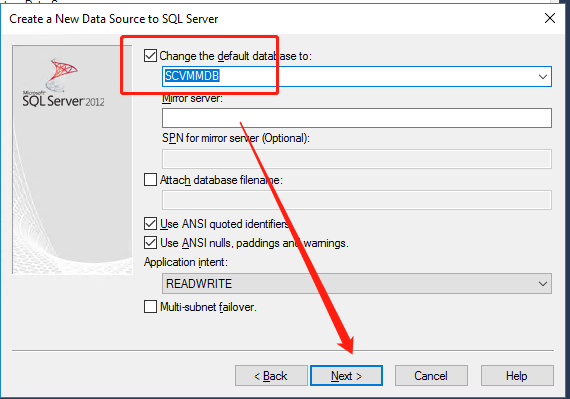
保持默认,点击finish

单击“测试数据源”,如果测试结果显示“测试成功!”就表示创建的数据源可以正常使用了,然后单击“确定”完成数据源创建

为帐户分配“服务登陆”权限
在安装SCVMM之前,需要为SCVMM Server的服务帐户分配“服务登陆”特权,点“开始”-“运行”,输入gpedit.msc后回车,打开“本地组策略”,依次展开“计算机配置”-“Windows配置”-“安全设置”-“本地策略”-“用户权限分配”,然后在右侧双击“作为服务登陆”,在弹出对话框单击“添加用户或组”将帐号加入,确认无误后单击“确定”

修改后我们通过命令强制刷新组策略
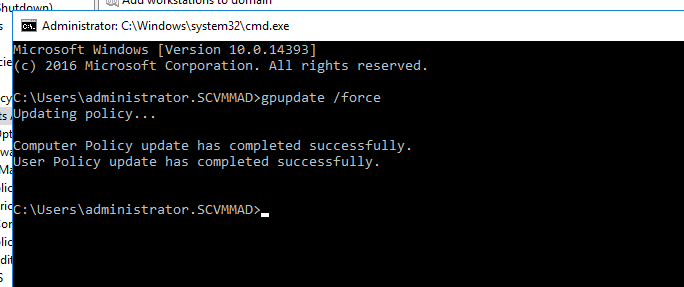
安装SCVMM
Add necessary Roles and Features
- Open Server Manager, then select “Roles” node, right click the mouse and select “Add Roles” item. Add relevant roles which the SCVMM server installation required.
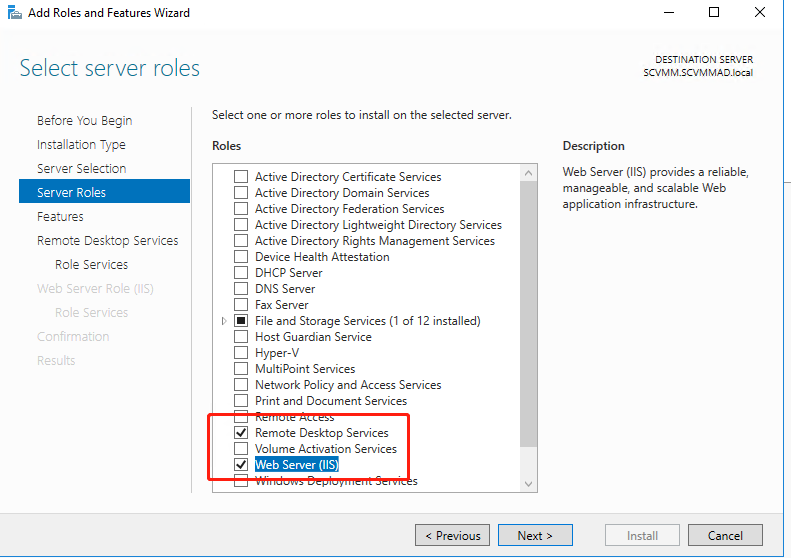
- The following roles need to add before you install, also refer to snapshot below.
- Roles: Remote Desktop Services, Web Server (IIS), Application Server
开始菜单中点击server manager按钮

点击add role and feature
选择remote desktop services & Web Server(IIS) in server roles
add Group Policy Management in add feature
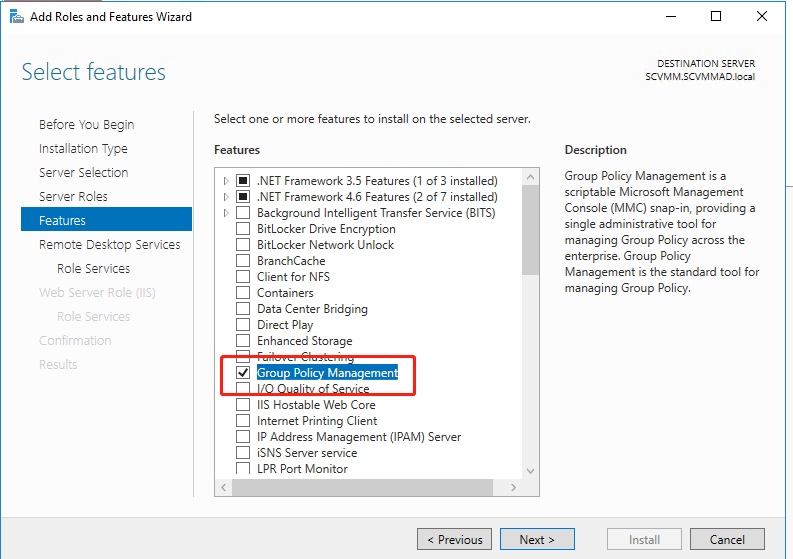
add remote desktop connection broker in role services

role services of web server role
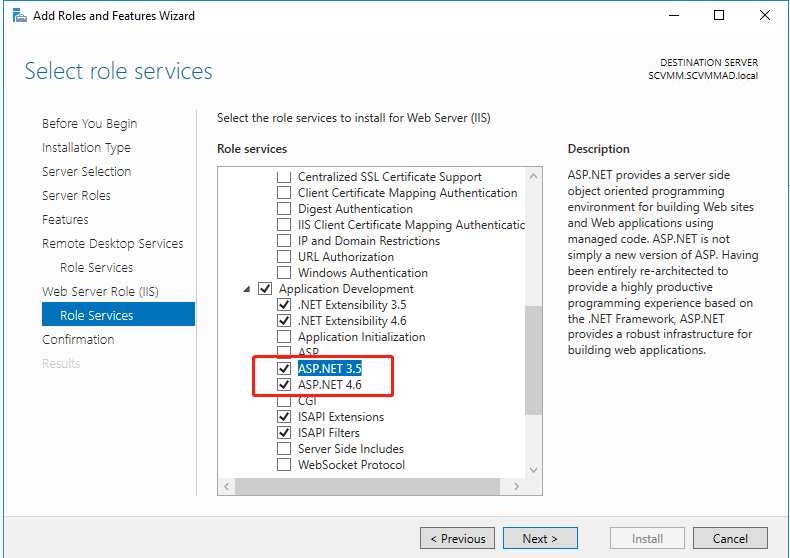

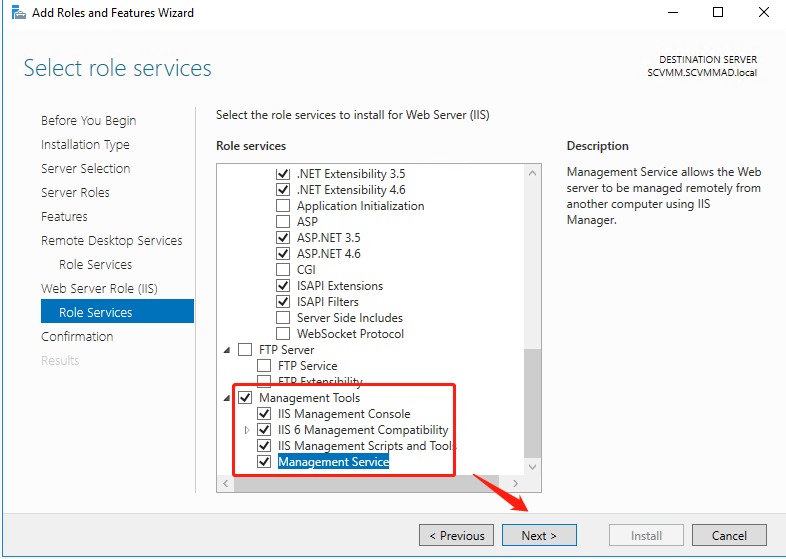
选择restart if required 然后点击finish

安装SCVMM
Download SCVMM installation : https://www.microsoft.com/en-us/evalcenter/evaluate-system-center-2016
This is an exe file.
安装exe文件,然后在安装路劲找到setup application

双击setup, 点击install

Here you need to check “VMM management server” and “VMM console”, but you also check all options based on your requirement. Then click “Next”.
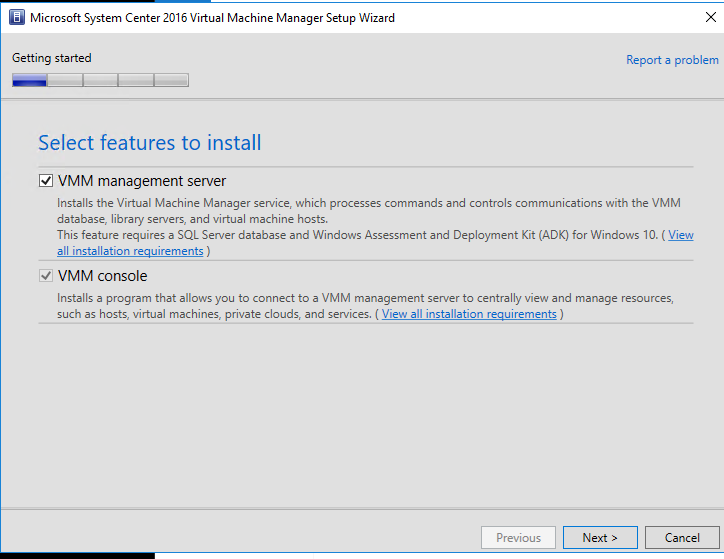
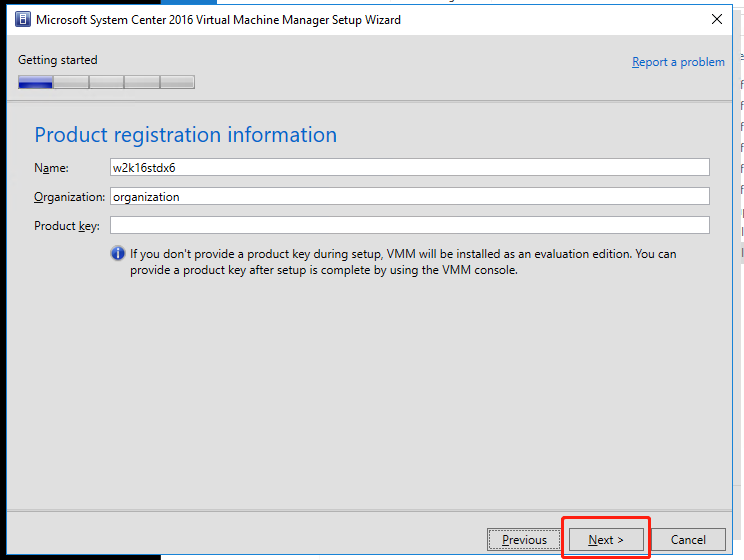
This interface, require you enter a product key, otherwise, the deployment is 180 evaluation version. As have no product key, you can deploy the 180 evaluation version barely, then click “Next”.
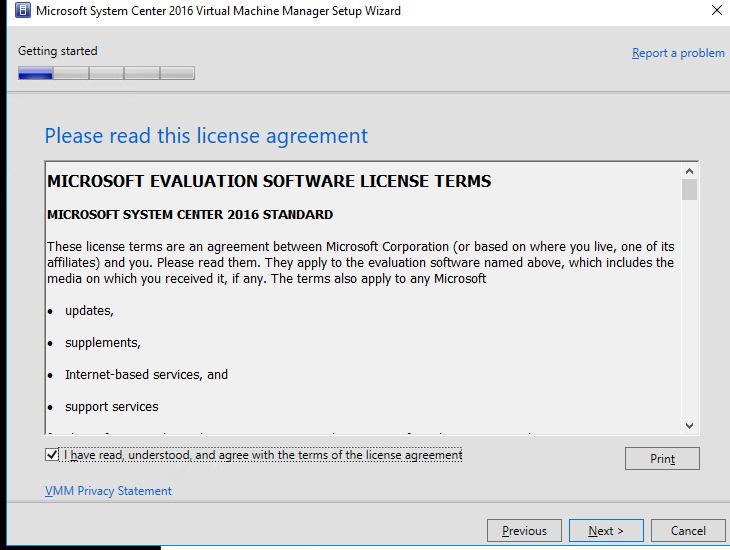
Accept the license agreement. Then click “Next”.
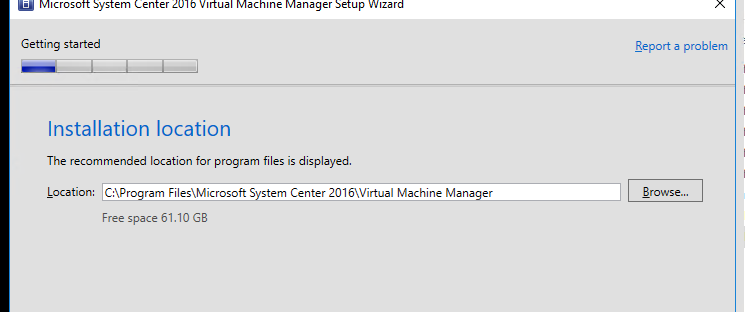
select the install path and click next
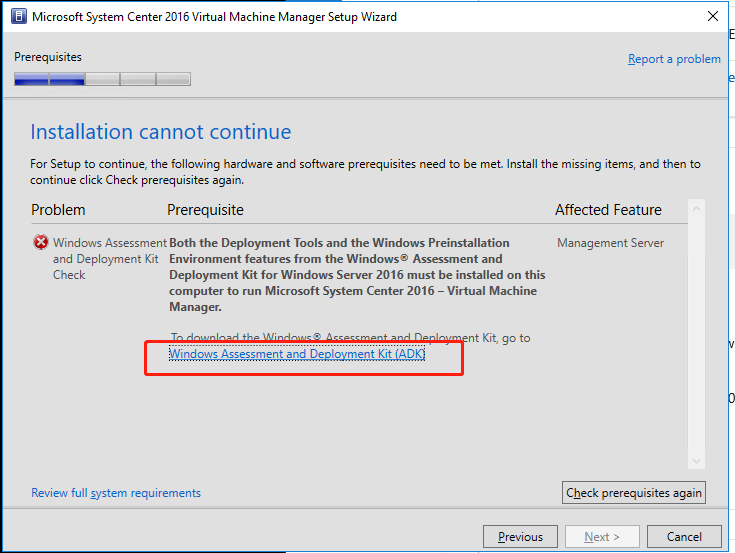
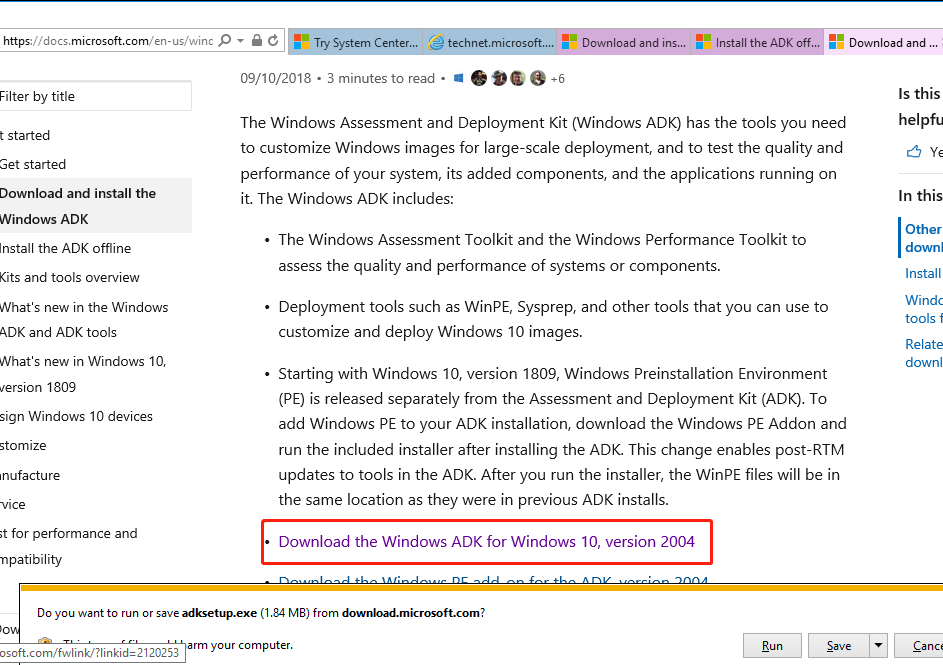
scvmm need to install ADK, click the link and install (win10+winpe installation)
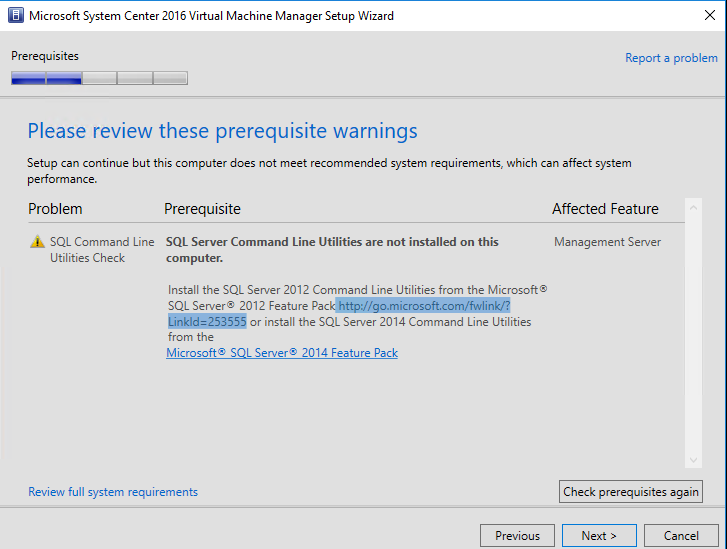
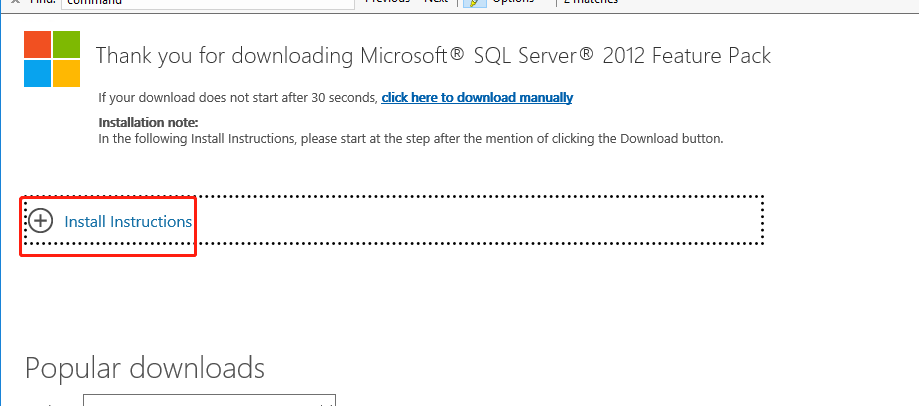
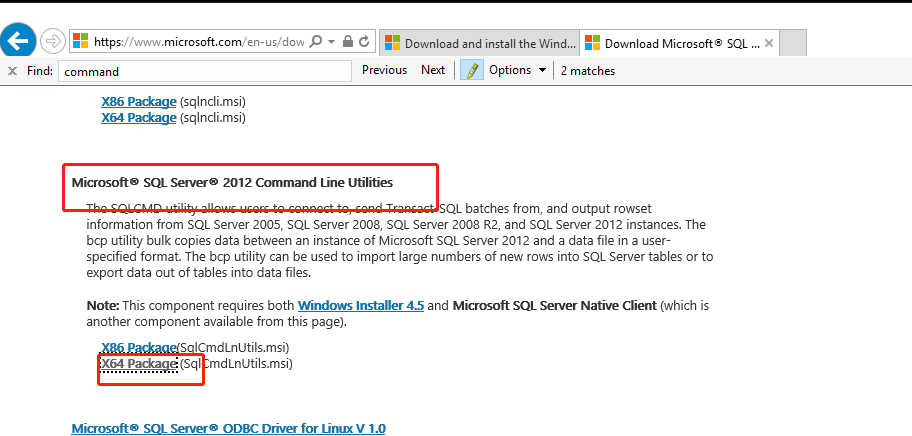
Install SQL Command Line Utilities
And restart VM
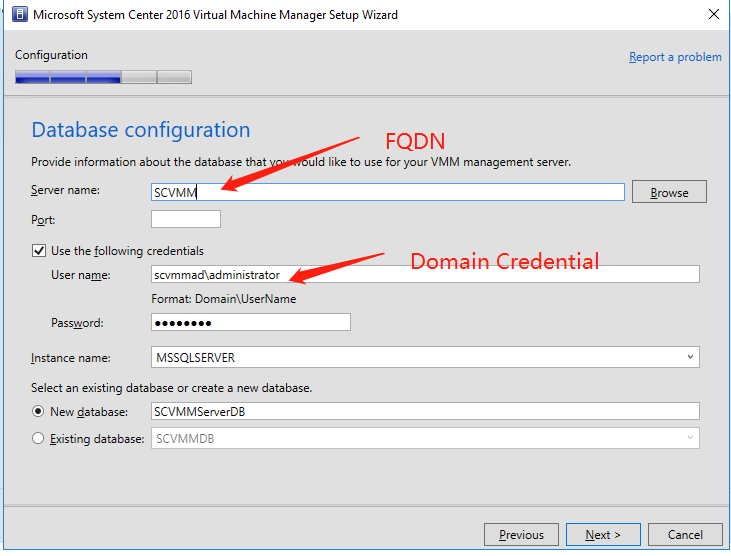
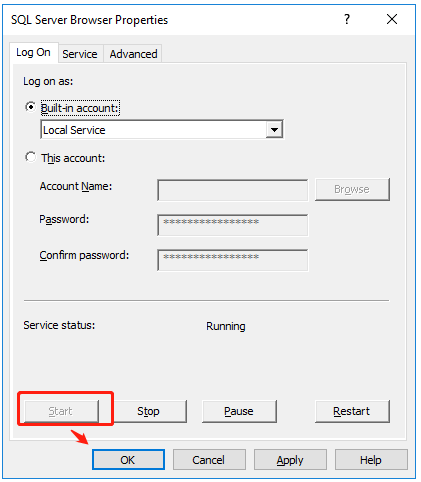
Note: During this step configuration, you need to enable “Named Pipes” and “TCP/IP” protocols for MSSQLSERVER and you also need restart the “SQL Server(MSSQLSERVER)”, start “SQL Server Browser” and “SQL Server Agent(MSSQLSERVER)” in Sql Server Configuration Manager. Please refer to the following snapshots.
- Enable “Name Pipes” and “TCP/IP” protocols.


b. Restart “SQL Server(MSSQLSERVER)”, and start “SQL Server Browser”, “SQL Server Agent(MSSQLSERVER)” in Sql Server Configuration Manager.

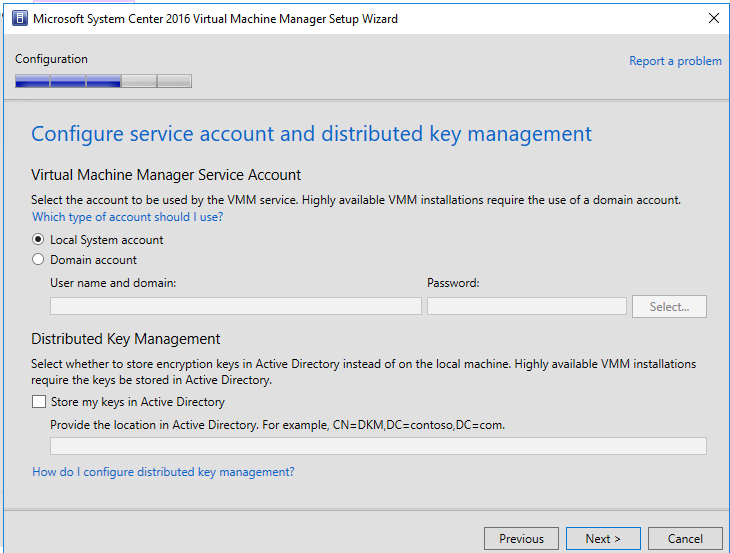
Check “Local System account” and next.
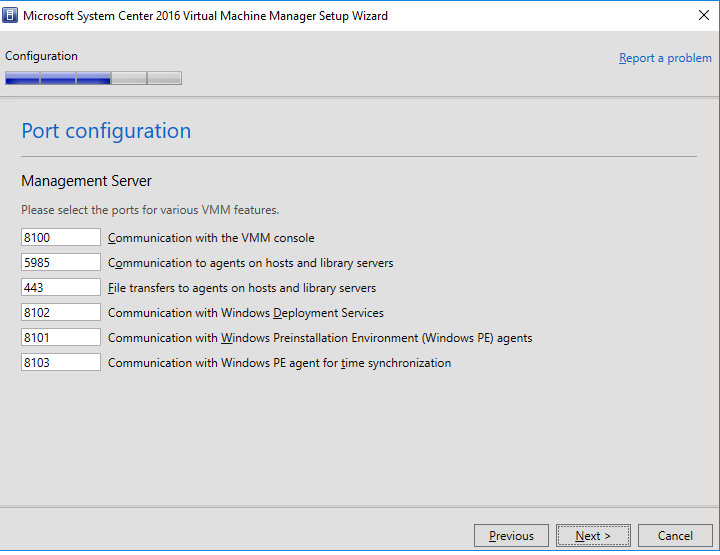
Keep Default and click Next
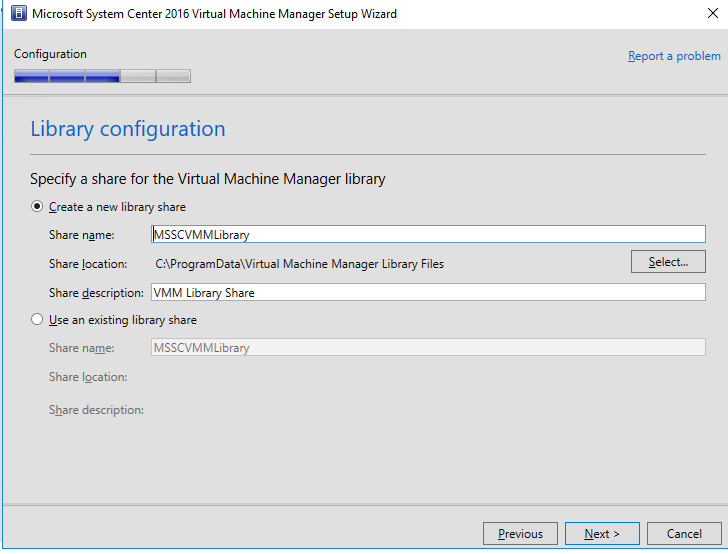
Keep Default and click Next
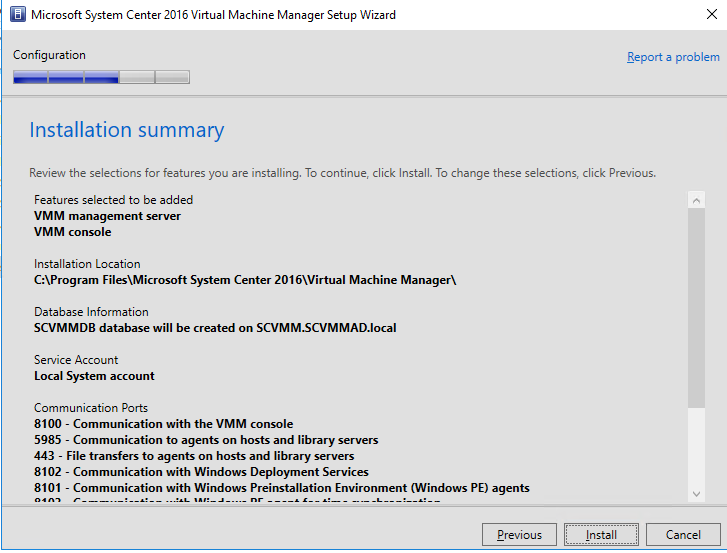
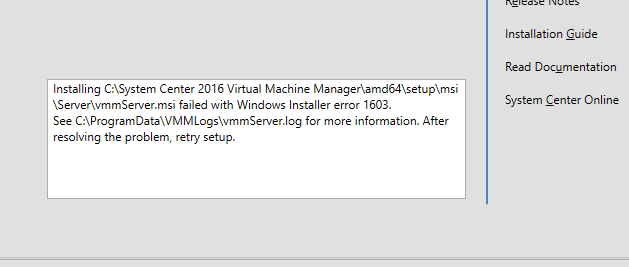
安装时候遇到1603error 查看log 发现报错信息

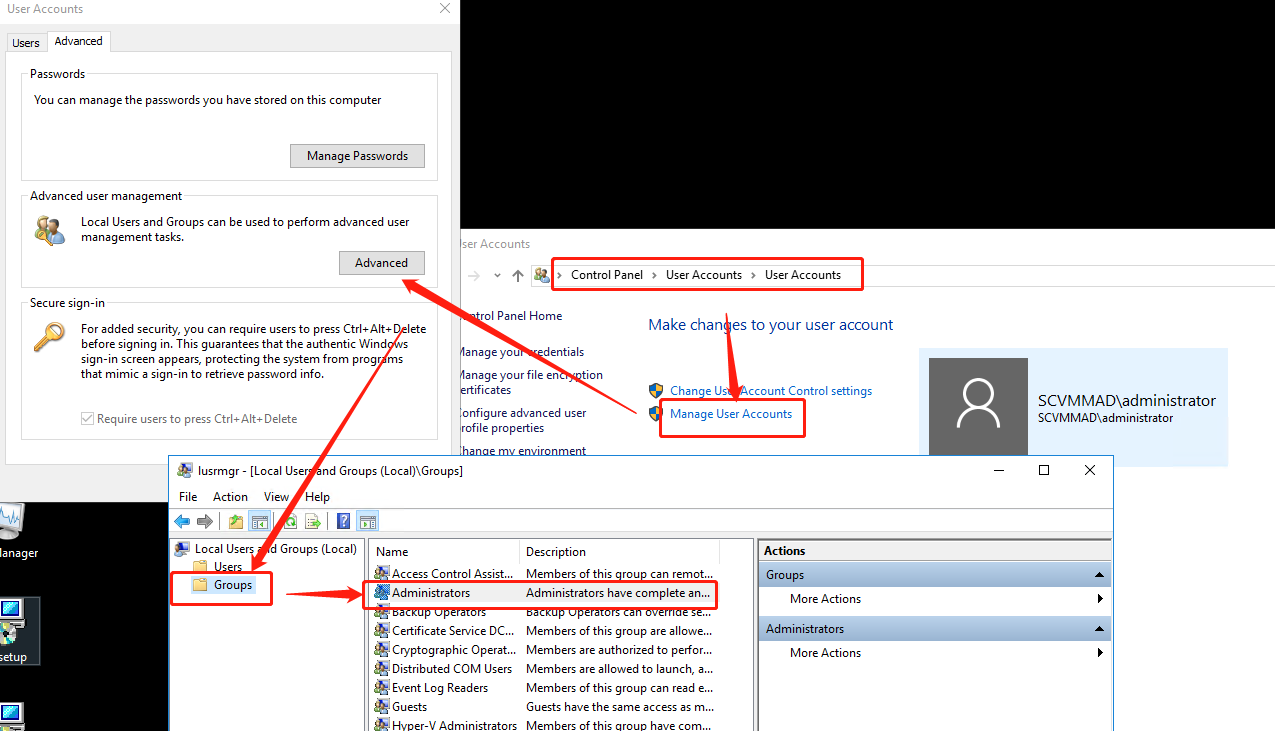
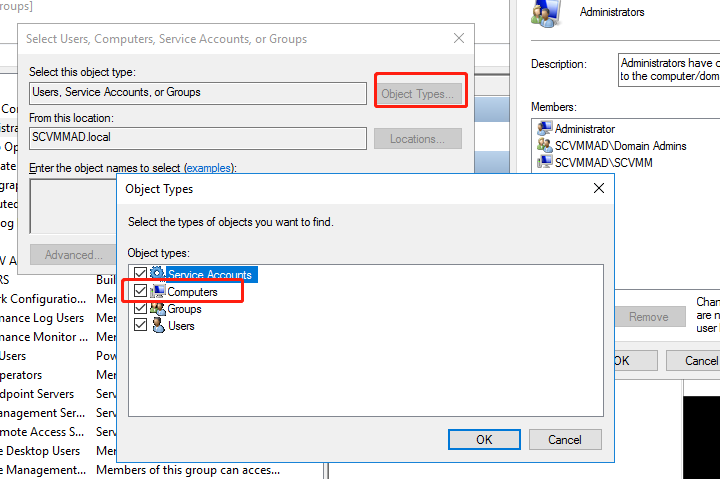
尝试去添加computer到admin,发现是脱预所致,重新加域。重新添加computer
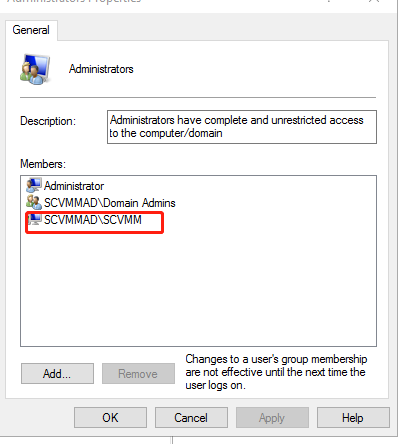
重新安装SCVMM
安装好以后launch console, 用domain credentials登入
2. Create a new host group
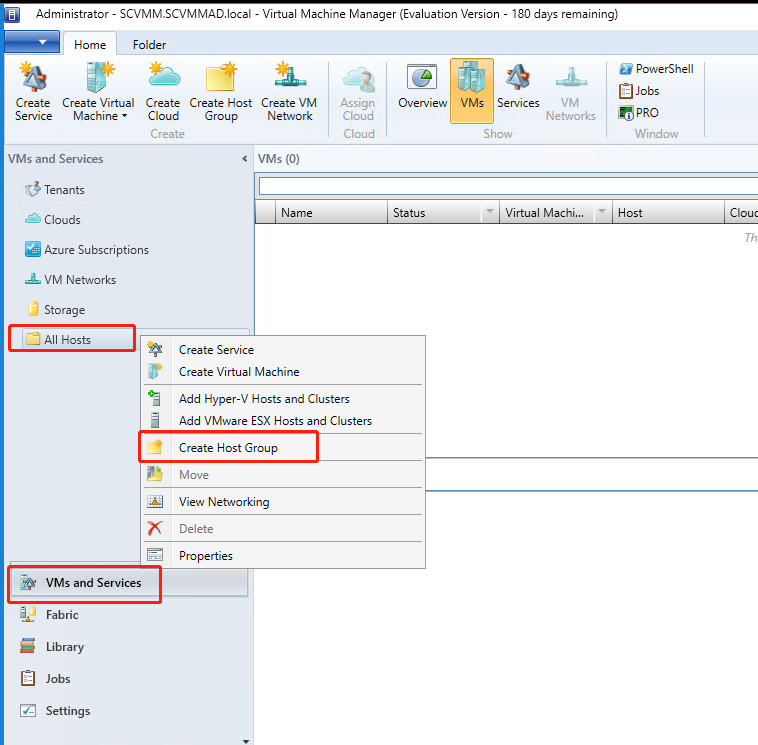
a. Select “VMs and Services” in the bottom left corner and right click the mouse on the “All Hosts”, then select “Create Host Group”.
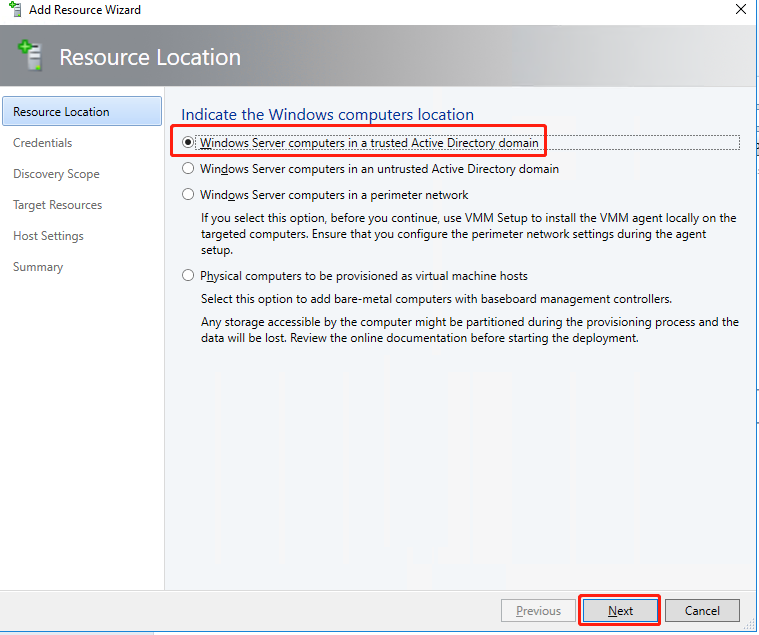
3. Then right click on the host group you created, and select “Add Hyper-V Hosts and Clusters”.

a. Popping up “Add Resource Wizard” window, keeping default, and click next.
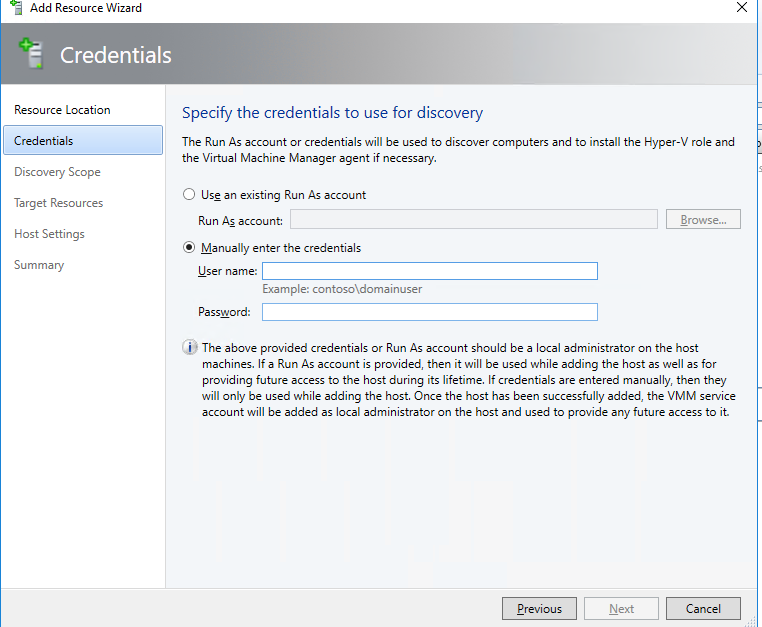
b. Check “Manually enter the credentials”, then input the domain administrator name and password and next.
c. Enter Hyper-V server FQDN in “Computer names” field, other options as default, then next.

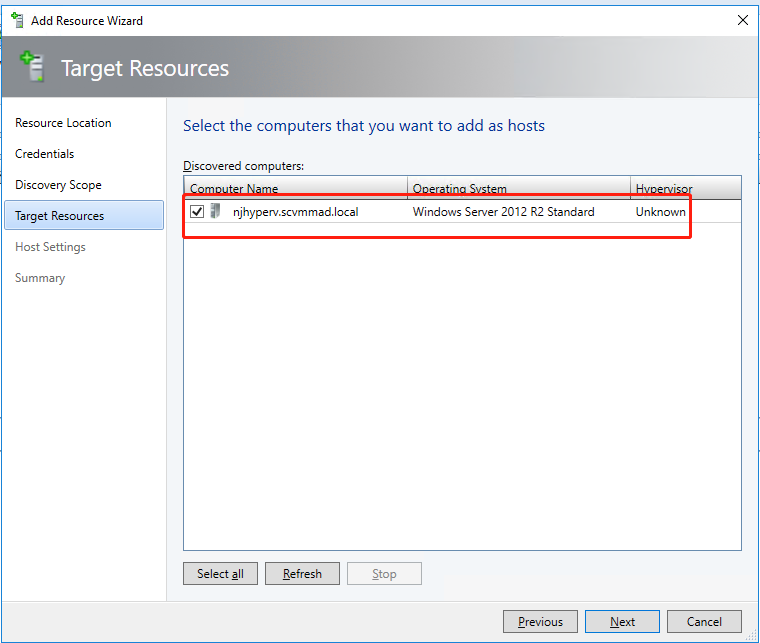
d. Check the Hyper-V server you inputed in the “Discovered computers” field, and next.
e. As default, and next.

f. Click Finish.
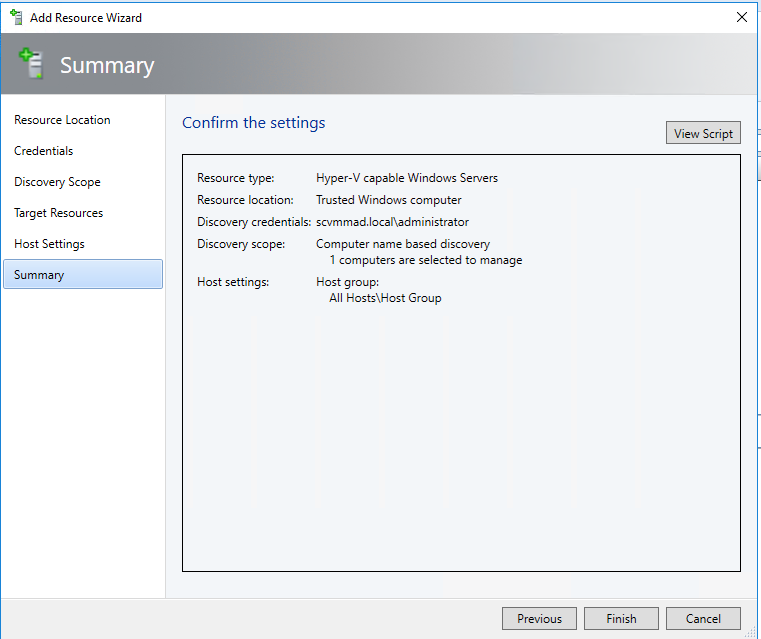
g. Add virtual machine host is in progress.


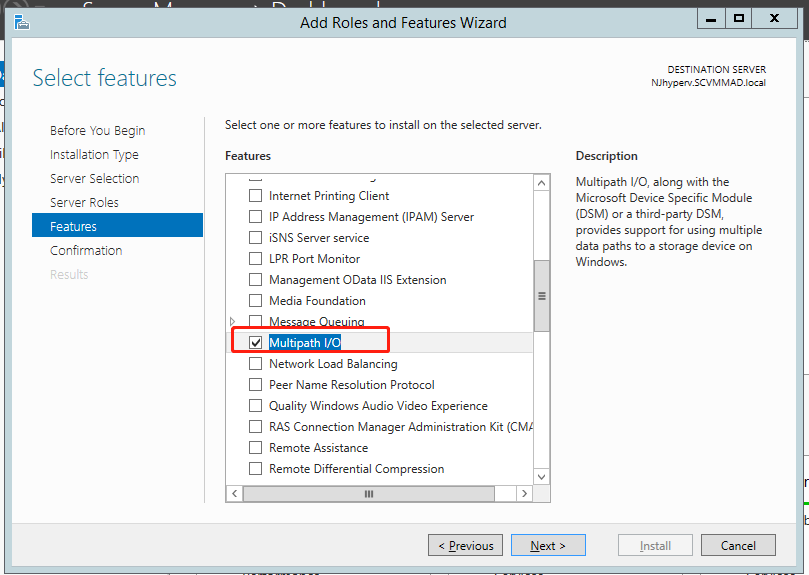
Add feature in hyperv machine
4. Select “Library” in the bottom left corner, and right click the mouse on the “Library Servers”, and select “Add Library Server”.

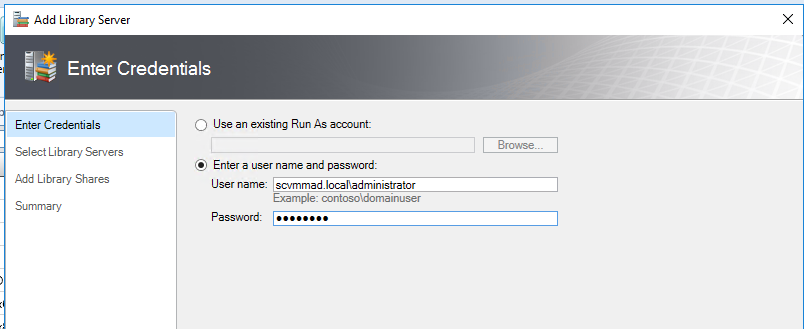
a. Popping up “Add Library Server” window, check “Enter a user name and password”, then enter domain administrator name and password, and next.
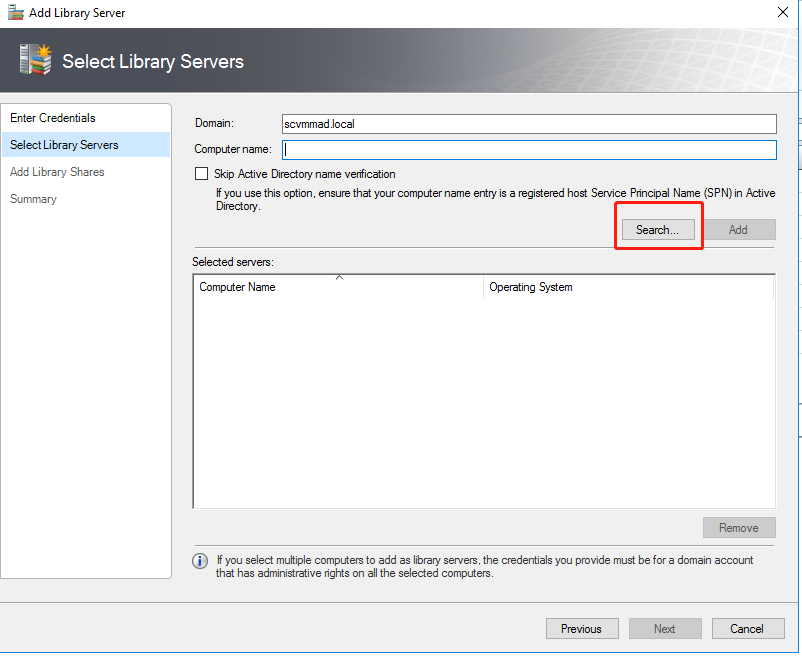
b. Click “Search” button directly.
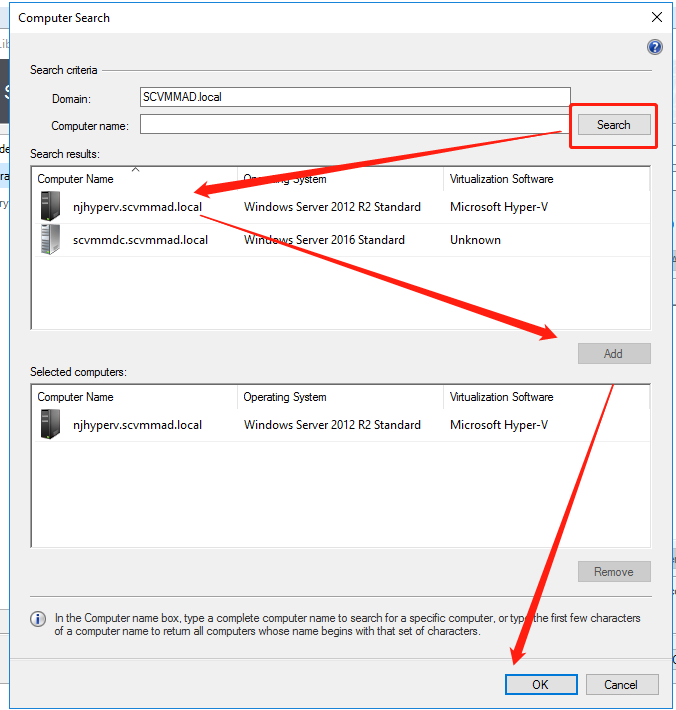
c. Then popping up “ComputerSearch” window, input the Hyper-V server computer name in “Computer name” field. Click “Search” button.
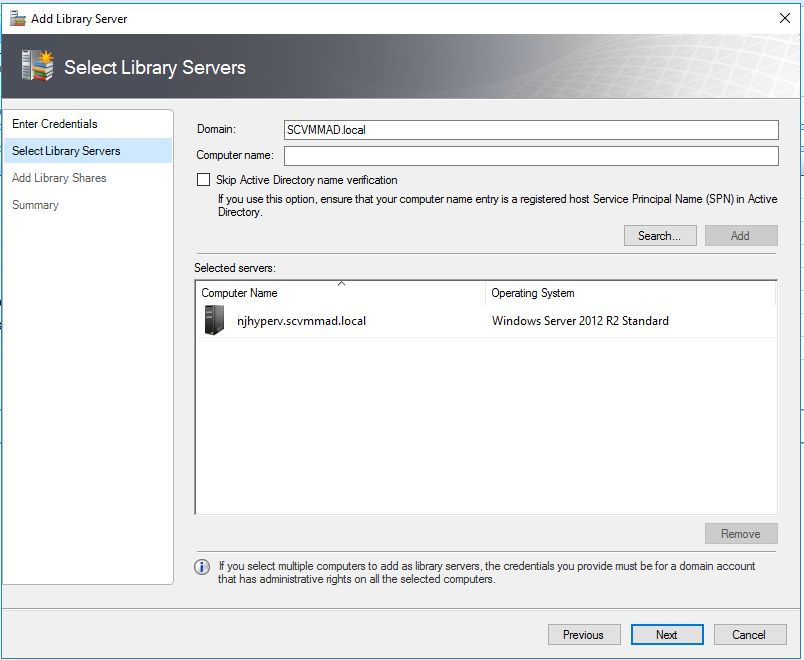
d. When completed above settings, click “Next” to “Add Library Server” window.
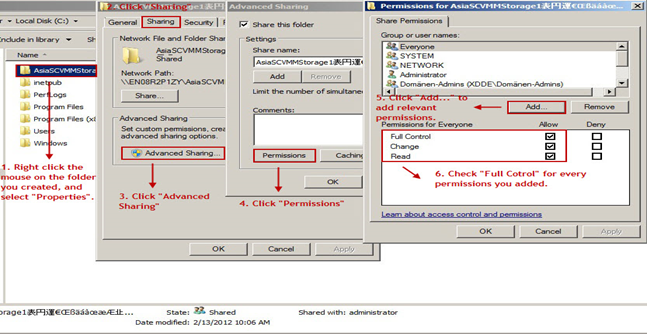
Note: Before you select library shares to add, you must create libraries on the Hyper-V server you will connect. Create steps as follows:
1. Create a new folder and nominate a name testing required, then sharing.
2. So this, you must add relevant permissions for this folder, the follow permissions is necessary.
Relevant permissions: SYSTEM, NETWORK, Domain Admins, Domain Users, Domain Comuters, Administrators.
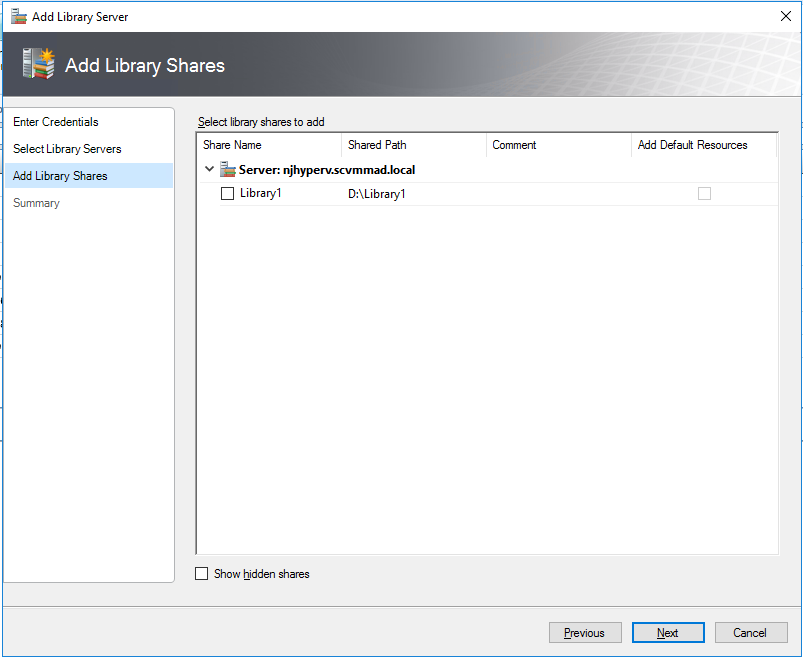
Click “Add Library Servers”

The result
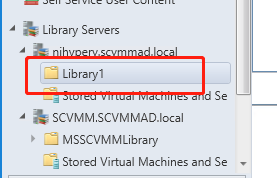
So far, the whole SCVMM2012 Server installation and deployed are all completely.
Note: console连不上,
Also, verify that CredSSP authentication is currently enabled on the service configuration of the target computer njhyperv.scvmmad.local. To enable the CredSSP on the service configuration of the target computer, run the following command from an elevated command line: winrm set winrm/config/service/auth @{CredSSP="true"}
Add host 报错
建议操作:
请确保已安装并运行该代理。请确保已安装并运行WS-Management服务,然后重新启动该代理。
系统提示该错误之后,按照该提示去查看SCVMM代理Agent与WS-Management服务是否正常启动,结果发现一切正常,重新安装Agent照样依旧提示该错误。
后来参考一个老外的KB,问题解决,原因是:
此前此台服务器使用过SCVMM连接过,如果重新部署SCVMM再连接Hyper-V主机的时候,在添加Hyper-V主机时候要勾选“将此主机与此VM环境重新关联(R)”,之后按下一步就OK。
注意:执行此动作之前,请删除掉hyper-V主机上已经成功安装的SCVMM Agent程序,否则还可能依旧出现上述错误。





 浙公网安备 33010602011771号