windows find & findstr (like linux grep)
Use findstr on Windows to find text in files and command outputs
https://www.ghacks.net/2018/05/04/use-findstr-on-windows-to-find-text-in-files-and-elsewhere/
Findstr is a built-in tool of the Windows operating system that you may run from the command line to find text in files or in command line outputs.
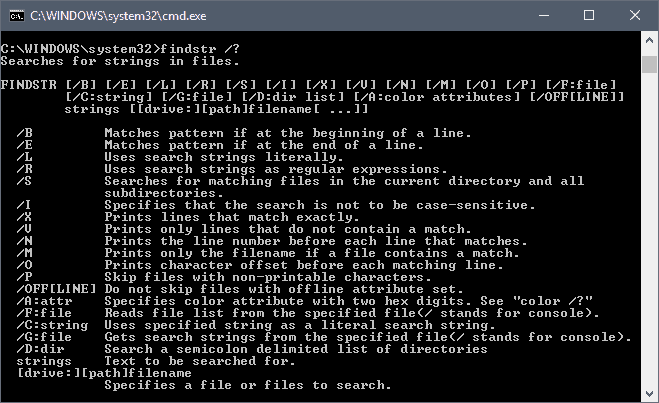
Run findstr /? from the command line to display all parameters and options that "Find String" supports.
Third-party tools like Notepad++, GGRep, or Everything support finding text in files as well.
Using findstr

You can run findstr from the command line or batch files. Open a new command line prompt by tapping on the Windows-key, typing cmd.exe and selecting the result.
Useful parameters:
- /? -- display the help text
- /S -- searches the directory and all subdirectories
- /I -- search is not case sensitive
- /R -- use search strings as regular expressions
- /B -- matches patterns at the beginning of lines
- /P -- skip files with non-printable characters
- /V -- print only lines that contain a match
- /N -- print the line number
Here is a list of examples that you may find useful:
- ipconfig | findstr "192.168" -- The command runs ipconfig and returns any result that matches 192.168. Any other result is ignored.
- netstat | findstr "123.123.123.13" -- Runs the netstat command and returns any result that matches the string (in this case the IP address).
- findstr /c:"windows 10" windows.txt -- Searches the document windows.txt for the string "windows 10"
- findstr "windows 10" windows txt -- Searches for "windows" or "10" in the file.
- findstr "windows" c:\documents\*.* -- Searches any file under c:\documents for the string "windows".
- findstr /s /i Windows *.* -- Searches every file in the current directory and all subdirectories for the word Windows ignoring letter case.
- findstr /b /n /r /c:"^ *FOR" *.bas-- Returns any line that begins with FOR that are preceded by zero or more spaces. Prints the line number as well.
Findstr is a powerful command that you may use to search for strings in files or to filter command line output. You may use it to scan entire directory structures or drives for files that match the selected string or part of it, and to find specified text in command line outputs quickly.
Advanced options include returning content that is found at the beginning or end of lines, using regular expressions, or using wildcards.
How to Use Find from the Windows Command Prompt
https://www.howtogeek.com/206097/how-to-use-find-from-the-windows-command-prompt/
Find is another great command line tool that every Windows user should know about because it can be used to search content of files for specific strings of text.
Find’s Switches and Parameters
As with every command prompt based tool in Windows, there are certain switches and parameters you will need to know in order to use the tools effectively. These are listed and explained below.
- /v – This switch will show any lines that don’t contain the string of words you specified.
- /c – This switch tells the find tool to count how many lines contain your search terms.
- /n – This switch shows the numbers that correspond with the lines.
- /i – This switch tells find to ignore the case of text you are searching for.
In addition to these switches, there are two parameters which you can specify with this tool.
- “String” – The string will be the words you are searching for in your documents. You must always remember to keep this secrtion surrounded by quotation marks, otherwise your command will return an error.
- Pathname – This parameter is where you will specify the location that you want to search. This can be as broad as listing a drive or as specific as defining a single or multiple files. If you don’t specify a path, FIND will ask you for text input or may accept text piped from another command. When you are ready to end the manual text input, you can press “Ctrl + Z.” We will discuss this more later.
Find’s Syntax
Like every tool in windows, you will need to know how to enter your commands. The syntax below is the perfect model.
FIND [SWITCH] "String" [Pathname/s]
Depending on your command, you will receive one of three %errorlevel% responses.
- 0 – The string you were searching for was found.
- 1 – The string you were searching for was not found.
- 2 – This means you had a bad switch or your parameters were incorrect.
Let’s Practice
Before we get started, you should download our three sample text documents which we will use for the test.
These documents each contain a paragraph of text with a few similar word groupings. Once you have downloaded these three documents, you can copy them into any folder on your computer. For the purposes of this tutorial, we will put all three text documents on the desktop.
Now you will need to open up an elevated command prompt window. Open the start menu in Windows 7 and 10 or open the search function in Windows 8 and search for CMD. Next, right-click on it and then press “Run as administrator.” While you don’t need to open an elevated command prompt window, it will help you to avoid any pesky confirmation dialog boxes.

Our tutorial today will cover several simple scenarios which will be elaborated on below.
- Search a single document for a string of words.
- Search multiple documents for the same string of words.
- Count the number of lines in a file or multiple files.
Scenario 1 – Search a single document for a string of words.
Now that you have your three documents downloaded, we will enter a command to search the text file called “exercise” for the words “martin hendrikx.” Use the command shown below. Remember to put your search string in quotation marks and change the path to match the folder where your documents are saved.
find "martin hendrikx" C:\Users\Martin\Desktop\exercise.txt

You will notice that no results showed up. Don’t worry, you did nothing wrong. The reason you have no results is because FIND is looking for an exact match to your search string. Let’s try it again, but this time, let’s add the “/i” switch so that FIND ignores the case of your search string.
find /i "martin hendrikx" C:\Users\Martin\Desktop\exercise.txt

Now you can see that FIND brought up one line that matches the search string, which means it is working. Let’s try this again, but change the search string to “sushi”; if your results look like the image below, you did it right.

Scenario 2 – Search multiple documents for the same string of words.
Now that you know how to do a basic search, let’s try to widen the span of the search. We will now search two of the text files (exercise and sample) for the term “sushi.” Do this by entering the following string. Remember to change the path to match the location of your files and add the “/i” switch so that your search is not case-sensitive.
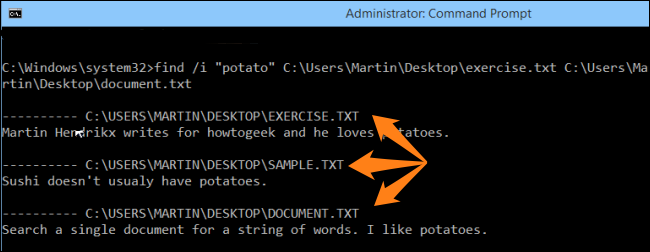
find /i "sushi" C:\Users\Martin\Desktop\exercise.txt C:\Users\Martin\Desktop\sample.txt

You will notice that the search terms were found in both documents and the sentences in which they were found, are listed under their corresponding file names and locations. Try this again, but this time, add the third file to the FIND command and search for the word “potato” instead. Your search results should look like the image below.

Note that the text found in each document is actually “potatoes” which means that even if you type a part of a word, you will see any phrases that contain the search string. Alternatively, you could use this command to check all text files.
find /i "sushi" C:\Users\Martin\Desktop\*.txt
Scenario 3 – Count the number of lines in a file.
If you want to know how many lines there are in a file, you can use the search command below. Remember to add a space between all your switches. In this case, we will replace the pathname with that of the “sample.txt” file. If you want only a number as your result, use this command:
type C:\Users\Martin\Desktop\sample.txt| find "" /v /c

If you want the number and the file info, use this command:
find /v /c “” C:\Users\Martin\Desktop\sample.txt

If you want to count the lines in multiple files on the desktop, use the following command.
find /v /c “” C:\Users\Martin\Desktop\*.txt

You can now experiment with a few different commands and familiarize yourself with the tool. It can help to save a lot of time in the future once you have a system created. Have fun and keep on geeking.
Image Credit: Littlehaulic on Flickr.com


