
es学习
单机10.10.10.141 CentOS Linux release 7.9.2009 (Core)
http://10.10.10.141:9200/_cluster/health
{
-
cluster_name: "docker-cluster",
-
status: "yellow",
-
timed_out: false,
-
number_of_nodes: 1,
-
number_of_data_nodes: 1,
-
active_primary_shards: 21,
-
active_shards: 21,
-
relocating_shards: 0,
-
initializing_shards: 0,
-
unassigned_shards: 1,
-
delayed_unassigned_shards: 0,
-
number_of_pending_tasks: 0,
-
number_of_in_flight_fetch: 0,
-
task_max_waiting_in_queue_millis: 0,
-
active_shards_percent_as_number: 95.45454545454545
}
http://10.10.10.141:9200/
{
-
name: "ffe23a691c76",
-
cluster_name: "docker-cluster",
-
cluster_uuid: "cMn-GZixSL6vyqLBA2sBKQ",
-
version:{
-
number: "7.10.2",
-
build_flavor: "oss",
-
build_type: "docker",
-
build_hash: "747e1cc71def077253878a59143c1f785afa92b9",
-
build_date: "2021-01-13T00:42:12.435326Z",
-
build_snapshot: false,
-
lucene_version: "8.7.0",
-
minimum_wire_compatibility_version: "6.8.0",
-
minimum_index_compatibility_version: "6.0.0-beta1"
-
-
tagline: "You Know, for Search"
}
放入一些素材:
curl -X PUT "localhost:9200/customer/_doc/1?pretty" -H 'Content-Type: application/json' -d'
{
"name": "John Doe"
}
'
返回:
{
"_index" : "customer",
"_type" : "_doc",
"_id" : "1",
"_version" : 1,
"result" : "created",
"_shards" : {
"total" : 2,
"successful" : 1,
"failed" : 0
},
"_seq_no" : 0,
"_primary_term" : 1
}
获取刚才的素材:
curl -X GET "localhost:9200/customer/_doc/1?pretty"
返回:
{
"_index" : "customer",
"_type" : "_doc",
"_id" : "1",
"_version" : 1,
"_seq_no" : 0,
"_primary_term" : 1,
"found" : true,
"_source" : {
"name" : "John Doe"
}
}
下载一个素材包,里面是各种模拟数据信息:
wget www.alexman.cn/accounts.json
导入上面的模拟数据进bank这个index:
curl -H "Content-Type: application/json" -XPOST "localhost:9200/bank/_bulk?pretty&refresh" --data-binary "@accounts.json"
curl "localhost:9200/_cat/indices?v=true"
health status index uuid pri rep docs.count docs.deleted store.size pri.store.size
yellow open hockey 3lRyrdjDRweGFWM02BAvWA 1 1 11 0 7.9kb 7.9kb
yellow open bank Euaugv5bRKqLptFtTq_GQw 1 1 1000 0 379.2kb 379.2kb
green open hockey_0 cRi85BtQRNGR0yjPeMTE6w 4 0 0 0 832b 832b
green open graylog_1 v5Y8H4d2Tq-0htmseiBrUg 4 0 1135828 0 1gb 1gb
green open graylog_0 IJv8pyPKRi-oc2lJ5F16Jw 4 0 336274 0 181.2mb 181.2mb
green open gl-events_0 Pq9Dw2kZTtabM-o-Ftu-PA 4 0 0 0 832b 832b
green open gl-system-events_0 X4LeeNCdQUKxph15fzRiFg 4 0 0 0 832b 832b
yellow open customer W633UJpyQzWNgTD-JhrAbw 1 1 1 0 3.8kb 3.8kb

开始查询:
查询bank索引的所有文档,并按account_number升序排序,默认只返回10条数据:
curl -X GET "localhost:9200/bank/_search?pretty" -H 'Content-Type: application/json' -d'
{
"query": { "match_all": {} },
"sort": [
{ "account_number": "asc" }
]
}
'
截图:

The response also provides the following information about the search request:
took– how long it took Elasticsearch to run the query, in millisecondstimed_out– whether or not the search request timed out_shards– how many shards were searched and a breakdown of how many shards succeeded, failed, or were skipped.max_score– the score of the most relevant document foundhits.total.value- how many matching documents were foundhits.sort- the document’s sort position (when not sorting by relevance score)hits._score- the document’s relevance score (not applicable when usingmatch_all)
上面案例的翻页功能,比如10-19,也就是从10开始取10个:
curl -X GET "localhost:9200/bank/_search?pretty" -H 'Content-Type: application/json' -d'
{
"query": { "match_all": {} },
"sort": [
{ "account_number": "asc" }
],
"from": 10,
"size": 10
}
'
搜索案例:
match方法搜索地址有mill 或者 lane的:
curl -X GET "localhost:9200/bank/_search?pretty" -H 'Content-Type: application/json' -d'
{
"query": { "match": { "address": "mill lane" } }
}
'
match_phrase方法搜索短语mill lane:
curl -X GET "localhost:9200/bank/_search?pretty" -H 'Content-Type: application/json' -d'
{
"query": { "match_phrase": { "address": "mill lane" } }
}
'
更复杂的查询:
使用must match必须符合
should match 渴望符合
must not match 不要符合
例子:
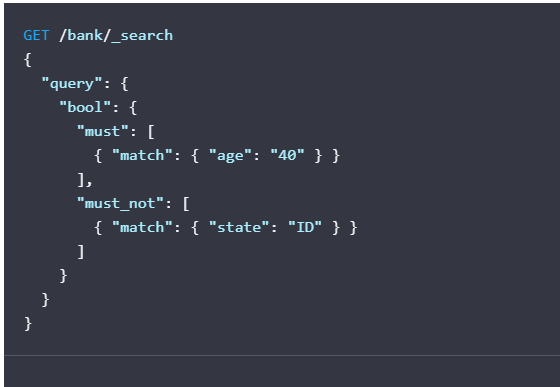
找出bank索引 40岁的客户 但是不住在Idaho(ID)的客户
curl -X GET "localhost:9200/bank/_search?pretty" -H 'Content-Type: application/json' -d'
{
"query": {
"bool": {
"must": [
{ "match": { "age": "40" } }
],
"must_not": [
{ "match": { "state": "ID" } }
]
}
}
}
'
例子:
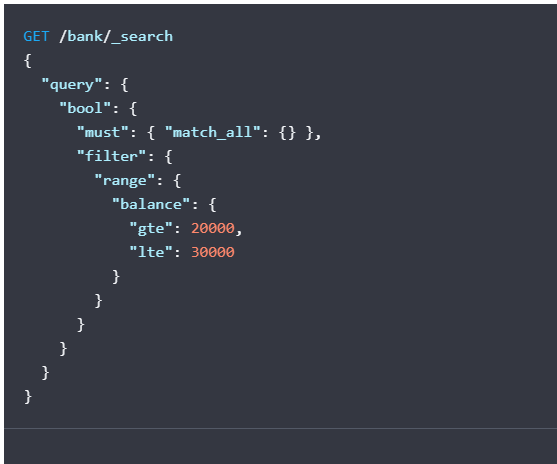
搜索账户余额在20000到30000元的人:
curl -X GET "localhost:9200/bank/_search?pretty" -H 'Content-Type: application/json' -d'
{
"query": {
"bool": {
"must": { "match_all": {} },
"filter": {
"range": {
"balance": {
"gte": 20000,
"lte": 30000
}
}
}
}
}
}
'
用aggregation分析结果:
在德州有多少用户?田纳西州的平均存款是多少?
例子:
列出bank索引里帐号数最多的十个洲:
curl -X GET "localhost:9200/bank/_search?pretty" -H 'Content-Type: application/json' -d'
{
"size": 0,
"aggs": {
"group_by_state": {
"terms": {
"field": "state.keyword"
}
}
}
}
'
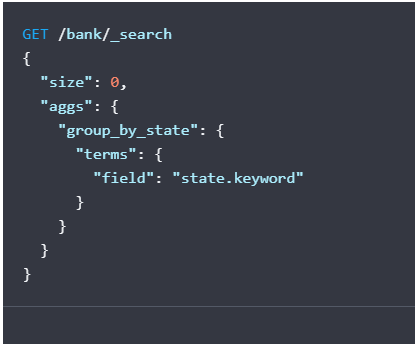
因为把size设置成了0,所以返回结果,只有聚合结果的那一块,而没有原始数据。
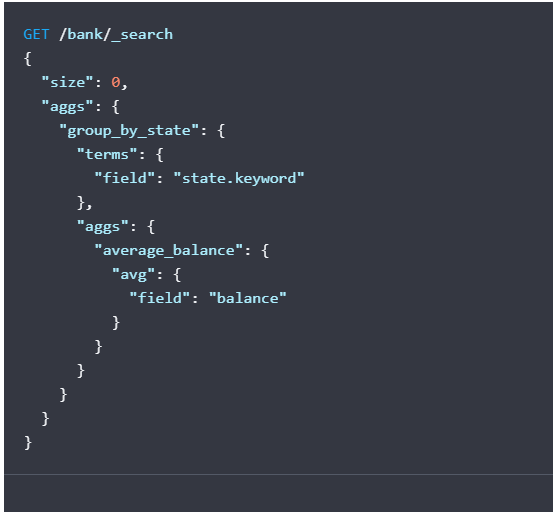
例子:
在上面例子中,加上平均存款的条件 也就是统计每个州的帐号数+每个州的平均存款:
curl -X GET "localhost:9200/bank/_search?pretty" -H 'Content-Type: application/json' -d'
{
"size": 0,
"aggs": {
"group_by_state": {
"terms": {
"field": "state.keyword"
},
"aggs": {
"average_balance": {
"avg": {
"field": "balance"
}
}
}
}
}
}
'
例子:
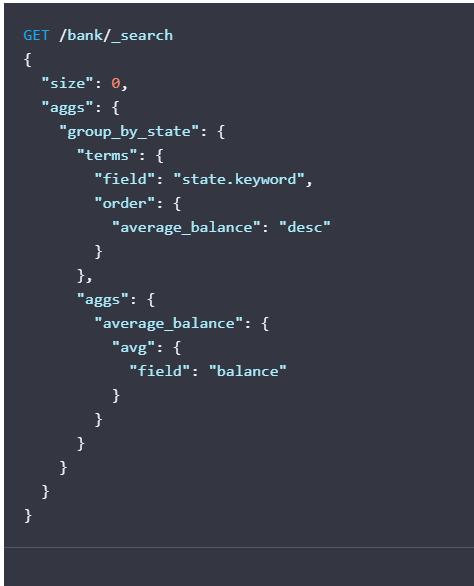
在上面例子的基础上,按照平均存款降序排序,在terms里加入order条件:
curl -X GET "localhost:9200/bank/_search?pretty" -H 'Content-Type: application/json' -d'
{
"size": 0,
"aggs": {
"group_by_state": {
"terms": {
"field": "state.keyword",
"order": {
"average_balance": "desc"
}
},
"aggs": {
"average_balance": {
"avg": {
"field": "balance"
}
}
}
}
}
}
'
安装kibana docker版本:
mkdir kibana
cd kibana
vi docker-compose.yml
version: '2.2'
services:

  kib01:
    image: docker.elastic.co/kibana/kibana:7.10.2
    container_name: kib01
    ports:
      - 5601:5601
    environment:
      ELASTICSEARCH_URL: http://10.10.10.141:9200
      ELASTICSEARCH_HOSTS: '["http://10.10.10.141:9200"]'
    networks:
      - elastic


networks:
  elastic:
    driver: bridge
docker-compose up -d
elaticsearch 备份和恢复:
工具1:
https://github.com/elasticsearch-dump/elasticsearch-dump
Installing
(local)

npm install elasticdump
./bin/elasticdump
(global)

npm install elasticdump -g
elasticdump
Use
Standard Install
Elasticdump works by sending an input to an output. Both can be either an elasticsearch URL or a File.

Elasticsearch:

format: {protocol}://{host}:{port}/{index}
example: http://127.0.0.1:9200/my_index
File:

format: {FilePath}
example: /Users/evantahler/Desktop/dump.json
Stdio:

format: stdin / stdout
format: $
You can then do things like:

# Copy an index from production to staging with analyzer and mapping:
elasticdump \
  --input=http://production.es.com:9200/my_index \
  --output=http://staging.es.com:9200/my_index \
  --type=analyzer
elasticdump \
  --input=http://production.es.com:9200/my_index \
  --output=http://staging.es.com:9200/my_index \
  --type=mapping
elasticdump \
  --input=http://production.es.com:9200/my_index \
  --output=http://staging.es.com:9200/my_index \
  --type=data

# Backup index data to a file:
elasticdump \
  --input=http://production.es.com:9200/my_index \
  --output=/data/my_index_mapping.json \
  --type=mapping
elasticdump \
  --input=http://production.es.com:9200/my_index \
  --output=/data/my_index.json \
  --type=data

# Backup and index to a gzip using stdout:
elasticdump \
  --input=http://production.es.com:9200/my_index \
  --output=$ \
  | gzip > /data/my_index.json.gz

# Backup the results of a query to a file
elasticdump \
  --input=http://production.es.com:9200/my_index \
  --output=query.json \
  --searchBody="{\"query\":{\"term\":{\"username\": \"admin\"}}}"

# Specify searchBody from a file
elasticdump \
  --input=http://production.es.com:9200/my_index \
  --output=query.json \
  --searchBody=@/data/searchbody.json

# Copy a single shard data:
elasticdump \
  --input=http://es.com:9200/api \
  --output=http://es.com:9200/api2 \
  --input-params="{\"preference\":\"_shards:0\"}"

# Backup aliases to a file
elasticdump \
  --input=http://es.com:9200/index-name/alias-filter \
  --output=alias.json \
  --type=alias

# Import aliases into ES
elasticdump \
  --input=./alias.json \
  --output=http://es.com:9200 \
  --type=alias

# Backup templates to a file
elasticdump \
  --input=http://es.com:9200/template-filter \
  --output=templates.json \
  --type=template

# Import templates into ES
elasticdump \
  --input=./templates.json \
  --output=http://es.com:9200 \
  --type=template

# Split files into multiple parts
elasticdump \
  --input=http://production.es.com:9200/my_index \
  --output=/data/my_index.json \
  --fileSize=10mb

# Import data from S3 into ES (using s3urls)
elasticdump \
  --s3AccessKeyId "${access_key_id}" \
  --s3SecretAccessKey "${access_key_secret}" \
  --input "s3://${bucket_name}/${file_name}.json" \
  --output=http://production.es.com:9200/my_index

# Export ES data to S3 (using s3urls)
elasticdump \
  --s3AccessKeyId "${access_key_id}" \
  --s3SecretAccessKey "${access_key_secret}" \
  --input=http://production.es.com:9200/my_index \
  --output "s3://${bucket_name}/${file_name}.json"

# Import data from MINIO (s3 compatible) into ES (using s3urls)
elasticdump \
  --s3AccessKeyId "${access_key_id}" \
  --s3SecretAccessKey "${access_key_secret}" \
  --input "s3://${bucket_name}/${file_name}.json" \
  --output=http://production.es.com:9200/my_index
  --s3ForcePathStyle true
  --s3Endpoint https://production.minio.co

# Export ES data to MINIO (s3 compatible) (using s3urls)
elasticdump \
  --s3AccessKeyId "${access_key_id}" \
  --s3SecretAccessKey "${access_key_secret}" \
  --input=http://production.es.com:9200/my_index \
  --output "s3://${bucket_name}/${file_name}.json"
  --s3ForcePathStyle true
  --s3Endpoint https://production.minio.co

# Import data from CSV file into ES (using csvurls)
elasticdump \
  # csv:// prefix must be included to allow parsing of csv files
  # --input "csv://${file_path}.csv" \
  --input "csv:///data/cars.csv"
  --output=http://production.es.com:9200/my_index \
  --csvSkipRows 1    # used to skip parsed rows (this does not include the headers row)
  --csvDelimiter ";" # default csvDelimiter is ','
Non-Standard Install
If Elasticsearch is not being served from the root directory the --input-index and --output-index are required. If they are not provided, the additional sub-directories will be parsed for index and type.

Elasticsearch:

format: {protocol}://{host}:{port}/{sub}/{directory...}
example: http://127.0.0.1:9200/api/search
# Copy a single index from a elasticsearch:
elasticdump \
  --input=http://es.com:9200/api/search \
  --input-index=my_index \
  --output=http://es.com:9200/api/search \
  --output-index=my_index \
  --type=mapping

# Copy a single type:
elasticdump \
  --input=http://es.com:9200/api/search \
  --input-index=my_index/my_type \
  --output=http://es.com:9200/api/search \
  --output-index=my_index \
  --type=mapping
Docker install
If you prefer using docker to use elasticdump, you can download this project from docker hub:

docker pull elasticdump/elasticsearch-dump
Then you can use it just by :

using docker run --rm -ti elasticdump/elasticsearch-dump
you'll need to mount your file storage dir -v <your dumps dir>:<your mount point> to your docker container
Example:

# Copy an index from production to staging with mappings:
docker run --rm -ti elasticdump/elasticsearch-dump \
  --input=http://production.es.com:9200/my_index \
  --output=http://staging.es.com:9200/my_index \
  --type=mapping
docker run --rm -ti elasticdump/elasticsearch-dump \
  --input=http://production.es.com:9200/my_index \
  --output=http://staging.es.com:9200/my_index \
  --type=data

# Backup index data to a file:
docker run --rm -ti -v /data:/tmp elasticdump/elasticsearch-dump \
  --input=http://production.es.com:9200/my_index \
  --output=/tmp/my_index_mapping.json \
  --type=data

If you need to run using localhost as your ES host:
docker run --net=host --rm -ti elasticdump/elasticsearch-dump \
  --input=http://staging.es.com:9200/my_index \
  --output=http://localhost:9200/my_index \
  --type=data
备份例子:
注意:先改number_of_shards
curl -X PUT "10.10.10.141:9200/alexgraylog3?pretty" -H 'Content-Type: application/json' -d'
{
"settings" : {
"number_of_shards" : 5,
"number_of_replicas":0
}
}
'
导出到文件:
docker run --rm -ti -v /data:/tmp elasticdump/elasticsearch-dump --input=http://10.10.10.141:9200/graylog_1 --output=/tmp/my_index_mapping.json --limit 10000 --type=data
docker run --rm -ti -v /data:/tmp elasticdump/elasticsearch-dump --input=http://10.10.10.141:9200/graylog_1 --output=/tmp/my_index_mapping.json --limit 10000 --maxRows 100000 --type=data #十万行一个文件
my_index_mapping.split-0.json my_index_mapping.split-3.json my_index_mapping.split-6.json my_index_mapping.split-9.json
my_index_mapping.split-1.json my_index_mapping.split-4.json my_index_mapping.split-7.json
my_index_mapping.split-2.json my_index_mapping.split-5.json my_index_mapping.split-8.json
从文件导入:
docker run --rm -ti -v /data:/tmp elasticdump/elasticsearch-dump --input=/tmp/my_index_mapping.json --output=http://10.10.10.141:9200/alexgraylog1 --limit 10000 --type=data
docker run --rm -ti -v /data:/tmp elasticdump/elasticsearch-dump --input=/tmp/my_index_mapping.json --output=http://10.10.10.141:9200/alexgraylog1 --limit 3000 --type=data
cd /data #分割文件导入
for i in *;do docker run --rm -ti -v /data:/tmp elasticdump/elasticsearch-dump --input=/tmp/$i --output=http://10.10.10.141:9200/alexgraylog1 --limit 3000 --size 5000 --maxRows 1000 --type=data;done
for i in alex*;do docker run --rm -ti -v /data:/tmp elasticdump/elasticsearch-dump --input=/tmp/$i --output=http://10.10.10.141:9200/alexgraylog2 --limit 5000 --type=data;done
监控:
http://10.10.10.141:9200/_nodes/stats #这里可以查到press
elasticsearch-head
docker run -d -p 9100:9100 mobz/elasticsearch-head:5
sed -i "s/x-www-form-urlencoded/json/" _site/vendor.js
管理索引:
修改副本数量:
curl -X PUT "10.10.10.141:9200/alexgraylog2/_settings?pretty" -H 'Content-Type: application/json' -d'
{
"index" : {
"number_of_replicas" : 1
}
}
'
新增一台节点:
root@ubuntu:~# cat /etc/elasticsearch/elasticsearch.yml | grep -v \#
cluster.name: graylog
node.name: graylog4
path.data: /var/lib/elasticsearch
path.logs: /var/log/elasticsearch
network.host: 192.168.40.139
http.port: 9200
discovery.seed_hosts: ["192.168.40.136:9300", "192.168.40.137:9300","192.168.40.138:9300"]
gateway.recover_after_nodes: 2
某台机器关停:
1.关闭集群自动索引分片分配
curl -X PUT "192.168.40.136:9200/_cluster/settings" -H 'Content-Type: application/json' -d'
{
"persistent": {
"cluster.routing.allocation.enable": "none"
}
}
'
2.迁移graylog4上分片到graylog1,graylog2节点
curl -X POST "192.168.40.136:9200/_cluster/reroute" -H 'Content-Type: application/json' -d'
{
"commands" : [
{
"move" : {
"index" : "graylog_0", "shard" : 3,
"from_node" : "graylog4", "to_node" : "graylog1"
}
}
]
}
'
3.关闭节点
curl -X POST "192.168.40.136:9200/_cluster/voting_config_exclusions?node_names=graylog4&pretty"
systemctl stop elasticseach #准备关闭的那台机器执行
4.开启索引自动分片
curl -X PUT "192.168.40.136:9200/_cluster/settings" -H 'Content-Type: application/json' -d'
{
"persistent": {
"cluster.routing.allocation.enable": "all"
}
}
'
5.查看目前的排除列表:
http://192.168.40.136:9200/_cluster/state?filter_path=metadata.cluster_coordination.voting_config_exclusions
6.删除排除列表:
# Wait for all the nodes with voting configuration exclusions to be removed from
# the cluster and then remove all the exclusions, allowing any node to return to
# the voting configuration in the future.
curl -X DELETE "localhost:9200/_cluster/voting_config_exclusions?pretty"
# Immediately remove all the voting configuration exclusions, allowing any node
# to return to the voting configuration in the future.
curl -X DELETE "localhost:9200/_cluster/voting_config_exclusions?wait_for_removal=false&pretty"

