玩转Node.js-Koa基础知识
Koa介绍
Koa 是一个新的 web 框架,由 Express 幕后的原班人马打造, 致力于成为 web 应用和 API 开发领域中的一个更小、更富有表现力、更健壮的基石。 通过利用 async 函数,Koa 帮你丢弃回调函数,并有力地增强错误处理。 Koa 并没有捆绑任何中间件, 而是提供了一套优雅的方法,帮助您快速而愉快地编写服务端应用程序。
就像你很会原生,但是使用原生的API操作dom会比较麻烦,所以你才会用jQuery,Koa的出现也是如此。
Koa是一个类似Vue的渐进式的Node.js的Web开发框架,为什么说他是渐进式的?因为Koa框架本身的东西很少,只是对原生http部分做了封装,让我们可以写更少的代码就可以实现原生http的功能,这部分变得很高效,但是如果我们要使用更多的功能,比如静态资源托管、路由、模版引擎、body解析、formData解析,这些都是项目开发中经常用到的功能,Koa框架本身没有给我们集成进来,需要我们自己去寻找相应的中间件来解决问题。
因此可以说Koa的生态就是靠它的中间件支撑起来的。
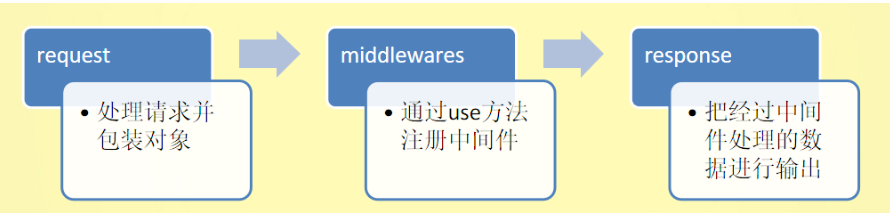
Koa精简的地方就在于他封装了图中的request和response方法,middlewares部分我们需要引入对应的中间件来完成,常用的中间件如下:
- koa-static-cache:静态文件代理服务
- koa-router:路由
- koa-swig:模版引擎
- koa-bodyparse:body解析
- koa-multer:formData解析
这篇博客也是围绕这几个中间件为核心来讲解的。
Koa安装与使用
安装Koa:npm i koa
Koa基本使用。
const Koa = require('koa'); // 本质还是http, 包装过的http

// 创建一个http服务器,监听请求,类似http.createServer()
const app = new Koa();

// 注册中间件函数
app.use((ctx, next) => {
  ctx.body = "Hello Koa";
})

// 监听当前机器的地址以及端口
app.listen(80, () => {
  console.log("[+] 服务器启动成功.")
});
Application
当前应用程序对象,即 new Koa() 得到的实例对象,保存了应用全局状态以及其他对象,后面的Context、Reqeust、Response对象都是该对象下的子对象。
中间件
- .use(callbakc) callback函数中有2个参数,context和next,每一次请求都会包装一个context对象,每一个中间件都是一个迭代器,需要调用next方法进入下一次迭代
- 异步中间件,.use(async callback) 就是在callback函数前加一个async关键字,配合callback函数中await使用即可
错误处理
app.on('error', err=>{})
context对象
每一次请求都会包装一个 context 对象,该对象对 node 的 request 和 response 对象进行了封装(加强了node中的request和response)同时提供了其他一些有用的 api,koa 会把 context 传入到中间件函数的第一个参数中,可以对context进行扩展,并在中间件中使用。这个context对象其实就是上面代码中app.use的回调函数第一个参数ctx。
下面为context对象中的一些属性:
-
.req:Node的request对象
-
.res:Node的response对象
-
注意:在Koa中尽量使用Koa提供的封装对象
-
.request:Koa的request对象
-
.response:Koa的response对象
-
.state:用户数据存储空间
-
.app:当前应用程序实例 - Application对象
-
.cookies对象
-
.throw([status],[,msg],[,properties]):抛出一个错误,Koa会进行处理(比如返回对应的响应信息)
在app.on('error')事件中可以捕获到该异常,error参数中也会保存msg和properties
request对象
在 Koa 中,request 对象是 Context 对象下的一个属性,为了方便调用 request 对象下的一些常用属性与方法同时在 Context 下有对应的挂载,也就是 Context 下的一些属性与方法等同于 request 对象下的对应属性和方法,response也是如此。
- .header:头信息对象,别名:headers
- .header=:设置头信息,别名:headers=
- .method:请求方式
- .method=:设置请求方式
- .length:请求正文内容长度
- .url:请求URL
- .url=:设置请求URL,不包含协议与主机部分
- .originalURL:原始URL,不包含协议与主机部分
- .href:原始完整URL,包含协议、主机、URL
- .path:URL路径部分
- .path=:设置URL路径
- .querystring:URL中的querystring
- .querystring=:设置URL中的querystring
- .search:URL中的search,带?的querystring
- .search=:设置URL中的search
- .host:请求头中的host
- .hostname:请求头中的hostname
- .URL:解析过的URL对象
- .type:请求头中content-type
- .charset:请求头中的charset
- .query:解析过的querystring对象
- .query=:设置querystring对象值
- .fresh:判断缓存设置时候有效,true表示有效
- .stale:与fresh相反
- protocol:请求使用的协议
- .secure:是否是安全协议,protocol=='https'
- .ip:请求客户端 IP
- .ips:请求客户端所有 IP(比如使用了代理等)
- .subdomains:子域名数组
- .is(types...):判断提交内容的MIME类型
- .socket:request.socket对象
- .get(field):获取请求头的通用方法
response对象
- .header:响应头对象
- .headers:header的别名
- .socket:response.socket对象
- .status:响应状态码
- .status=:设置响应状态码
- .message:响应状态码描述文本
- .message=:设置响应状态码描述文本
- .body:响应内容
- .body=:设置响应内容,如果status没有设置,Koa会默认设置status为:200 或者 204,同时 Koa 会根据返回的数据类型自动设置 content-type
- string:text/html 或 text/plain
- buffer/Stream:application/octet-stream
- object:application/json
- .length:响应内容长度
- .length=:设置响应内容长度
- .get(field):获取指定头信息
- .get(fields):批量设置头信息
- .set(field):设置指定头信息
- .append(field, value):追加头信息
- .remove(field):移除头信息
- .type:获取 content-type
- .type=:设置 content-type
- .is(types...):判断 content-type
- .redirect(url):重定向,默认重定向状态码为:302,可以通过status进行设置
- .attachment([filename]):设置下载文件头,filename为下载文件的名称
参考代码
const Koa = require('koa'); // koa本质是一个包装过的http

// 创建一个http服务器,监听请求,本质是http.createServer()
const app = new Koa();

app.use((ctx, next) => {
  // ctx 是 koa处理过的对象
  console.log(1);
  ctx.body = '<h1>Hello,Koa</h1>'
  // 异常处理
  // ctx.throw(404, '页面没了', {a: 1});
  // next的应用场景:判断当前用户是否有权限,如果有权限再调用next()
  next();
})

app.use(async (ctx, next) => {
  console.log(2);
  ctx.body += '<strong>Welcome Use Koa</strong>'
  // await 异步请求/查询数据库
  next();
});

app.use((ctx, next) => {
  // throw new Error('非常严重的错误!');
  let n = Math.random();
  // 不推荐这种写法
  // ctx.n = n;
  ctx.state.n = n;
  // console.log("ctx.request: ", ctx.request);
  next();
})

app.use((ctx, next) => {
  console.log(ctx.state.n);
  ctx.response.body = {
    a: 1,
    b: 2
  };
  ctx.attachment('a.txt');
})

// 监听错误
app.on('error', (err, ctx) => {
  console.log("[-] 检测到错误: ", err);
})

// 监听当前机器的地址、端口
app.listen(80);
koa-static-cache 静态资源代理服务
参考代码
const Koa = require('koa');
const koaStaticCache = require('koa-static-cache');

const app = new Koa();

// 主要有请求,则通过 koaStaticCache 进行处理
app.use(koaStaticCache(__dirname + '/static', {
  // root:__dirname + '/static'  // 与上面的第一个参数效果一样
  prefix: '/public', // 如果当前请求的url是以 /public开始,则作为静态资源请求
}));

app.use((ctx, next) => {
  // ...其他业务逻辑
  console.log("请求来了")
});

// 监听当前机器的地址,端口
app.listen(80);
这个中间件的目的就是帮助我们托管静态资源文件,我们按照配置的路径在浏览器的URL地址中输入带/public前缀的路径就能访问到static目录下的文件,比如http://127.0.0.1/public/index.html,这个时候中间件就会将我们的请求代理到/static文件夹下的index.html,读取文件,自动识别MIME类型,然后进行响应,非常方便,极大程度提高了我们的开发效率!
koa-router 路由系统
像极了vue-router系统,学起来成本较低。
安装:npm i koa-router
非RESTful的路由设计:
http://127.0.0.1/user/add 新增用户
http://127.0.0.1/user/query/1 查询用户
http://127.0.0.1/user/delete/1 删除用户
存在的问题:URL反映的是资源的位置,不应该带有操作,换句话说,对资源的操作不应该改变资源的定位。
RESTful的路由设计:
使用 http 中的 method 来表述动作
POST:http://127.0.0.1/user 新增用户
GET:http://127.0.0.1/user/1 查询用户
DELETE:http://127.0.0.1/user/1 删除用户
HTTP 中的 method
- GET:用来获取资源
- POST:新建资源
- PUT:更新资源
- DELETE:删除资源
参考代码
const Koa = require('koa');
const koaStaticCache = require('koa-static-cache');
const Router = require('koa-router');
const app = new Koa();

app.use(koaStaticCache(__dirname + '/static', {
  prefix: '/public'
}));


// app.use((ctx, next) => {
//   console.log(ctx.request.url);
//   下面的代码其实也是一种路由,只不过特别简单,还需要处理很多其他一些问题,因此我们需要使用模版
//   switch (ctx.request.url) {
//     case '/user':
//       ctx.response.body = "<h1>user 页面</h1>"
//       break;
//   }
// })

const router = new Router();
// 通过 get 方式 发送 / 请求 => get http://127.0.0.1
router.get('/', (ctx, next) => {
  ctx.body = "<h1>首页</h1>";
})

// 子路由,也叫嵌套路由
const userRouter = new Router();
userRouter.get('/', (ctx, next) => {
  ctx.body = "<h1>用户首页</h1>";
})

userRouter.get('/address', (ctx, next) => {
  ctx.body = '<h1>用户收货地址</h1>'
})

router.use('/user', userRouter.routes());

// 子路由:添加前缀方式
const itemRouter = new Router({
  prefix: '/item'
});

itemRouter.get('/add', (ctx, next) => {
  ctx.body = '<h1>添加物品</h1>';
})

// 子路由 动态路由
const goodsRouter = new Router();
goodsRouter.get('/goods/:id', (ctx, next) => {
  // URL生成器
  console.log(Router.url('/list', {
    page: 1
  }, {
    query: {
      order: 'desc'
    }
  }));
  ctx.body = `<h1>添加商品:</h1> ${ctx.params.id}`
})

// 路由重定向
// router.redirect('/admin', '/user', 301);
router.redirect('/admin/test', '/user', 301);

// 把路由对象挂载到app对象中
app.use(router.routes());
app.use(itemRouter.routes());
app.use(goodsRouter.routes());

// 监听当前机器的地址,端口
app.listen(80)
创建路由
const Router = require('koa-router');	// 引入路由模块
const router = new Router();	// 创建路由实例对象
给应用注册指定的路由中间件
app.use(router.routes());
命名路由
router.get('main', '/', cb);
嵌套路由
const parent = new Router()
const child = new Router()
parent.use('/p', child.routes())	// 注册子路由
路由前缀
const router = new Router({
	prefix: '/user'
})
动态路由
router.get('/user/:id', cb); // 动态路由参数通过 ctx.params 对象获取
路由重定向
router.redirect('/user', '/login', 301) // 将/user路由重定向到/login路由
URL生成器
Router.url('/list', {page:1}, {query{order:'desc'}})
更多API介绍参考koa-router官方文档
koa-swig 模版引擎
安装:npm install koa-swig
koa v2.x 需要使用 co 函数
加载 co 模块,安装:npm i co
参考代码
const Koa = require('koa');
const koaStaticCache = require('koa-static-cache');
const Router = require('koa-router');
const Swig = require('koa-swig');
const co = require('co');

const app = new Koa();

let users = [
  {username: 'Alex'},
  {username: 'Jack'},
  {username: 'Rose'},
  {username: 'Jim'}
]

app.use(koaStaticCache(__dirname + '/static'), {
  prefix: '/public'
});

const router = new Router();

const render = Swig({
  root: __dirname + '/views',
  autoscape: true,
  cache: false,
  ext: '.html'
});

app.context.render = co.wrap(render);

router.get('/list', async (ctx,next) => {
  ctx.body = await ctx.render('list.html', {
    users
  })
})

app.use(router.routes());

app.listen(80);
注意:读取模版文件中的数据这个行为是异步的,需要使用async/await方式进行等待,否则ctx.body响应给前端的数据为空
