
Vcenter6.0升级Vcenter6.7方法总结
vcenter 升级
一、小版本升级vc6.0u1 升级vc6.0u
下载升级补丁镜像,例如:VMware-vCenter-Server-Appliance-6.0.0.xxxx-xxxxxxx-patch-FP.iso.将镜像挂载到vc驱动上,登录https://vc_ip:5480——>更新——>检查cd/cdrom,如果更新包有效,安装更新即可。
二、大版本升级vc6.0u1升级到vc6.7u3
此过程可以有两种完成的方法。(使用vds交换机,未配置vsan,未使用nsx网络)
方法(一)
1.新建创建vc6.7
2.导出原vc6.0的分布式交换机配置,在新vc6.7网络导入分布式交换机配置。
3.新建集群,并添加主机
4.为分布式交换机添加主机,并按原来的配置分配上行适配器,例如:vds1上行适配器分配vmnic0和vmnic1.
此时,新vc6.7接管原来的vc的esxi主机,业务基本没有丢包,不影响业务。
注意事项,新接管的esxi 上运行的vm可能在“虚拟机硬件”中的网络适配器1,2...无法显示出对应网络端口组信息。可能显示成“不可使用的数据”。解决方法是,将主机“断开连接”,待彻底断开后重新连接,即可显示正常的信息配置。此过程不影响esxi 上的业务vm,不会产生断网。
方法(二)
1.下载最新的vc6.7u3版本,在任意网络可达的机器上运行\vdsa-ui-installer\win32\installer,弹出vc安装向导,
2.向导弹出后,此时选择升级而非安装。根据向导填写对应的配置(此过程会新安装一个vc6.7),并且配置一个临时ip,同原vc 保持同网段,升级成功后,原vc6.0会关机,并将原vc的ip地址替换掉临时ip地址形成的升级的后vc
3.根据向导第一阶段部署新机器后,进入第二阶段配置,在此阶段vc会做升级前检查,如果出现报错将无法进行升级。反之,进入升级阶段,即将原vc6.0 的配置,可选保留原任务即性能数据,导入到新升级后的机器上。配置及数据导入完成后,原vc 自动关闭,地址切换成原vc ip。升级完成
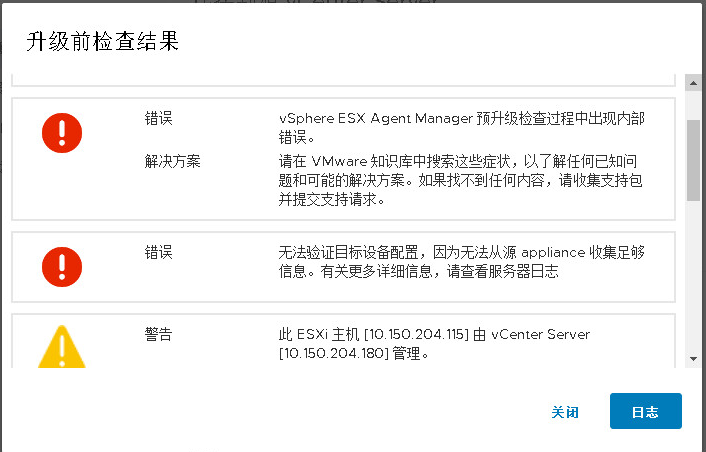
注意事项:
升级检查报错1
修复的方法是1.使用 SSH 及 root 账号连接到 原vCenter Appliance。2.浏览到 /etc/vmware-eam/。3.备份eam.properties 文件cp eam.properties eam.properties.old。4.运行命令:cat /etc/vmware/install-defaults/sca.hostid。5.记录输出。输出应该是一个字符串,如下所示:0a12dfe2-b3b7-4eb6-9737-1ec5a8e770ec。6.编辑eam.properties 文件。7.将下面内容贴入文件中:
#########################################################################
# Copyright 2013-2014 VMware, Inc. All rights reserved. VMware Confidential
#########################################################################
vc.proxy.host=localhost
vc.proxy.port=80
# Hostname or IP of the EAM server
# Fill only if EAM is not running on the same host as VC
eam.host=
# EAM service port used to configure the HTTP connector of the application server.
eam.int.http.port=15005
# Port and scheme configuration which is used by the ESX 6.x hosts to reach EAM Vib
# file server.
eam.ext.port=443
eam.ext.scheme=https
# Port and scheme configuration which is used by the ESX 5.x hosts to reach EAM Vib
# file server.
eam.ext.port.deprecated=80
eam.ext.scheme.deprecated=http
eam.support_linked_clone=true
eam.clear_db_on_startup=false
eam.debug_ref_count=false
eam.recent_event_size=20
# Enable/disable VUM integration
vum.integration=true
# Value is specified in minutes (set to 24h = 1440m)
eam.scan_for_unknown_agent_vms=1440
# The timeout to wait for hostd to restart on a host (set to 5m=300s)
eam.hostd_restart_timeout=300
# The following entries will be added verbatim to the advanced options
# of hosts on which EAM is enabled. All are optional.
Net.DVFilterBindIpAddress=169.254.0.1
Net.TrafficFilterIpAddress=
#The IP for the VSWIF NIC on the dvFilter switch (for ESX classic).
Net.DVFilterVswifIpAddress=169.254.0.2
# Resource bundle configuration
eam.resourcebundle.filename=eam-resourcebundle.jar
# VLSI embedded tcServer configuration
#
tcserver.tmp.dir=/var/tmp/vmware/eam/tomcat
# EAM SSL configuration
#
eam.keystore.type=VKS
eam.key.alias=vpxd-extension
eam.keystore.storename=vpxd-extension
# CM configuration
#
cm.url=http://localhost:18090/cm/sdk/?hostid=0a12dfe2-b3b7-4eb6-9737-1ec5a8e770ec <====== 使用第 5 步中记录的输出
cm.wait.attempts=360
cm.wait.intervalSeconds=5
# SSO configuration
#
sso.wait.attempts=360
sso.wait.intervalSeconds=5
# VC SSL configuration
#
vc.truststore.type=VKS
vc.truststore.storename=TRUSTED_ROOTS
vc.tunnelSdkUri.template=https://##{VC_HOST_NAME}##:8089/sdk/vimService
vc.tunnelSdkUri=<vCenter_FQDN>:8089/sdk/vimService <====== 将此更改为您的 vCenter FQDN/IP
drs.demandCapacityRatio=100
8.保存退出后,给文件更改权限644
chmod 0644 eam.properties
9.启动EAM服务
service-control --start vmware-eam
再次执行升级检查将不会出现以上问题
参考:https://kb.vmware.com/s/article/50113982?lang=zh_CN
升级检查报错2
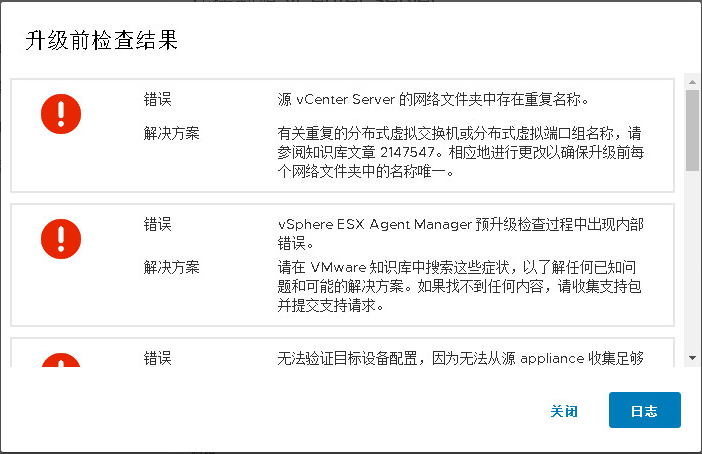
升级检查出现分布式交换机或分布式端口组命名重复的的问题。经过检查,没有相同命名的vds 交换机,也没有相同命名的分布式端口组。后经测试。问题原因是,存在vds分布式交换机和分布式端口组的命名相同的问题,将分布式交换机重新命名后,该问题解决。因此判断vds 和端口组也不能出现相同的命名。
