1、ClickHouse介绍
ClickHouse系列文章
1、ClickHouse介绍
2、clickhouse安装与简单验证(centos)
3、ClickHouse表引擎-MergeTree引擎
4、clickhouse的Log系列表引擎、外部集成表引擎和其他特殊的表引擎介绍及使用
5、ClickHouse查看数据库容量、表的指标、表分区、数据大小等
文章目录
本文主要分为三部分,即OLAP关键特性、clickhouse特性和配置文件的简单介绍。
Clickhouse是一个高性能且开源的数据库管理系统,主要用于在线分析处理(OLAP)业务。它采用列式存储结构,可使用SQL语句实时生成数据分析报告,另外它还支持索引,分布式查询以及近似计算等特性,凭借其优异的表现,ClickHouse在各大互联网公司均有广泛地应用。
官网:https://clickhouse.com/
中文官网:https://clickhouse.com/docs/zh
一、OLAP关键特征
- 大多数数据库访问都是读请求
- 数据总是以批量形式写入数据库(每次写入大于1000行)
- 已添加的数据一般无需修改
- 每次查询都从数据库中读取大量的行,但是同时又仅需少量的列
- 数据表多为宽表,即每个表均包含着大量的列
- 查询量一般较少(非高并发,通常每台服务器每秒约有数百个查询或更少)
- 对于简单查询,允许的延迟大约为50毫秒(响应时间要迅速)
- 列中的数据相对较小,一般为数字或短字符串
- 处理单个查询时需要高吞吐量(每个服务器每秒高达数十亿行)
- 事务不是必须的
- 对数据一致性要求低
- 查询结果明显小于源数据,换句话说,数据被过滤或聚合后能够被存放在单台服务器的内存中。
OLAP业务场景与业务场景OLTP等有很大的不同,使用OLTP数据库或Key-Value数据库去处理分析查询业务将会获得非常差的性能。
另外,相比于行式数据库,列式数据库则更适用于OLAP场景,因为对于大多数的查询而言,列式数据库的处理速度要至少比行式数据库快100倍。二者的性能差别很大,列式数据库明显占优,主要体现在如下:
- 对于分析类查询,通常只需要读取数据表中的一小部分列,使用列式数据库可以很轻松地实现,而使用行式数据库却必须要读取全部的列,这就带来了性能的损失。
- 列式数据库按列存储数据,使得数据更容易被压缩,可以降低I/O传输的体积,从而使查询速度加快。
- 由于I/O体积的降低,可以使得更多的查询数据被系统缓存,进一步加快了查询的速度。
- 执行一个查询一般需要处理大量的行,在整个列向量上执行所有操作将比在每一行上执行所有操作更加高效,而且还可以更加充分地利用CPU资源,从而提升了查询的性能。
二、ClickHouse特性
相比于其它的列式数据库,ClickHouse的以下特性决定了它更适用于OLAP业务场景
- 数据压缩:ClickHouse会自动对插入的数据进行压缩,这对于性能的提升起到了至关重要的作用
- 磁盘存储:ClickHouse被设计为工作在传统磁盘上,这意味着数据存储的成本较低
- 多核心并行处理:ClickHouse会利用服务器的一切必要资源,以并行化处理大规模查询
- 分布式查询:在ClickHouse中,数据可以保存在不同的分片(shard)上,查询可以在所有分片上并行处理
- 支持SQL:ClickHouse的查询语言大部分情况下是与SQL标准兼容的
- 向量引擎:ClickHouse采用了列向量引擎技术,可以更为高效地使用CPU资源
- 实时数据更新:ClickHouse使用MergeTree引擎对数据进行增量排序,数据可以持续不断地写入到表中并进行合并,而且在整个过程中不会存在任何加锁行为
- 支持索引:ClickHouse按照排序键对数据进行排序并支持主键索引,可以使其在几十毫秒内完成对特定值或特定范围的查找
- 支持近似计算:ClickHouse提供了许多在允许牺牲数据精度的情况下对查询进行加速的方法
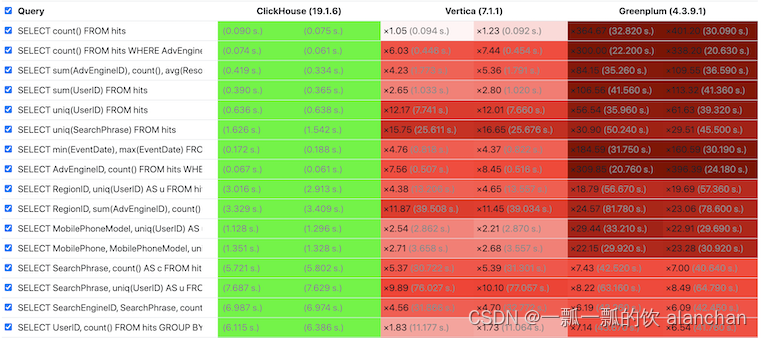
下图显示了ClickHouse与其它主流列式数据库的性能对比。可以看到,对于大多数查询而言,ClickHouse的响应速度更快,这也是选择ClickHouse作为OLAP数据处理的主要原因
![在这里插入图片描述]()
三、ClickHouse配置文件
在使用ClickHouse之前,我们需要修改ClickHouse配置文件中的一些默认配置,比如数据存储路径,集群信息以及用户信息等,这样可以更好地对ClickHouse进行管理控制,以满足我们的业务需求。
1、配置说明
- ClickHouse支持多配置文件管理,主配置文件为config.xml,默认位于/etc/clickhouse-server目录下,其余的配置文件均需包含在/etc/clickhouse-server/config.d目录下。
- ClickHouse的所有配置文件均是XML格式的,而且在每个配置文件中都需要有相同的根元素,通常为主配置文件中的一些配置可以通过replace或remove属性被其子配置文件所覆盖,如子配置文件中的表示将使用该配置来替换主配置文件中的zookeeper选项。如果两个属性都未指定,则会递归组合各配置文件的内容并替换重复子项的值。
- 配置文件中还可以定义substitution替换,如果一个配置包含incl属性,则替换文件中相应的配置将被使用。默认情况下替换文件的路径为/etc/metrika.xml,可以通过include_from配置项进行设置。如果待替换的配置不存在,ClickHouse会记录错误日志,为了避免这种情况,可以指定配置项的optional属性来表示该替换是可选的,如在启动时,ClickHouse会根据已有的配置文件生成相应的预处理文件,这些文件中包含了所有已完成替换和覆盖的配置项,它们被统一放置于preprocessed目录下,你可以从这些文件中查看最终的配置项是否正确。另外ClickHouse会跟踪配置文件的更改,对于某些配置如集群配置以及用户配置等,更改后会自动生效,无需重启ClickHouse服务,而对于其它配置项的更改可能需要重启服务才能生效。
- 对于集群中的全部ClickHouse节点,除部分配置(如macros)外,其它所有的配置最好都保持一致,以便于统一管理及使用。
2、数据路径配置
- 数据路径下既存储数据库和表的元数据信息(位于metadata目录)也存储表的真实数据(位于data目录)。元数据是指建库和建表的语句,亦即数据库和表的结构信息,每次ClickHouse启动时会根据元数据信息去加载相应的数据库和表。
- 数据路径的配置如下所示,其对应的XML标签为。
<path>/path/to/clickhouse/</path>
- 当单个物理盘无法存储全部的数据时,可以考虑将不同的数据库存储在不同的物理盘上,然后在/path/to/clickhouse/data/目录下创建软连接指向其它物理盘上的数据库目录。
3、日志配置
ClickHouse的日志文件中记录了各种类型的事件日志,包括数据的插入和查询的日志以及一些配置和数据合并相关的日志等。一般我们会通过日志文件找出ClickHouse报错的具体原因,以便解决问题。
日志的配置如下所示,其对应的XML标签为
<logger>
    <level>trace</level>
    <log>/path/to/clickhouse-server/clickhouse-server.log</log>
    <errorlog>/path/to/clickhouse-server/clickhouse-server.err.log</errorlog>
    <size>1000M</size>
    <count>10</count>
</logger>
- level表示事件的日志级别,可以配置为trace,debug,information,warning,error等值
- log表示主日志文件路径,该日志文件中包含所有level级别以上的事件日志
- errorlog表示错误日志文件路径,该日志文件仅包含错误日志,便于问题排查
- size表示日志大小,当日志文件达到指定size后,ClickHouse会进行日志轮转
- count表示日志轮转的最大数量
事件日志是由多线程异步写入到日志文件中的,所以不同事件之间的日志会产生交错,不利于按顺序进行日志排查。但ClickHouse为每个事件都提供了唯一的ID来标识,我们可以根据此ID来跟踪事件状态的变化
4、集群配置
集群的配置主要用于分布式查询,在创建分布式表(Distributed)时会用到。
集群配置文件的示例如下所示,其对应的XML标签为
<yandex>
    <remote_servers>
        <cluster_name>
            <shard>
                <weight>1</weight>
                <internal_replication>false</internal_replication>
                <replica>
                    <host>hostname1/ip1</host>
                    <port>9000</port>
                </replica>
            </shard>
            <shard>
                <weight>1</weight>
                <internal_replication>false</internal_replication>
                <replica>
                    <host>hostname2/ip2</host>
                    <port>9000</port>
                </replica>
            </shard>
        </cluster_name>
    </remote_servers>
</yandex>
- cluster_name表示集群名称,shard表示集群的分片(即ClickHouse节点),集群会有多个shard,每个shard上都存有全部数据的一部分
- weight表示数据写入的权重,当有数据直接写入集群时会根据该权重来将数据分发给不同的ClickHouse节点,可以理解为权重轮询负载均衡
- replica表示每个shard的副本,默认为1个,可以设置多个,表示该shard有多个副本。正常情况下,每个副本都会存有相同的数据
- internal_replication表示副本间是否为内部复制,当通过集群向分片插入数据时会起作用,参数的默认值为false,表示向该分片的所有副本中写入相同的数据(副本间数据一致性不强,无法保证完全同步),true表示只向其中的一个副本写入数据(副本间通过复制表来完成同步,能保证数据的一致性)
在实际情况下,一般不会通过集群进行数据写入,而是将数据直接写入到各ClickHouse节点。一来通过集群进行分发数据会带来二次的网络延迟,降低了数据的写入速度,二来当数据量较多时,由于网络带宽限制,数据分发节点会成为数据传输的瓶颈,从而拉低了整体的数据写入效率
可以定义多个集群,以应对不同的查询需要。每次添加新的集群配置后,无需重启ClickHouse服务,该配置会即时生效
5、字典配置
更多信息参考官网关于字典配置
字典就是一种 键->值 映射关系,一般在数据查询时使用。相比于多表JOIN的查询操作,使用字典查询会更加高效。
字典文件的位置需要由config.xml文件中的dictionaries_config配置项设置。
<dictionaries_config>dictionaries/*_dictionary.xml</dictionaries_config>
上述配置表示ClickHouse会从与config.xml文件同级的dictionaries目录下加载以_dictionary.xml为后缀的全部字典文件
字典配置文件的示例如下所示,其对应的XML标签为
<dictionary>
    <name>dict_name</name>
    <format>TabSeparated</format>
    <file></file>
    <source>
        <!-- Source configuration -->
    </source>
    <layout>
        <!--Memory layout configuration-->
        <complex_key_hashed></complex_key_hashed>
    </layout>
    <structure>
        <!--Complex key configuration-->
        <key>
            <attribute>
                <name>key</name>
                <type>String</type>
            </attribute>
        </key>
        <attribute>
            <name>value</name>
            <type>String</type>
            <null_value></null_value>
            <injective>true</injective>
        </attribute>
    </structure>
    <!-- Lifetime of dictionary in memory -->
    <lifetime>300</lifetime>
</dictionary>
- name表示字典名称
- source表示字典的数据来源,数据来源有多种类型,可以是本地的文本文件,HTTP接口或者其它各种数据库管理系统
- layout表示字典在内存中的存储方式。一般推荐使用flat,hashed和complex_key_hashed存储方式,因为它们提供了最佳的查询处理速度
- structure表示字典的结构,亦即键值对的信息
- key表示字典的键值,它可以由多个属性组成
- attribute表示字典的值,也可以有多个
- lifetime表示字典的更新频率,单位为秒
创建完字典后,我们就可以通过SELECT dictGetTYPE语句来查询字典中指定key值对应的value了。其中TYPE表示具体的数据类型,比如获取字符串类型的值可以使用dictGetString。
除了使用配置文件来创建字典外,还可以使用SQL语句来生成字典。但相对而言,使用配置文件会更加直观便捷
sql语句示例
CREATE DICTIONARY dict_name
(
    ... -- attributes
)
PRIMARY KEY ... -- complex or single key configuration
SOURCE(...) -- Source configuration
LAYOUT(...) -- Memory layout configuration
LIFETIME(...) -- Lifetime of dictionary in memory
6、用户配置
config.xml可以指定单独的文件来对用户信息进行配置,用户配置文件的路径通过users_config配置项指定,默认为users.xml。
<users_xml>
    <!-- Path to configuration file with predefined users. -->
    <path>users.xml</path>
</users_xml>
与config.xml文件类似,用户配置也可以被切分为不同的文件以便于管理,这些文件需要保存到users.d目录下。
ClickHouse的默认用户为default,密码为空。
用户配置的示例如下所示,其对应的XML标签为
<clickhouse>
    <!-- See also the files in users.d directory where the settings can be overridden. -->

    <!-- Profiles of settings. -->
    <profiles>
        <!-- Default settings. -->
        <default>
            <!-- Maximum memory usage for processing single query, in bytes. -->
            <max_memory_usage>10000000000</max_memory_usage>

            <!-- How to choose between replicas during distributed query processing.
                 random - choose random replica from set of replicas with minimum number of errors
                 nearest_hostname - from set of replicas with minimum number of errors, choose replica
                  with minimum number of different symbols between replica's hostname and local hostname
                  (Hamming distance).
                 in_order - first live replica is chosen in specified order.
                 first_or_random - if first replica one has higher number of errors, pick a random one from replicas with minimum number of errors.
            -->
            <load_balancing>random</load_balancing>
        </default>

        <!-- Profile that allows only read queries. -->
        <readonly>
            <readonly>1</readonly>
        </readonly>
    </profiles>

    <!-- Users and ACL. -->
    <users>
        <!-- If user name was not specified, 'default' user is used. -->
        <default>
            <!-- See also the files in users.d directory where the password can be overridden.

                 Password could be specified in plaintext or in SHA256 (in hex format).

                 If you want to specify password in plaintext (not recommended), place it in 'password' element.
                 Example: <password>qwerty</password>.
                 Password could be empty.

                 If you want to specify SHA256, place it in 'password_sha256_hex' element.
                 Example: <password_sha256_hex>65e84be33532fb784c48129675f9eff3a682b27168c0ea744b2cf58ee02337c5</password_sha256_hex>
                 Restrictions of SHA256: impossibility to connect to ClickHouse using MySQL JS client (as of July 2019).

                 If you want to specify double SHA1, place it in 'password_double_sha1_hex' element.
                 Example: <password_double_sha1_hex>e395796d6546b1b65db9d665cd43f0e858dd4303</password_double_sha1_hex>

                 If you want to specify a previously defined LDAP server (see 'ldap_servers' in the main config) for authentication,
                  place its name in 'server' element inside 'ldap' element.
                 Example: <ldap><server>my_ldap_server</server></ldap>

                 If you want to authenticate the user via Kerberos (assuming Kerberos is enabled, see 'kerberos' in the main config),
                  place 'kerberos' element instead of 'password' (and similar) elements.
                 The name part of the canonical principal name of the initiator must match the user name for authentication to succeed.
                 You can also place 'realm' element inside 'kerberos' element to further restrict authentication to only those requests
                  whose initiator's realm matches it.
                 Example: <kerberos />
                 Example: <kerberos><realm>EXAMPLE.COM</realm></kerberos>

                 How to generate decent password:
                 Execute: PASSWORD=$(base64 < /dev/urandom | head -c8); echo "$PASSWORD"; echo -n "$PASSWORD" | sha256sum | tr -d '-'
                 In first line will be password and in second - corresponding SHA256.

                 How to generate double SHA1:
                 Execute: PASSWORD=$(base64 < /dev/urandom | head -c8); echo "$PASSWORD"; echo -n "$PASSWORD" | sha1sum | tr -d '-' | xxd -r -p | sha1sum | tr -d '-'
                 In first line will be password and in second - corresponding double SHA1.
            -->
            <password></password>

            <!-- List of networks with open access.

                 To open access from everywhere, specify:
                    <ip>::/0</ip>

                 To open access only from localhost, specify:
                    <ip>::1</ip>
                    <ip>127.0.0.1</ip>

                 Each element of list has one of the following forms:
                 <ip> IP-address or network mask. Examples: 213.180.204.3 or 10.0.0.1/8 or 10.0.0.1/255.255.255.0
                     2a02:6b8::3 or 2a02:6b8::3/64 or 2a02:6b8::3/ffff:ffff:ffff:ffff::.
                 <host> Hostname. Example: server01.yandex.ru.
                     To check access, DNS query is performed, and all received addresses compared to peer address.
                 <host_regexp> Regular expression for host names. Example, ^server\d\d-\d\d-\d\.yandex\.ru$
                     To check access, DNS PTR query is performed for peer address and then regexp is applied.
                     Then, for result of PTR query, another DNS query is performed and all received addresses compared to peer address.
                     Strongly recommended that regexp is ends with $
                 All results of DNS requests are cached till server restart.
            -->
            <networks>
                <ip>::/0</ip>
            </networks>

            <!-- Settings profile for user. -->
            <profile>default</profile>

            <!-- Quota for user. -->
            <quota>default</quota>

            <!-- User can create other users and grant rights to them. -->
            <!-- <access_management>1</access_management> -->
        </default>
    </users>

    <!-- Quotas. -->
    <quotas>
        <!-- Name of quota. -->
        <default>
            <!-- Limits for time interval. You could specify many intervals with different limits. -->
            <interval>
                <!-- Length of interval. -->
                <duration>3600</duration>

                <!-- No limits. Just calculate resource usage for time interval. -->
                <queries>0</queries>
                <errors>0</errors>
                <result_rows>0</result_rows>
                <read_rows>0</read_rows>
                <execution_time>0</execution_time>
            </interval>
        </default>
    </quotas>
</clickhouse>
- user_name表示待添加的用户名。
- password表示明文密码,不推荐使用该方式设置密码。
- password_sha256_hex表示经过sha256hash后的密码,推荐使用该方式设置密码,密码的生成方式如下所示。
- echo-n"$PASSWORD"|sha256sum|tr-d’-’
- networks表示允许连接到ClickHouse节点的网络地址列表,可以为IP地址或Hostname。::/0表示该用户可以从任何网络地址连接到ClickHouse节点。
- profile表示对用户的一系列设置,用以控制用户的行为,如设置该用户具有只读权限等。它是以单独的XML标签存在于users.xml文件中的。配置的示例如下所示
<!--Settings profiles-->
<profiles>
    <!--Default settings-->
    <default>
        <!--The maximum number of threads when running asingle query.-->
        <max_threads>8</max_threads>
    </default>
    <!--Settings for quries from the user interface-->
    <profile_name>
        <!--Maximum memory usage for processing single query,in bytes.-->
        <max_memory_usage>30000000000</max_memory_usage>
        <!--How to choose between replicas during distributed query processing.-->
        <load_balancing>in_order</load_balancing>
        <readonly>1</readonly>
    </profile_name>
</profiles>
profile的名称可以任意,不同的用户可以配置相同的profile。另外需要注意,defaultprofile必须存在,它会在ClickHouse启动时作为默认的设置使用。
- quota表示用户配额设置,用来限制用户一段时间内的资源使用,如1小时内的查询数不超过1024等。它同样是以单独的XML标签存在于users.xml文件中的。配置的示例如下所示
<!-- Quotas. -->
    <quotas>
        <!-- Name of quota. -->
        <default>
            <!-- Limits for time interval. You could specify many intervals with different limits. -->
            <interval>
                <!-- Length of interval. -->
                <duration>3600</duration>

                <!-- No limits. Just calculate resource usage for time interval. -->
                <queries>0</queries>
                <errors>0</errors>
                <result_rows>0</result_rows>
                <read_rows>0</read_rows>
                <execution_time>0</execution_time>
            </interval>
        </default>
    </quotas>
配额限制与profile中限制的主要区别在于,它可以对一段时间内运行的一组查询设置限制,而不是限制单个查询。
除了使用配置文件管理用户,还可以基于SQL语句来创建、修改或删除用户。但相对而言,使用配置文件会更加直观便捷。
7、ZooKeeper配置
zookeeper配置允许ClickHouse与一个ZooKeeper集群进行交互。ClickHouse主要使用ZooKeeper来存储复制表的元数据,当不使用复制表时,该配置可以忽略。
ZooKeeper配置文件的示例如下所示,其对应的XML标签为
<yandex>
    <zookeeper replace="true">
        <node index="1">
            <host>hostname1/ip1</host>
            <port>2181</port>
        </node>
        <node index="2">
            <host>hostname2/ip2</host>
            <port>2181</port>
        </node>
        <node index="3">
            <host>hostname3/ip3</host>
            <port>2181</port>
        </node>
    </zookeeper>
</yandex>
node表示一个ZooKeeper节点,可以设置多个。当尝试连接到ZooKeeper集群时,index属性指定了各节点的连接顺序。
8、Macros配置
macros配置主要用来替换复制表的参数,在创建复制表时需要用到,当不使用复制表时,该配置可以忽略。
Macros配置文件的示例如下所示,其对应的XML标签为
<yandex>
    <macros replace="true">
        <shard>01</shard>
        <replica>hostname/ip</replica>
    </macros>
</yandex>
9、Prometheus配置
该配置用来供Prometheus获取ClickHouse的指标信息。
Prometheus配置的示例如下所示,其对应的XML标签为
<prometheus>
    <endpoint>/metrics</endpoint>
    <port>9363</port>
    <metrics>true</metrics>
    <events>true</events>
    <asynchronous_metrics>true</asynchronous_metrics>
</prometheus>
- endpoint表示指标接口的URI。
- port表示指标服务所使用的端口。
- metrics,events和asynchronous_metrics都是标志项,代表是否暴露相应的指标信息
配置完成后,即可访问http://ip:port/metrics来查看所有的ClickHouse指标信息了
10、MergeTree配置
该配置用来对使用MergeTree系列引擎的表进行微调。除非你对该配置有充分的了解,否则不建议修改。
MergeTree配置的示例如下所示,其对应的XML标签为
<merge_tree>
    <!--Ifmorethanthisnumberactivepartsinsinglepartition,throw'Toomanyparts...'exception.-->
    <parts_to_throw_insert>300</parts_to_throw_insert>
</merge_tree>
11、其他常用配置
- 时区配置
<timezone>Asia/Shanghai</timezone>
- 最大连接数配置
<max_connections>4096</max_connections>
- 并发查询数配置
<max_concurrent_queries>200</max_concurrent_queries>
- ClickHouse最大内存使用量配置
<max_server_memory_usage>0</max_server_memory_usage>
- 可删除表的最大数据量配置
<max_table_size_to_drop>0</max_table_size_to_drop>
单位为字节,默认值为50G,当表中数据大小超过该限制时,不能使用DROP语句去删除该表(防止误操作)。如果设置为0,表示没有任何限制。如果你仍然想删除某个数据量超限的表而不想修改上述配置并重启ClickHouse时,可以在ClickHouse的数据目录下创建一个标志文件/path/to/clickhouse/flags/force_drop_table表示可以强制删除该表,然后执行DROP语句即可删表成功。需要注意上述标志文件在执行完一次DROP语句后会被自动删除以防止再次执行意外的DROP操作,因此执行创建标志文件和执行DROP语句的系统用户(非ClickHouse用户)应该保持一致,以避免在执行完DROP语句后,用户没有权限删除标志文件,从而导致后续操作失误并造成数据损失。
更多的配置可参见其官方文档,然后再按需调整。
以上,针对clickhouse进行了初步介绍。
本文来自博客园,作者:一瓢一瓢的饮,转载请注明原文链接:https://www.cnblogs.com/alanchan2win/p/17403638.html

 浙公网安备 33010602011771号