


我的runtime学习笔记
0、简介:
OC方法不同于C语言函数,属于动态调用过程,在编译的时候并不能决定真正调用哪个函数,只有在真正运行的时候才会根据函数的名称找到对应的函数来调用。
至于其他理论上的东西不必讲太多,编程讲的就是实用性,只记录一下各种使用场景。
使用运行时:(1)导入<objc/message.h> (2)Build Setting -> 搜索msg -> 设置属性为No(取消消息机制的检查)
一般见人写runtime第一个必讲消息机制,发消息是怎么回事
比如:新建一个dog类,头文件定义三个外部调用方法,内部实现这里就不写了,随意
1 - (void)run; //对象方法
2
3 + (void)run; //类方法
4
5 - (void)eat:(NSString *)food; //带参数的实例方法
来到使用它的地方
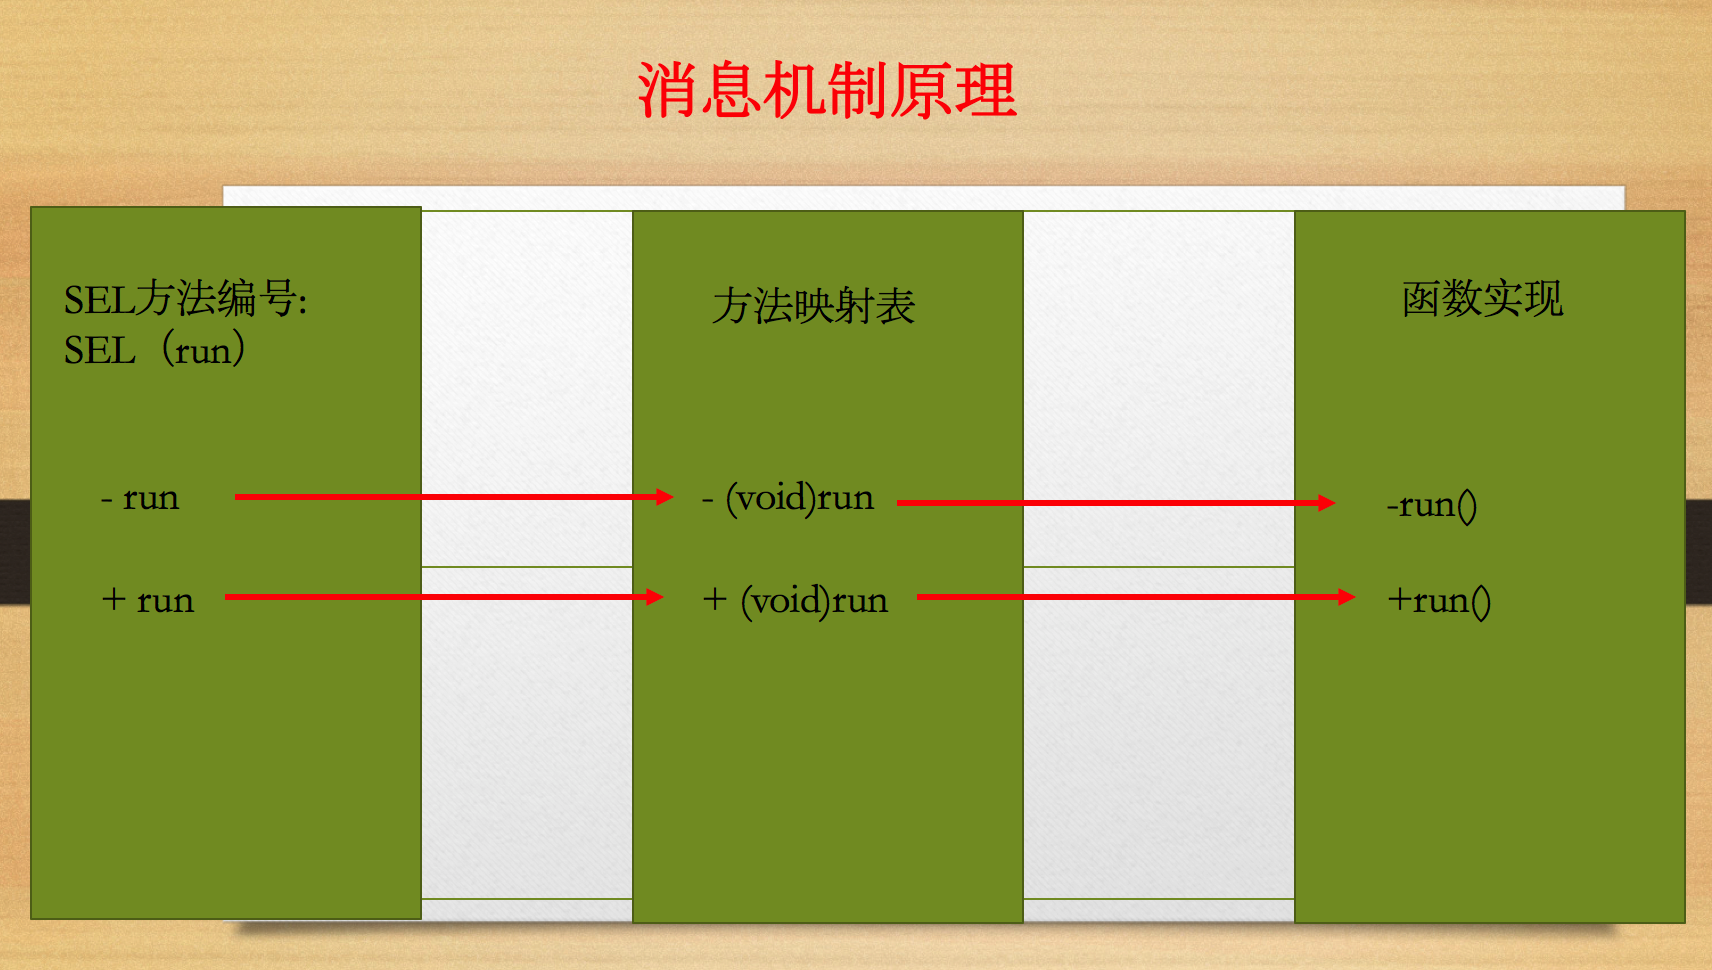
 1     Dog *d = [[Dog alloc] init];
 2
 3     [d run];
 4
 5     // 消息机制:任何方法调用,本质都是发送消息
 6     // SEL:方法编号,根据方法编号就可以找到对应方法实现
 7       [d performSelector:@selector(run)];
 8
 9     // 让d发送消息
10     objc_msgSend(d, @selector(run));
基本可以理解为第3行代码底层调用第7行,第7行底层调用第10行
顺便也写一下OC方法的大概调用流程吧:
简单理解下就行了,看了下网上大神写的资料,感觉没必要记那么多繁复的东西
大概我理解就是:方法调用就是个发消息的过程,消息名即方法名,接收消息的对象即我们普遍认为的调用那个方法的对象。
SEL即方法编号,第3行调用方法之后去接收者那里找到对应的方法编号,通过方法编号找到方法映射表中的对应方法,最后根据方法映射表找到对应的方法实现。
来个图更明显点:
为避免误读,对上面的图做个补充,以免为初学者产生一个错误的映射表内存模型:
类与对象相比只是多了实例变量和方法列表等,类和对象都是对象,分别是类对象和实例对象。
在class中的isa指针指向的是metaClass,metaClass中存放的是静态成员变量和类方法(+开头)。在object中的isa指针指向的是对应的类结构:Class,Class其中存放的是普通成员变量和实例方法(-开头)。
所有的metaclass中isa指针都是指向根metaclass,而根metaclass则指向自身。根metaclass是通过继承根类产生的,与根class结构体成员一致,不同的是根metaclass的isa指针指向自身。
实例对象存放对象方法的映射表,类对象存放类方法的映射表,因此上面的两个方法其实是在不同的映射表中的。
上面的代码是对象无参调用的方式,补充一下类方法和含参方法:
 1
 2 //类名调用类方法的本质就是类名转换成类对象
 3 [Dog run];
 4
 5  // 获取类对象
 6 Class dogClass = [Dog class];
 7
 8 //上面方法会调用这个
 9 [dogClass performSelector:@selector(run)];
10
11  //最终干的事还是发消息
12 objc_msgSend(dogClass, @selector(eat));
最后说含参方法:
1 //含参方法
2 [d eat:@"789"];
3
4 [d performSelector:@selector(eat:) withObject:@"456"];
5
6 objc_msgSend(d, @selector(eat:),@"123");
顺便补充一下:含参方法performSelector最多只能传入两个参数,参数更多的时候多余的参数可以放到字典、数组里,这个不存在问题,demo里面有写。
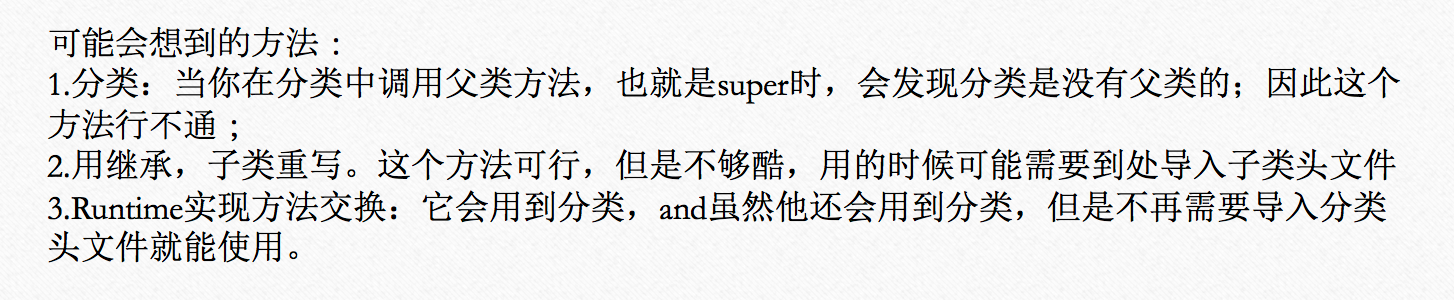
1、当你希望给系统方法扩展一些功能,并且保持原有的功能时;
直接上代码:
分类:
#import <UIKit/UIKit.h>

@interface UIColor (extension)
+ (__kindof UIColor *)at_redColor;
@end


#import "UIColor+extension.h"
#import <objc/message.h>

@implementation UIColor (extension)

// 加载这个分类的时候就会调用load方法
+ (void)load
{
    // class:获取这个类
    // SEL:获取方法编号,根据SEL就能去对应的类找方法
    Method redColorMethod = class_getClassMethod([UIColor class], @selector(redColor));

    // 获取类方法
    Method at_redColorMethod = class_getClassMethod([UIColor class], @selector(at_redColor));

    // 交换方法实现
    method_exchangeImplementations(redColorMethod, at_redColorMethod);

}

//自己的方法
+ (__kindof UIColor *)at_redColor {
    UIColor *color = [UIColor at_redColor];
    //添加一个打印功能
    NSLog(@"123");
    return color;
}
@end
控制器:
1 self.view.backgroundColor = [UIColor redColor];
会打印出"123"。
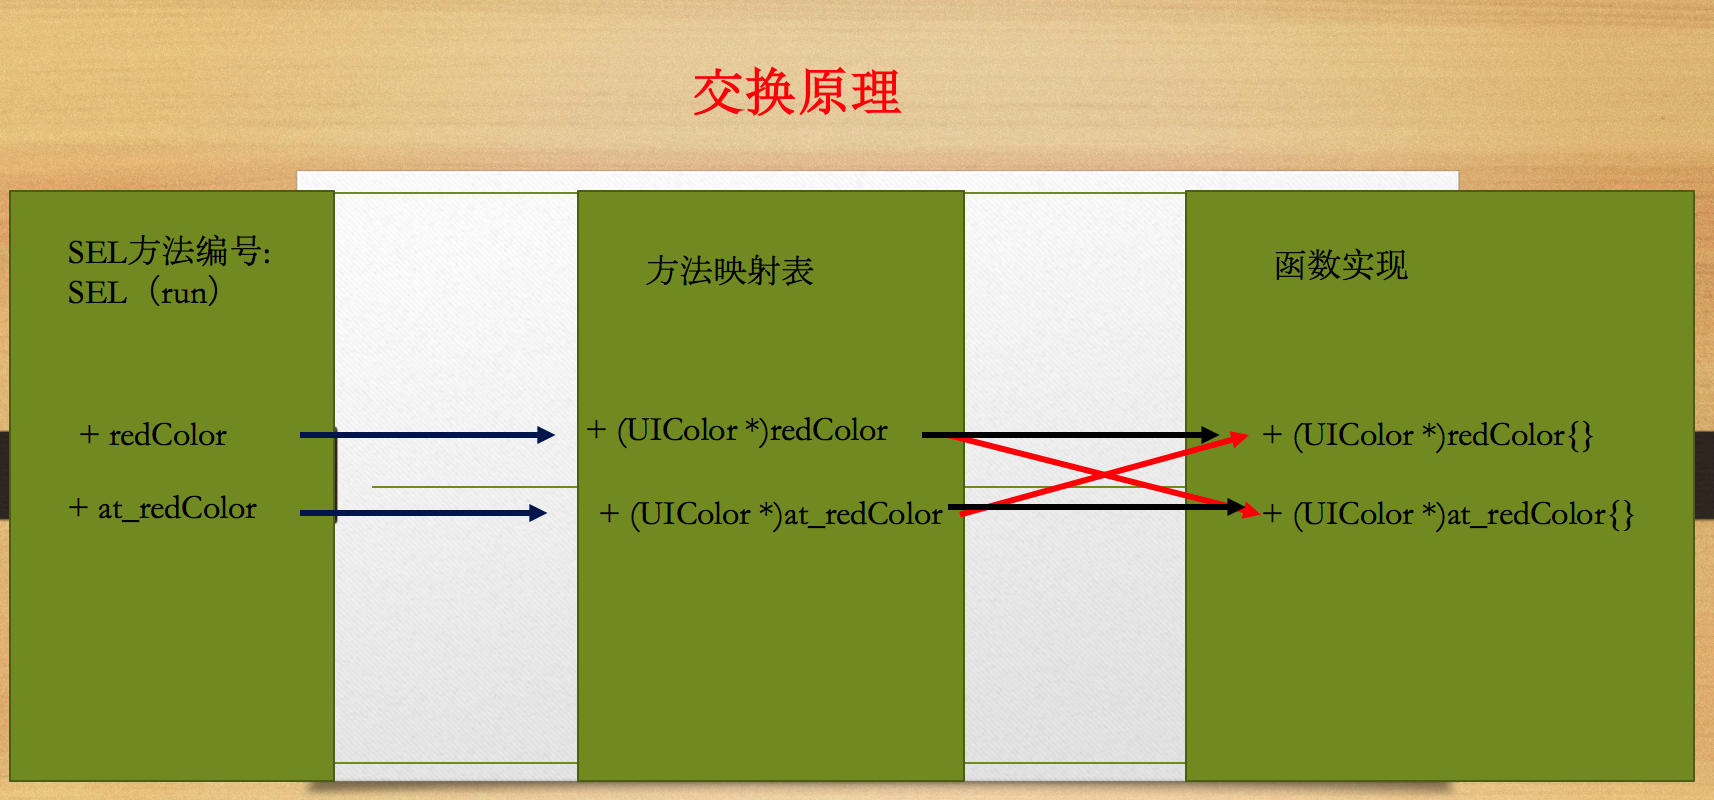
红线表示方法交换;
2、动态给某个类添加方法(如果一个类方法非常多,加载类到内存的时候也比较耗费资源(感觉也耗不了什么资源,非要说的话跟懒加载的思想差不多吧,工作中基本没这么玩过),需要给每个方法生成映射表)
 1 #import "Dog.h"
 2 #import <objc/message.h>
 3
 4 @implementation Dog
 5 // 定义函数
 6 // 默认一个方法都有两个隐式参数, self:方法调用者, _cmd:调用方法的编号
 7 void runImp(id self, SEL _cmd, NSString *param)
 8 {
 9     NSLog(@"调用run %@ %@ %@",self,NSStringFromSelector(_cmd),param);
10 }
11
12 // 动态添加方法,首先实现这个resolveInstanceMethod
13 // resolveInstanceMethod调用:当调用了没有实现的方法没有实现就会调用resolveInstanceMethod
14 // resolveInstanceMethod作用:知道哪些方法没有实现,从而动态添加方法
15 // sel:没有实现方法
16 + (BOOL)resolveInstanceMethod:(SEL)sel
17 {
18     //    NSLog(@"%@",NSStringFromSelector(sel));
19     // 动态添加run方法
20
21     if (sel == @selector(run:)) {
22         /*
23          cls:给哪个类添加方法
24          SEL:添加方法的方法编号是什么
25          IMP:方法实现,函数入口,函数名
26          types:方法类型
27          */
28         // @:对象 :SEL
29         class_addMethod(self, sel, (IMP)runImp1, "v@:@");
30
31         // 处理完
32         return YES;
33
34     }
35     return [super resolveInstanceMethod:sel];
36 }
37 @end
使用: (会调用runImp方法)
1 Dog *dog = [[Dog alloc] init];
2 [dog performSelector:@selector(run:) withObject:@"跑啊"];
说明:那两个隐式参数可写可不写,types:方法类型只是对runImp方法的类型说明,具体说明可以搜官方文档,v代表返回值void,@代表对象,:代表SEL。但是我故意把方法类型改错了也就是和方法定义的真实类型不匹配的时候,运行也没什么问题。
3、在分类中添加属性
都知道你在分类中定义属性的时候,只会生成get和set方法的声明,不会生成实际的成员变量和方法实现。再顺便说一句,分类没有父类
第一个想到的办法可能是自己定义一个全局变量,像这样
代码:
1 @interface NSObject (ATTest)
2 @property (nonatomic, copy) NSString *sex;
3 @end
1 @implementation NSObject (ATTest)
2 NSString *_sex;
3 - (void)setSex:(NSString *)sex {
4     _sex = sex;
5 }
6 - (NSString *)sex {
7     return  _sex;
8 }
9 @end
尝试用一下:
1  NSObject *objText = [[NSObject alloc] init];
2  objText.sex = @"女博士";
3  NSLog(@"%@",objText.sex);
4
5  NSObject *objText1 = [[NSObject alloc] init];
6  NSLog(@"%@",objText1.sex);
两个对象打印出来的都是“女博士”;
因此,给一个类声明属性,本质就是给这个类 和 属性值 设置关联,使类中的属性指向属性值的内存空间,而上面的做法是直接把这个值的内存空间添加到了这个类的内存空间。
下面是runtime做法:
1 @interface NSObject (ATDog)
2 @property (nonatomic, copy) NSString *name;
3 @end
 1 #import "NSObject+ATDog.h"
 2 #import <objc/message.h>
 3
 4 @implementation NSObject (ATDog)
 5 - (void)setName:(NSString *)name {
 6     //设置关联属性
 7     /* 参数说明
 8      object:添加属性的对象
 9      key:属性名
10      value:属性关联的值
11      policy:属性策略,就是strong,copy那些东西
12      */
13     objc_setAssociatedObject(self, @"name", name, OBJC_ASSOCIATION_COPY_NONATOMIC);
14 }
15 - (NSString *)name {
16     //获取关联属性
17     /* 参数说明
18      object:获取属性的对象
19      key:属性名
20     */
21     return objc_getAssociatedObject(self, @"name");
22 }
23 @end
使用:
1     NSObject *obj = [[NSObject alloc] init];
2     obj.name = @"1";
3     NSLog(@"%@",obj.name);
4
5     NSObject *obj1 = [[NSObject alloc] init];
6     obj1.name = @"2";
7     NSLog(@"%@",obj1.name);
前面打印“1”,后面打印“2”;一个obj对象对应一个属性
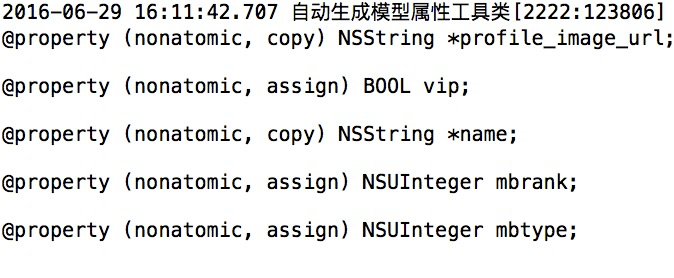
4、自动生成模型属性代码的工具类
不用每次手打属性了,挺方便的
没有访问网络,直接搞了个plist文件,反正都一样的,plist文件是微博首页的微博列表,具体见最下面demo
先复习一下读取plist:
1  //读取plist(最外层一个字典,字典里是个大数组)
2     NSString *path = [[NSBundle mainBundle] pathForResource:@"status.plist" ofType:nil];
3     NSDictionary *dict = [NSDictionary dictionaryWithContentsOfFile:path];
4     NSArray *arr = dict[@"statuses"];
1 //调用分类方法打印模型属性代码
2   [NSObject createPropertyCodeWithDict:arr[2][@"user"]];
打印user模型属性是这个样子的:
现在看一下工具类是怎么实现的吧:先声明一个类方法供外部调用,之后是实现,如果还有没考虑到的类型自行添加就OK,具体实现就不说了,代码已经很清楚了。也可以自己看一下下面的demo
1 @interface NSObject (ATProperty)
2
3 + (void)createPropertyCodeWithDict:(NSDictionary *)dict;
4 @end
 1 @implementation NSObject (ATProperty)
 2 + (void)createPropertyCodeWithDict:(NSDictionary *)dict {
 3     NSMutableString *propertyCode = [NSMutableString string];
 4
 5     //遍历字典
 6     [dict enumerateKeysAndObjectsUsingBlock:^(id  _Nonnull key, id  _Nonnull obj, BOOL * _Nonnull stop) {
 7 //        NSLog(@"%@ %@", key, [obj class]);
 8
 9         NSString *code = nil;
10         //判断不同类型的属性定义代码
11         if ([obj isKindOfClass:NSClassFromString(@"__NSCFString")]) {
12             code = [NSString stringWithFormat:@"@property (nonatomic, copy) NSString *%@;", key];
13         } else if ([obj isKindOfClass:NSClassFromString(@"__NSCFBoolean")]) {
14             code = [NSString stringWithFormat:@"@property (nonatomic, assign) BOOL %@;", key];
15         } else if ([obj isKindOfClass:NSClassFromString(@"__NSCFNumber")]) {
16             code = [NSString stringWithFormat:@"@property (nonatomic, assign) NSUInteger %@;", key];
17         } else if ([obj isKindOfClass:NSClassFromString(@"__NSCFDictionary")]) {
18             code = [NSString stringWithFormat:@"@property (nonatomic, copy) NSDictionary *%@;", key];
19         } else if ([obj isKindOfClass:NSClassFromString(@"__NSCFArray")]) {
20             code = [NSString stringWithFormat:@"@property (nonatomic, copy) NSArray *%@;", key];
21         }
22         //拼接字符串
23         [propertyCode appendFormat:@"\n%@\n", code];
24     }];
25     NSLog(@"%@",propertyCode);
26 }
27 @end
5、字典转模型
1、直接用KVC
1、导入plist文件,导入上面打印模型属性代码的工具类,新建status模型类,将打印出来的属性代码copy进去
打印属性代码的时候的一点问题
1 //先打印一下属性代码(有时候每个字典里不一定每个属性都有,比如转发微博的属性,有的微博有转发,有的则没有,所以
2     // 用这个打印出的模型属性放到模型里不一定是全部属性都有的,还好如果崩溃的话会提醒你哪个没有写上去)
3     [NSObject createPropertyCodeWithDict:arr[0]];
2、解析plist
1  //解析plist
2     NSString *path = [[NSBundle mainBundle] pathForResource:@"status.plist" ofType:nil];
3     NSDictionary *dict = [NSDictionary dictionaryWithContentsOfFile:path];
4     NSArray *arr = dict[@"statuses"];
3、转模型
1  //转模型
2     NSMutableArray *statuses = [NSMutableArray array];
3     for (NSDictionary *statusDict in arr) {
4         ATStatus *status = [ATStatus statusWithDict:statusDict];
5         [statuses addObject:status];
6     }
7     NSLog(@"%@",statuses);
在模型类中实现转模型方法statusWithDict的代码
1 //转模型实现
2 + (ATStatus *)statusWithDict:(NSDictionary *)dict {
3     ATStatus *status = [[self alloc] init];
4     //KVC
5     [status setValuesForKeysWithDictionary:dict];
6     return  status;
7 }
4、还有些问题((1)服务器返回的字段不一定都用的到,但是现有方法如果不把服务器返回的所有字段属性都写到模型的话就会因为找不到key崩溃;(2)服务器经常返回属性名id的字段,但是id在OC中是关键字,直接写id可能会导致一些问题,所以最好在模型中给丫换个名字,比如ID)这两个问题都能用下面的方法解决:
 1 //解决KVC对应属性崩溃找不到崩溃
 2 - (void)setValue:(id)value forUndefinedKey:(NSString *)key {
 3     //key:没有找到的key
 4     //value:没有找到的key对应的value
 5
 6     //找不到id,把id的值赋给ID
 7     if ([key isEqualToString:@"id"]) {
 8         _ID = [value integerValue];
 9     }
10     //打印出没找到的key
11     NSLog(@"unFind: key:%@ value:%@", key, value);
12 }
实现效果:(最下有代码demo)
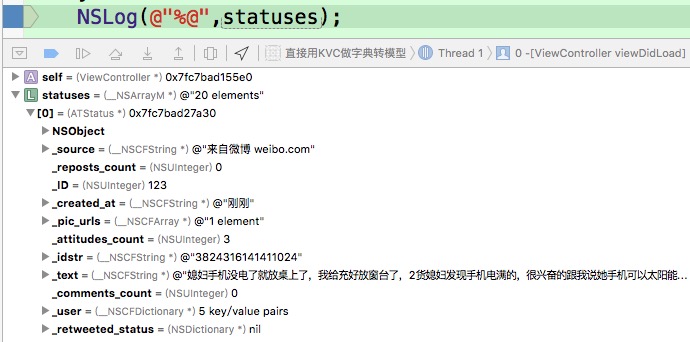
打个断点,看到已经成功转模型。
2、runtime转模型
二者的区别:
KVC:遍历字典中所有key,去模型中查找有没有对应的属性名,没找到就会崩
runtime:遍历模型中所有属性名,去字典中查找,如果找不到也不会崩
1、导入plist文件,导入上面打印模型属性代码的工具类,新建status模型类,将打印出来的属性代码copy进去
2、新建一个分类做转模型的工具类,具体用法注释已经很详细了,包括服务器返回id的问题(我把id一律在模型中定义为ID)
#import <objc/message.h>

@implementation NSObject (ATObjectModel)
+ (__kindof NSObject *)objectModelWithDict:(NSDictionary *)dict {
    //创建对应模型类
    id obj = [[self alloc] init];

    //成员属性数量
    unsigned int count = 0;
    //获取模型类属性列表数组
    Ivar *ivarList = class_copyIvarList(self, &count);
    //遍历所有成员属性
    for (int i = 0; i < count; i++) {
        //获取成员属性(Ivar)
        Ivar ivar = ivarList[i];
        //获取成员属性名
        NSString *propertyName = [NSString stringWithUTF8String:ivar_getName(ivar)];
        //去掉proprtyName前面的下划线
        propertyName = [propertyName substringFromIndex:1];

        //获取value
        id value = nil;
        if ([propertyName isEqualToString:@"ID"]) {
            value = dict[@"id"];
        } else {
            value = dict[propertyName];
        }

        if (value) {
            //KVC赋值,不能传空
            [obj setValue:value forKey:propertyName];
        }

    }
    //C语言函数,ARC不会自动释放,需要手动释放
    free(ivarList);
    return obj;
}
@end
使用就很简单了:
 1  NSString *path = [[NSBundle mainBundle] pathForResource:@"status.plist" ofType:nil];
 2     NSDictionary *dict = [NSDictionary dictionaryWithContentsOfFile:path];
 3     NSArray *array = dict[@"statuses"];
 4 //    [NSObject createPropertyCodeWithDict:array[0]];
 5
 6     NSMutableArray *statuses = [NSMutableArray array];
 7     for (NSDictionary *dict in array) {
 8         //runtime转模型
 9         ATStatus *status = [ATStatus objectModelWithDict:dict];
10         [statuses addObject:status];
11     }
12     NSLog(@"%@",statuses);
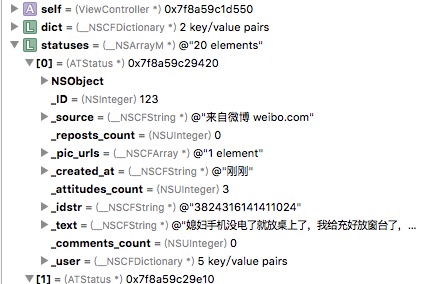
打个断点查看statuses
OK。
当然上面只是最外层的转换,那么value如果是字典或者数组呢?
这就需要在上面的代码里再加点东西:
首先是字典的情况:
 1         //二级转换
 2         //获取成员属性类型
 3         NSString *propertyType = [NSString stringWithUTF8String:ivar_getTypeEncoding(ivar)];
 4         //如果value是字典(实质是字典类型,但是不是NSDictionary,因为如果类型还是NSDictionary没有必要转换)
 5         if ([value isKindOfClass:[NSDictionary class]] && ![propertyType containsString:@"NS"]) {
 6 //            NSLog(@"%@", propertyType);
 7             //获取属性类型(剪切字符串@"@\"ATUser\"")
 8             NSString *type = [NSString stringWithUTF8String:ivar_getTypeEncoding(ivar)];
 9             NSRange range = [type rangeOfString:@"\""];
10             type = [type substringFromIndex:range.location + range.length];
11             range = [type rangeOfString:@"\""];
12             type = [type substringToIndex:range.location];
13
14             Class modelClass = NSClassFromString(type);
15             if (modelClass) { //有对应的类型才需要转
16                 value = [modelClass objectModelWithDict:value];
17             }
18         }
数组的情况:
 1 //三级转换(如果value是数组,数组中再包含字典)
 2         if ([value isKindOfClass:[NSArray class]]) {
 3             //如果模型类实现了字典数组转模型数组的协议
 4             if ([self respondsToSelector:@selector(ModelClassInArray)]) {
 5                 //转换成id类型,就能调用任何对象的方法
 6                 id idSelf = self;
 7                 //获取数组中的模型
 8                 NSString *type = [idSelf ModelClassInArray][propertyName];
 9                 Class modelClass = NSClassFromString(type);
10
11                 NSMutableArray *dictArr = [NSMutableArray array];
12                 //遍历数组
13                 for (NSDictionary *dict in value) {
14                     //转模型
15                     id model = [modelClass objectModelWithDict:dict];
16                     [dictArr addObject:model];
17                 }
18                 //把模型数组赋值给value
19                 value = dictArr;
20             }
21         }
数组的情况需要转模型的工具类提供一个协议供ATStatus遵守并实现,返回一个字典告诉工具类数组中是一个什么样的字典,这样工具类才知道给他转成一个什么类的模型。
最后仍然是KVC赋值。
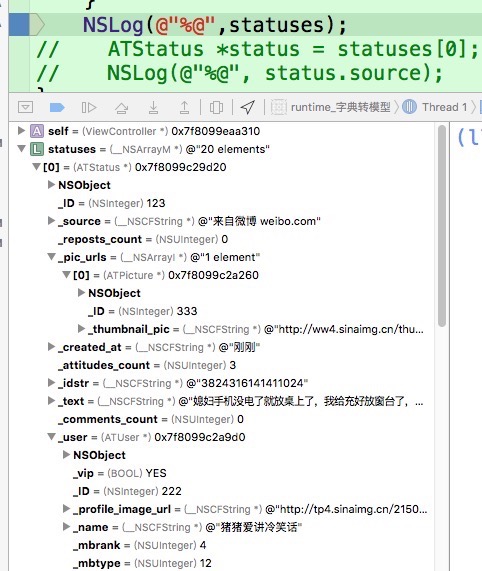
可以看见数组和字典中都转换成model对象了,而且我特意在每层添加了id,经过上面对id的处理也没有问题了(id的处理做的比较简单,只要在定义模型类的时候把id的情况改成ID就行了,其他情况就没有处理,比如ie也是个关键字呢?没做到人家框架中可以让使用者自定义模型属性叫什么的程度)。
注意:当你把NSDictionary改成 ATUser 的时候注意策略如果不匹配也要改一下 ,我一开始就忘改了,结果用的是copy,然后就崩了,要改成strong。
6、利用runtime归档和解档
同样是用NSObject分类来做这个工具类;
先看头文件提供的方法:
1 @interface NSObject (ATArchiver)
2 - (NSArray *)ignorePropertyNames;
3 - (void)encode:(NSCoder *)encoder;
4 - (void)decode:(NSCoder *)decoder;
5 @end
具体实现:归档和解档(比较简单没写注释,说一下大体流程:1:获取调用类的属性列表;2:遍历属性(propertyName = [propertyName substringFromIndex:1];这句代码的意思是去掉成员变量名前面的下划线)3:如果有需要忽略的属性,忽略掉;4:归解档;5:释放ivarList)
 1 - (void)encode:(NSCoder *)encoder {
 2     unsigned int count = 0;
 3     Ivar *ivarList = class_copyIvarList([self class], &count);
 4     for (int i = 0; i < count; i++) {
 5         Ivar ivar = ivarList[i];
 6         NSString *propertyName = [NSString stringWithUTF8String:ivar_getName(ivar)];
 7         propertyName = [propertyName substringFromIndex:1];
 8
 9         if ([self respondsToSelector:@selector(ignorePropertyNames)]) {
10             if ([[self ignorePropertyNames] containsObject:propertyName]) {
11                 continue;
12             }
13         }
14         id value = [self valueForKey:propertyName];
15         [encoder encodeObject:value forKey:propertyName];
16     }
17     free(ivarList);
18 }
19 - (void)decode:(NSCoder *)decoder {
20     unsigned int count = 0;
21     Ivar *ivarList = class_copyIvarList([self class], &count);
22     for (int i = 0; i < count; i++) {
23         Ivar ivar = ivarList[i];
24         NSString *propertyName = [NSString stringWithUTF8String:ivar_getName(ivar)];
25         propertyName = [propertyName substringFromIndex:1];
26         if ([self respondsToSelector:@selector(ignorePropertyNames)]) {
27             if ([[self ignorePropertyNames] containsObject:propertyName]) {
28                 continue;
29             }
30         }
31         id value = [decoder decodeObjectForKey:propertyName];
32         [self setValue:value forKey:propertyName];
33     }
34     free(ivarList);
35 }
控制器里面使用:
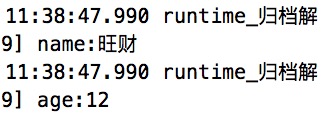
 1  NSString *path = [[NSSearchPathForDirectoriesInDomains(NSDocumentDirectory, NSUserDomainMask, YES) lastObject] stringByAppendingPathComponent:@"archiver.plist"];
 2
 3     Dog *d = [[Dog alloc] init];
 4     d.name = @"旺财";
 5     d.age = 12;
 6     //归档
 7     [NSKeyedArchiver archiveRootObject:d toFile:path];
 8     //解档
 9     Dog *d1 = [NSKeyedUnarchiver unarchiveObjectWithFile:path];
10     NSLog(@"name:%@",d1.name);
11     NSLog(@"age:%ld",d1.age);
效果:
更具体可以看github源码demo
my github:https://github.com/alan12138/runtime
