
通过lua脚本实现双层nginx(一)
为了支持高并发,需要引入缓存策略,而大型系统的缓存系统更为复杂。由于技术水平有限,现在将目前掌握的缓存架构中的部分知识做一总结。
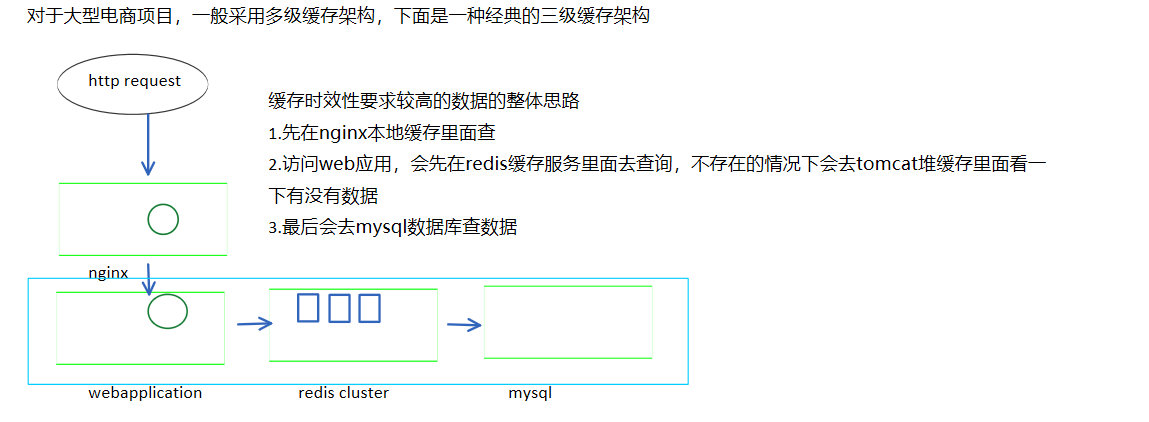
电商系统缓存系统主要分为三个层级 (下面是自己结合整体系统缓存策略的理解,画的图)
总结一点:
第一层是Ngnix缓存,第二层是缓存服务(途中蓝色方框中的部分)中的redis(redis cluster+jedis cluster)缓存,第三层是本地堆缓存(ehcache+spring cache)
当然在这里并不是详细讨论缓存架构的内容,只是引入问题。
下面就第一层nginx缓存实现中的技术问题做一些记录。
在生产环境中一般会引入多个nginx以避免单点问题。但为了提高系统缓存的命中率,需要制定一定的规则来让同一类请求分发至指定的nginx服务器,这样第一次请求的结果会缓存起来,下一次请求会直接从缓存中取数。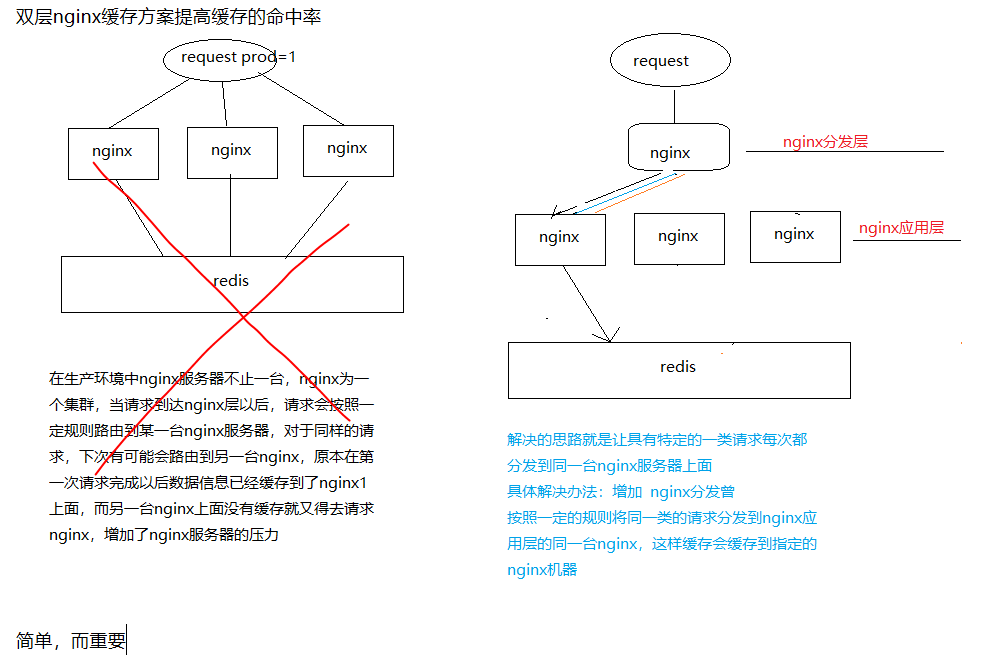
具体实现步骤:
1.安装nginx+lua, 具体安装步骤可以参考这位仁兄的博客,https://www.cnblogs.com/vinci-yu/p/13164053.html, 在此不在啰嗦
安装完成:
/usr/local/nginx --nginx安装目录
/usr/local/luajit --lua安装目录
2.创建lua项目,构建的项目结构为:
/usr/local/nginx/lua/ ##lua项目根路径
--hello.conf
--hello.conf
--hello2.lua
--templates
----product.html
nginx.conf-------
http {
    include       mime.types;
    default_type  application/octet-stream;

    #log_format  main  '$remote_addr - $remote_user [$time_local] "$request" '
    #                  '$status $body_bytes_sent "$http_referer" '
    #                  '"$http_user_agent" "$http_x_forwarded_for"';

    #access_log  logs/access.log  main;

    sendfile        on;
    #tcp_nopush     on;

    #keepalive_timeout  0;
    keepalive_timeout  65;

    #common libs
    lua_package_path "/usr/local/nginx/lualib/?.lua;;";  #在此引入lua需要的lib
    lua_package_cpath "/usr/local/nginx/lualib/?.so;;";  #
    #lua
    lua_shared_dict my_cache 128m;  #配置缓存的名字
    include /usr/local/nginx/lua/hello.conf;  #配置lua项目的配置文件地址
    #gzip  on;

    server {
    ...
/usr/local/nginx/lua/hello.conf


server {
    listen       80;
    server_name  _;
    set $template_location "/templates";
    set $template_root "/usr/local/nginx/lua/templates";
    location /hello {
        default_type 'text/html';
       # lua_code_cache off;
        content_by_lua_file /usr/local/nginx/lua/hello2.lua;
    }
}
/usr/local/nginx/lua/hello2.lua
 1 local uri_args = ngx.req.get_uri_args()
 2 local productId = uri_args["productId"]
 3 local shopId = uri_args["shopId"]
 4 print("productId is "..productId)  --没什么鸟用,打不出来log,还得继续研究
 5 print("shopId is "..shopId)
 6 local cache_ngx = ngx.shared.my_cache
 7
 8 local productCacheKey = "product_info_"..productId
 9 local shopCacheKey = "shop_info_"..shopId
10
11 local productCache = cache_ngx:get(productCacheKey)
12 local shopCache = cache_ngx:get(shopCacheKey)
13
14 if productCache == "" or productCache == nil then
15     local http = require("resty.http")
16     local httpc = http.new()
17     local resp, err = httpc:request_uri("http://192.168.94.129:8080",{
18           method = "GET",
19         ssl_verify = false,
20           path = "/product/getProductInfo?productId="..productId
21     })
22
23     productCache = resp.body
24     cache_ngx:set(productCacheKey, productCache, 10 * 60)
25 end
26
27 if shopCache == "" or shopCache == nil then
28     local http = require("resty.http")
29     local httpc = http.new()
30
31     local resp, err = httpc:request_uri("http://192.168.94.129:8080",{
32           method = "GET",
33         ssl_verify = false,
34           path = "/product/getShopInfo?shopId="..shopId
35     })
36     shopCache = resp.body
37     cache_ngx:set(shopCacheKey, shopCache, 10 * 60)
38 end
39
40 local cjson = require("cjson")
41 local productCacheJSON = cjson.decode(productCache)
42 local shopCacheJSON = cjson.decode(shopCache)
43
44 local context = {
45     productId = productCacheJSON.id,
46     productName = productCacheJSON.name,
47     productPrice = productCacheJSON.price,
48     productPictureList = productCacheJSON.pictureList,
49     productSpecification = productCacheJSON.specification,
50     productService = productCacheJSON.service,
51     productColor = productCacheJSON.color,
52     productSize = productCacheJSON.size,
53     shopId = shopCacheJSON.id,
54     shopName = shopCacheJSON.name,
55     shopLevel = shopCacheJSON.level,
56     shopGoodCommentRate = shopCacheJSON.goodCommentRate
57 }
58
59 local template = require("resty.template")
60 template.render("product.html", context)
写完代码以后重新加载nginx
nginx -s reload ,访问localhost/hello
遇到的问题:
问题1:
2022/04/12 22:25:30 [error] 23812#0: *3 lua entry thread aborted: runtime error: /usr/local/nginx/lua/hello2.lua:40: module 'cjson' not found:
no field package.preload['cjson']
no file '/usr/local/nginx/lualib/cjson.lua'
no file './cjson.lua'
no file '/usr/local/luajit/share/luajit-2.0.4/cjson.lua'
no file '/usr/local/share/lua/5.1/cjson.lua'
no file '/usr/local/share/lua/5.1/cjson/init.lua'
no file '/usr/local/luajit/share/lua/5.1/cjson.lua'
no file '/usr/local/luajit/share/lua/5.1/cjson/init.lua'
no file '/usr/local/nginx/lualib/cjson.so'
no file './cjson.so'
no file '/usr/local/lib/lua/5.1/cjson.so'
no file '/usr/local/luajit/lib/lua/5.1/cjson.so'
no file '/usr/local/lib/lua/5.1/loadall.so'
stack traceback:
coroutine 0:
[C]: in function 'require'
/usr/local/nginx/lua/hello2.lua:40: in function </usr/local/nginx/lua/hello2.lua:1>, client: 192.168.94.158, server: _, request: "GET /hello?productId=1&shopId=2 HTTP/1.1", host: "eshop03"
解决办法:
下载lua-cjson,
cd /usr/local
wget https://www.kyne.com.au/~mark/software/lua-cjson.php --no-check-certificate
tar -xvf lua-cjson-2.1.0.tar.gz
cd lua-cjson-2.1.0
make
执行make发现会报错,出现问题2
问题2 ----
cc -c -O3 -Wall -pedantic -DNDEBUG -I/usr/local/include -fpic -o lua_cjson.o lua_cjson.c
lua_cjson.c:43:17: error: lua.h: No such file or directory
lua_cjson.c:44:21: error: lauxlib.h: No such file or directory
解决办法:
先查找lua.h位置,手动make,find / -name lua.h 得到结果
/usr/local/redis-stable/deps/lua/src/lua.h
/usr/local/LuaJIT-2.0.4/src/lua.h
/usr/local/luajit/include/luajit-2.0/lua.h (这正是我需要的目录)
调整一下参数执行手动编译,第一步
cc -c -O3 -Wall -pedantic -DNDEBUG -I/usr/local/luajit/include/luajit-2.0 -fpic -o lua_cjson.o lua_cjson.c
接着执行make操作
make LUAINC=/usr/local/luajit/include/luajit-2.0/
发现没有报错,good,继续执行install操作
make install
install完了已经将cjson命令写入环境变量,可以继续lua项目的测试
访问 localhost/hello ,发现数据成功返回,缓存中存入数据,但template模板位置有问题,继续调整,发现nginx会去另一个路径去找这个模板。
copy html模板到log中的指定位置,重启后错误解决

 浙公网安备 33010602011771号