【Abaqus】Composite Layup建模
abaqus 的3个复合材料建模途径:
- 传统的material->section->orientation->step->job的建模方式
- Composite Layup建模方式
- Composite Modeler (CM) 插件-建模方式

本文是我对composite layup复合材料建模的理解和回顾,仅供参考。
composite layup manager支持三种单元类型:
- conventional shells(2d shells)
- comtinuum shells(3d shells)
- solid (solid elements)
1. composite layups and orientations
复合材料建模最关键的点是: 确定铺层顺序(layup sequence)和铺层方向(layup orientation).
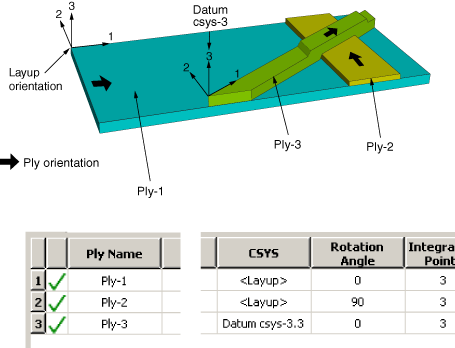
在Abaqus/CAE中,通过从三个相对的参数(layup orientation、ply orientation和额外的旋转)中导出纤维的方向,使复合铺层过程更易于管理
1.1 layup orientation
layup orientation定义了layup中所有ply的基准方向(base orientation)。
在 conventional and continuum shell layups,abaqus会将选择的Datums坐标系投影到shell单元面,使得layup orientation的stacking direction和shell的normal方向一致。默认情况下是,3方向和normal方向一致。
In solid composite layups, the orientation is not projected.

ABaqus定义layup orientation的式:
- 使用part global coordinate system
- 指定一个基准坐标系( Coordinate system)
- 使用Discrete orientation,可以为每个单元指定一个orientation
- 使用Discrete field,定义 orientation discrete field来指定空间变化的orienation
- 使用子程序
ORIEN,但对EXPLICIT求解器无效
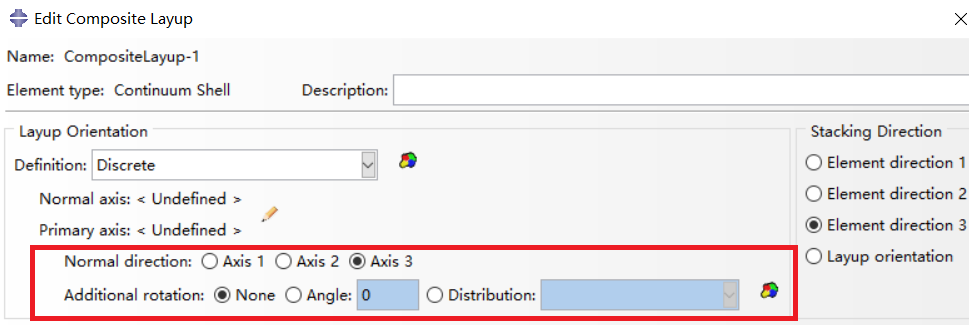
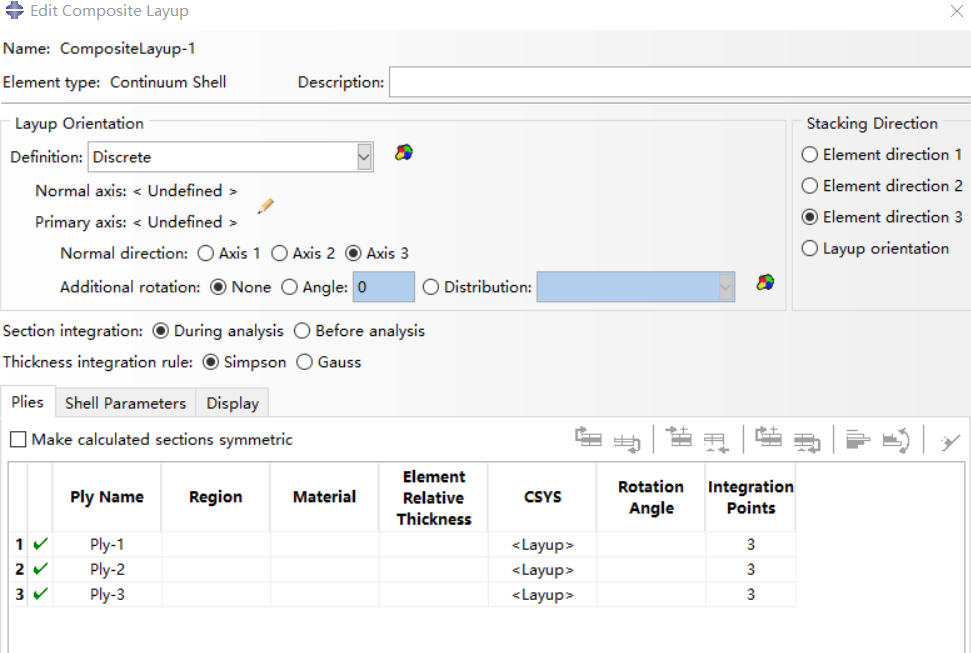
- Normal direction: 指定哪个坐标轴为复材的3-方向,默认是axis-3.
- additional rotation:如果使用2,3,4方式来定义layup orientation,则可以指定一个角度(以度为单位),该角度定义了整个层叠围绕指定法线方向的附加旋转。可以使用标量离散场来指定空间变化的附加旋转角度。
1.2 ply orientation
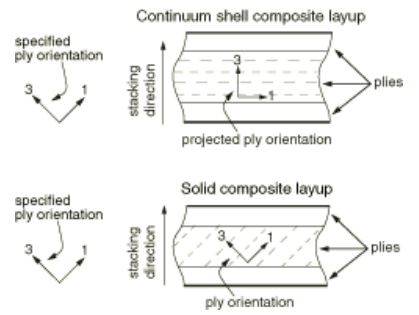
ply orientation定义了每个ply在layup中的相对方向。和layup 同理,在conventional and continuum shell layups,ply orientation会被投影到shell单元面,使得ply orientation的stacking direction和shell的normal方向一致。see Defining the stacking and thickness direction
In solid composite layups , the orientation is not projected.就像下图:
Plies and ply orientations for shell and solid composite layups.
abaqus会根据CSYS和rotation angle来确定ply orientation。
- CSYS的选项:
- Layup : 使用layup orientation作为ply的坐标系
- 引用一个Datums坐标系,并指定normal direnction,e.g.
Datum csys1.3indicates that you chose Datum csys-1 to define the coordinate system of the ply, and you chose the 3-axis to define the normal.
- rotation angle: 这个选项用来定义每个层内纤维相对于层坐标系统的旋转角度
1.如果指定一个旋转角度,则ply绕坐标系法线逆时针旋转,并且角度相对于1轴进行测量。
1.2.1 Case: Determining the orientation of each ply.
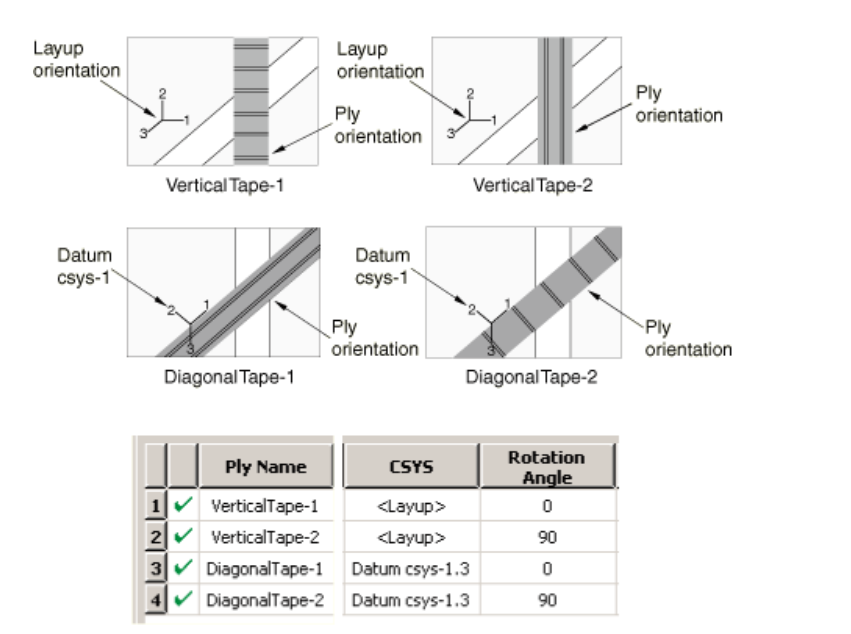
上图中说明:
- VerticalTape-1的铺层角度为0°,方位坐标系和layup一致,得到的ply方向是沿着layup orientation方向的1轴。
- VerticalTape-2d的铺层角度为90°,方位坐标系和layup一致,layup基准绕3轴逆时针(有手定则)转90度,得到ply方向
- DiagonalTape-1 的铺层角度为0°,方位坐标系选择
Datum csys-1,Datums csys-1绕3轴逆时针转0度,得到ply方向 - DiagonalTape-2 的铺层角度为90°,方位坐标系选择
Datum csys-1,Datums csys-1绕3轴逆时针转90度,得到ply方向
2. 从composite layup中获得输出
众所周知,应力,应变等输出变量是在积分点上输出的.在composite layup中,可以指定ply厚度方向上的积分点数;
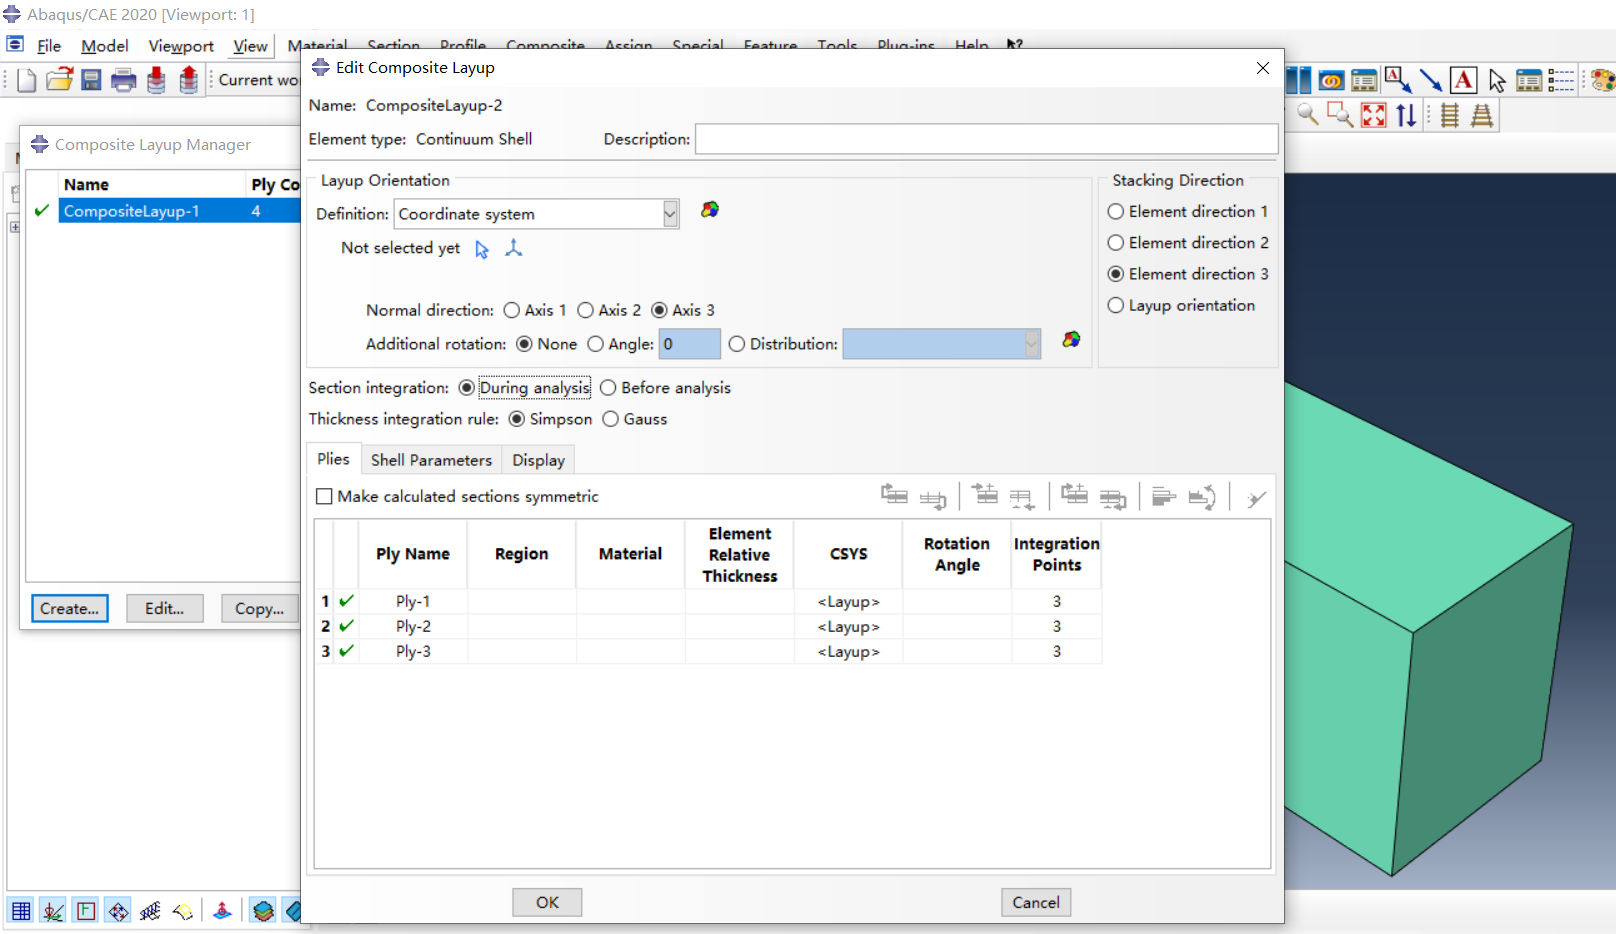
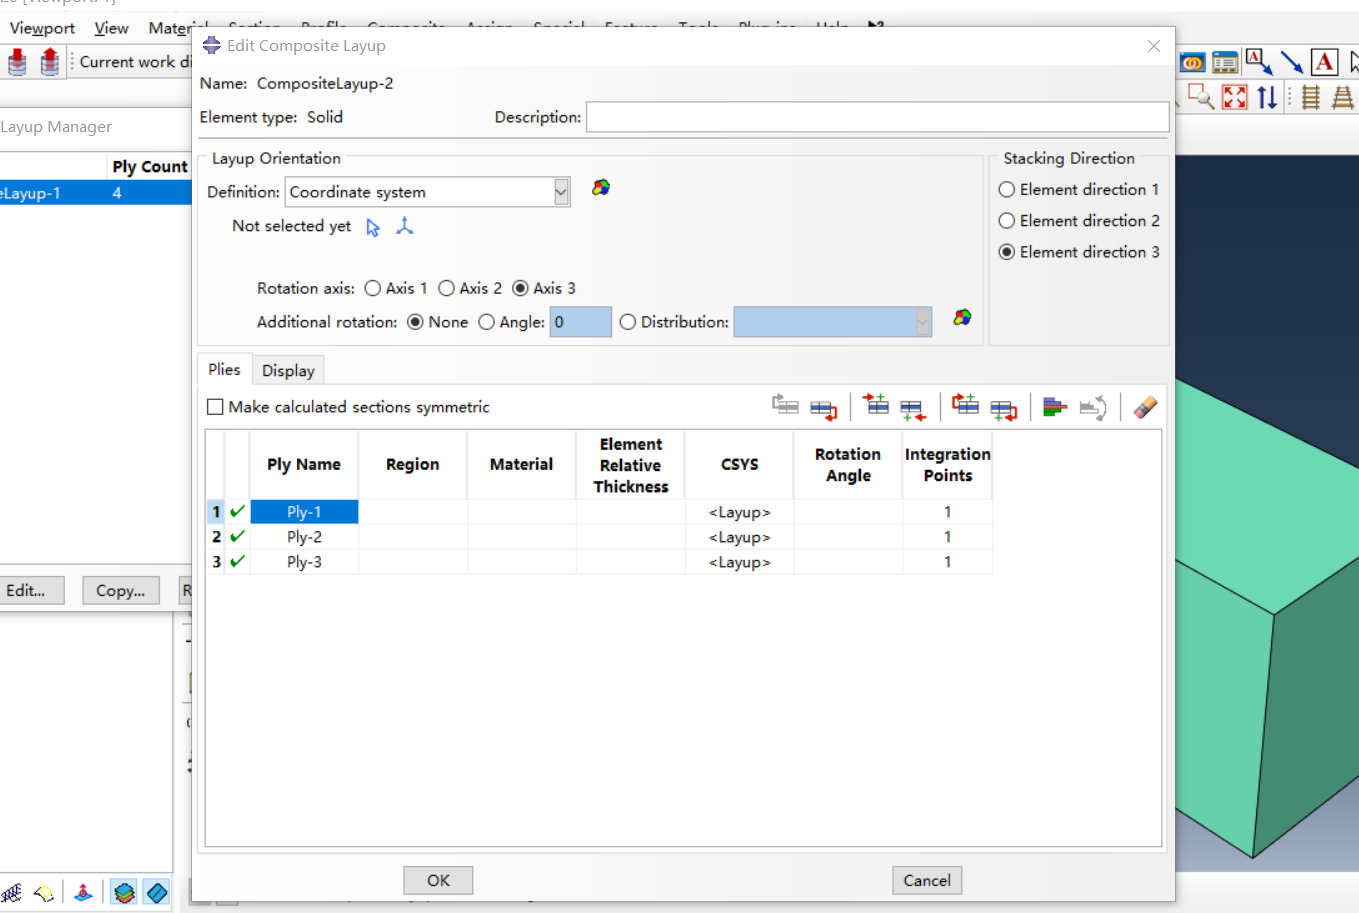
使用 shell sections integrated during the analysis时,shell or continuum shell composite layup默认每个ply有3个积分点;solid composite layup默认每个ply只有1个积分点.可以修改,但需要是奇数
使用 pre-integrated shell sections时,每个ply有3个积分点,不可修改

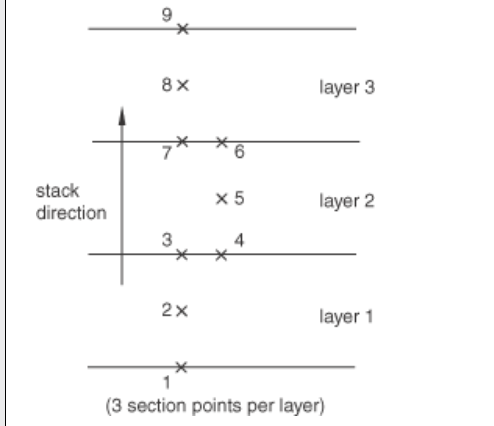
具有三层的复合层的集成点编号规律如下:
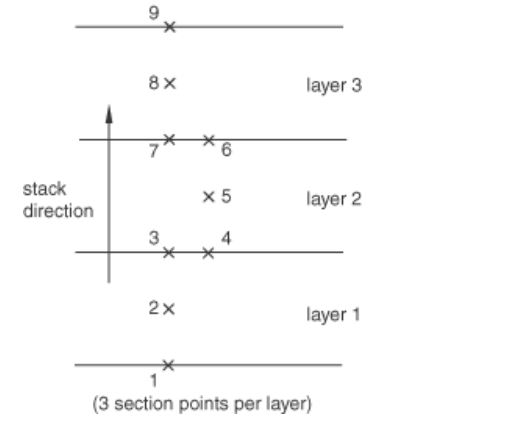
如果不创建输出请求,Abaqus只从复合层的顶部和底部(最高和最低积分点)计算场变量输出;所以,如果需要从composite layup获得场变量输出,必须新建一个输出请求,并且指定输出域(Domain)为composite layup.e.g 从一个composite layup中获得应力,应变输出,输出位置为积分点2,3:
新建一个输出请求,输出域为composite layup,默认的输出位置为ply-middle
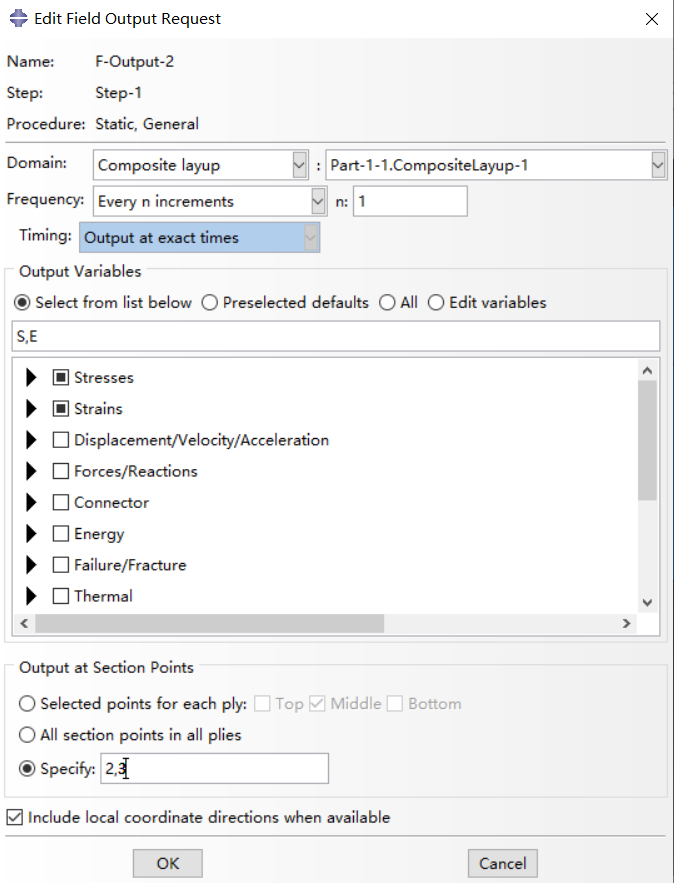
2.1 从特定的积分点获得输出
Abaqus/CAE从指定的积分点计算输出。积分点从底层的底部到顶层的顶部依次编号,其中底层是layup中的第一层。例如: 如果希望从下图中所示的每一ply的中间积分点输出应力,则需要输入2、5、8
3. 可视化composite layup结果
3.1 Ply stack plot
ply stack plot可以用来可视化composite layup的铺层顺序.
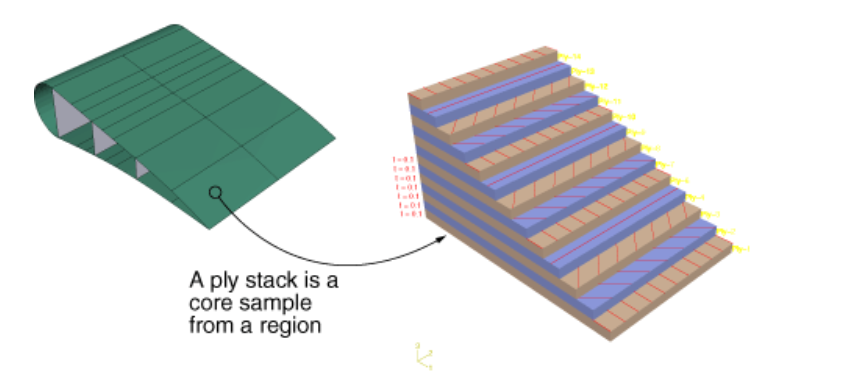
进入property模块,选择tools->Query->Ply Stack Plot,选中要查询铺层的区域,然后选择ply stack plot options可以定义可视化的选项.比如下图,可以显示每个ply的角度,厚度,材料,坐标系,积分点等信息.

3.2 Ply-based results
abaqus后处理支持查看composite layup的各个层的结果云图.也可以查看 envelope contour plot(maximum or minimum values across all of the plies in the layup.)
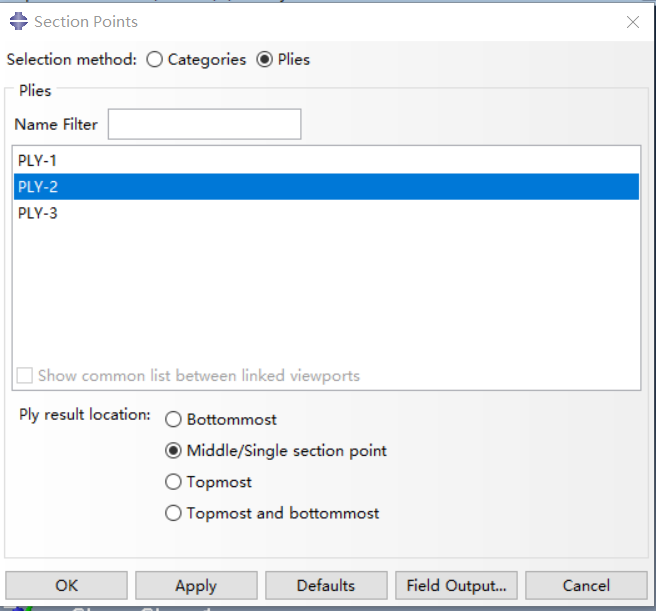
查看单个ply的结果云图
进入后处理模块,results->Section Points,选中ply,然后指定输出的积分点位置.
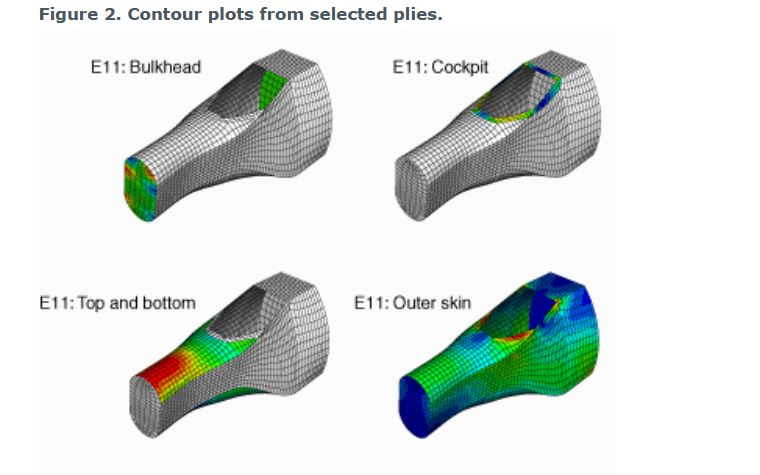
abaqus可以同时查看layup的顶面/底面位置的结果云图.conventional shell composite layup 表现为双面壳的云图,两侧的云图并不相同,分别为顶/底面位置的结果;continuum shell composite layup or solid composite layup则是分别在顶面,底面绘制云图.[see Selecting section point data by category]
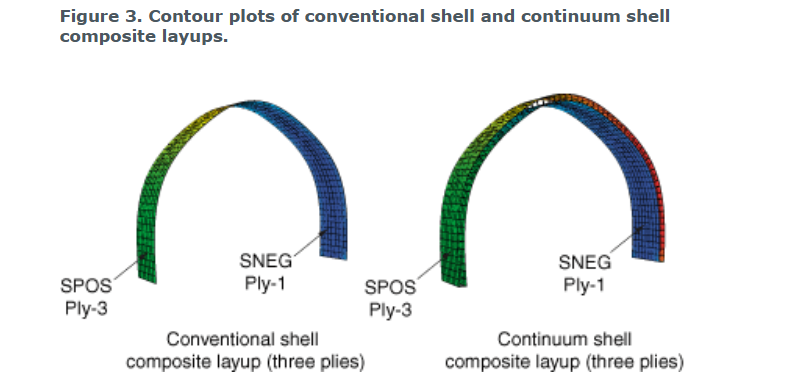
Envelope plots(包络云图)
包络云图显示了复合材料layup的最大值或最小值变量分布.例如,单元100含有3个ply,每个ply的应力S11值分别为10,20,30.包络云图中显示的值则是10或者30.
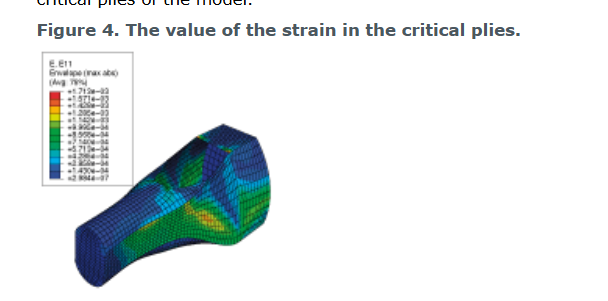
此外,也可以输出quilt contour plot来展示每个单元中的临界层(critical ply)名称

想要绘制包络图,必须创建一个输出请求,并选择输出所有ply位置的变量
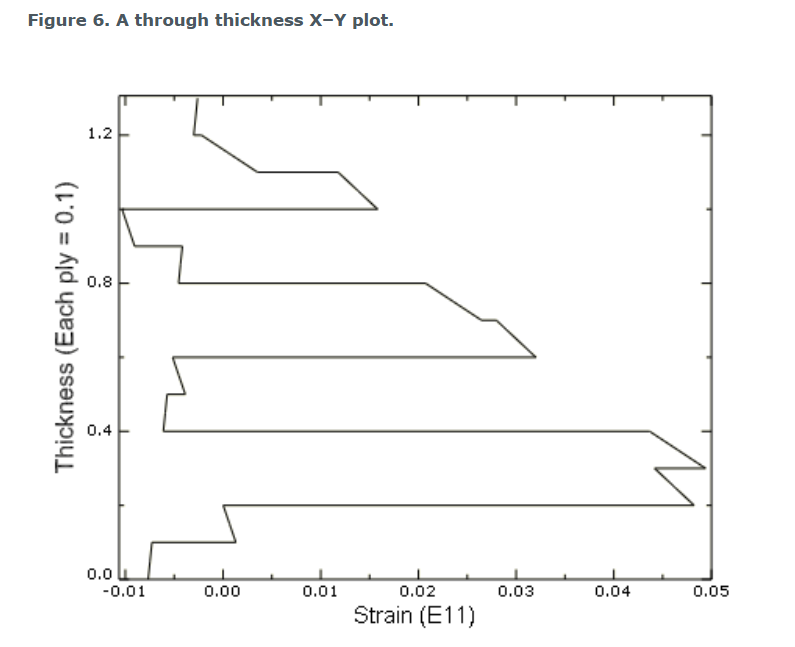
Through thickness X–Y plots
abaqus可以绘制厚度方向上的变量值分布,比如以下是通过13层复合材料铺层在纤维方向上的应变的贯穿厚度图。应变是不连续的,因为纤维的取向在层之间发生了变化
4. 三种 composite layup的建模
三种方式的选项,如果前文已经说明,后续不会重复说明.
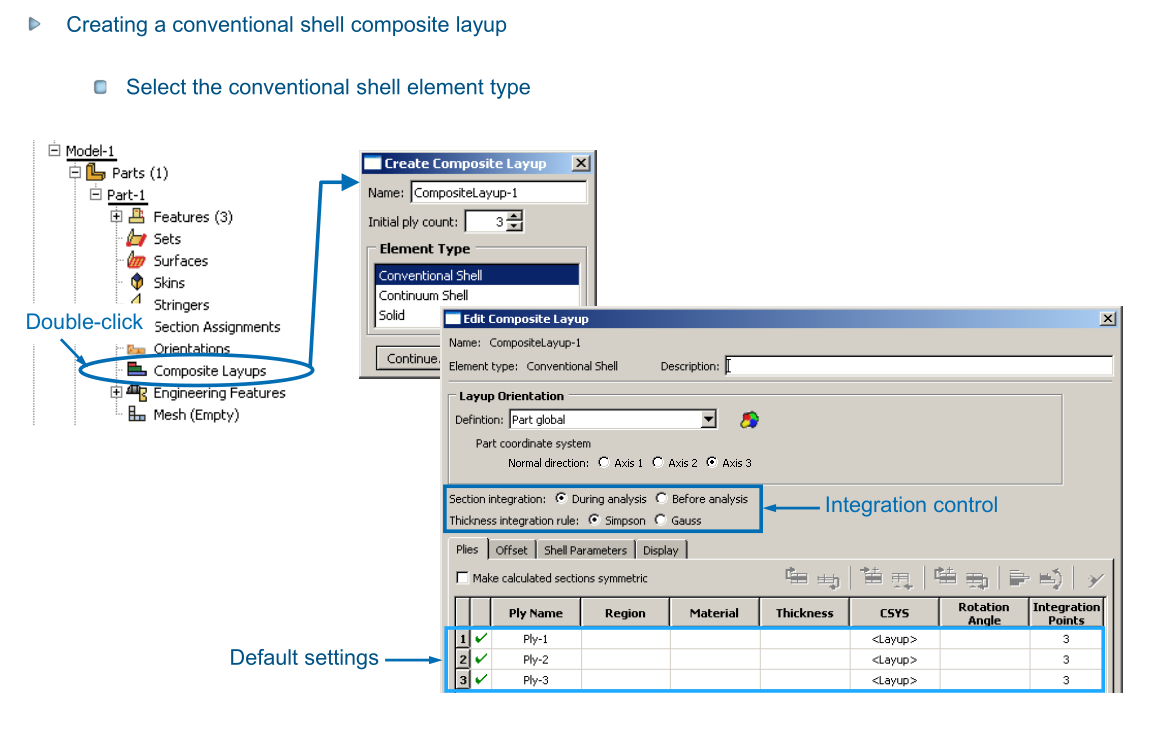
4.1 conventional shell composite layup
conventional shell composite layup是由不同方向的不同材料组成的layup.这种方式使用传统的2d shell单元(常用的是S4R,S3R等)来模拟composite layup.
- section integration选项
可选:during 和before analysis两种方式.采用默认值(during analysis)即可,适用于绝大多数情况;如果分析涉及nonlinear material behavior和heat transfer,必须使用during analysis.(see Using a shell section integrated during the analysis to define the section behavior)
使用before analysis选项可以定义Linear moment-bending 和 force-membrane strain relationships(我猜大概是复合材料的CLT理论)此时所有的计算都是根据截面力和力矩的关系来进行的.section 属性通过弹性行为定义;此外在befor analysis的前提下还可以对壳的行为进行理想化处理( idealization)(see Using a general shell section to define the section behavior)
You should use pre-integrated composite layups if the response of the layup is linear elastic and its behavior is not dependent on changes in temperature or predefined field variables
四种理想化选项(pre-integrated),详见Idealizing the section response:
- No idealization,顾名思义
- Smeared properties,用于并不明确具体的铺层顺序的情况,比如设计方案中只说明了45度,90度,0度分别占比10%,50%,40%
- Membrane only,忽略弯曲刚度,只考虑in-plane行为
- Select Bending only,表示结构是
pure-bending的
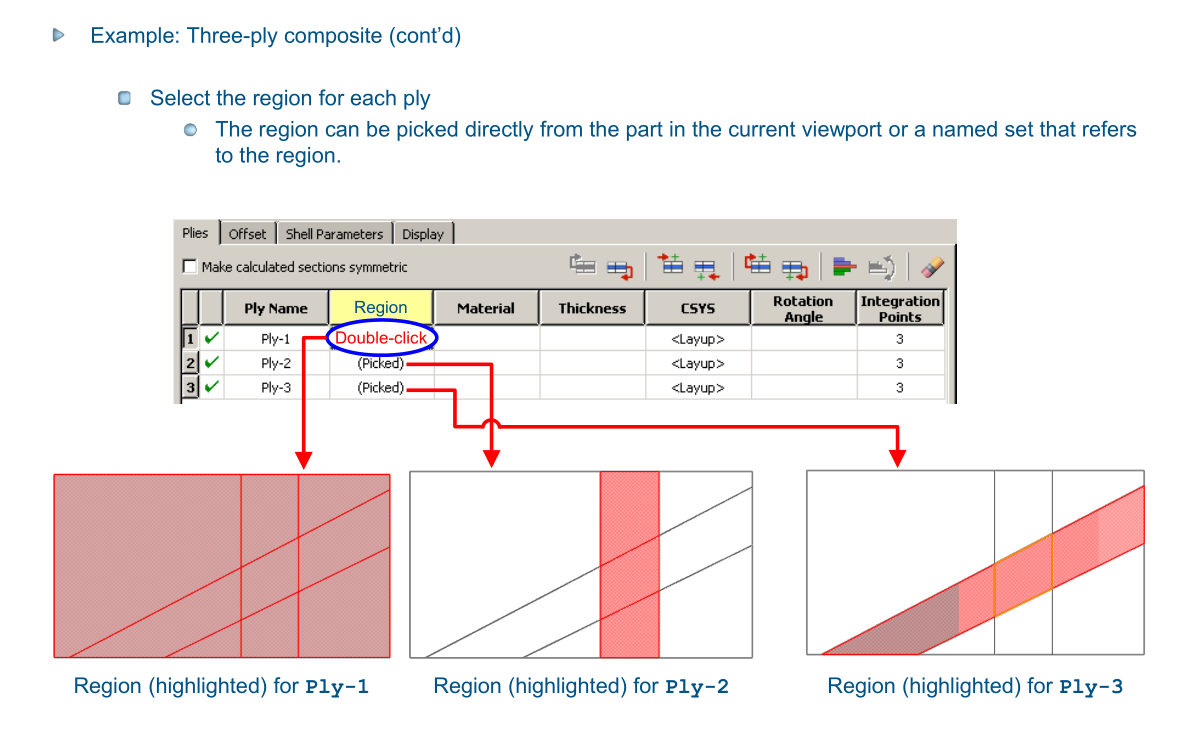
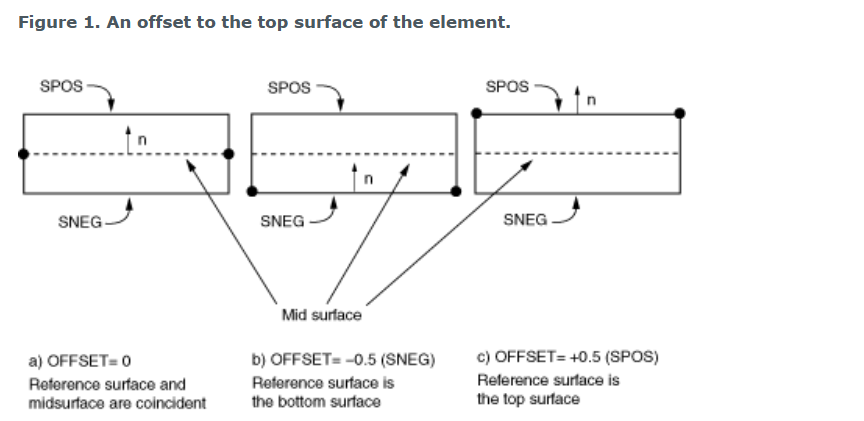
以下是定义conventional shell composite layup的界面,表格数据含义已在之前说明,需要注意: 这里的Thickness一列需要输入真实的厚度值,在Shell Parameters中,可以定义Shell thickness和Shell thickness variation等壳属性,在Offset下可以指定壳单元的refference surface.
- 定义
reference surface的偏移值,偏移值是单元面到中面之距离与单元厚度值的比值
- Section Poisson's ratio选项
Section Poisson's ratio用于定义shell thickness behavior,在conventional shell element在大变形分析中允许有限的膜应变,截面泊松比能够使膜厚度随膜应变的变化而变化.
在Abaqus/Standard中,默认值为0.5,这使得对于membrane strains来说,单元强制不可压缩。在Abaqus/Explicit中,默认是基于元素材料定义来改变厚度。Section Poisson's ratio \(\nu_p\)的值必须在-1.0~0.5之间.0.0表示shell单元厚度为常数;$\nu_p<0$表示tensile membrane strains导致的shell thickness上升;
4.2 continuum shell composite layup
Abaqus的continuum shell composite layup使用comtinuum shell element离散,该单元类型具有基于壳理论的运动学行为,但却是3D单元,如SC6R,SC8R.
这种建模方式需要特别注意的是:
- comtinuum shell composite layup在厚度方向上应该只有一个单元,这个单元含有layup定义的所有plys;如果layup赋予的region在厚度上有多个单元,那么每个单元中都含有相应的plys;
- 在网格划分时,应该注意
mesh stack direction,comtinuum shell composite layup可以模拟双面接触,以及厚度变化,因此相比于conventional shell composite layup在接触分析中精度更高. - 对于section integration选项,使用默认即可.和
conventianal shell composite layup一致的意思
4.3 solid composite layup
Composite solid elements are primarily intended for modeling convenience. They usually ==do not provide a more accurate solution ==than composite shell elements
大多数情况下,使用前两种建模方式已经满足需要.但如果有以下需求,建议使用solid composite layup:
- 当横向剪切效应占主导地位时
- 法向压力不能忽视
- 需要精确的层间应力时,例如复杂载荷或几何形状的局部区域附近
建模时需要注意的有:
-
同样的,solid composite layup在厚度方向上应该只有一个单元;如果layup赋予的region在厚度上有多个单元,那么每个单元中都含有相应的plys.
-
在Abaqus/Standard中,实体单元可以含有几层不同的材料,用于分析
laminated composite solids。在Abaqus/Explicit中,一个实体单元只能有一种均质材料; -
solid composite layup只用和具有位移自由度(1~6)的3d brick单元(如C3D8R,C3D6等),
更多理解see Defining composite solid elements in Abaqus/Standard,Modeling thick composites with solid elements in Abaqus/Standard
总结
三种建模方式,从精度来说,comtinuum shell composite layup 已经足够高了,使用solid composite layup并不能提供更高的精度.实际应用中,前两种方式已经足够
参考链接
本文来自博客园,作者:FE-有限元鹰,转载请注明原文链接:https://www.cnblogs.com/aksoam/p/18369061

 abaqus 的composite layup建模方式
