Flink源码学习(5)Flink编程的执行流程
Flink上层的API很简单,编程套路较为固定执行环境 ExecutionEnvironment数据抽象 DataSet/DataStream逻辑算子 Source Tramsform Sink
我们以Flink中提供的AdaptiveSchedulerITCase为例子
@Test
public void testGlobalFailoverCanRecoverState() throws Exception {

    StreamExecutionEnvironment env = StreamExecutionEnvironment.getExecutionEnvironment();
    env.setParallelism(PARALLELISM);

    env.enableCheckpointing(20L, CheckpointingMode.EXACTLY_ONCE);
    final DataStreamSource<Integer> input = env.addSource(new SimpleSource());

    input.addSink(new DiscardingSink<>());

    env.execute();
}
Env->Datasource->Addsink->Execute
在flink应用程序中所有的操作都是StreamOperator,分为Source,Sink,Stream
内置优化:多个特定能被优化的operator会形成chain
三个类似的概念:
Function高阶算子的参数->形成Operator->底层的表示Tramsform
Flink内置入门程序
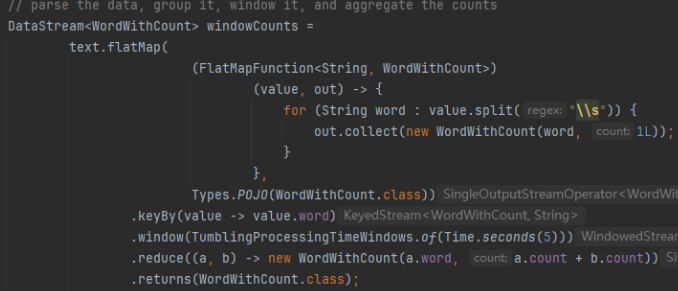
public class SocketWindowWordCount {

    public static void main(String[] args) throws Exception {

        // the host and the port to connect to
        final String hostname;
        final int port;
        try {
            final ParameterTool params = ParameterTool.fromArgs(args);
            hostname = params.has("hostname") ? params.get("hostname") : "localhost";
            port = params.getInt("port");
        } catch (Exception e) {
            System.err.println(
                    "No port specified. Please run 'SocketWindowWordCount "
                            + "--hostname <hostname> --port <port>', where hostname (localhost by default) "
                            + "and port is the address of the text server");
            System.err.println(
                    "To start a simple text server, run 'netcat -l <port>' and "
                            + "type the input text into the command line");
            return;
        }

        // get the execution environment
        final StreamExecutionEnvironment env = StreamExecutionEnvironment.getExecutionEnvironment();

        // get input data by connecting to the socket
        DataStream<String> text = env.socketTextStream(hostname, port, "\n");

        // parse the data, group it, window it, and aggregate the counts
        DataStream<WordWithCount> windowCounts =
                text.flatMap(
                                (FlatMapFunction<String, WordWithCount>)
                                        (value, out) -> {
                                            for (String word : value.split("\\s")) {
                                                out.collect(new WordWithCount(word, 1L));
                                            }
                                        },
                                Types.POJO(WordWithCount.class))
                        .keyBy(value -> value.word)
                        .window(TumblingProcessingTimeWindows.of(Time.seconds(5)))
                        .reduce((a, b) -> new WordWithCount(a.word, a.count + b.count))
                        .returns(WordWithCount.class);

        // print the results with a single thread, rather than in parallel
        windowCounts.print().setParallelism(1);

        env.execute("Socket Window WordCount");
    }

    // ------------------------------------------------------------------------

    /** Data type for words with count. */
    public static class WordWithCount {

        public String word;
        public long count;

        @SuppressWarnings("unused")
        public WordWithCount() {}

        public WordWithCount(String word, long count) {
            this.word = word;
            this.count = count;
        }

        @Override
        public String toString() {
            return word + " : " + count;
        }
    }
}
编写好之后打成jar包
mvn clean package -DskipTests
通过命令提交
flink命令脚本通过Java命令启动,在ClieFrontend类来启动jvm进程执行任务的构造和提交
Flink run xxx.jar class arg1 arg2
在flink-bin的bin/flink中,提交一个jar到flink运行
exec "${JAVA_RUN}" $JVM_ARGS $FLINK_ENV_JAVA_OPTS "${log_setting[@]}" -classpath "`manglePathList "$CC_CLASSPATH:$INTERNAL_HADOOP_CLASSPATHS"`" org.apache.flink.client.cli.CliFrontend "$@"
这行命令会让我们跳转到CliFrontend类的main方法中
static int mainInternal(final String[] args) {
    EnvironmentInformation.logEnvironmentInfo(LOG, "Command Line Client", args);

    // 1. find the configuration directory
    final String configurationDirectory = getConfigurationDirectoryFromEnv();

    // 2. load the global configuration
    final Configuration configuration =
            GlobalConfiguration.loadConfiguration(configurationDirectory);

    // 3. load the custom command lines
    final List<CustomCommandLine> customCommandLines =
            loadCustomCommandLines(configuration, configurationDirectory);

    int retCode = INITIAL_RET_CODE;
    try {
        final CliFrontend cli = new CliFrontend(configuration, customCommandLines);
        CommandLine commandLine =
                cli.getCommandLine(
                        new Options(),
                        Arrays.copyOfRange(args, min(args.length, 1), args.length),
                        true);
        Configuration securityConfig = new Configuration(cli.configuration);
        DynamicPropertiesUtil.encodeDynamicProperties(commandLine, securityConfig);
        SecurityUtils.install(new SecurityConfiguration(securityConfig));
        retCode = SecurityUtils.getInstalledContext().runSecured(() -> cli.parseAndRun(args));
    } catch (Throwable t) {
        final Throwable strippedThrowable =
                ExceptionUtils.stripException(t, UndeclaredThrowableException.class);
        LOG.error("Fatal error while running command line interface.", strippedThrowable);
        strippedThrowable.printStackTrace();
    }
    return retCode;
}
打印输出一些环境信息
通过flinki conf dir找到conf文件,解析文件
加载flinkyarnSessionCli和DefaultCli
在cli.parseAndRun中会执行run方法,方法里面会解析jar包,拿到主类参数依赖等信息
getPackagedProgram拿到jarFile,userClassPaths,entryPointClassName,configuration,savepointRestoreSettings,args
try (PackagedProgram program = getPackagedProgram(programOptions, effectiveConfiguration)) {
    executeProgram(effectiveConfiguration, program);
}
然后调用execute来执行
protected void executeProgram(final Configuration configuration, final PackagedProgram program)
        throws ProgramInvocationException {
    ClientUtils.executeProgram(
            new DefaultExecutorServiceLoader(), configuration, program, false, false);
}
executeProgram里面通过反射的方式调用运行,mainMethod.invoke(null, (Object) args)
反射是一种在运行时获取和操作类的信息的机制。它允许我们:
- 获取类的名称、方法、字段等信息。
- 创建类的实例。
- 调用类的方法和访问字段。
- 动态修改类的结构。
想要拿到一个类或者调用某个类的方法,首先需要获取到该类的class对象
- Class<TestClass> class = TestClass.class;
- Class<TestClass> class = tc.getClass();
- Class<TestClass> class = Class.forName("TestClass");
Java反射和new的区别
- 反射是动态编译,意思就是说只有运行时才会去获得该对象的实例,举例:Spring就是用反射。new是静态编译,在编译的时候所有模块加载入exe
- 首先new出来的对象我们无法访问其中的私有属性,但是通过反射出来的对象我们可以通过setAccessible()方法来访问其中的私有属性。
- 在使用new创建一个对象实例的时候必须知道类名,但是通过反射创建对象有时候不需要知道类名也可以
import java.lang.reflect.*;

public class ReflectionExample {
    public static void main(String[] args) throws ClassNotFoundException {
        // 获取类的Class对象
        Class<?> myClass = Class.forName("com.example.MyClass");

        // 获取类的名称
        String className = myClass.getName();
        System.out.println("Class Name: " + className);

        // 获取类的方法
        Method[] methods = myClass.getMethods();
        for (Method method : methods) {
            System.out.println("Method: " + method.getName());
        }

        // 获取类的字段
        Field[] fields = myClass.getDeclaredFields();
        for (Field field : fields) {
            System.out.println("Field: " + field.getName());
        }
    }
}
在ClientFrontUtils中
try {
    program.invokeInteractiveModeForExecution();
} finally {
    ContextEnvironment.unsetAsContext();
    StreamContextEnvironment.unsetAsContext();
}
最终调用自己写的类的main方法
public void invokeInteractiveModeForExecution() throws ProgramInvocationException {
    FlinkSecurityManager.monitorUserSystemExitForCurrentThread();
    try {
        callMainMethod(mainClass, args);
    } finally {
        FlinkSecurityManager.unmonitorUserSystemExitForCurrentThread();
    }
}
callMainMethod中,得到运行主类的main方法实例, entryClass自己编写的应用程序
try {
    mainMethod = entryClass.getMethod("main", String[].class);
} catch (NoSuchMethodException e) {
    throw new ProgramInvocationException(
            "The class " + entryClass.getName() + " has no main(String[]) method.");
} catch (Throwable t) {
    throw new ProgramInvocationException(
            "Could not look up the main(String[]) method from the class "
                    + entryClass.getName()
                    + ": "
                    + t.getMessage(),
            t);
}
最终进入自己编写的业务程序的main中
在Execution Environment源码解析
final StreamExecutionEnvironment env = StreamExecutionEnvironment.getExecutionEnvironment();
Flink程序第一步创建运行环境StreamExecution Environment
通过getExecutionEnvironment()来获取
时flink程序的执行入口提供重要的操作机制
- 提供了readTextFile(),socketTestStream(),createInput(), addSource()
- 提供了setParallelism设置并行度
- 管理EnvironmentConfig对象,负责job执行的一些行为配置
- StreamExecutionEnviroment管理了一个list transformation 成员变量用于保存job各种算子转化得到的transformation,拼起来就成了StreamGraph
- StreamExecutionEnvrioment提供了execute提交job的执行,接收的参数是StreamGraph
StreamExecutionEnvironment是Flink应用程序执行的上下文
Job提交代码的流程
1. DataStream<String> text = env.socketTextStream(String hostname, int port, String delimiter)
查看他的代码,其实返回的是addSource
public DataStreamSource<String> socketTextStream(
        String hostname, int port, String delimiter, long maxRetry) {
    return addSource(
            new SocketTextStreamFunction(hostname, port, delimiter, maxRetry), "Socket Stream");
}
进入addSource
private <OUT> DataStreamSource<OUT> addSource(
        final SourceFunction<OUT> function,
        final String sourceName,
        @Nullable final TypeInformation<OUT> typeInfo,
        final Boundedness boundedness) {
    checkNotNull(function);
    checkNotNull(sourceName);
    checkNotNull(boundedness);

    TypeInformation<OUT> resolvedTypeInfo =
            getTypeInfo(function, sourceName, SourceFunction.class, typeInfo);

    boolean isParallel = function instanceof ParallelSourceFunction;

    clean(function);

    final StreamSource<OUT, ?> sourceOperator = new StreamSource<>(function);
    return new DataStreamSource<>(
            this, resolvedTypeInfo, sourceOperator, isParallel, sourceName, boundedness);
}
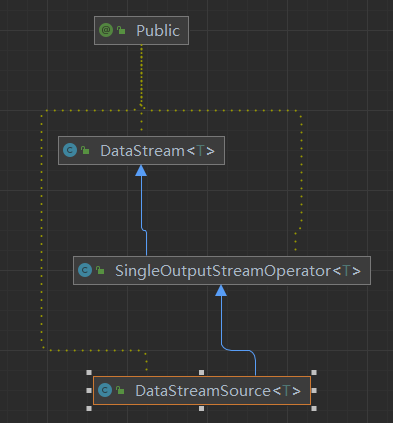
返回DataStreamSource,可以被抽象成DataStream,KeyedDataStream,DataStreamSource,DataStreamSink
- DataStream 是一个抽象类,它定义了数据流的基本操作和属性。
- DataStreamSource 是
2. FlatMap
DataStream<WordWithCount> windowCounts =
                text.flatMap(
                                (FlatMapFunction<String, WordWithCount>)
                                        (value, out) -> {
                                            for (String word : value.split("\\s")) {
                                                out.collect(new WordWithCount(word, 1L));
                                            }
                                        },
                                Types.POJO(WordWithCount.class))
                        .keyBy(value -> value.word)
                        .window(TumblingProcessingTimeWindows.of(Time.seconds(5)))
                        .reduce((a, b) -> new WordWithCount(a.word, a.count + b.count))
                        .returns(WordWithCount.class);
这个方法底层返回的是transform方法
public <R> SingleOutputStreamOperator<R> flatMap(
        FlatMapFunction<T, R> flatMapper, TypeInformation<R> outputType) {
    return transform("Flat Map", outputType, new StreamFlatMap<>(clean(flatMapper)));
}
把一个flatMapper这个function构建成StreamFlatMap这个operator
把算子变成function在变成function
最终调用transform方法来把operator这种streamOperator转换成transformation,最终加入到StreamExecutionEnvironment的List transformations中
这个Transform里面,把operator注册到执行环境中,用于生成StreamGraph,将这个transformation注册到执行环境中,当执行generate方法时,生成streamGraph图结构
protected <R> SingleOutputStreamOperator<R> doTransform(
        String operatorName,
        TypeInformation<R> outTypeInfo,
        StreamOperatorFactory<R> operatorFactory) {

    // read the output type of the input Transform to coax out errors about MissingTypeInfo
    transformation.getOutputType();

    OneInputTransformation<T, R> resultTransform =
            new OneInputTransformation<>(
                    this.transformation,
                    operatorName,
                    operatorFactory,
                    outTypeInfo,
                    environment.getParallelism(),
                    false);

    @SuppressWarnings({"unchecked", "rawtypes"})
    SingleOutputStreamOperator<R> returnStream =
            new SingleOutputStreamOperator(environment, resultTransform);

    getExecutionEnvironment().addOperator(resultTransform);

    return returnStream;
}
上述方法addOperator加的时transform,可见二者概念较为类似
也就是说把所有的高阶算子变成transformation加入list中
最后提交job:
env.execute("Socket Window WordCount");
Execute流程
public JobExecutionResult execute(String jobName) throws Exception {
    final List<Transformation<?>> originalTransformations = new ArrayList<>(transformations);
    StreamGraph streamGraph = getStreamGraph();
    if (jobName != null) {
        streamGraph.setJobName(jobName);
    }

    try {
        return execute(streamGraph);
    } catch (Throwable t) {
        Optional<ClusterDatasetCorruptedException> clusterDatasetCorruptedException =
                ExceptionUtils.findThrowable(t, ClusterDatasetCorruptedException.class);
        if (!clusterDatasetCorruptedException.isPresent()) {
            throw t;
        }

        // Retry without cache if it is caused by corrupted cluster dataset.
        invalidateCacheTransformations(originalTransformations);
        streamGraph = getStreamGraph(originalTransformations);
        return execute(streamGraph);
    }
}
通过getStreamGraph()获取streamGraph
通过execute提交streamGraph
streamGraphFlink的一个job,需要构建一个高效率的用于分布式并行执行的DAG执行图
- 相同函数类型的算子:如果两个算子是相同类型的函数,例如两个连续的 相邻两个阶段之间的streamTask是有关联的,到底哪些上游StreamTask生成数据给下游消费的StreamTask
一个Flink流式作业,从Client提交到Flink集群到最后执行,总共会经历4个状态,Flink中的执行图:StreamGraph->jobGraph->executionGraph->执行图
- client根据用户代码生成StreamGraph,把StreamGraph构建成JobGraph提交给Flink集群主节点
- 启动JobMaster接受到JobGraph,解析成ExecutionGraph,调度StreamTask执行
- StreamTask并行化的运行在Flink集群中,就是最终的物理执行图状态结构
StreamGraph:根据用户通过stram API编写的代码生成的最初的图,标识程序的拓扑结构JobGraph:streamGrapoh经过优化之后生成了JobGraph,提交给JobManager的数据结构,主要的优化为将多个符合条件的node给chain成一个node,减少序列化开销ExecutionGraph:Job Manager根据JobGraph生成ExecutionGraph,是JobGraph的并行版本,是一个数据结构物理执行图:JM跟布局ExecutionGraph对job调度,在各个TM上部署task后形成的实际物理图,不是数据结构
提交的流程的细节介绍
1. generate
private StreamGraphGenerator getStreamGraphGenerator(List<Transformation<?>> transformations) {
    if (transformations.size() <= 0) {
        throw new IllegalStateException(
                "No operators defined in streaming topology. Cannot execute.");
    }

    // We copy the transformation so that newly added transformations cannot intervene with the
    // stream graph generation.
    return new StreamGraphGenerator(
                    new ArrayList<>(transformations), config, checkpointCfg, configuration)
            .setStateBackend(defaultStateBackend)
            .setChangelogStateBackendEnabled(changelogStateBackendEnabled)
            .setSavepointDir(defaultSavepointDirectory)
            .setChaining(isChainingEnabled)
            .setUserArtifacts(cacheFile)
            .setTimeCharacteristic(timeCharacteristic)
            .setDefaultBufferTimeout(bufferTimeout)
            .setSlotSharingGroupResource(slotSharingGroupResources);
}
存储转换过的transformation
从Env对象中把transformation拿出来,转换成StreamNode
Function->Operator->Transformation->StreamNode
final List<Collection<Integer>> allInputIds = getParentInputIds(transform.getInputs());
递归调用input的Transformation处理完之后才能处理后面的,先处理transform的上一个transform
2. 解析streamGraph
在StreamGraph里面会添加很多StreamNode
protected StreamNode addNode(
        Integer vertexID,
        @Nullable String slotSharingGroup,
        @Nullable String coLocationGroup,
        Class<? extends TaskInvokable> vertexClass,
        StreamOperatorFactory<?> operatorFactory,
        String operatorName) {

    if (streamNodes.containsKey(vertexID)) {
        throw new RuntimeException("Duplicate vertexID " + vertexID);
    }

    StreamNode vertex =
            new StreamNode(
                    vertexID,
                    slotSharingGroup,
                    coLocationGroup,
                    operatorFactory,
                    operatorName,
                    vertexClass);

    streamNodes.put(vertexID, vertex);

    return vertex;
}
StreamGraph包含StreamNode和StreamEdge,对于边的生成,则是设置当前StreamNode和上游所有的StreamNode之间的StreamEdge
for (Transformation<F> feedbackEdge : coIterate.getFeedbackEdges()) {
    Collection<Integer> feedbackIds = transform(feedbackEdge);
    allFeedbackIds.addAll(feedbackIds);
    for (Integer feedbackId : feedbackIds) {
        streamGraph.addEdge(feedbackId, itSink.getId(), 0);
    }
}
设置的具体方法,一个上游的streamVertexID一个下游的streamVertexID,也可以一看成StreamNodeID
public void addEdge(Integer upStreamVertexID, Integer downStreamVertexID, int typeNumber) {
    addEdge(upStreamVertexID, downStreamVertexID, typeNumber, null);
}
看看如何构建的边
private void addEdgeInternal(
        Integer upStreamVertexID,
        Integer downStreamVertexID,
        int typeNumber,
        StreamPartitioner<?> partitioner,
        List<String> outputNames,
        OutputTag outputTag,
        StreamExchangeMode exchangeMode,
        IntermediateDataSetID intermediateDataSetId) {

    if (virtualSideOutputNodes.containsKey(upStreamVertexID)) {
        int virtualId = upStreamVertexID;
        upStreamVertexID = virtualSideOutputNodes.get(virtualId).f0;
        if (outputTag == null) {
            outputTag = virtualSideOutputNodes.get(virtualId).f1;
        }
        addEdgeInternal(
                upStreamVertexID,
                downStreamVertexID,
                typeNumber,
                partitioner,
                null,
                outputTag,
                exchangeMode,
                intermediateDataSetId);
    } else if (virtualPartitionNodes.containsKey(upStreamVertexID)) {
        int virtualId = upStreamVertexID;
        upStreamVertexID = virtualPartitionNodes.get(virtualId).f0;
        if (partitioner == null) {
            partitioner = virtualPartitionNodes.get(virtualId).f1;
        }
        exchangeMode = virtualPartitionNodes.get(virtualId).f2;
        addEdgeInternal(
                upStreamVertexID,
                downStreamVertexID,
                typeNumber,
                partitioner,
                outputNames,
                outputTag,
                exchangeMode,
                intermediateDataSetId);
    } else {
        createActualEdge(
                upStreamVertexID,
                downStreamVertexID,
                typeNumber,
                partitioner,
                outputTag,
                exchangeMode,
                intermediateDataSetId);
    }
}
使用递归的方法addEdgeInternal构建边,
addEdgeInternal方法都是在处理了特定的条件后,使用更新后的参数列表再次调用自身,这是递归的典型特征,递归的结束条件是当upStreamVertexID既不在virtualSideOutputNodes也不在virtualPartitionNodes中,这时代码将执行到else分支,并调用createActualEdge方法来创建实际的边,此时不再进行递归调用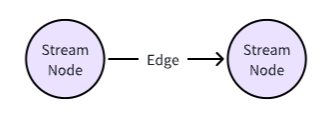
会把所有的transform都做一次,转换成StreamNode
既然处理了streamGraph之后,我们后面的流程是异步地启动一个流处理作业,并在作业启动后提供反馈给监听器,同时处理可能发生的异常情况。使用了
CompletableFuture 来实现异步执行public JobClient executeAsync(StreamGraph streamGraph) throws Exception { checkNotNull(streamGraph, "StreamGraph cannot be null."); final PipelineExecutor executor = getPipelineExecutor(); CompletableFuture<JobClient> jobClientFuture = executor.execute(streamGraph, configuration, userClassloader); try { JobClient jobClient = jobClientFuture.get(); jobListeners.forEach(jobListener -> jobListener.onJobSubmitted(jobClient, null)); collectIterators.forEach(iterator -> iterator.setJobClient(jobClient)); collectIterators.clear(); return jobClient; } catch (ExecutionException executionException) { final Throwable strippedException = ExceptionUtils.stripExecutionException(executionException); jobListeners.forEach( jobListener -> jobListener.onJobSubmitted(null, strippedException)); throw new FlinkException( String.format("Failed to execute job '%s'.", streamGraph.getJobName()), strippedException); } }
3. 转为JobGraph提交给RestClient处理
执行完成后,可以通过
getJobClient() 获取 JobClient 对象,它提供了对作业执行结果的访问,包括作业的状态和统计信息MiniClusterClient本地执行
RestClusterClient提交到Flink Rest服务端
在提交JobGraph到Flink集群运行的时候,其实提交的就是jobGraphFile
由JobSubmitHandler接受请求执行处理
在执行处理的第一件事情,把传送过来的这个文件反序列化得到JobGraph对象
然后把JobGraphFile上传到HDFS
然后SendRetriableRequest多次提交这个请求,job Submit RequestBody
restClient提交Request给WebMonitorEndpoint,最终由JobSubmitHandler来执行请求处理
通过Http Restful方式提交
因此总的流程:
+---------------------------+
|    创建执行环境         |
|  StreamExecutionEnvironment env = |
|         StreamExecutionEnvironment.getExecutionEnvironment(); |
+---------------------------+
            |
            v
+---------------------------+
|    添加源数据            |
|  DataStream<T> source =   |
|  env.addSource(sourceFunction); |
+---------------------------+
            |
            v
+---------------------------+
|    转换操作(例如:map、flatMap)|
|  DataStream<R> transformed = |
|  source.transformed(transformFunction); |
+---------------------------+
            |
            v
+---------------------------+
|    设置并行度            |
|  env.setParallelism(parallelism); |
+---------------------------+
            |
            v
+---------------------------+
|    添加Sink(输出)      |
|  transformResult.addSink(sinkFunction); |
+---------------------------+
            |
            v
+---------------------------+
|    执行作业              |
|  env.execute(jobName);    |
+---------------------------+
            |
            v
+---------------------------+
|    作业执行结果           |
|  JobClient jobClient =    |
|  getJobClient()            |
+---------------------------+
提交的流程流程
构建StreamNode和StreamEdge
提交StreamGraph,生成JobGraph,通过RestClusterClient提交JobCraph,http请求
到webmonitorEndpoint中的JobSubmitHandler来执行处理
通过FlinkPipelineTranslator来转换获取到JobGraph
final JobGraph jobGraph =
        FlinkPipelineTranslationUtil.getJobGraph(
                userClassloader,
                pipeline,
                configuration,
                executionConfigAccessor.getParallelism());
StreamGraph.getJobGraph
StreamingJobGraphGenerator.createJobGraph来实现streamGraph到jobGraph的转换
StreamGraph到JobGraph之间主要是做了chain动作:setChaining方法
将可以chain在一起的streamNode链接在一起
能减少线程之间的切换,消息的序列化,缓冲区交换,减少延时
一个StreamNode也可以被认为是做了chain动作
一个StreamEdge链接上下游两个StreamNode
List<StreamEdge> chainableOutputs = new ArrayList<>()
拿到streamNode的getOutEdges
isChainable判断是否能chain,能就放入chainableOutputs,不能就放入nonchainableOutputs
当前判断只能做当前StreamNode和直接下游StreamNode
把每一个可以chain的Edges给createChain
如何判断能否被chain
private static boolean isChainable(
        Transformation<?> upTransform,
        Transformation<?> downTransform,
        Map<Transformation<?>, Set<Transformation<?>>> outputMap) {
    return upTransform.getParallelism() == downTransform.getParallelism()
            && upTransform.getMaxParallelism() == downTransform.getMaxParallelism()
            && upTransform.getSlotSharingGroup().equals(downTransform.getSlotSharingGroup())
            && areOperatorsChainable(upTransform, downTransform)
            && outputMap.get(upTransform).size() == 1;
}


private static boolean areOperatorsChainable(
        Transformation<?> upTransform, Transformation<?> downTransform) {
    if (!areOperatorsChainableByChainingStrategy(upTransform, downTransform)) {
        return false;
    }

    if (upTransform instanceof PythonBroadcastStateTransformation
            || upTransform instanceof PythonKeyedBroadcastStateTransformation) {
        return false;
    }

    DataStreamPythonFunctionOperator<?> upOperator =
            (DataStreamPythonFunctionOperator<?>)
                    ((SimpleOperatorFactory<?>) getOperatorFactory(upTransform)).getOperator();

    DataStreamPythonFunctionOperator<?> downOperator =
            (DataStreamPythonFunctionOperator<?>)
                    ((SimpleOperatorFactory<?>) getOperatorFactory(downTransform))
                            .getOperator();

    if (!arePythonOperatorsInSameExecutionEnvironment(upOperator, downOperator)) {
        return false;
    }

    return (downOperator instanceof ExternalPythonProcessOperator
                    && (upOperator instanceof ExternalPythonKeyedProcessOperator
                            || upOperator instanceof ExternalPythonKeyedCoProcessOperator
                            || upOperator instanceof ExternalPythonProcessOperator
                            || upOperator instanceof ExternalPythonCoProcessOperator))
            || (downOperator instanceof EmbeddedPythonProcessOperator
                    && (upOperator instanceof EmbeddedPythonKeyedProcessOperator
                            || upOperator instanceof EmbeddedPythonKeyedCoProcessOperator
                            || upOperator instanceof EmbeddedPythonProcessOperator
                            || upOperator instanceof EmbeddedPythonCoProcessOperator
                            || upOperator instanceof EmbeddedPythonWindowOperator));
}
4. JobSubmitHandler的作用
资源管理:ResourceManager+TaskExecutor任务运行:JobMaster+StreamTask
- 客户端提交作业,客户端把JobGraph提交给JobManager了
- handleRequest服务端处理,接受JobGraph
- 加载JobGraph:从请求中获取文件,拿到请求体,从中loadJobGraph恢复成JobGraph
- 客户端异步等待结果:异步等待拿到结果
- webMonitor监听:当webmonitor拿到请求之后马上调用Job Submit的submitHandleRequest处理,上传jar包之后,把数据提交给getway,也就是Dispatcher
-
Dispatcher处理:当客户端提交一个job的时候由集群的主节点Dispatcher接受来继续提交执行,分配Job给JobManager实例
-
createJobManagerRunner:创建JM实例,JobGraph变成ExecutionGraph
- 把jobGraph通过json字符串的方式设置到ExecutionGraph的成员变量
最大的变化是单个jobVertex变成了多个ExecutionVertex,一对多的关系,根据JobVertex的并发度设置来决定生成多少ExecutionVertex。一个ExecutionVertex就对应到真正执行的streamTask。正常来说,一个StreamTask对应一个slot
- 把jobGraph通过json字符串的方式设置到ExecutionGraph的成员变量
-
JobVertex可以指定其并行度,ExecutionGraph会根据这个并行度将每个JobVertex分割成多个ExecutionVertex。每个ExecutionVertex代表操作符的一个并行实例。- slot分配
- startJobManagerRunner:启动JM对象
- 作业执行:调度完成后JM将作业分发给TM
-
TaskManager上面已经启动好了一个JobMaster
- JobMaster需要向resourceManager汇报心跳
-
JobMaster需要向TaskManager维持心跳
- 对应task在那些TM运行,所以需要维持
- 把所有注册的心跳对象发一个心跳请求,调度任务重新10s刷新调度请求心跳
- 当前JobMaster启动slotPool,为了集中管理所有申请到的slot
- ReconnectToResource连接ResourceManager
- 监听resource Manager的变更,jobMaster需要实时感知RM的更新
- 如果主节点failover,重新建立JobMaster连接
- 向RM注册当前这个JobMaster
8. WebMonitor更新:更新作业的状态信息,可以实时监控进度
9.结果反馈:客户端通过webMonitor的REST API拿到结果的状态
也就是:客户端准备作业 -> 客户端提交作业 -> 联系 JobManager -> handleRequest 服务端处理 -> 加载 JobGraph -> 调度作业 -> 异步等待结果 -> WebMonitor 监听 -> Dispatcher(Gateway)处理 -> 作业执行 -> WebMonitor 更新 -> 结果反馈。5. slot管理申请和释放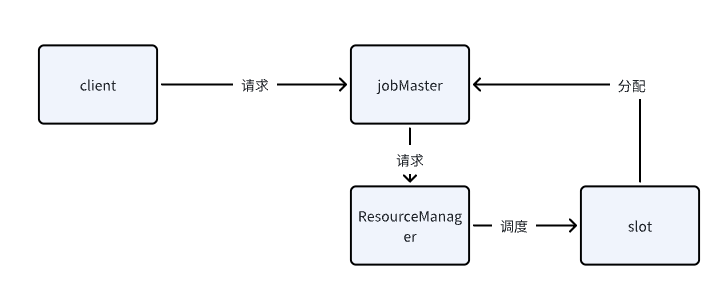 JobMaster服务端处理入口恢复得到JobGraph创建JobManagerRunner,创建JobMaster,创建过程中,把JobGraph转为ExecutionGraph,当前整个Job到底需要多少资源内部主要做2件事情,startJobMasterService,jobMasterServiceJM发送请求申请slot对象RM,执行slot请求处理TM处理RM发过来slot请求
- ResourceManager管理所有的TaskManager taskExecutor
-
TaskExecutor中关于资源的管理,使用slot的抽象
- slot的状态管理,专门有一个做slot管理的slotManagerImpl
-
JobMaster申请slot管理组件slotPool
- slot共享,既然由slot共享的概念,如果要执行一个task,其实就可以先尝试从slotPool中申请,如果申请不到,则向ResourceManager申请
-
Taskmanager的slot管理jobMaster发送请求申请slot
ResourceManager接受请求执行slot请求TaskManager处理ResourceManager发送过来的slot请求JobMaster接收到TaskManager发送的slot申请处理结果用户客户端 ----> JobManager | ^ | | v | 作业图生成 <----+----> ResourceManager | ^ | | v | JobSubmitHandler <--+ | v TaskManager(s)
allocateSlotsAndDeploy初始化一个容器存储申请到的slotExecutionVertexAssignment遍历待申请slot的ExecutionVertex集合,依次执行slot申请处理申请结果:如果申请到,最终申请到的是LogicalSlot,可能存在共享slot,多个task公用一个slot,在逻辑上看作多个slot,在物理上是同一个slot如果第一次申请slot,那么slotpool里面肯定没有slot,那么就去resourcemanager安排一个slot- 假设申请slot,刚好没有了,启动的是standalone集群
只能等待- 假设申请slot,刚好没有了, 启动的是yarn集群
动态slot管理,job提交给yarn之后,如果taskExecutor太少,重新申请一个container启动,每个taskExecutor提供一定数量的slot用于执行任务请求存起来,如果断网了还能等恢复之后继续发如果这一次slot申请,最终申请到了slot,这个slot会被分配一个allocationID防止重复申请调用RM的代理对象申请slot进入RM处理流程:判断这个job是不是已经被内注册过了,判断申请slot的JM和注册的Job的Master地址是不是一样防止Failover后因为JM的迁移导致了双倍的slot申请资源浪费从Free状态的已注册的slot中选择符合要求的slot、找到了对应的slot,从freeslots集合中删除申请到的slot只要taskExecutor注册上线了,必然进行slot汇报在执行完task之后被释放的slot放入freeslots中如果集群中没有free状态的slot,那么执行allocateResource申请资源如果是yarn集群:开启新的TaskExecutor,开启一个startNewWorker如果是standalone方式:并不能startNewWorker,刚才ResourceManager通过调用SlotManagerImpl的findMatchingSlot==逻辑计算,找出一个最合适的free状态的最合适的slot如果能拿到free的slot,那么方法的返回结果中,必然包含slotID和TaskExecutorID状态校验,看这个taskManagerSlot是allocated,pending,free。taskManagerSlot状态变为pending,resourceManager已经分配出去了,但是TaskManager不知道,还没返回成功,所以叫pending如果某个TaskExecutor里面的某个slot被分配给了某个job的某个task,那么当前这个taskExecutor就会封装一个TaskSlot进行管理taskSlot = new TaskSlot<>( index, effectiveResourceProfile, memoryPageSize, jobId, allocationId, memoryVerificationExecutor); taskSlots.put(index, taskSlot); // update the allocation id to task slot map allocatedSlots.put(allocationId, taskSlot);更新job在该节点上申请的slot数量,维护slot和allocationID之间的关系if (slots == null) { slots = new HashSet<>(4); slotsPerJob.put(jobId, slots); } slots.add(allocationId);
把每一个slot封装成slotOffer,将自己的slot分配给jobManager处理分配执行的反馈如果超时了就重来,报错就释放slot,没错就在taskSlotTable里面的slot状态修改将申请到的slotOffer的集合返回JobMaster经过一系列动作,最终RM把某一个TaskExecutor上的某个slot分配给当前jobMaster,当前JM通过slotPool来管理起来这个申请到的slotslotExecutionVertexAssignment返回slot抽象集合Execution需要的slot申请完毕,拥有资源,给每一个对象构建一个handler通过一个handler启动和部署一个task构建的deploymentHandler并行部署slotwaitForAllslotsAndDeploy找到对应的slotAssigned=slotExecutionVertexAssignment对应起来把slotAssigned.handle进行部署通过deployOrHandlerError方法,根据slotAssigned,deploymentHandledeployTaskSafe方法,根据ExeutionVertexId获取ExecutionVertex,在初始化jobMaster的时候会同时创建一个Scheduler = DefaultScheduler,在被创建的时候会把jobGraph变成ExecutionGraph第一次执行失败可能会充实,但是这两次执行的是同一个ExecutionVertex,怎么区分每执行一次ExecutionVertex就封装一个Execution对象 -

 浙公网安备 33010602011771号