SpringBoot学习记录(二)
1、总体概述
1.1什么是微服务,微服务和微服务架构的区别
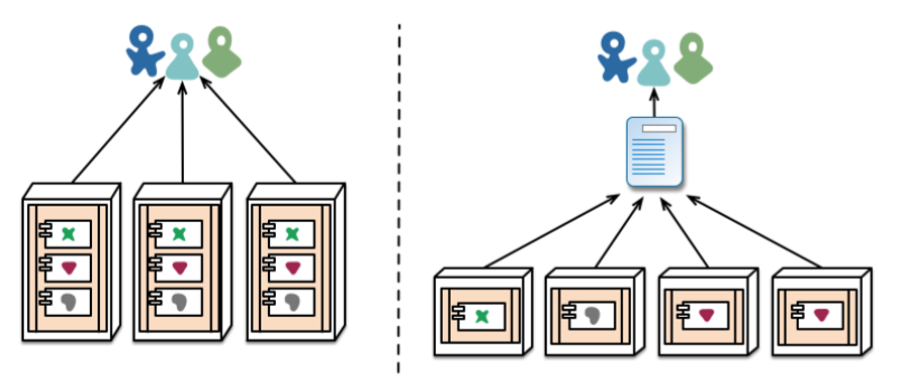
目前而言,对于微服务业界没有一个统一的标准定义,但是通常而言提倡把一个单一的应用程序划分为一组小的服务,每个小的服务都会运行在自己的进程中,服务之间通过轻量级的通信机制(http的rest api)进行通信,那么一个个的小服务就是微服务。
在传统的应用,都是把所有的模块都在一个项目中,若某一个模块出现线上bug,会导致整个版本发布回退,若把单一的应用拆分为一个个微服务,那么一个微服务出错不会导致整个版本回退。
单体架构与微服务架构图示:
1.2什么是微服务架构:
微服务架构是一种架构模式(用于服务管理微服务的),它把一组小的服务互相协调、互相配合,并且 完成功能。每个服务运行在其独立的进程中,服务与服务间采用轻量级的通信机制互相协作(通常是基 于HTTP 协议的RESTfulAPI )。每个服务都围绕着具体业务进行构建,并且能够被独立的部署到生产环 境、类生产环境等。另外,应当尽量避免统一的、集中式的服务管理机制,对具体的一个服务而言,应 根据业务上下文,选择合适的语言、工具对其进行构建。

1.3微服务的优缺点
1.3.1优点:
①:优点每个服务足够内聚,足够小,代码容易理解这样能聚焦一个指定的业务功能或业务需求(职责单 一)
②:开发简单、开发效率提高,一个服务可能就是专一的只干一件事,微服务能够被小团队单独开发,这 个小团队是 2 到 5 人的开发人员组成。
③:微服务能使用不同的语言开发
④:易于和第三方集成,微服务允许容易且灵活的方式集成自动部署,通过持续集成工具,如 Jenkin等。
⑥:每个微服务都有自己的存储能力,可以有自己的数据库。也可以有统一数据库。
1.3.2缺点:
①:开发人员要处理分布式系统的复杂性(分布式事物)
②:多服务运维难度,随着服务的增加,运维的压力也在增
③:系统部署依赖
④:服务间通信成本
⑤:数据一致性
2、项目上如何使用
2.1演示如何快速构建一个springboot的微服务项目
2.1.1基于maven版本就行构建
需要提前安装的有jdk1.8,maven,然后在maven的settings.xml配置文件中设置为如下配置:
<profile>
       <id>jdk-1.8</id>
        <activation>
            <activeByDefault>true</activeByDefault>
            <jdk>1.8</jdk>
        </activation>
        <properties>
            <maven.compiler.source>1.8</maven.compiler.source>
            <maven.compiler.target>1.8</maven.compiler.target>
            <maven.compiler.compilerVersion>1.8</maven.compiler.compilerVersion>
        </properties>
</profile>
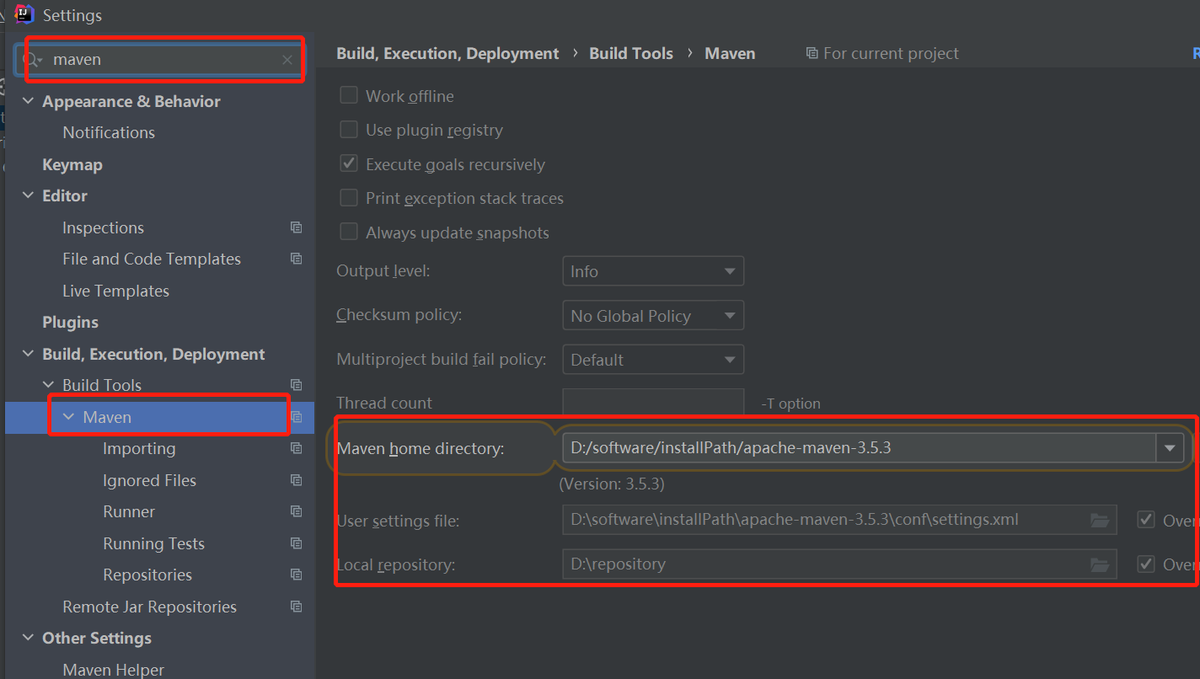
2.1.2配置IDE的环境(maven配置)
2.1.3创建一个空的maven工程,然后导入springboot相关的jar包
//父工程依赖
<parent>
<groupId>org.springframework.boot</groupId>
<artifactId>spring-boot-starter-parent</artifactId>
<version>2.2.5.RELEASEE</version>
</parent>
 //spring mvc-web的依赖
<dependencies>
 <dependency>
<groupId>org.springframework.boot</groupId>
<artifactId>spring-boot-starter-web</artifactId>
</dependency>
 </dependencies>
 //引入一个spring boot插件,可以支持我们将web应用程序打成可运行jar包
<build>
<plugins>
<plugin>
<groupId>org.springframework.boot</groupId>
<artifactId>spring-boot-maven-plugin</artifactId>
   </plugin>
  </plugins>
  </build>
2.1.4编写主入口程序
@SpringBootApplication
public class FinancialNewApplication {
   public static void main(String[] args) {
      SpringApplication.run(FinancialNewApplication.class, args);
      System.out.println("started");
   }
}
2.1.5其他业务组件
controller、service、mapper、entity等自己写的组件必须放在主启动类FinancialNewApplication所在包及其子包下

2.1.6探究
为啥我只要引入为啥我只要引入 spring-boot-starter-parent 和 spring-boot-starter-web就可以快速开 发mvc的项目
pom分析:
<parent>
    <groupId>org.springframework.boot</groupId>
    <artifactId>spring-boot-starter-parent</artifactId>
    <version>2.2.5.RELEASE</version>
</parent>
//真正的版本管理仲裁中心 来决定应用的版本
<parent>
  <groupId>org.springframework.boot</groupId>
  <artifactId>spring-boot-dependencies</artifactId>
  <version>2.2.5.RELEASE</version>
  <relativePath>../../spring-boot-dependencies</relativePath>
</parent>

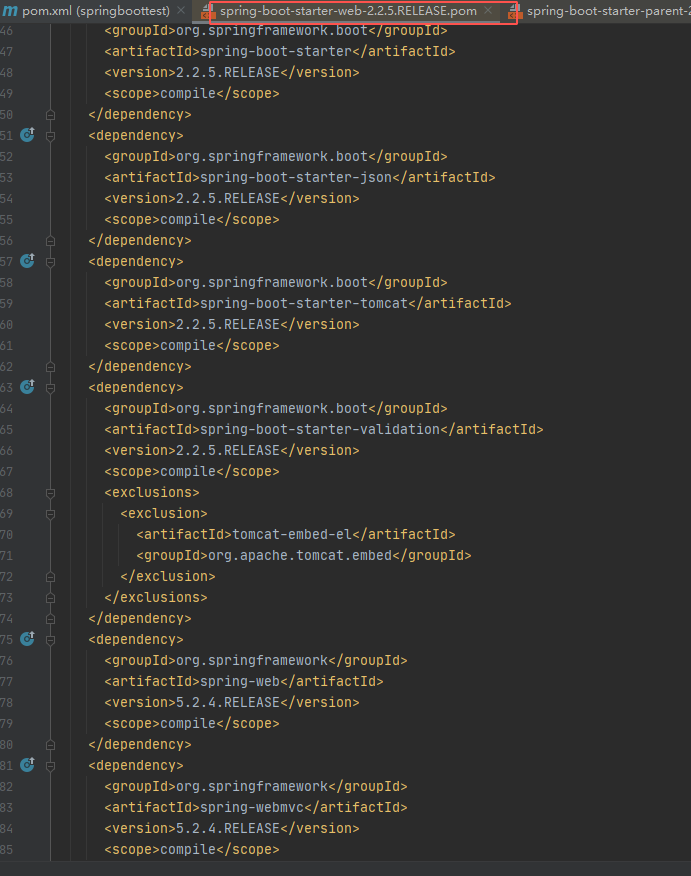
以后我们导入依赖默认是不需要写版本(如果没有在dependencies里面管理的依赖就自然而然需要声明版本号),下面看下spring-boot-start-web(场景启动器)为我们项目中导入web开发需要的jar包依赖
2.1.7配置文件
springboot支持yml或者properties后缀格式的文件进行配置(以下介绍比较传统没有统一配置中心情况下多环境部署配置文件的切换,在财务系统构建区别介绍有配置中心的情况)
多profile切换:我们在开发应用时,通常一个项目会被部署到不同的环境中,比如:开发、测试、生产等。其中每个环 境的数据库地址、服务器端口等等配置都会不同,对于多环境的配置,大部分构建工具或是框架解决的 基本思路是一致的,通过配置多份不同环境的配置文件,再通过打包命令指定需要打包的内容之后进行 区分打包
yml支持多模块文档块(冒号后面记得加空格)
server:
port: 8081
servlet:
context-path: /xxx01
spring:
profiles:
active: dev
---
开发环境配置
spring:
profiles: dev
server:
port: 8082
---
生产环境配置
spring:
profiles: prod
server:
port: 8083
启动的时候设置虚拟机参数:-Dspring.profiles.active=dev|prod即可
2.1.8财务系统构建的区别
财务系统或者是我们公司新的项目使用的情况,总体跟上面的介绍大同小异,只是我们公司的架构师在原有的基础上进行封装一层,所以我们在构建一个个的springboot微服务的时候,就不是像上面进行引入依赖,而是引入我们自己封装的starter,根据需要什么就引入什么即可,本质封装的这个也是引入原来的starter,所以对于引入本质是没啥区别,区别在于我们引入的是在原有的基础上再封装一些适合我们公司要用的东西
pom文件:
<parent>
    <groupId>com.xxx.bootcore</groupId>
    <artifactId>bootcore-parent</artifactId>
    <version>1.0.0</version>
</parent>
<parent>
    <groupId>com.xxx.bootcore</groupId>
    <artifactId>bootcore-dependencies</artifactId>
    <version>1.0.0</version>
    <relativePath>bootcore-dependencies/pom.xml</relativePath>
</parent>
//回到第一步分析的类似
<parent>
    <groupId>org.springframework.boot</groupId>
    <artifactId>spring-boot-starter-parent</artifactId>
    <version>2.2.5.RELEASE</version>
    <relativePath/> <!-- lookup parent from repository -->
</parent>
其他的组件类似,需要什么引入什么即可
2.2 apollo配置中心
对于多环境的配置文件不宜直接写在代码中,所以我们公司统一部署一个apollo配置中心,来管理所有项目增对开发环境,测试环境,生产环境的配置文件,在我们项目中需要引入apollo的客户端即以下:
//只需引入这个即可
<dependency>
    <groupId>com.xxx.bootcore</groupId>
    <artifactId>bootcore-cloud-starter-config</artifactId>
</dependency>
//这个已经在引入上面一个的时候依赖引入进来了
<dependencies>
    <dependency>
        <groupId>com.ctrip.framework.apollo</groupId>
        <artifactId>apollo-client</artifactId>
    </dependency>
</dependencies>
项目启动的时候指定是开发,还是测试,还是生产后就会去apollo配置中心读取对应的配置文件:

2.3 springboot关于打包问题总结
2.3.1打成jar包时指定名称

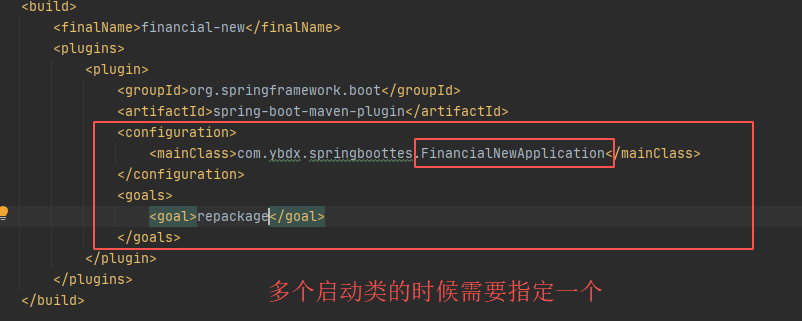
2.3.2如果工程中出现多个mainclass的时候需要指定主启动类
springboot也很好的支持传统打成war然后放在自己的tomcat上运行,下面介绍以下如何打成war包
第一步:指定springboot pom中打包方式 由jar改为war

第二步:在spring-boot-starter-web模块打包被依赖与 tomcat
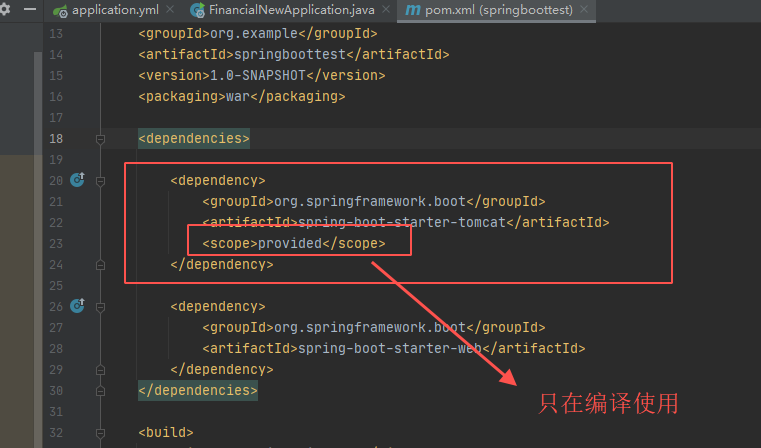
第三步:在主启动类上实现SpringBootServletInitializer,并重写confiure方法
@SpringBootApplication
public class FinancialNewApplication extends SpringBootServletInitializer {
   public static void main(String[] args) {
      SpringApplication.run(FinancialNewApplication.class, args);
      System.out.println("started");
   }

   @Override
   protected SpringApplicationBuilder configure(SpringApplicationBuilder builder) {
      return builder.sources(FinancialNewApplication.class);
   }
}
第四步:打包生成后就可以放在我们自己部署的tomcat上运行了:

3、springboot与第三方组件整合与自动装配原理详解
3.1传统ssm整合
在传统ssm整合的时候需要在xml的配置文件中,进行大量的配置Bean,下面演示:
第一步:加入配置
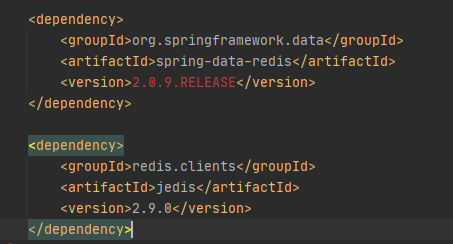
第二步:配置xml的bean的配置
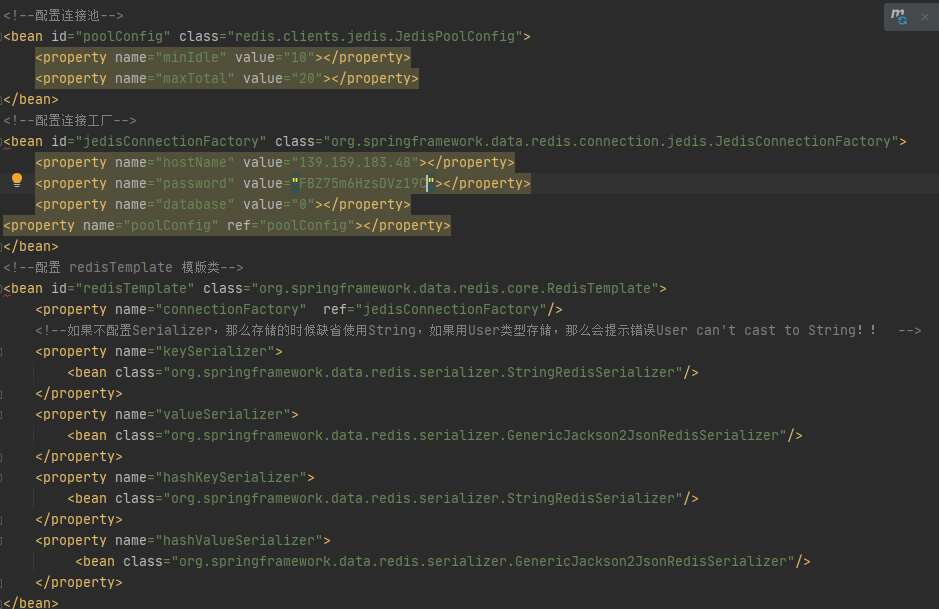
第三步:导入配置,然后即可通过注入的方式进行使用
@Autowired
private RedisTemplate redisTemplate;
3.2 springboot整合
综上所看,若整合redis的时候通过传统的方式进行整合,需要在xml中进行大量的配置,下面看下通过springboot自动装配整合的比对
第一步:导入依赖
<dependency>
<groupId>org.springframework.boot</groupId>
<artifactId>spring-boot-starter-data-redis</artifactId>
</dependency>
第二步:修改yml配置文件
spring.redis.host=139.159.183.48
spring.redis.port=6379
spring.redis.password=FBZ75m6HzsDVz19C
第三步:注入即可使用
@Autowired
StringRedisTemplate stringRedisTemplate;
3.3自定装配原理前导
在讲解自动配置原理前,先说几个比较重要的注解
通过@Import注解来导入ImportSelector的注解,下面以一个小例子来说明:
①:写一个配置类在配置类上标注一个@Import的注解,

②:在@Import注解的value值写自己需要导入的组件,在selectImports方法中 就是你需要导入组件的全类名

③:核心代码
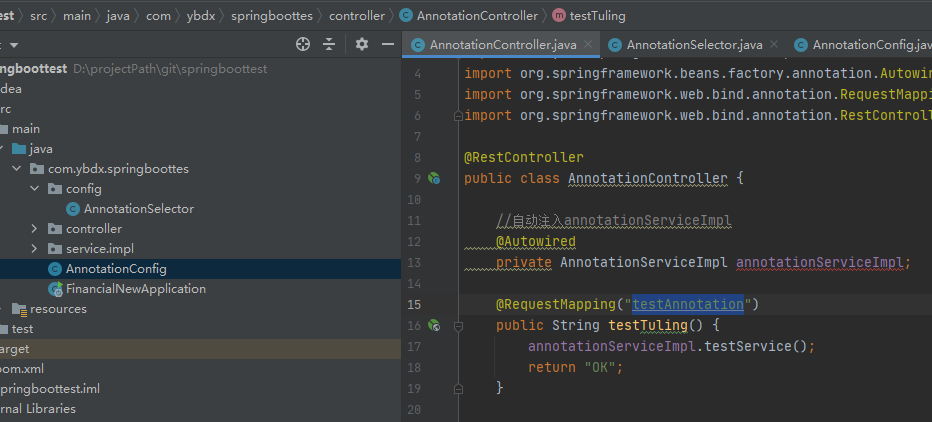


通过@Import导入ImportBeanDefinitionRegistrar 从而进来导入组件
①:配置导入组件

②:核心代码
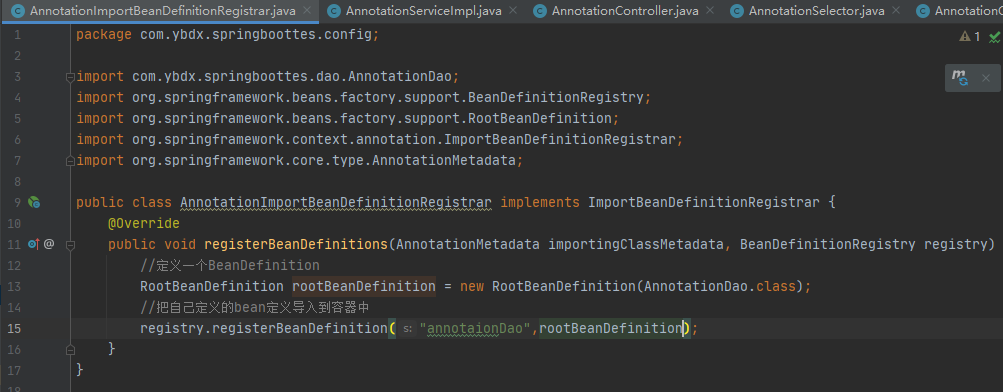


③:测试结果

spring底层条件装配注解:
@Conditional//按照一定的条件进行判断,满足条件的才给容器注册Bean
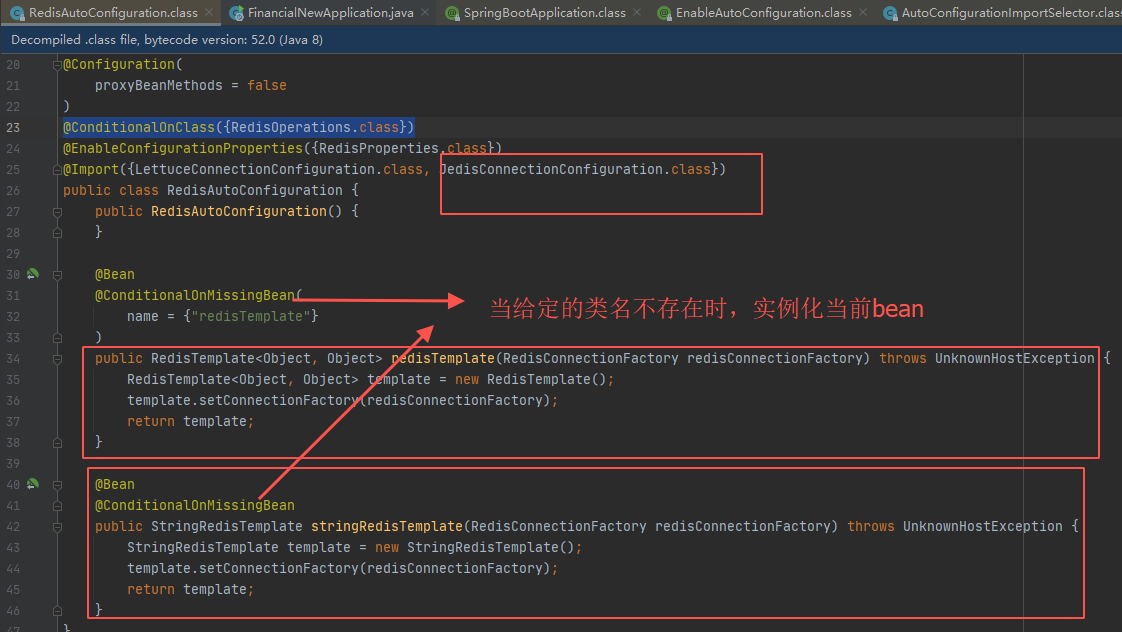
@ConditionalOnBean //当给定的在bean存在时,则实例化当前Bean@ConditionalOnMissingBean //当给定的在bean不存在时,则实例化当前Bean@ConditionalOnClass //当给定的类名在类路径上存在,则实例化当前Bean@ConditionalOnMissingClass //当给定的类名在类路径上不存在,则实例化当前Bean
下面以@Conditional进行细讲,其它几个注解都差不多,在实际开发过程中可以根据实际情况使用以上注解
①:应用要求,比如我有两个组件,一个是xxxLog,一个是xxxAspect,而xxxLog是依赖xxxAspect的,只有容器中有xxxAspect组件才会加载xxxLog
//xxxLog组件 依赖xxxAspect组件
public class xxxLog{}
//xxxAspect组件
public class xxxAspect{}
②:自定义条件组件条件
public class xxxConditional implements Condition {

@Override
    public boolean matches(ConditionContext conditionContext, AnnotatedTypeMetadata annotatedTypeMetadata) {

//容器中包含xxxAspect组件才返回Ture
         if(conditionContext.getBeanFactory().containsBean("xxxAspect")){
            return true;

}else{

return false;

}

}
}
③:测试
以下情况会加载两个组件
 @Bean

public xxxAspect xxxAspect() {

System.out.println("xxxAspect组件自动装配到容器中");
         return new xxxAspect();

}


@Bean

@Conditional(value = xxxConditional .class)

public xxxLog xxxLog() {

System.out.println("xxxLog组件自动装配到容器中");

return new xxxLog();

}
以下情况两个组件都不会加载
/*@Bean**/

public xxxAspect xxxAspect() {

System.out.println("xxxAspect组件自动装配到容器中");
         return new xxxAspect();

}


@Bean

@Conditional(value = xxxConditional .class)

public xxxLog xxxLog() {

System.out.println("xxxLog组件自动装配到容器中");

return new xxxLog();

}
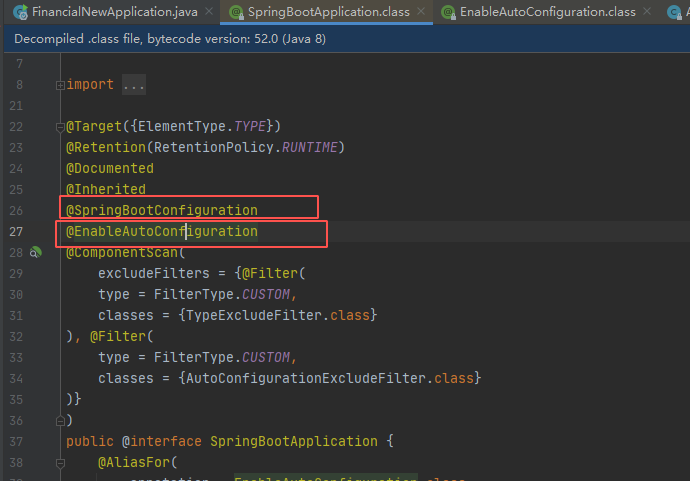
3.4自动装配原理分析从@SpringbootApplication入手分析
①:先看下SpringbootApplication标了哪些注解
②:点击进@EnableAutoConfiguration看
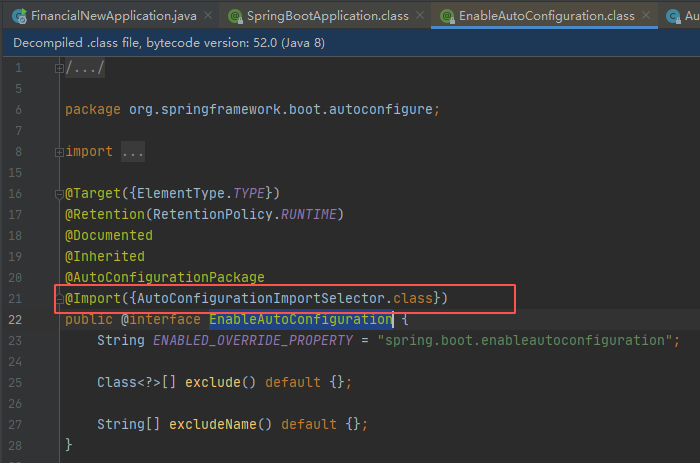
③:看到了@Import({AutoConfigurationImportSelector.class})就是我们上面介绍通过@Import注解来导入ImportSelector的注解原理一样,我们点击进去看下,为我们自动装配了哪些类:
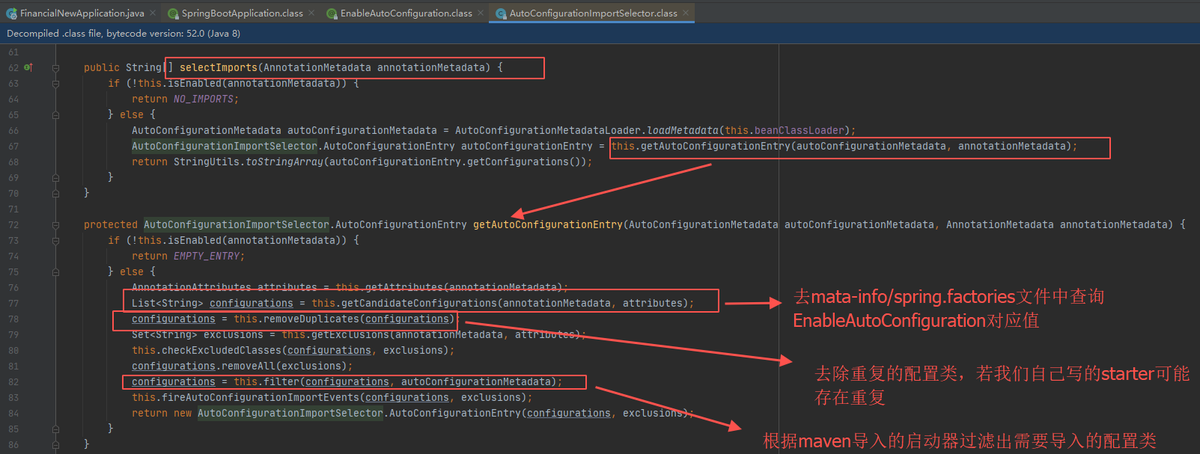
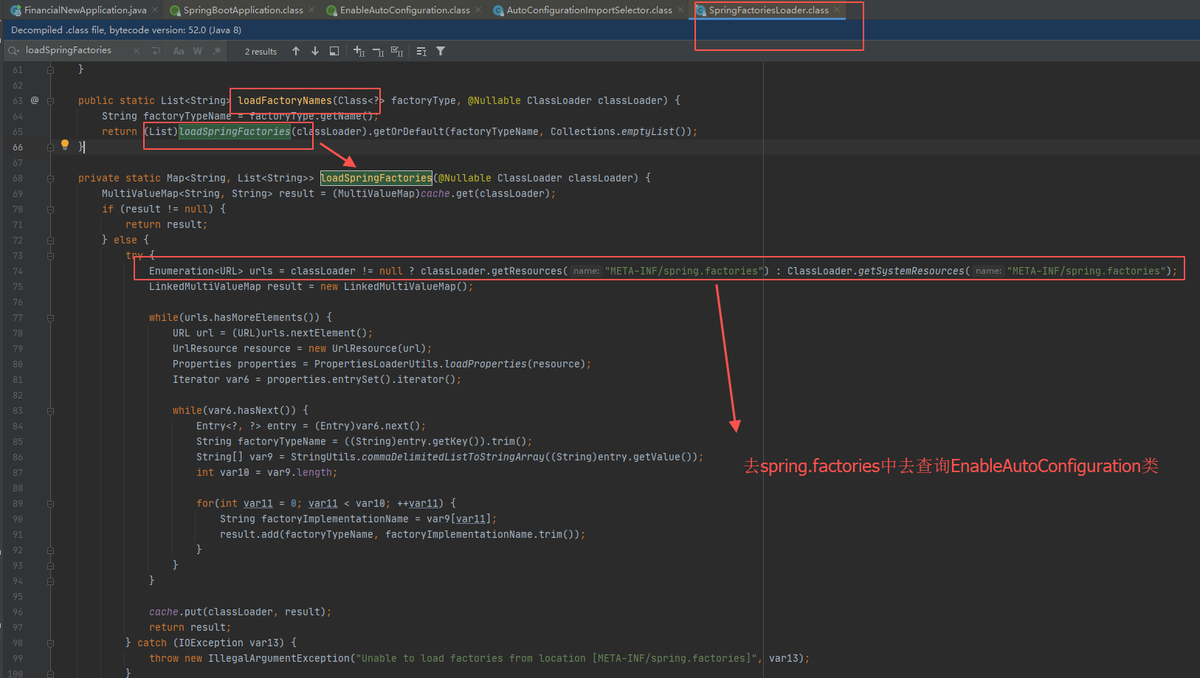
④:查询spring.factories中的EnableAutoConfiguration类

⑤:现在分析RedisAutoConfiguration类,看看为我们到了三个组件RedisTemplate、StringRedisTemplage、JedisConnectionConfiguration
3.5自动装配原理总结
通过以上分析可以得出,springboot会自动为我们装配组件,我们拿过来就可以直接使用,省去了传统各种xml配置的痛点,但是springboot也不会所有的组件都帮我们装配,只有我们需要的才会为我们装配,那么springboot怎么知道哪些是我们需要的呢?是通过在maven引入的组件,如果在maven引入了,springboot就默认这个是你需要的,所有在项目启动的时候就会自动装配。
4、jar包启动原理
上面分析了springboot自动装配原理,接下来我们依靠自动装配原理来分析出springboot的jar包启动流程
4.1 spring自动装配tomcat相关组件
我们先来看springboot怎么来自动装配tomcat相关组件,
EmbeddedWebServerFactoryCustomizerAutoConfiguratio.class:内嵌web容器工厂自定义定制器装配
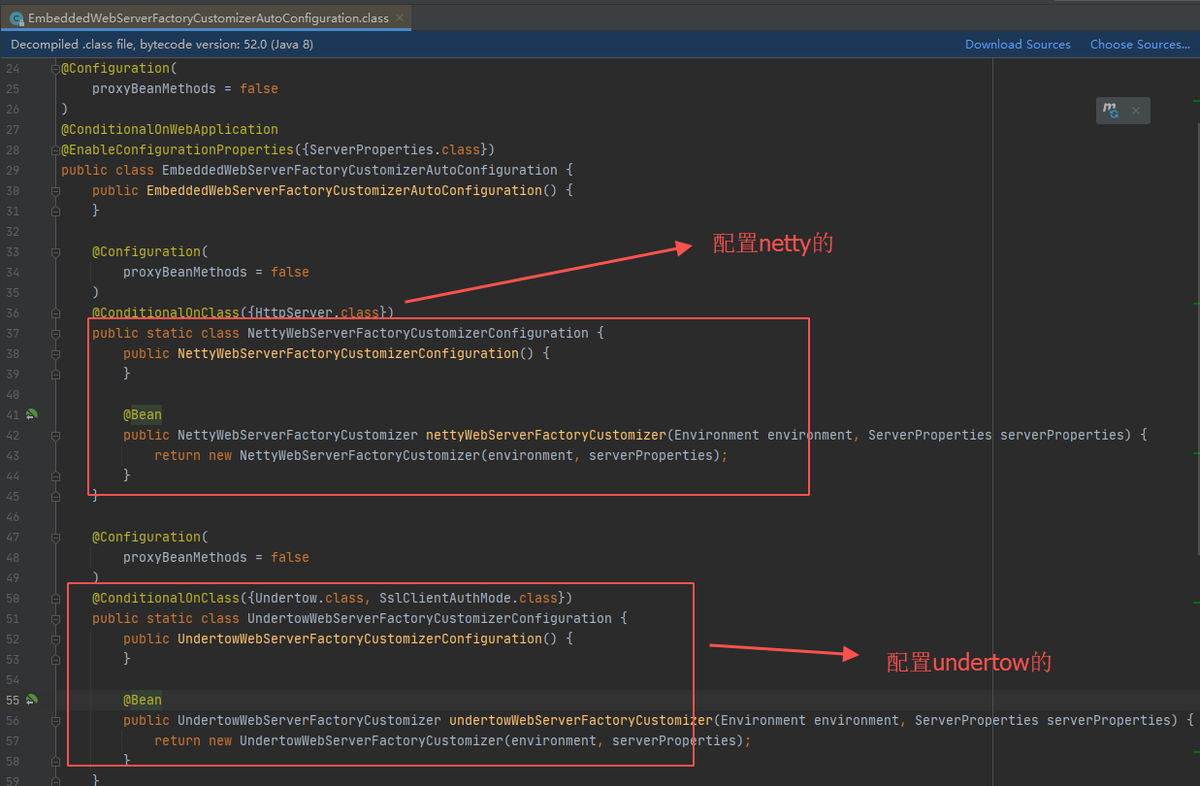

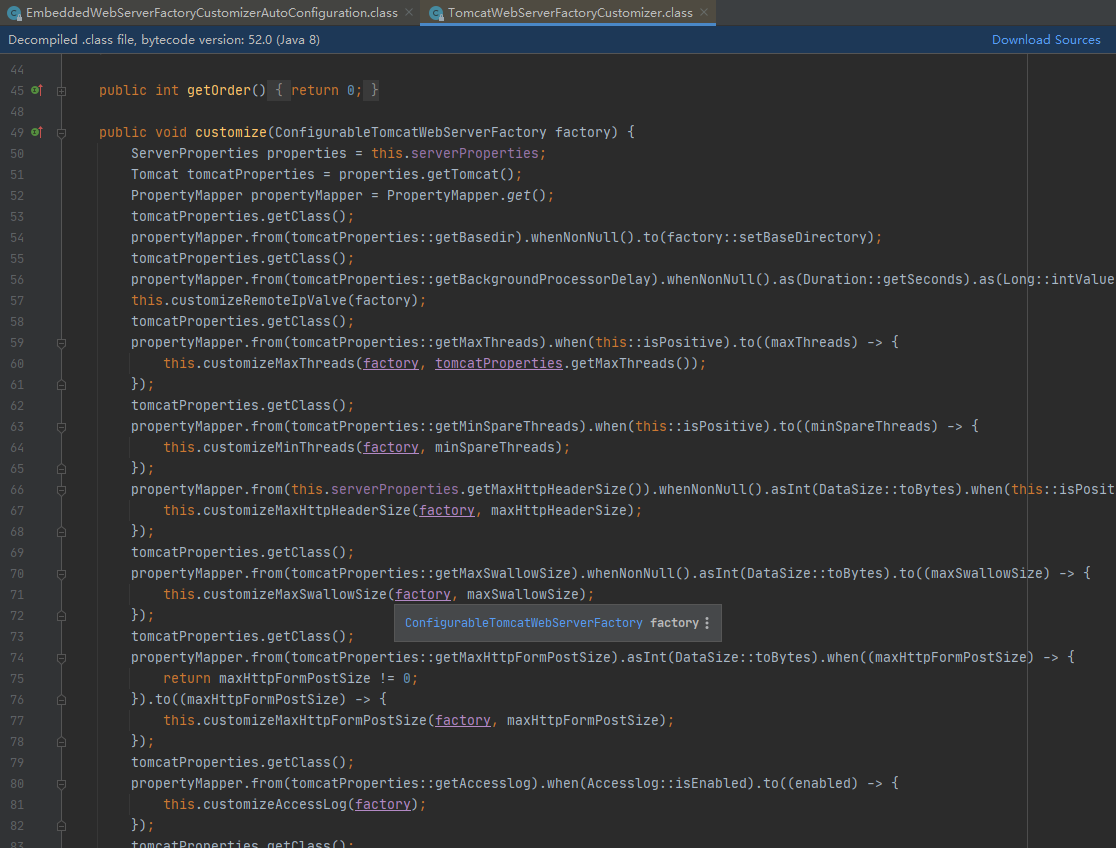
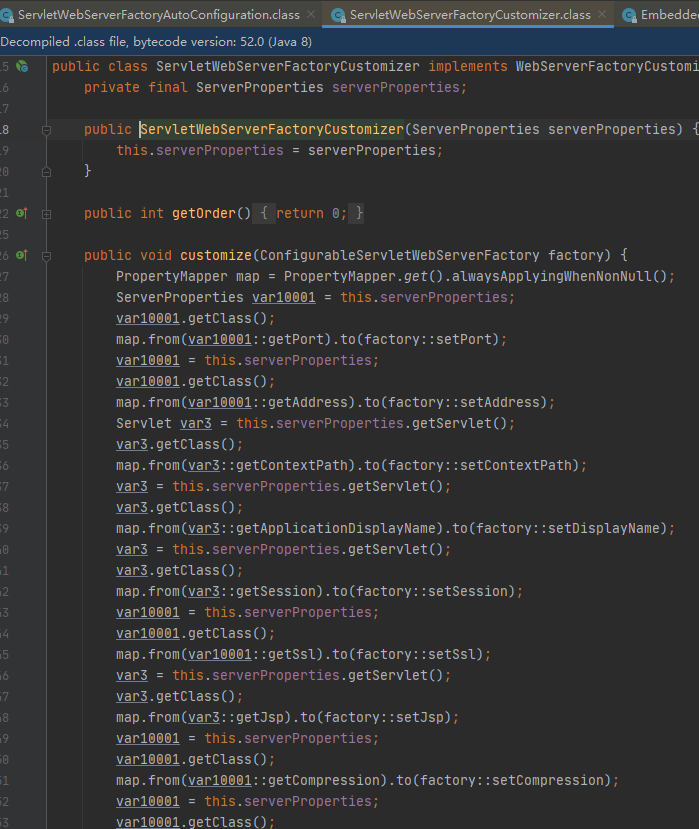
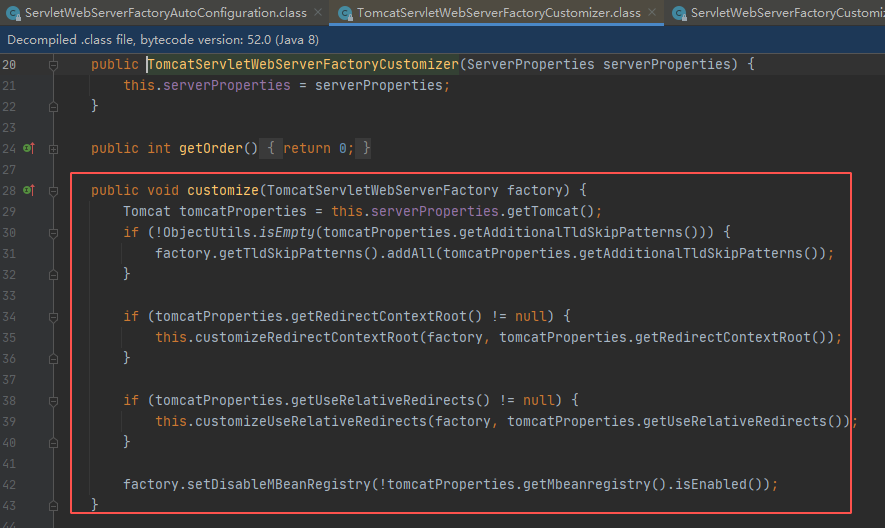
下面以tomcat作为内嵌容器来分析,先看下tomcat的工厂定制器TomcatWebServerFactoryCustomizer,是用来修改设置容器的内容的(把serverProperties的属性设置到tomcat的创建工厂中)
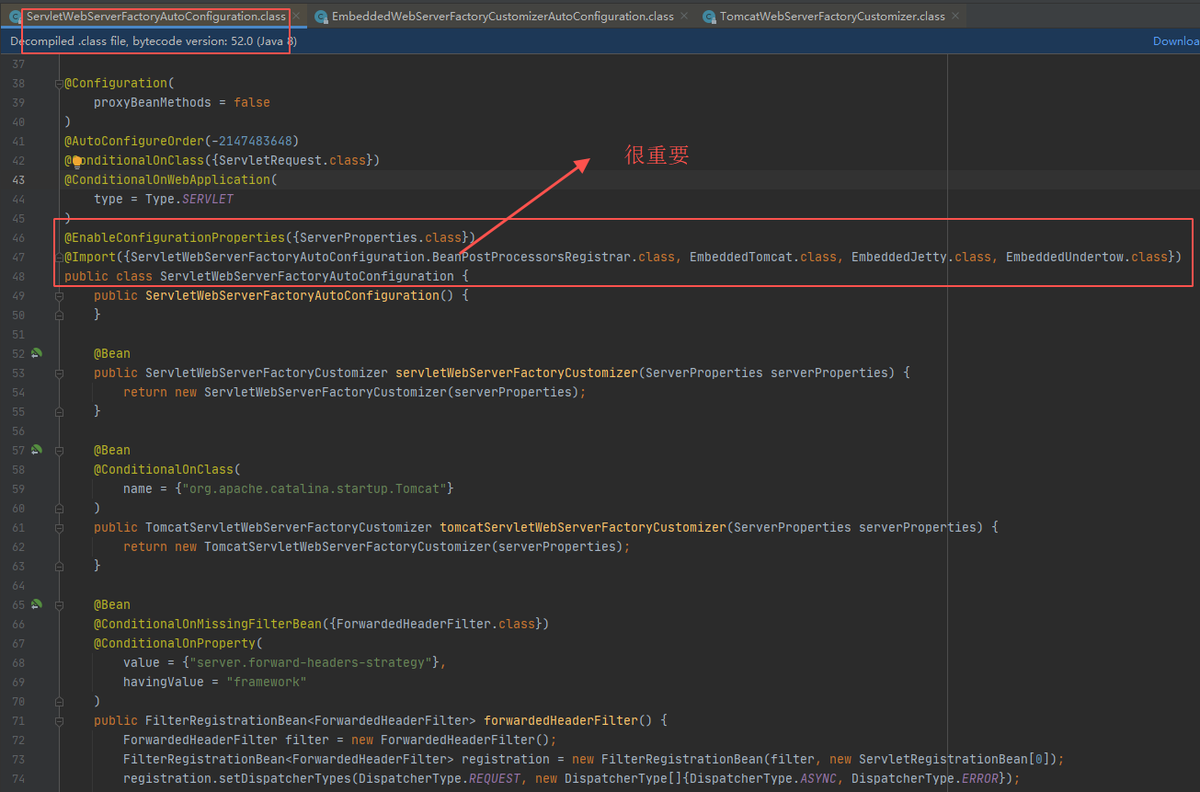
ServletWebServerFactoryAutoConfiguration:Servletweb工厂自动配置类
ServletWebServerFactoryCustomizer核心代码:
tomcat核心逻辑代码:
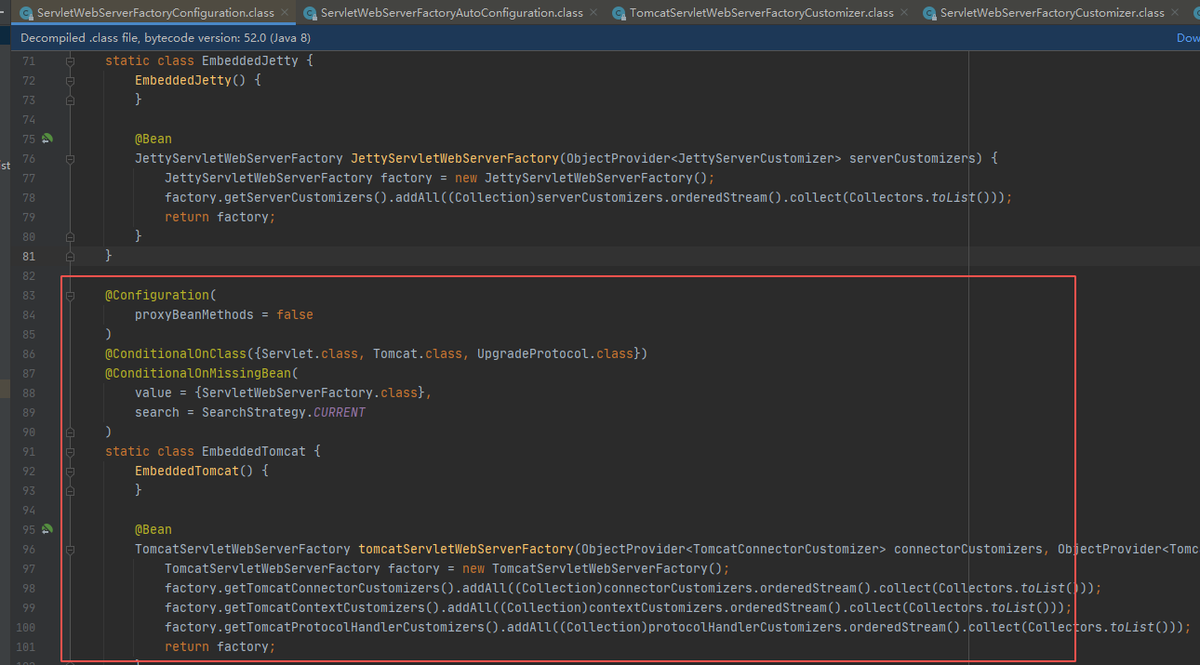
ServletWebServerFactoryConfiguration :容器工厂类
4.2 启动流程
介绍上面几个核心的类之后,下面正式来分析以下启动流程,运行run方法并将参数加进去
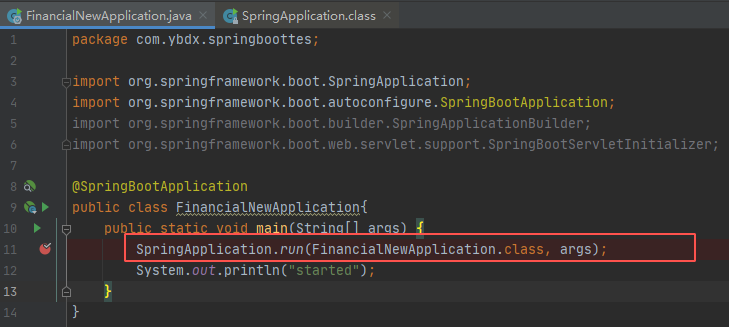
传入主配置类,以及命令行参数,然后创建SpringApplication对象

在执行创建SpringApplication对象时主要执行了:
①:保存主配置类
②:保存web应用的配置类型
③:去mate-info/spring.factories文件中获取 ApplicationContextInitializer(容器初始 化器) 保存到springapplication对象中
④:去mate-info/spring.factories文件中获取 ApplicationListener(容器监听器) 保存到 springapplication对象
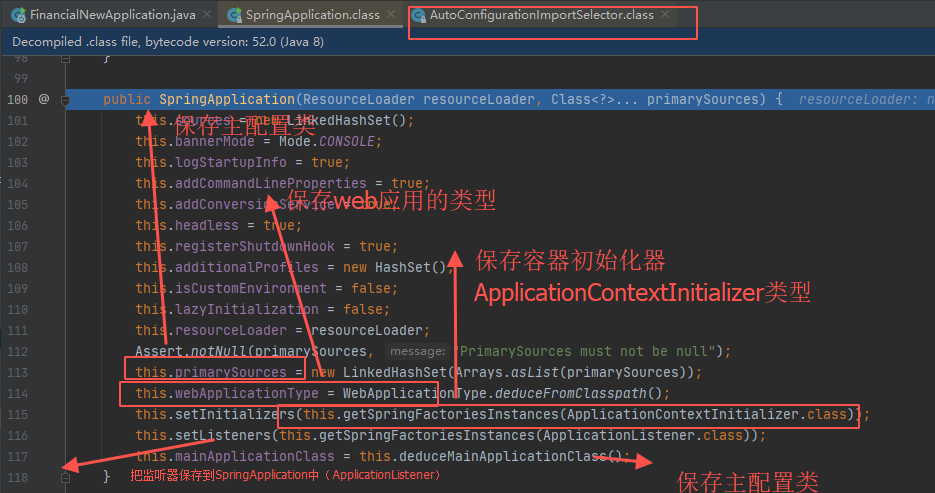
⑤:去META-INFO/spring.factories 中获取ApplicationContextInitializer 类型,用于初始化容器

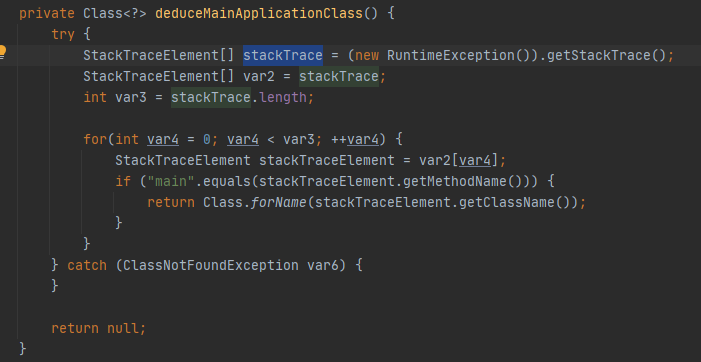
⑥:查找主配置类 查询的依据就是看哪个方法是否有main方法
⑦:运行SpringbootApplication的run方法(核心),在这里主要执行了
//创建一个容器对象,为后面做准备
//去meta-info/spring.factories中获取SpringApplicationRunListener监听器(事件发布监听器)
//发布容器starting事件(通过spring的事件多播器)
//封装传进来的命令行参数
准备容器环境:
//把环境变量设置到容器中
//循环调用ApplicationInitializer进行容器初始化工作
//发布容器上下文准备完成事件
//注册关于springboot特性的相关单例Bean
//发布容器上下文加载完毕事件
//运行 ApplicationRunner 和CommandLineRunner
//发布容器启动事件
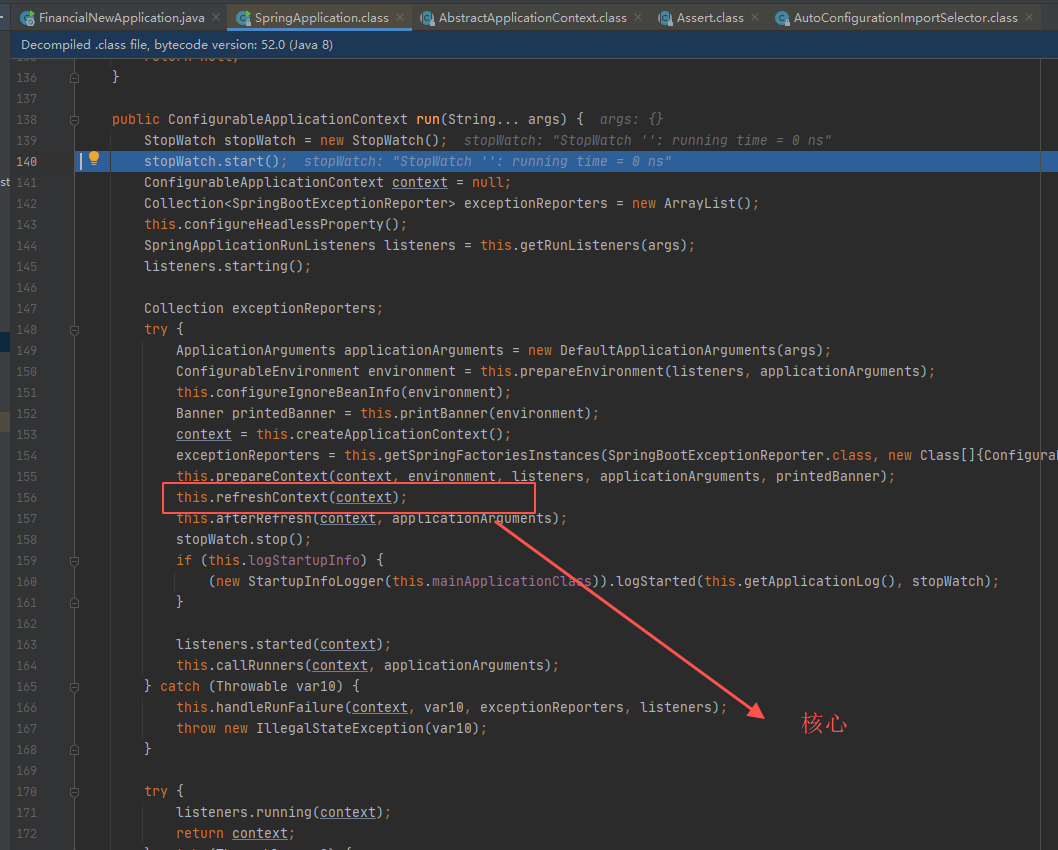
下面看这个refreshContext核心的方法,后面的启动也是由这个引出
org.springframework.boot.SpringApplication#refreshContext
org.springframework.boot.SpringApplication#refresh
org.springframework.boot.web.servlet.context.ServletWebServerApplicationContext#refresh
org.springframework.context.support.AbstractApplicationContext#refresh
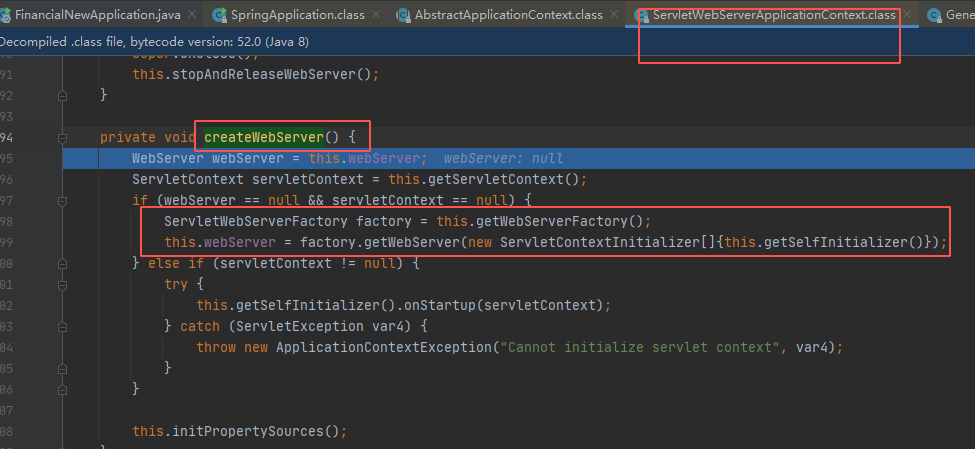
org.springframework.boot.web.servlet.context.ServletWebServerApplicationContext#createWebServer(创建webServer)
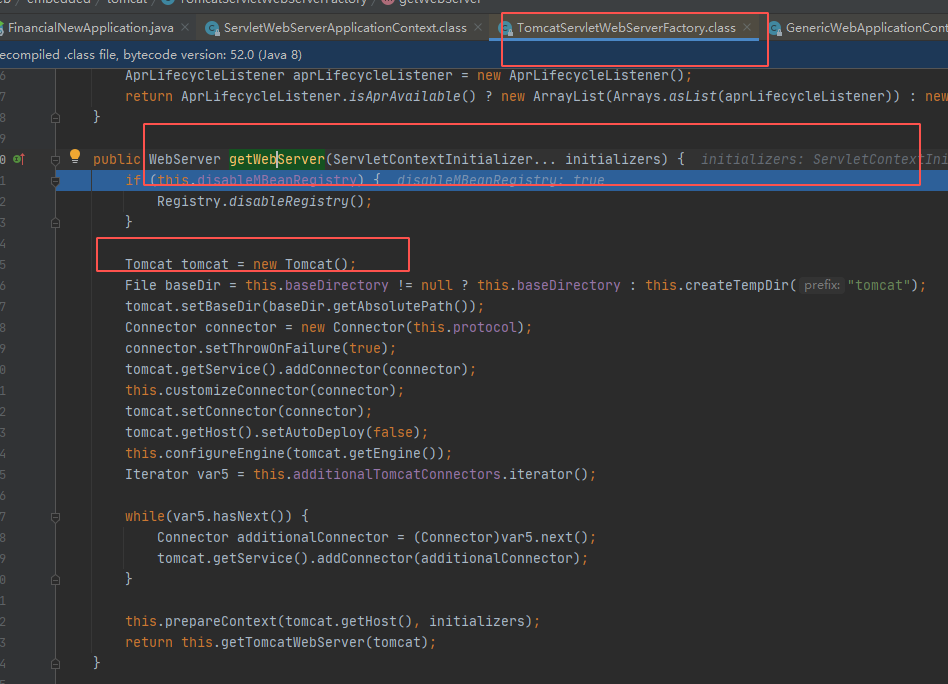
org.springframework.boot.web.embedded.tomcat.TomcatServletWebServerFactory#getWebServer(生成tomcat对象并赋值)
4.3 jar启动原理总结
在IOC容器中,由refresh的 onReFresh()带动tomcat启动 然后在接着执行 ioc容器的其他步骤。内置Tomcat(springboot集成的),会自动注册一些启动tomcat的配置以及customizers(定制器),这样我们会在加载bean的后置处理其中启动Tomcat
- 内置容器:IOC容器的启动带动Tomcat容器的启动
- 外置容器:Tomcat的启动带动IOC的启动


