
Android开发 - onDraw通过RectF绘画矩形(RectF解析)
RectF的参数解析
RectF(float left, float top, float right, float bottom);:可见四个参数均为float(浮点数)类型,其参数为:left:左边坐标;在绘制中常表示为起点的Y轴坐标top:上边左边;在绘制中常表示为起点的X轴坐标right:右边坐标;在绘制中常表示为终点的Y轴坐标bottom:下边坐标;在绘制中常表示为终点的Y轴坐标
onDraw通过RectF绘画矩形
-
新建一个自定义View,
CustomViewRectF,然后继承View,实现里面的两个基本的构造方法,这样就可以在布局中显示了,自定义View代码如下:package com.llw.paintdemo; import android.content.Context; import android.graphics.Canvas; import android.graphics.Color; import android.graphics.Paint; import android.graphics.RectF; import android.util.AttributeSet; import android.view.View; import androidx.annotation.Nullable; public class CustomViewRectF extends View { public CustomViewRectF(Context context) { super(context); } public CustomViewRectF(Context context, @Nullable AttributeSet attrs) { super(context, attrs); } private Paint customPaint(int color) { Paint paint = new Paint(); paint.setColor(color);//画笔颜色 paint.setStyle(Paint.Style.FILL);//实心 paint.setStrokeWidth(6);//画笔宽度 paint.setAntiAlias(true);//光滑 return paint; } /** * 在纸上画矩形 * @param canvas 纸 */ @Override protected void onDraw(Canvas canvas) { super.onDraw(canvas); /** * 画矩形 以两个点来画,起点和终点,通常是左上为起点,右下为终点 以下面这个图来看 * 参数一:起点的Y轴坐标 * 参数二:起点的X轴坐标 * 参数三:终点的Y轴坐标 * 参数四:终点的Y轴坐标 * * * * * * * top * **************** * * * * left * * right * * * * * * * ****************** * bottom * * * * * * 可以看到,左和上无限延长就会在一个点,右和下也是如此,这样应该理解了吧 * */ RectF rectF = new RectF(10,10,200,200); canvas.drawRect(rectF, customPaint(Color.BLUE)); } } -
实际效果:
![]()
-
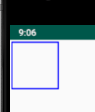
通过修改paint(画笔)部分代码修改为空心
paint.setStyle(Paint.Style.STROKE);//空心 -
实际效果:
![]()
-
通过修改paint(画笔)部分代码修改为长方形
RectF rectF = new RectF(10,10,100,200);//长方形 -
实际效果:
![]()
-
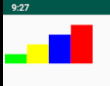
通过paint(画笔)添加部分代码修改为多个长方形
RectF rectF2 = new RectF(120,10,210,200);//长方形2 canvas.drawRect(rectF2, customPaint(Color.BLUE)); RectF rectF3 = new RectF(240,10,330,200);//长方形3 canvas.drawRect(rectF3, customPaint(Color.BLUE)); RectF rectF4 = new RectF(360,10,450,200);//长方形4 canvas.drawRect(rectF4, customPaint(Color.BLUE)); -
实际效果:
![]()
-
再整体改一下形成旋转的效果
RectF rectF = new RectF(10,10,300,100);//长方形 canvas.drawRect(rectF, customPaint(Color.GREEN)); RectF rectF2 = new RectF(300,10,390,300);//长方形2 canvas.drawRect(rectF2, customPaint(Color.YELLOW)); RectF rectF3 = new RectF(100,300,390,390);//长方形3 canvas.drawRect(rectF3, customPaint(Color.BLUE)); RectF rectF4 = new RectF(10,100,100,390);//长方形4 canvas.drawRect(rectF4, customPaint(Color.RED)); -
实际效果:
![]()
-
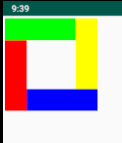
再改一下形成花式旋转的效果
RectF rectF = new RectF(10,100,300,190);//长方形 canvas.drawRect(rectF, customPaint(Color.GREEN)); RectF rectF2 = new RectF(300,10,390,300);//长方形2 canvas.drawRect(rectF2, customPaint(Color.YELLOW)); RectF rectF3 = new RectF(190,300,480,390);//长方形3 canvas.drawRect(rectF3, customPaint(Color.BLUE)); RectF rectF4 = new RectF(100,190,190,480);//长方形4 canvas.drawRect(rectF4, customPaint(Color.RED)); -
实际效果:
![]()


 浙公网安备 33010602011771号