
SpringBoot基础24_SpringBoot的原理分析3
一、起步依赖原理分析
1、 分析spring-boot-starter-parent
按住Ctrl点击pom.xml中的spring-boot-starter-parent,跳转到了spring-boot-starter-parent的pom.xml,xml配置如下(只摘抄了部分重点配置):
<parent>
  <groupId>org.springframework.boot</groupId>
  <artifactId>spring-boot-dependencies</artifactId>
  <version>2.0.1.RELEASE</version>
  <relativePath>../../spring-boot-dependencies</relativePath>
</parent>
按住Ctrl点击pom.xml中的spring-boot-dependencies,跳转到了spring-boot-dependencies的pom.xml,xml配置如下(只摘抄了部分重点配置):
<properties>
      <activemq.version>5.15.3</activemq.version>
      <antlr2.version>2.7.7</antlr2.version>
      <appengine-sdk.version>1.9.63</appengine-sdk.version>
      <artemis.version>2.4.0</artemis.version>
      <aspectj.version>1.8.13</aspectj.version>
      <assertj.version>3.9.1</assertj.version>
      <atomikos.version>4.0.6</atomikos.version>
      <bitronix.version>2.1.4</bitronix.version>
      <build-helper-maven-plugin.version>3.0.0</build-helper-maven-plugin.version>
      <byte-buddy.version>1.7.11</byte-buddy.version>
      ... ... ...
</properties>
<dependencyManagement>
      <dependencies>
          <dependency>
            <groupId>org.springframework.boot</groupId>
            <artifactId>spring-boot</artifactId>
            <version>2.0.1.RELEASE</version>
          </dependency>
          <dependency>
            <groupId>org.springframework.boot</groupId>
            <artifactId>spring-boot-test</artifactId>
            <version>2.0.1.RELEASE</version>
          </dependency>
          ... ... ...
    </dependencies>
</dependencyManagement>
<build>
      <pluginManagement>
        <plugins>
              <plugin>
                <groupId>org.jetbrains.kotlin</groupId>
                <artifactId>kotlin-maven-plugin</artifactId>
                <version>${kotlin.version}</version>
              </plugin>
              <plugin>
                <groupId>org.jooq</groupId>
                <artifactId>jooq-codegen-maven</artifactId>
                <version>${jooq.version}</version>
              </plugin>
              <plugin>
                <groupId>org.springframework.boot</groupId>
                <artifactId>spring-boot-maven-plugin</artifactId>
                <version>2.0.1.RELEASE</version>
              </plugin>
              ... ... ...
        </plugins>
      </pluginManagement>
</build>
从上面的spring-boot-dependencies的pom.xml中我们可以发现,一部分坐标的版本、依赖管理、插件管理已经定义好,所以我们的SpringBoot工程继承spring-boot-starter-parent后已经具备版本锁定等配置了。所以起步依赖的作用就是进行依赖的传递。
2、分析spring-boot-starter-web
按住Ctrl点击pom.xml中的spring-boot-starter-web,跳转到了spring-boot-starter-web的pom.xml,xml配置如下(只摘抄了部分重点配置):
<?xml version="1.0" encoding="UTF-8"?>
<project xsi:schemaLocation="http://maven.apache.org/POM/4.0.0 http://maven.apache.org/xsd/maven-4.0.0.xsd" xmlns="http://maven.apache.org/POM/4.0.0"
    xmlns:xsi="http://www.w3.org/2001/XMLSchema-instance">
      <modelVersion>4.0.0</modelVersion>
      <parent>
        <groupId>org.springframework.boot</groupId>
        <artifactId>spring-boot-starters</artifactId>
        <version>2.0.1.RELEASE</version>
      </parent>
      <groupId>org.springframework.boot</groupId>
      <artifactId>spring-boot-starter-web</artifactId>
      <version>2.0.1.RELEASE</version>
      <name>Spring Boot Web Starter</name>

      <dependencies>
        <dependency>
              <groupId>org.springframework.boot</groupId>
              <artifactId>spring-boot-starter</artifactId>
              <version>2.0.1.RELEASE</version>
              <scope>compile</scope>
        </dependency>
        <dependency>
              <groupId>org.springframework.boot</groupId>
              <artifactId>spring-boot-starter-json</artifactId>
              <version>2.0.1.RELEASE</version>
              <scope>compile</scope>
        </dependency>
        <dependency>
              <groupId>org.springframework.boot</groupId>
              <artifactId>spring-boot-starter-tomcat</artifactId>
              <version>2.0.1.RELEASE</version>
              <scope>compile</scope>
        </dependency>
        <dependency>
              <groupId>org.hibernate.validator</groupId>
              <artifactId>hibernate-validator</artifactId>
              <version>6.0.9.Final</version>
              <scope>compile</scope>
        </dependency>
        <dependency>
              <groupId>org.springframework</groupId>
              <artifactId>spring-web</artifactId>
              <version>5.0.5.RELEASE</version>
              <scope>compile</scope>
        </dependency>
        <dependency>
              <groupId>org.springframework</groupId>
              <artifactId>spring-webmvc</artifactId>
              <version>5.0.5.RELEASE</version>
              <scope>compile</scope>
        </dependency>
      </dependencies>
</project>
从上面的spring-boot-starter-web的pom.xml中我们可以发现,spring-boot-starter-web就是将web开发要使用的spring-web、spring-webmvc等坐标进行了“打包”,这样我们的工程只要引入spring-boot-starter-web起步依赖的坐标就可以进行web开发了,同样体现了依赖传递的作用。
二、自动配置原理解析
按住Ctrl点击查看启动类MySpringBootApplication上的注解@SpringBootApplication
@SpringBootApplication
public class MySpringBootApplication {
    public static void main(String[] args) {
        SpringApplication.run(MySpringBootApplication.class);
    }
}
注解@SpringBootApplication的源码
@Target(ElementType.TYPE)
@Retention(RetentionPolicy.RUNTIME)
@Documented
@Inherited
@SpringBootConfiguration
@EnableAutoConfiguration
@ComponentScan(excludeFilters = {
        @Filter(type = FilterType.CUSTOM, classes = TypeExcludeFilter.class),
        @Filter(type = FilterType.CUSTOM, classes = AutoConfigurationExcludeFilter.class) })
public @interface SpringBootApplication {

    /**
     * Exclude specific auto-configuration classes such that they will never be applied.
     * @return the classes to exclude
     */
    @AliasFor(annotation = EnableAutoConfiguration.class)
    Class<?>[] exclude() default {};

    ... ... ...

}
其中,
@SpringBootConfiguration:等同与@Configuration,既标注该类是Spring的一个配置类
@EnableAutoConfiguration:SpringBoot自动配置功能开启
按住Ctrl点击查看注解@EnableAutoConfiguration
@Target(ElementType.TYPE)
@Retention(RetentionPolicy.RUNTIME)
@Documented
@Inherited
@AutoConfigurationPackage
@Import(AutoConfigurationImportSelector.class)
public @interface EnableAutoConfiguration {
    ... ... ...
}
其中,@Import(AutoConfigurationImportSelector.class) 导入了AutoConfigurationImportSelector类
按住Ctrl点击查看AutoConfigurationImportSelector源码
public String[] selectImports(AnnotationMetadata annotationMetadata) {
        ... ... ...
        List<String> configurations = getCandidateConfigurations(annotationMetadata,
                                                                   attributes);
        configurations = removeDuplicates(configurations);
        Set<String> exclusions = getExclusions(annotationMetadata, attributes);
        checkExcludedClasses(configurations, exclusions);
        configurations.removeAll(exclusions);
        configurations = filter(configurations, autoConfigurationMetadata);
        fireAutoConfigurationImportEvents(configurations, exclusions);
        return StringUtils.toStringArray(configurations);
}
    protected List<String> getCandidateConfigurations(AnnotationMetadata metadata, AnnotationAttributes attributes) {
        List<String> configurations = SpringFactoriesLoader.loadFactoryNames(this.getSpringFactoriesLoaderFactoryClass(), this.getBeanClassLoader());
        Assert.notEmpty(configurations, "No auto configuration classes found in META-INF/spring.factories. If you are using a custom packaging, make sure that file is correct.");
        return configurations;
    }
其中,SpringFactoriesLoader.loadFactoryNames 方法的作用就是从META-INF/spring.factories文件中读取指定类对应的类名称列表
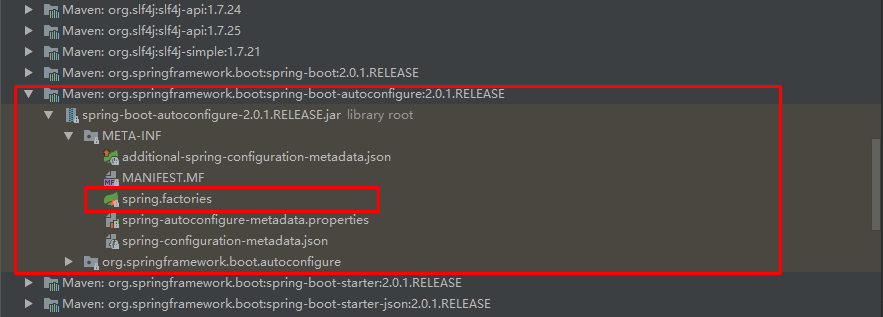
spring.factories 文件中有关自动配置的配置信息如下:
... ... ...

org.springframework.boot.autoconfigure.web.reactive.function.client.WebClientAutoConfiguration,\
org.springframework.boot.autoconfigure.web.servlet.DispatcherServletAutoConfiguration,\
org.springframework.boot.autoconfigure.web.servlet.ServletWebServerFactoryAutoConfiguration,\
org.springframework.boot.autoconfigure.web.servlet.error.ErrorMvcAutoConfiguration,\
org.springframework.boot.autoconfigure.web.servlet.HttpEncodingAutoConfiguration,\
org.springframework.boot.autoconfigure.web.servlet.MultipartAutoConfiguration,\

... ... ...
上面配置文件存在大量的以AutoConfiguration为结尾的类名称,这些类就是存有自动配置信息的类,而SpringApplication在获取这些类名后再加载
我们以ServletWebServerFactoryAutoConfiguration为例来分析源码:
@Configuration
@AutoConfigureOrder(Ordered.HIGHEST_PRECEDENCE)
@ConditionalOnClass(ServletRequest.class)
@ConditionalOnWebApplication(type = Type.SERVLET)
@EnableConfigurationProperties(ServerProperties.class)
@Import({ ServletWebServerFactoryAutoConfiguration.BeanPostProcessorsRegistrar.class,
        ServletWebServerFactoryConfiguration.EmbeddedTomcat.class,
        ServletWebServerFactoryConfiguration.EmbeddedJetty.class,
        ServletWebServerFactoryConfiguration.EmbeddedUndertow.class })
public class ServletWebServerFactoryAutoConfiguration {
    ... ... ...
}
其中,@EnableConfigurationProperties(ServerProperties.class) 代表加载ServerProperties服务器配置属性类
进入ServerProperties.class源码如下:
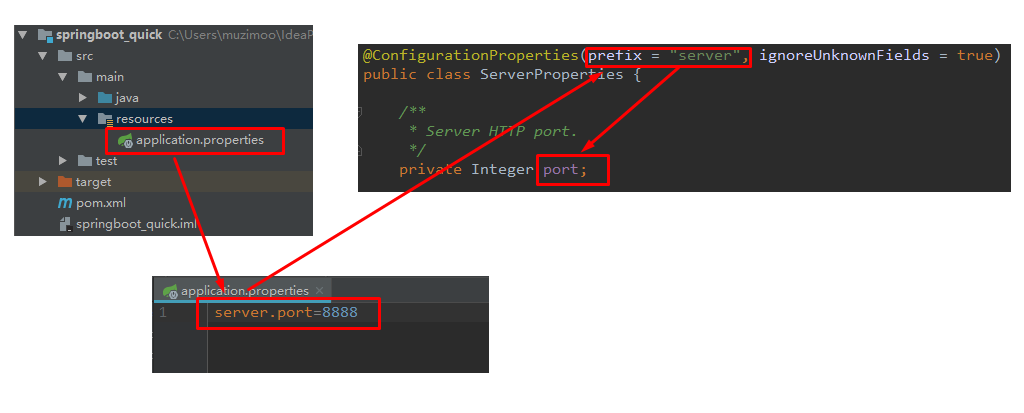
@ConfigurationProperties(prefix = "server", ignoreUnknownFields = true)
public class ServerProperties {

    /**
     * Server HTTP port.
     */
    private Integer port;

    /**
     * Network address to which the server should bind.
     */
    private InetAddress address;

      ... ... ...

}
其中,prefix = "server" 表示SpringBoot配置文件中的前缀,所有的以server.开头的配置都在spring-configuration-metadata.json中配好了
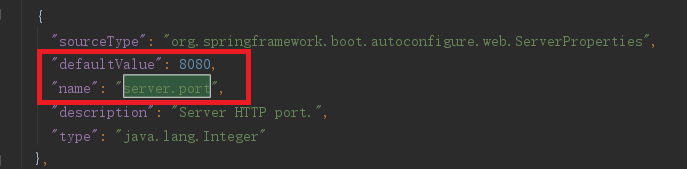
配好之后通过ServerProperties进行加载,加载完毕再通过@EnableConfigurationProperties(ServerProperties.class)进行引入,最终默认配置就会配好了。
更改端口后启动项目,浏览器就需要访问http://localhost:8888/quick2

更改当前web应用的名称,修改application.properties
spring.application.name=springboot_quick2
#服务器的端口号
server.port=8888
#当前web应用的名称
server.servlet.context-path=/demo
启动项目,这时浏览器就需要访问http://localhost:8888/demo/quick2


 浙公网安备 33010602011771号