ng 基础
特性模块
坚持为应用中每个明显的特性创建一个 Angular 模块
坚持把特性模块放在与特性区同名的目录中(例如 app/heroes)
坚持特性模块的文件名应该能反映出特性区的名字和目录(例如 app/heroes/heroes.module.ts)
共享特性模块
坚持在 shared 目录中创建名叫 SharedModule 的特性模块(例如在 app/shared/shared.module.ts 中定义 SharedModule)
坚持在共享模块中声明那些可能被特性模块引用的可复用组件、指令和管道
坚持在 SharedModule 中导入所有模块都需要的资产(例如 CommonModule 和 FormsModule)
核心特性模块
考虑把那些数量庞大、辅助性的、只用一次的类收集到核心模块中,让特性模块的结构更清晰简明
坚持在 core 目录下创建一个名叫 CoreModule 的特性模块(例如在 app/core/core.module.ts 中定义 CoreModule)
坚持把要共享给整个应用的单例服务放进 CoreModule 中(例如 ExceptionService 和 LoggerService)
很多只用一次的组件(例如加载动画、消息浮层、模态框等),它们只会在 AppComponent 的模板中出现。 不会在其它地方导入它们
服务
组件的工作只管用户体验,而不用顾及其它。 它应该提供用于数据绑定的属性和方法,以便作为视图和应用逻辑的中介者
组件应该把诸如从服务器获取数据、验证用户输入或直接往控制台中写日志等工作委托给各种服务。通过把各种处理任务定义到可注入的服务类中,你可以让它被任何组件使用
- 插值表达式
- for循环
- 事件和属性绑定
- 双向绑定
- if
- ngSwitch
- 模板引用变量
- 管道
- 属性型指令
- 结构型指令
- ViewChild
- 绑定class
- 绑定style
- 设置proxy
- ng-container
插值表达式
<div>{{ title }}</div>
<div>{{ true ? 1 : 2}}</div>
<div>{{ title() }}</div>
<div>{{ null ?? 'x' }}</div>
<div>{{ title?.name }}</div>
<div>{{ titles?.[0] }}</div>

// 变量与字符串的拼接
<li *ngFor="let item of arr" title="{{item}}.txt">{{item}}</li>
<li *ngFor="let item of arr" [title]="item + '.txt'">{{item}}</li>

// 渲染dom标签
<div [innerHTML]="h"></div>
h = `<h2>title</h2>`
for循环
trackByFn 返回唯一id
<li *ngFor="let item of items; index as i; trackBy: trackByFn">...</li>
  trackByName(index, it) {
    return it.id;
  }
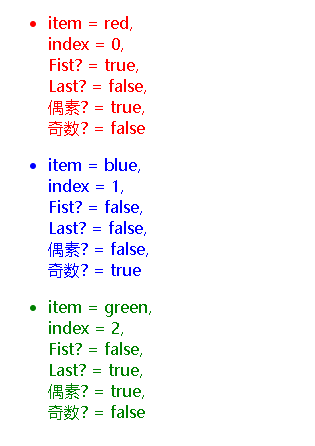
arr = ['red', 'blue', 'green'];
<ul *ngFor="let item of arr; index as i; first as f; last as l; even as e; odd as o">
  <li [style.color]="item">
    item = {{ item }},<br />
    index = {{ i }},<br />
    Fist? = {{ f }},<br />
    Last? = {{ l }},<br />
    偶素? = {{ e }},<br />
    奇数? = {{ o }}<br />
  </li>
</ul>

@Pipe({name: 'demoNumber'})
export class DemoNumber implements PipeTransform {
  transform(value, args:string[]) : any {
    let res = [];
    for (let i = 0; i < value; i++) {
        res.push(i);
      }
      return res;
  }
}
<ul>
  <li>Method First Using PIPE</li>
  <li *ngFor='let key of 5 | demoNumber'>
    {{key}}
  </li>
</ul>
硬编码
<ul>
  <li>Method Second</li>
  <li *ngFor='let key of  [1,2]'>
    {{key}}
  </li>
</ul>
循环流数据
<ul>
  <li *ngFor="let it of list | async as data">
    {{it}} {{ data.length }}
  </li>
</ul>
export class AppComponent {
  list = new BehaviorSubject<string[]>(["a", "b", "c"]);
}
事件和属性绑定
<button (click)="alert()" [title]="title">click</button>
双向绑定 组件双向绑定
import { FormsModule } from '@angular/forms';
@NgModule({
imports: [FormsModule] // 需要这个模块,通常在shared模块中导出
})
<input type="text" name="name" [(ngModel)]="name" /> {{ name }}
展开双向绑定
<input type="text" name="name" [(ngModel)]="name" (ngModelChange)="nameChange($event)"/> {{ name }}
  name = "ajanuw";
  nameChange(v: string) {
    this.name = v.toLocaleUpperCase();
  }
if
  myName = '';
  ngOnInit() {
    setTimeout(() => this.myName = 'alone', 2000);
  }
<p *ngIf="myName; else elesTemp" >{{ myName }}</p>
<ng-template #elesTemp>
  <p> 暂无数据!</p>
</ng-template>
if/then/else
<p *ngIf="myName; then thenTemp; else elesTemp"></p>
<ng-template #thenTemp>
  <p>{{ myName }}</p>
</ng-template>
<ng-template #elesTemp>
  <p> 暂无数据!</p>
</ng-template>
ngSwitch
<div [ngSwitch]="name">
    <p *ngSwitchCase="'ajanuw'">hello {{name}}</p>
    <p *ngSwitchCase="'coo'">bey bey {{name}}</p>
    <p *ngSwitchCase="'boo'">i'm {{name}}...</p>
    <p *ngSwitchDefault>not name!</p>
</div>
模板引用变量
<div>{{ name.name }}_{{ name.value }}</div>
<input type="text" name="name" value="123" #name />
<button (click)="onClick(name.value)">click me</button>

 onClick(v: string) {
    l(v); // 123
  }

// 获取组件实例(只能在模板中调用),类似react使用ref获取组件实例
<app-hello #hello></app-hello>
<button (click)="hello.event()">click me</button>
管道
<p>{{ 'ajanuw' | uppercase }}</p>  全大写 -> AJANUW
<p>{{ 'Ajanuw' | lowercase }}</p>  全小写 -> ajanuw
<p>{{ 'hi ajanuw' | titlecase }}</p> 单词首写大写 -> Hi Ajanuw
<p>{{ {name: 'ajanuw'} | json }}</p> onj => json
<p>{{ 'ajanuw' | slice:1:3 }}</p> 类似js的slice -> ja
处理number
<p>{{ 3.141 | number:'1.2-2' }}</p> -> 3.14
<p>{{ 3.141 | number:'1.1-3' }}</p> -> 3.141
<p>{{ 3.141 | number:'2.1-1' }}</p> -> 03.1
<p>{{ 3.141 | number:'2.4-4' }}</p> -> 03.1410
<p>{{ 0.5 | percent }}</p> 百分比 -> 50%

<p>美元: {{ 5 | currency }}</p>  这两个都没什么卵用
<p>英镑:{{ 5 | currency:'GBP' }}</p>
- 创建
ng g @schematics/angular:pipe mathCeil --project=angular-universal --module=app.module.ts --no-spec
- 使用
<div>{{ 12.3 | mathCeil: 2 }}</div>
- 实现
import { Pipe, PipeTransform } from "@angular/core";

@Pipe({
  name: "mathCeil",
})
export class MathCeilPipe implements PipeTransform {

  /**
   * @param value 传入的值
   * @param args 传入的参数
   */
  transform(value: number, args?: number): any {
    console.log(args); // 2
    return Math.ceil(value);
  }
}
父子组件传递参数
<app-hello [name]="name" (onAlert)="onAlert($event)"></app-hello>

  name = "ajanuw";
  onAlert(v: string) {
    l(v);
  }
Input输入, Output 输出
<h2 (click)="handleClick()">{{name}}</h2>

@Input() name: string;
@Output() onAlert = new EventEmitter<string>();
 handleClick() {
    this.onAlert.emit("hello...");
  }
属性型指令
- 创建指令
ng g directive highlight
- 使用
<h1 [appHighlight]="'blue'" [defaultColor]="'#f48'">Welcome to {{ title }}!</h1>
- 实现
import { Directive, ElementRef, HostListener, Input } from "@angular/core";

const l = console.log;
@Directive({
  selector: "[appHighlight]",
})
export class HighlightDirective {
  @Input("appHighlight")
  public color: string; // 设置选中时的颜色

  // 初始化时的颜色
  @Input()
  public set defaultColor(color: string) {
    this.setColor(color);
  }

  // el: 获取指令绑定的dom元素
  constructor(private readonly el: ElementRef) {}

  // 响应用户引发的事件
  @HostListener("mouseenter")
  public onMouseEnter(): void {
    this.setColor(this.color || "red");
  }

  @HostListener("mouseleave")
  public onMouseLeave(): void {
    this.setColor(null);
  }

  private setColor(color: string): void {
    this.el.nativeElement.style["color"] = color;
  }
}
结构型指令
- 创建指令
ng g @schematics/angular:directive delay --project=angular-universal --module=app.module.ts --no-spec
- 使用
  <div *appDelay="1200">
    hello <ng-container *ngIf="!!username"> {{ username }} </ng-container>
  </div>
- 实现
delay.directive.ts
import {
  Directive,
  Input,
  TemplateRef,
  ViewContainerRef,
  OnDestroy,
} from "@angular/core";

@Directive({
  selector: "[appDelay]",
})
export class DelayDirective implements OnDestroy {
  private timer: NodeJS.Timer;
  constructor(
    private readonly templateRef: TemplateRef<any>,
    private readonly viewContainer: ViewContainerRef,
  ) {}

  // 延迟加载dom
  @Input()
  public set appDelay(delayNum: number) {
    this.timer = setTimeout(() => {
      this.viewContainer.createEmbeddedView(this.templateRef);
    }, delayNum);
  }

  ngOnDestroy(): void {
    clearTimeout(this.timer);
  }
}
ViewChild
获取子组件的实例,和dom节点
<app-hello></app-hello>
<button (click)="onClick()">click me</button>

import { Component, OnInit, AfterViewInit, ViewChild } from "@angular/core";
import { HelloComponent } from "./hello/hello.component";

export class AppComponent implements OnInit, AfterViewInit {

  @ViewChild(HelloComponent)
  private helloRef: HelloComponent; // 注入HelloComponent实例到helloRef

  ngOnInit(): void {}

  // 组件的视图初始化之后
  ngAfterViewInit() {
    this.helloRef.handleOk(); // 调用HelloComponent实例的方法
  }

  onClick() {
    this.helloRef.handleOk();
  }
}
获取dom节点
   <div #test>hello</div>

  @ViewChild("test") public testRef: ElementRef;

  ngAfterViewInit(): void {
    console.log(this.testRef.nativeElement.textContent); // hello
  }
? ! $any()
The current hero's name is {{currentHero?.name}}  // 安全返回

<div *ngIf="hero">
  The hero's name is {{hero!.name}}  // 非空断言操作符
</div>

Undeclared members is {{$any(this).member}} // 使用 $any 转换函数来把表达式转换成 any 类型
绑定class
  classes = {
    'text-danger': true,
    'text-success': false,
    'p-2': true
  };
<p class="a" [class]="'text-danger'">{{ txt() }}</p>  // 'text-danger'
<p class="a" [class.text-danger]="true">{{ txt() }}</p> // 'a text-danger'
<p class="a" [ngClass]="classes">{{ txt() }}</p> // 'a text-danger p-2'
绑定style
  styles = {
    color: 'red',
    padding: '1rem',
    backgroundColor: '#e5e5ef75',
    display: 'inline-block'
  };
<p style="font-family: Consolas;" [style.color]="'red'">{{ txt() }}</p>
<p style="font-family: Consolas;" [ngStyle]="styles">{{ txt() }}</p>
设置proxy
proxy.conf.json
{
  "/api": {
    "target": "http://localhost:5000",
    "secure": false,
    "pathRewrite": {
      "^/api": ""
    }
  }
}
  ngOnInit() {
    this.msg$ = this.http.get("/api/ng7", {
      responseType: "text",
    });
  }
ng-container
用来挂载结构型指令, 避免使用多余的 html 元素挂载指令
<div>
  hello <ng-container *ngIf="!!username"> {{ username }} </ng-container>
</div>

<div>
  hello <span *ngIf="!!username"> {{ username }} </span>
</div>
按键事件
<input #box (keyup.enter)="onEnter(box.value); box.value=''">


 浙公网安备 33010602011771号