

git 命令总结(转)
结构图:
<1>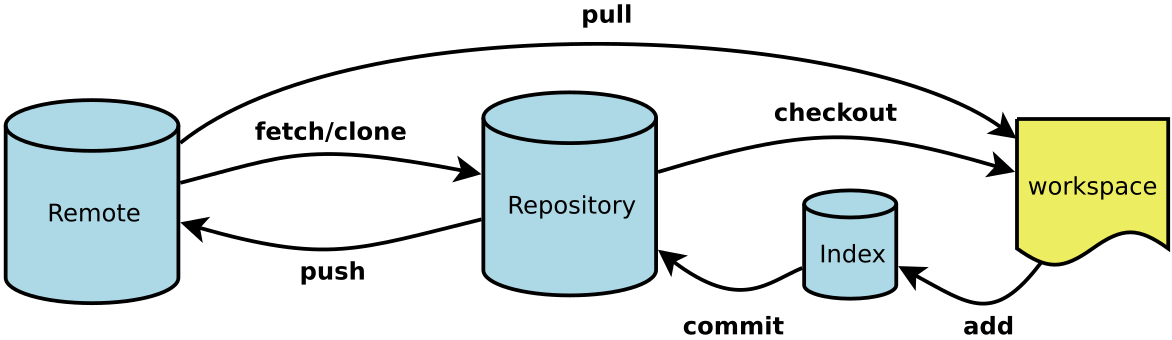
- Workspace:工作区
- Index / Stage:暂存区
- Repository:仓库区(或本地仓库)
- Remote:远程仓库
一、新建代码库
二、配置
Git的设置文件为.gitconfig,它可以在用户主目录下(全局配置),也可以在项目目录下(项目配置)。
三、增加/删除文件
四、代码提交
五、分支
六、标签
七、查看信息
八、远程同步
九、撤销
十、其他
-
-
# 生成一个可供发布的压缩包
-
$ git archive
<2>

<3>
git fetch和git pull都可以将远端仓库更新至本地那么他们之间有何区别?想要弄清楚这个问题有有几个概念不得不提。
FETCH_HEAD: 是一个版本链接,记录在本地的一个文件中,指向着目前已经从远程仓库取下来的分支的末端版本。
commit-id:在每次本地工作完成后,都会做一个git commit 操作来保存当前工作到本地的repo, 此时会产生一个commit-id,这是一个能唯一标识一个版本的序列号。 在使用git push后,这个序列号还会同步到远程仓库。
有了以上的概念再来说说git fetch
git fetch:这将更新git remote 中所有的远程仓库所包含分支的最新commit-id, 将其记录到.git/FETCH_HEAD文件中
git fetch更新远程仓库的方式如下:
git fetch origin master:tmp
//在本地新建一个temp分支,并将远程origin仓库的master分支代码下载到本地temp分支
git diff tmp
//来比较本地代码与刚刚从远程下载下来的代码的区别
git merge tmp
//合并temp分支到本地的master分支
git branch -d temp
//如果不想保留temp分支 可以用这步删除
(1)如果直接使用git fetch,则步骤如下:
创建并更新本 地远程分支。即创建并更新origin/xxx 分支,拉取代码到origin/xxx分支上。
在FETCH_HEAD中设定当前分支-origin/当前分支对应,如直接到时候git merge就可以将origin/abc合并到abc分支上。
(2)git fetch origin
只是手动指定了要fetch的remote。在不指定分支时通常默认为master
(3)git fetch origin dev
指定远程remote和FETCH_HEAD,并且只拉取该分支的提交。
git pull : 首先,基于本地的FETCH_HEAD记录,比对本地的FETCH_HEAD记录与远程仓库的版本号,然后git fetch 获得当前指向的远程分支的后续版本的数据,然后再利用git merge将其与本地的当前分支合并。所以可以认为git pull是git fetch和git merge两个步骤的结合。
git pull的用法如下:
git pull <远程主机名> <远程分支名>:<本地分支名>
//取回远程主机某个分支的更新,再与本地的指定分支合并。
因此,与git pull相比git fetch相当于是从远程获取最新版本到本地,但不会自动merge。如果需要有选择的合并git fetch是更好的选择。效果相同时git pull将更为快捷
---------------------
git reset (–mixed) HEAD~1
回退一个版本,且会将暂存区的内容和本地已提交的内容全部恢复到未暂存的状态,不影响原来本地文件(未提交的也
不受影响)
git reset –soft HEAD~1
回退一个版本,不清空暂存区,将已提交的内容恢复到暂存区,不影响原来本地的文件(未提交的也不受影响)
git reset –hard HEAD~1
回退一个版本,清空暂存区,将已提交的内容的版本恢复到本地,本地的文件也将被恢复的版本替换
---------------------
使用git log 查看历史提交
git stauts 查看一下当前版本库中文件状态。

