CUDA学习笔记1:第一个CUDA实例
一、cuda简介
CUDA是支持c++/c语言,一般我喜欢用c来写,他的编译是gpu部分由nvcc来进行的
一般的函数定义 void function();
cuda的函数定义 __global__ void function();
解释:在这里,这个global前缀表明这个函数在哪里执行,可以由谁来呼叫
global:主机呼叫,设备执行
host:主机呼叫,主机执行
device:设备呼叫,设备执行
执行一般c函数 funtion();
执行cuda函数 function<<>> ();
解释:在GPU上面执行函数可以自定分配grid和线程,grid包含线程,因为是并列执行,因此如果内容一样数据的生成很多是不分前后的。
二、运行例子的方法:
建立一个CUDA8.0 Runtim模版为基础的工程,
或建立一个c++工程,将cpp后缀改为.cu

建完工程后会有一部分代码

在主函数return 0 之前加入getchar();即可运行,关于此代码后期可慢慢研究,这里不做讲解。
源码为:


#include "cuda_runtime.h"
#include "device_launch_parameters.h"

#include <stdio.h>

cudaError_t addWithCuda(int *c, const int *a, const int *b, unsigned int size);

__global__ void addKernel(int *c, const int *a, const int *b)
{
    int i = threadIdx.x;
    c[i] = a[i] + b[i];
}

int main()
{
    const int arraySize = 5;
    const int a[arraySize] = { 1, 2, 3, 4, 5 };
    const int b[arraySize] = { 10, 20, 30, 40, 50 };
    int c[arraySize] = { 0 };

    // Add vectors in parallel.
    cudaError_t cudaStatus = addWithCuda(c, a, b, arraySize);
    if (cudaStatus != cudaSuccess) {
        fprintf(stderr, "addWithCuda failed!");
        return 1;
    }

    printf("{1,2,3,4,5} + {10,20,30,40,50} = {%d,%d,%d,%d,%d}\n",
        c[0], c[1], c[2], c[3], c[4]);

    // cudaDeviceReset must be called before exiting in order for profiling and
    // tracing tools such as Nsight and Visual Profiler to show complete traces.
    cudaStatus = cudaDeviceReset();
    if (cudaStatus != cudaSuccess) {
        fprintf(stderr, "cudaDeviceReset failed!");
        return 1;
    }
    getchar();
    return 0;
}

// Helper function for using CUDA to add vectors in parallel.
cudaError_t addWithCuda(int *c, const int *a, const int *b, unsigned int size)
{
    int *dev_a = 0;
    int *dev_b = 0;
    int *dev_c = 0;
    cudaError_t cudaStatus;

    // Choose which GPU to run on, change this on a multi-GPU system.
    cudaStatus = cudaSetDevice(0);
    if (cudaStatus != cudaSuccess) {
        fprintf(stderr, "cudaSetDevice failed!  Do you have a CUDA-capable GPU installed?");
        goto Error;
    }

    // Allocate GPU buffers for three vectors (two input, one output)    .
    cudaStatus = cudaMalloc((void**)&dev_c, size * sizeof(int));
    if (cudaStatus != cudaSuccess) {
        fprintf(stderr, "cudaMalloc failed!");
        goto Error;
    }

    cudaStatus = cudaMalloc((void**)&dev_a, size * sizeof(int));
    if (cudaStatus != cudaSuccess) {
        fprintf(stderr, "cudaMalloc failed!");
        goto Error;
    }

    cudaStatus = cudaMalloc((void**)&dev_b, size * sizeof(int));
    if (cudaStatus != cudaSuccess) {
        fprintf(stderr, "cudaMalloc failed!");
        goto Error;
    }

    // Copy input vectors from host memory to GPU buffers.
    cudaStatus = cudaMemcpy(dev_a, a, size * sizeof(int), cudaMemcpyHostToDevice);
    if (cudaStatus != cudaSuccess) {
        fprintf(stderr, "cudaMemcpy failed!");
        goto Error;
    }

    cudaStatus = cudaMemcpy(dev_b, b, size * sizeof(int), cudaMemcpyHostToDevice);
    if (cudaStatus != cudaSuccess) {
        fprintf(stderr, "cudaMemcpy failed!");
        goto Error;
    }

    // Launch a kernel on the GPU with one thread for each element.
    addKernel<<<1, size>>>(dev_c, dev_a, dev_b);

    // Check for any errors launching the kernel
    cudaStatus = cudaGetLastError();
    if (cudaStatus != cudaSuccess) {
        fprintf(stderr, "addKernel launch failed: %s\n", cudaGetErrorString(cudaStatus));
        goto Error;
    }

    // cudaDeviceSynchronize waits for the kernel to finish, and returns
    // any errors encountered during the launch.
    cudaStatus = cudaDeviceSynchronize();
    if (cudaStatus != cudaSuccess) {
        fprintf(stderr, "cudaDeviceSynchronize returned error code %d after launching addKernel!\n", cudaStatus);
        goto Error;
    }

    // Copy output vector from GPU buffer to host memory.
    cudaStatus = cudaMemcpy(c, dev_c, size * sizeof(int), cudaMemcpyDeviceToHost);
    if (cudaStatus != cudaSuccess) {
        fprintf(stderr, "cudaMemcpy failed!");
        goto Error;
    }

Error:
    cudaFree(dev_c);
    cudaFree(dev_a);
    cudaFree(dev_b);

    return cudaStatus;
}
三、实战代码:
例一:第一个程序hello world
#include "cuda_runtime.h"
#include "device_launch_parameters.h"
#include <stdio.h>
#include <Windows.h>
__global__ void helloFromGPU(void)
{
printf("Hello World from GPU!\n");
}
int main(void)
{
// hello from cpu
cudaError_t cudaStatus;
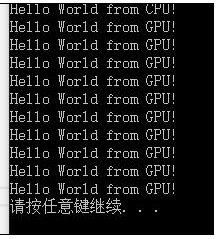
printf("Hello World from CPU!\n");
helloFromGPU << <1, 10 >> > ();
cudaDeviceReset();//重置CUDA设备释放程序占用的资源
system("pause");
return 0;
}
无视所有错误直接运行即可。
在这里 helloFromGPU << <1, 10 >> >();
表示这一函数将有十个一样的线程,也就是这个函数总计会被执行十次。
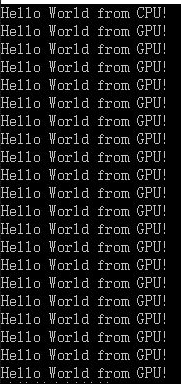
改为helloFromGPU << <2, 10 >> >();
例二:参数的传入
#include "cuda_runtime.h"
#include "device_launch_parameters.h"
#include <stdio.h>
#include <Windows.h>
__global__ void Add(int i, int j)
{
    int count;
    count = i + j;
    printf("\nNum is %d\n", count);
}
int main(void)
{
    Add << <1, 1 >> >(10, 15);
    cudaDeviceReset();//重置CUDA设备释放程序占用的资源
    system("pause");
    return 0;
}
传入参数与一般的c没有什么不一样之处
例三:数据的传入和传出
从这里开始要用到显存分配,在这一段中,我们的数据要从内存copy到显存上面,然后现在又要从显存上面copy回来
这次我们定一个减法函数,在设备上执行
__global__ void Decrease(int a, int b, int *c)
{
    *c = a - b;
}
我的要传的数为一个整数型的c,一般会定义一个全局的以cuda错误处理返回值为类型的函数,在这一函数内执行数据的传输,及时返回错误
cudaError_t addWithCuda(int *c);
在例子中我省略了这个直接用void类型
void addWithCuda(int *c);
代码:
#include "cuda_runtime.h"
#include "device_launch_parameters.h"
#include <stdio.h>
#include <Windows.h>
void addWithCuda(int *c);//1.定义传入的函数c
int main(void)
{
    int c;
    c = 10;
    addWithCuda(&c);//2.传入参数变量(地址)
    cudaDeviceReset();//6.重置CUDA设备释放程序占用的资源
    printf("Value is %d", c);//7.主机上打印显示数据

    system("pause");
    return 0;
}
__global__ void Decrease(int a, int b, int *c)
{
    *c = a - b;
}
void addWithCuda(int *c)
{
    int *dev_c = 0;//这个相当于内存和显存有一样的
    //3.请求CUDA设备的内存(显存),执行CUDA函数
    cudaMalloc((void**)&dev_c, sizeof(int));
    Decrease << <1, 1 >> >(15, 30, dev_c);
    //4.等待设备所有线程任务执行完毕
    cudaDeviceSynchronize();
    //5.数据复制到主机,释放占用空间
    cudaMemcpy(c, dev_c, sizeof(int), cudaMemcpyDeviceToHost);
    cudaFree(dev_c);
}
例四:数据的传入和传出Ⅱ
如果要复制数据进去,那么我们先要修改下上一个例子的函数
1.传入的数值全改为指针类型
__global__ void Decrease(int *a, int *b, int *c)
{
     *c = *a - *b;
}
2.修改函数的传入参数
void addWithCuda(int *c,int *a,int *b);//1.定义传入的函数c
3.增加处理函数中对于相应存储空间的的申请和释放
void addWithCuda(int *c, int *a, int *b)
{
    int *dev_c = 0;
    int *dev_a = 0;
    int *dev_b = 0;
    //3.请求CUDA设备的内存(显存),执行CUDA函数
    cudaMalloc((void**)&dev_c, sizeof(int));
    cudaMalloc((void**)&dev_a, sizeof(int));
    cudaMalloc((void**)&dev_b, sizeof(int));

    //4.从主机复制数据到设备上
    cudaMemcpy(dev_a, a, sizeof(int), cudaMemcpyHostToDevice);
    cudaMemcpy(dev_b, b, sizeof(int), cudaMemcpyHostToDevice);

    Decrease << < 1, 1 >> >(dev_a, dev_b, dev_c);

    //5.等待设备所有线程任务执行完毕
    cudaDeviceSynchronize();

    //6.数据复制到主机,释放占用空间
    cudaMemcpy(c, dev_c, sizeof(int), cudaMemcpyDeviceToHost);
    cudaFree(dev_c);
    cudaFree(dev_a);
    cudaFree(dev_b);
}
4.最后是主函数
int main(void)
{
    int c;
    int a, b;
    c = 10;
    a = 30;
    b = 15;
    addWithCuda(&c, &a, &b);//2.传入参数变量(地址)
    cudaDeviceReset();//7.重置CUDA设备释放程序占用的资源
    printf("Value is %d", c);//8.主机上打印显示数据
    system("pause");
    return 0;
}
5.代码:
#include "cuda_runtime.h"
#include "device_launch_parameters.h"
#include <stdio.h>
#include <Windows.h>
__global__ void Decrease(int *a, int *b, int *c)
{
    *c = *a - *b;
}
void addWithCuda(int *c, int *a, int *b)
{
    int *dev_c = 0;
    int *dev_a = 0;
    int *dev_b = 0;
    //3.请求CUDA设备的内存(显存),执行CUDA函数
    cudaMalloc((void**)&dev_c, sizeof(int));
    cudaMalloc((void**)&dev_a, sizeof(int));
    cudaMalloc((void**)&dev_b, sizeof(int));

    //4.从主机复制数据到设备上
    cudaMemcpy(dev_a, a, sizeof(int), cudaMemcpyHostToDevice);
    cudaMemcpy(dev_b, b, sizeof(int), cudaMemcpyHostToDevice);

    Decrease << < 1, 1 >> >(dev_a, dev_b, dev_c);

    //5.等待设备所有线程任务执行完毕
    cudaDeviceSynchronize();

    //6.数据复制到主机,释放占用空间
    cudaMemcpy(c, dev_c, sizeof(int), cudaMemcpyDeviceToHost);
    cudaFree(dev_c);
    cudaFree(dev_a);
    cudaFree(dev_b);
}

int main(void)
{
    int c;
    int a, b;
    c = 10;
    a = 30;
    b = 15;
    addWithCuda(&c, &a, &b);//2.传入参数变量(地址)
    cudaDeviceReset();//7.重置CUDA设备释放程序占用的资源
    printf("Value is %d", c);//8.主机上打印显示数据
    system("pause");
    return 0;
}
最后再放一个程序关于循环可以自行理解
程序实现向量的加法操作,使用了一个block内部的512个线程。
#include <stdio.h>
#include<cuda_runtime.h>

//__global__声明的函数,告诉编译器这段代码交由CPU调用,由GPU执行
__global__ void add(const int *dev_a,const int *dev_b,int *dev_c)
{
    int i=threadIdx.x;
    dev_c[i]=dev_a[i]+dev_b[i];
}

int main(void)
{
    //申请主机内存,并进行初始化
    int host_a[512],host_b[512],host_c[512];
    for(int i=0;i<512;i++)
    {
        host_a[i]=i;
        host_b[i]=i<<1;
    }

    //定义cudaError,默认为cudaSuccess(0)
    cudaError_t err = cudaSuccess;

    //申请GPU存储空间
    int *dev_a,*dev_b,*dev_c;
    err=cudaMalloc((void **)&dev_a, sizeof(int)*512);
    err=cudaMalloc((void **)&dev_b, sizeof(int)*512);
    err=cudaMalloc((void **)&dev_c, sizeof(int)*512);
    if(err!=cudaSuccess)
    {
        printf("the cudaMalloc on GPU is failed");
        return 1;
    }
    printf("SUCCESS");
    //将要计算的数据使用cudaMemcpy传送到GPU
    cudaMemcpy(dev_a,host_a,sizeof(host_a),cudaMemcpyHostToDevice);
    cudaMemcpy(dev_b,host_b,sizeof(host_b),cudaMemcpyHostToDevice);

    //调用核函数在GPU上执行。数据较少,之使用一个Block,含有512个线程
    add<<<1,512>>>(dev_a,dev_b,dev_c);
    cudaMemcpy(&host_c,dev_c,sizeof(host_c),cudaMemcpyDeviceToHost);
    for(int i=0;i<512;i++)
        printf("host_a[%d] + host_b[%d] = %d + %d = %d\n",i,i,host_a[i],host_b[i],host_c[i]);
    cudaFree(dev_a);//释放GPU内存
    cudaFree(dev_b);//释放GPU内存
    cudaFree(dev_c);//释放GPU内存
    return 0 ;
}
