Spring Boot 持续更新中...
内容
- Spring Boot入门
- Spring Boot配置
- Spring Boot与日志
- Spring Boot与Web开发
- Spring Boot与Docker
- Spring Boot与数据访问
- Spring Boot启动配置原理
- Spring Boot自定义starters
- Spring Boot与缓存
- Spring Boot与消息
- Spring Boot与检索
- Spring Boot与任务
- Spring Boot与安全
- Spring Boot与分布式
- Spring Boot与开发热部署
- Spring Boot与监控管理
一、入门
Spring Boot来简化Spring应用开发,约定大于配置,去繁从简, just run就能创建一个独立的,产品级别的应用。
背景:
J2EE笨重的开发、繁多的配置、低下的开发效率、
复杂的部署流程、第三方技术集成难度大。
解决:
- “Spring全家桶”时代。
- Spring Boot J2EE一站式解决方案
- Spring Cloud 分布式整体解决方案
优点:
- 快速创建独立运行的Spring项目以及与主流框架集成
- 使用嵌入式的Servlet容器,应用无需打成WAR包
- starters自动依赖与版本控制
- 大量的自动配置,简化开发,也可修改默认值
- 无需配置XML,无代码生成,开箱即用
- 准生产环境的运行时应用监控
- 与云计算的天然集成

入门示例
步骤
- 创建maven项目
- 引入starters
- 创建主程序
- 启动运行
https://start.spring.io/ 可以快速创建一个springboot项目
引入starters
    <parent>
        <groupId>org.springframework.boot</groupId>
        <artifactId>spring-boot-starter-parent</artifactId>
        <version>2.2.5.RELEASE</version>
        <relativePath/> <!-- lookup parent from repository -->
    </parent>
    <dependencies>
        <dependency>
            <groupId>org.springframework.boot</groupId>
            <artifactId>spring-boot-starter</artifactId>
        </dependency>

        <dependency>
            <groupId>org.springframework.boot</groupId>
            <artifactId>spring-boot-starter-test</artifactId>
            <scope>test</scope>
            <exclusions>
                <exclusion>
                    <groupId>org.junit.vintage</groupId>
                    <artifactId>junit-vintage-engine</artifactId>
                </exclusion>
            </exclusions>
        </dependency>
    </dependencies>
创建主程序
@SpringBootApplication 来标注一个主程序类,说明这是一个Spring Boot应用
package com.aijava.springboot;

import org.springframework.boot.SpringApplication;
import org.springframework.boot.autoconfigure.SpringBootApplication;

@SpringBootApplication
public class HelloWorld {
    public static void main(String[] args) {
        SpringApplication.run(HelloWorld.class, args);
    }
}
package com.aijava.springboot.controller;

import org.springframework.boot.autoconfigure.EnableAutoConfiguration;
import org.springframework.stereotype.Controller;
import org.springframework.web.bind.annotation.RequestMapping;
import org.springframework.web.bind.annotation.ResponseBody;

@Controller
public class SampleController {

    @RequestMapping("/")
    @ResponseBody
    String home(){
        return "Hello World!";
    }
}
运行
简化部属
 <!-- 这个插件,可以将应用打包成一个可执行的jar包;-->
    <build>
        <plugins>
            <plugin>
                <groupId>org.springframework.boot</groupId>
                <artifactId>spring-boot-maven-plugin</artifactId>
            </plugin>
        </plugins>
    </build>
示例探究
Pom文件
父项目
    <parent>
        <groupId>org.springframework.boot</groupId>
        <artifactId>spring-boot-starter-parent</artifactId>
        <version>2.2.5.RELEASE</version>
        <relativePath/> <!-- lookup parent from repository -->
    </parent>
它还有父项目
他的父项目是
<parent>
  <groupId>org.springframework.boot</groupId>
  <artifactId>spring-boot-dependencies</artifactId>
  <version>2.2.5.RELEASE</version>
  <relativePath>../../spring-boot-dependencies</relativePath>
</parent>
它用来真正的管理Spring Boot应用里面的所有依赖版本
以后我们导入依赖默认是不需要写版本;(没有在dependencies里面管理的依赖自然需要声明版本号)
启动器
<dependency>
    <groupId>org.springframework.boot</groupId>
    <artifactId>spring-boot-starter-web</artifactId>
</dependency>
spring-boot-starter-web:
Spring Boot将所有的功能场景都抽取出来,做成一个个的starters(启动器),只需要在项目里面引入这些starter相关场景的所有依赖都会导入进来。要用什么功能就导入什么场景的启动器
主程序类
/**
 *  @SpringBootApplication 来标注一个主程序类,说明这是一个Spring Boot应用
 */
@SpringBootApplication
public class HelloWorldMainApplication {

    public static void main(String[] args) {

        // Spring应用启动起来
        SpringApplication.run(HelloWorldMainApplication.class,args);
    }
}
@SpringBootApplication: Spring Boot应用标注在某个类上说明这个类是SpringBoot的主配置类,SpringBoot就应该运行这个类的main方法来启动SpringBoot应用;
查看 @SpringBootApplication 源码
@Target(ElementType.TYPE)
@Retention(RetentionPolicy.RUNTIME)
@Documented
@Inherited
@SpringBootConfiguration
@EnableAutoConfiguration
@ComponentScan(excludeFilters = {
      @Filter(type = FilterType.CUSTOM, classes = TypeExcludeFilter.class),
      @Filter(type = FilterType.CUSTOM, classes = AutoConfigurationExcludeFilter.class) })
public @interface SpringBootApplication {
发现其是组合注解
@SpringBootConfiguration
Spring Boot的配置类
跟踪其源码
@Target({ElementType.TYPE})
@Retention(RetentionPolicy.RUNTIME)
@Documented
@Configuration
public @interface SpringBootConfiguration {
    @AliasFor(
        annotation = Configuration.class
    )
    boolean proxyBeanMethods() default true;
}
@Configuration:配置类上来标注这个注解
@Target({ElementType.TYPE})
@Retention(RetentionPolicy.RUNTIME)
@Documented
@Component
public @interface Configuration {
    @AliasFor(
        annotation = Component.class
    )
    String value() default "";

    boolean proxyBeanMethods() default true;
}
@EnableAutoConfiguration
开启自动配置功能,我们不需要再自己做配置了
@AutoConfigurationPackage
@Import(EnableAutoConfigurationImportSelector.class)
public @interface EnableAutoConfiguration {
@Target({ElementType.TYPE})
@Retention(RetentionPolicy.RUNTIME)
@Documented
@Inherited
@Import({Registrar.class})
public @interface AutoConfigurationPackage {
}
@Import(AutoConfigurationPackages.Registrar.class):
@
给容器中导入组件?
EnableAutoConfigurationImportSelector:导入哪些组件的选择器;
将所有需要导入的组件以全类名的方式返回;这些组件就会被添加到容器中;
会给容器中导入非常多的自动配置类(xxxAutoConfiguration);就是给容器中导入这个场景需要的所有组件,并配置好这些组件;
有了自动配置类,免去了我们手动编写配置注入功能组件等的工作;
SpringFactoriesLoader.loadFactoryNames(EnableAutoConfiguration.class,classLoader);
Spring Boot在启动的时候从类路径下的META-INF/spring.factories中获取EnableAutoConfiguration指定的值,将这些值作为自动配置类导入到容器中,自动配置类就生效,帮我们进行自动配置工作;以前我们需要自己配置的东西,自动配置类都帮我们;
J2EE的整体整合解决方案和自动配置都在spring-boot-autoconfigure-xxxx.RELEASE.jar;
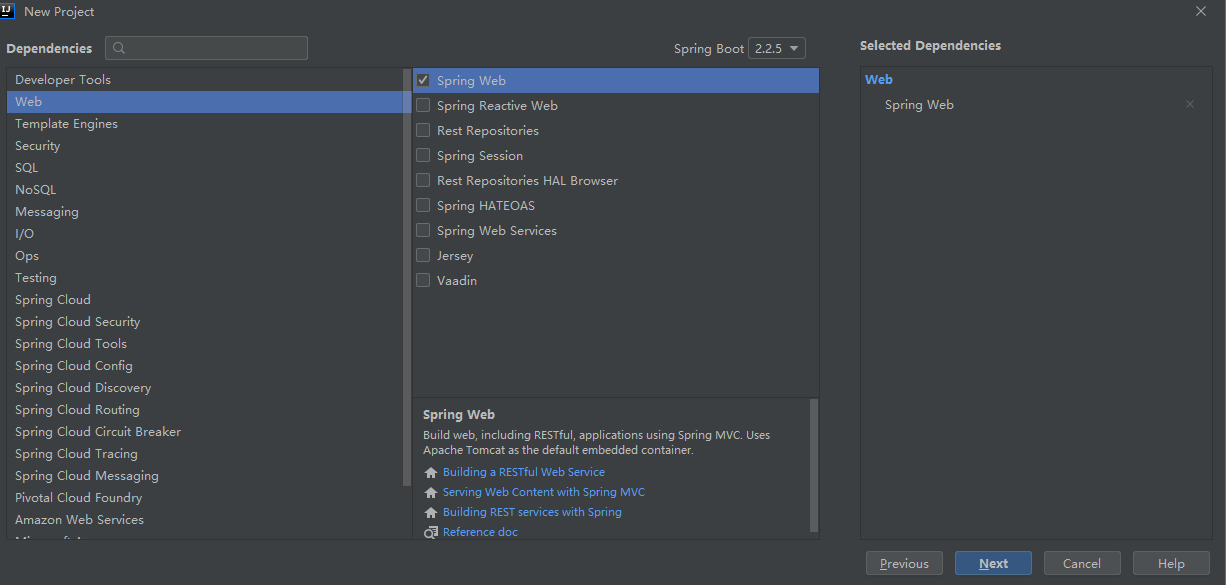
1、IDEA:使用 Spring Initializer快速创建项目
IDE都支持使用Spring的项目创建向导快速创建一个Spring Boot项目

选择我们需要的模块,向导会联网创建Spring Boot项目
默认生成的Spring Boot项目;
-
主程序已经生成好了,我们只需要我们自己的逻辑
-
resources文件夹中目录结构
-
static:保存所有的静态资源; js css images;
-
templates:保存所有的模板页面;(Spring Boot默认jar包使用嵌入式的Tomcat,默认不支持JSP页面);可以使用模板引擎(freemarker、thymeleaf);
-
application.properties:Spring Boot应用的配置文件;可以修改一些默认设置;
-
2、STS使用 Spring Starter Project快速创建项目
二、配置文件
配置文件
- application.properties
- application.yml
配置文件的作用:SpringBoot在底层都给我们自动配置好,修改SpringBoot自动配置的默认值。
YAML(YAML Ain't Markup Language)
YAML A Markup Language:是一个标记语言
YAML isn't Markup Language:不是一个标记语言;
标记语言:
YAML:以数据为中心,比json、xml等更适合做配置文件;
YAML:配置例子
server:
  port: 8081
XML
<server>
    <port>8081</port>
</server>
YAML
YAML(/ˈjæməl/,尾音类似camel骆驼)是一个可读性高,用来表达数据序列化的格式。YAML参考了其他多种语言,包括:C语言、Python、Perl,并从XML、电子邮件的数据格式(RFC 2822)中获得灵感。Clark Evans在2001年首次发表了这种语言[1],另外Ingy döt Net与Oren Ben-Kiki也是这语言的共同设计者[2]。当前已经有数种编程语言或脚本语言支持(或者说解析)这种语言。
YAML是"YAML Ain't a Markup Language"(YAML不是一种标记语言)的递归缩写。在开发的这种语言时,YAML 的意思其实是:"Yet Another Markup Language"(仍是一种标记语言)[3],但为了强调这种语言以数据做为中心,而不是以标记语言为重点,而用反向缩略语重命名。
YAML的语法和其他高级语言类似,并且可以简单表达清单、散列表,标量等数据形态。[4]它使用空白符号缩进和大量依赖外观的特色,特别适合用来表达或编辑数据结构、各种配置文件、倾印调试内容、文件大纲(例如:许多电子邮件标题格式和YAML非常接近)。尽管它比较适合用来表达层次结构式(hierarchical model)的数据结构,不过也有精致的语法可以表示关系性(relational model)的数据。[5]由于YAML使用空白字符和分行来分隔数据,使得它特别适合用grep/Python/Perl/Ruby操作。其让人最容易上手的特色是巧妙避开各种封闭符号,如:引号、各种括号等,这些符号在嵌套结构时会变得复杂而难以辨认。
- YAML大小写敏感
- 使用缩进代表层级关系
- 缩进只能使用空格,不能使用TAB,不要求空格个数,只需要相同层级左对齐(一般2个或4个空格)
- 使用冒号代表,格式为key: value,冒号后面要加一个空格
YAML中允许表示三种格式,分别是常量值,对象和数组
例如:
#即表示url属性值;
url: http://www.wolfcode.cn
#即表示server.host属性的值;
server:
    host: http://www.wolfcode.cn
#数组,即表示server为[a,b,c]
server:
    - 120.168.117.21
    - 120.168.117.22
    - 120.168.117.23
#常量
pi: 3.14   #定义一个数值3.14
hasChild: true  #定义一个boolean值
name: '你好YAML'   #定义一个字符串
注释和properties相同,使用#作为注释,YAML中只有行注释。
对象
使用冒号代表,格式为key: value。冒号后面要加一个空格:
key: value
可以使用缩进表示层级关系;
key:
    child-key: value
    child-key2: value2
YAML中还支持流式(flow)语法表示对象,比如上面例子可以写为:
key: {child-key: value, child-key2: value2}
较为复杂的对象格式,可以使用问号加一个空格代表一个复杂的key,配合一个冒号加一个空格代表一个value:
?
    - complexkey1
    - complexkey2
:
    - complexvalue1
    - complexvalue2
意思即对象的属性是一个数组[complexkey1,complexkey2],对应的值也是一个数组[complexvalue1,complexvalue2]
数组
使用一个短横线加一个空格代表一个数组项:
hobby:
    - Java
    - LOL
转为Properties
hobby[0]=Java
hobby[1]=LOL
行内写法
hobby: [Java, LOL]
一个相对复杂的例子:
companies:
    -   id: 1
        name: company1
        price: 200W
    -   id: 2
        name: company2
        price: 500W
或
companies:
    -
        id: 1
        name: company1
        price: 200W
    -
        id: 2
        name: company2
        price: 500W
转为Properties
companies[0].id=1
companies[0].name=company1
companies[0].price=200W
companies[1].id=2
companies[1].name=company2
companies[1].price=500W
意思是companies属性是一个数组,每一个数组元素又是由id,name,price三个属性构成;
数组也可以使用流式(flow)的方式表示:
companies: [{id: 1,name: company1,price: 200W},{id: 2,name: company2,price: 500W}]
常量
YAML中提供了多种常量结构,包括:整数,浮点数,字符串,NULL,日期,布尔,时间。下面使用一个例子来快速了解常量的基本使用:
boolean:
    - TRUE  #true,True都可以
    - FALSE  #false,False都可以
float:
    - 3.14
    - 6.8523015e+5  #可以使用科学计数法
int:
    - 123
    - 0b1010_0111_0100_1010_1110    #二进制表示
null:
    nodeName: 'node'
    parent: ~  #使用~表示null
string:
    - 哈哈
    - 'Hello world'  #可以使用双引号或者单引号包裹特殊字符
    - newline
      newline2    #字符串可以拆成多行,每一行会被转化成一个空格
date:
    - 2018-02-17    #日期必须使用ISO 8601格式,即yyyy-MM-dd
datetime:
    -  2018-02-17T15:02:31+08:00    #时间使用ISO 8601格式,时间和日期之间使用T连接,最后使用+代表时区
一些特殊符号
YAML中提供了很多特殊符号,在这里简单介绍常用的一些:
1,--- YAML可以在同一个文件中,使用---表示一个文档的开始;比如Springboot中profile的定义:
server:
    address: 192.168.1.100
---
spring:
    profiles: development
    server:
        address: 127.0.0.1
---
spring:
    profiles: production
    server:
        address: 192.168.1.120
代表定义了两个profile,一个是development,一个production;也常常使用---来分割不同的内容,比如记录日志:
---
Time: 2018-02-17T15:02:31+08:00
User: ed
Warning:
     This is an error message for the log file
---
Time: 2018-02-17T15:05:21+08:00
User: ed
Warning:
    A slightly different error message.
2,... 和---配合使用,在一个配置文件中代表一个文件的结束:
---
time: 20:03:20
player: Sammy Sosa
action: strike (miss)
...
---
time: 20:03:47
player: Sammy Sosa
action: grand slam
...
相当于在一个yaml文件中连续写了两个yaml配置项。
3,!! YAML中使用!!做类型强行转换:
string:
    - !!str 54321
    - !!str true
相当于把数字和布尔类型强转为字符串。当然允许转型的类型很多,比如:
--- !!set
- Mark McGwire: 65
- Sammy Sosa: 63
- Sammy Sosa: 63
- Ken Griffy: 58
将数组解析为set,简单理解,转化的内容就是:[{Ken Griffy=58}, {Mark McGwire=65}, {Sammy Sosa=63}],重复的Sammy Sosa去掉;
4,>在字符串中折叠换行,| 保留换行符,这两个符号是YAML中字符串经常使用的符号,比如:
accomplishment: >
 Mark set a major league
 home run record in 1998.
stats: |
 65 Home Runs
 0.278 Batting Average
结果是
accomplishment=Mark set a major league home run record in 1998.

stats=65 Home Runs
0.278 Batting Average
即| 符号保留了换行符,而accomplishment的结果为:
accomplishment=Mark set a major league home run record in 1998.
即将换行符转化成了空格;要注意一点的是,每行的文本前一定要有一个空格。
|符号常见用于在YAML中配置HTML片段:
phraseTemplate: |
  <p style="color: red">
    some template ${msg}
  </p>
5,引用。重复的内容在YAML中可以使用&来完成锚点定义,使用*来完成锚点引用,例如:
hr:
- Mark McGwire
- &SS Sammy Sosa
rbi:
- *SS
- Ken Griffey
可以看到,在hr中,使用&SS为Sammy Sosa设置了一个锚点(引用),名称为SS,在rbi中,使用*SS完成了锚点使用,那么结果为:
{rbi=[Sammy Sosa, Ken Griffey], hr=[Mark McGwire, Sammy Sosa]}
我们也可以这样定义:
SS: &SS Sammy Sosa
hr:
 - Mark McGwire
 - *SS
rbi:
 - *SS
 - Ken Griffey
注意,不能独立的定义锚点,比如不能直接这样写: &SS Sammy Sosa;另外,锚点能够定义更复杂的内容,比如:
default: &default
    - Mark McGwire
    - Sammy Sosa
hr: *default
那么hr相当于引用了default的数组,注意,hr: *default要写在同一行。
6,合并内容。主要和锚点配合使用,可以将一个锚点内容直接合并到一个对象中。来看一个示例:
merge:
  - &CENTER { x: 1, y: 2 }
  - &LEFT { x: 0, y: 2 }
  - &BIG { r: 10 }
  - &SMALL { r: 1 }

sample1:
    <<: *CENTER
    r: 10

sample2:
    << : [ *CENTER, *BIG ]
    other: haha

sample3:
    << : [ *CENTER, *BIG ]
    r: 100
在merge中,定义了四个锚点,分别在sample中使用。
sample1中,<<: *CENTER意思是引用{x: 1,y: 2},并且合并到sample1中,那么合并的结果为:sample1={r=10, y=2, x=1}
sample2中,<<: [*CENTER, *BIG] 意思是联合引用{x: 1,y: 2}和{r: 10},并且合并到sample2中,那么合并的结果为:sample2={other=haha, x=1, y=2, r=10}
sample3中,引入了*CENTER, *BIG,还使用了r: 100覆盖了引入的r: 10,所以sample3值为:sample3={r=100, y=2, x=1}
有了合并,我们就可以在配置中,把相同的基础配置抽取出来,在不同的子配置中合并引用即可。
package com.aidata.demo.bean;

import org.springframework.boot.context.properties.ConfigurationProperties;
import org.springframework.stereotype.Component;

import java.util.Date;
import java.util.List;
import java.util.Map;

/**
 * 将配置文件中配置的每一个属性的值,映射到这个组件中
 * @ConfigurationProperties:告诉SpringBoot将本类中的所有属性和配置文件中相关的配置进行绑定;
 *      prefix = "person":配置文件中哪个下面的所有属性进行一一映射
 *
 * 只有这个组件是容器中的组件,才能容器提供的@ConfigurationProperties功能;
 *
 */
@Component
@ConfigurationProperties(prefix = "person")
public class Person {

    private String lastName;
    private Integer age;
    private Boolean boss;
    private Date birth;

    private Map<String, Object> maps;
    private List<Object> lists;
    private Dog dog;

    public String getLastName() {
        return lastName;
    }

    public void setLastName(String lastName) {
        this.lastName = lastName;
    }

    public Integer getAge() {
        return age;
    }

    public void setAge(Integer age) {
        this.age = age;
    }

    public Boolean getBoss() {
        return boss;
    }

    public void setBoss(Boolean boss) {
        this.boss = boss;
    }

    public Date getBirth() {
        return birth;
    }

    public void setBirth(Date birth) {
        this.birth = birth;
    }

    public Map<String, Object> getMaps() {
        return maps;
    }

    public void setMaps(Map<String, Object> maps) {
        this.maps = maps;
    }

    public List<Object> getLists() {
        return lists;
    }

    public void setLists(List<Object> lists) {
        this.lists = lists;
    }

    public Dog getDog() {
        return dog;
    }

    public void setDog(Dog dog) {
        this.dog = dog;
    }

    @Override
    public String toString() {
        return "Person{" +
                "lastName='" + lastName + '\'' +
                ", age=" + age +
                ", boss=" + boss +
                ", birth=" + birth +
                ", maps=" + maps +
                ", lists=" + lists +
                ", dog=" + dog +
                '}';
    }
}
Dog
package com.aidata.demo.bean;

public class Dog {

    private String name;
    private int age;

    public String getName() {
        return name;
    }

    public void setName(String name) {
        this.name = name;
    }

    public int getAge() {
        return age;
    }

    public void setAge(int age) {
        this.age = age;
    }
}
resources 目录下创建 application.yml
server:
  port: 8080

person:
  lastName: hello
  age: 18
  boss: false
  birth: 2017/12/12
  maps: {k1: v1,k2: 12}
  lists:
    - lisi
    - zhaoliu
  dog:
    name: 小狗
    age: 12
测试
package com.aidata.demo;

import com.aidata.demo.bean.Person;
import org.junit.jupiter.api.Test;
import org.springframework.beans.factory.annotation.Autowired;
import org.springframework.boot.test.context.SpringBootTest;

@SpringBootTest
class DemoApplicationTests {

    @Autowired
    private Person person;

    @Test
    void contextLoads() {
        System.out.println(person);
    }
}
结果
Person{lastName='hello', age=18, boss=false, birth=Tue Dec 12 00:00:00 CST 2017, maps={k1=v1, k2=12}, lists=[lisi, zhaoliu], dog=com.aidata.demo.bean.Dog@53a5e217}
我们可以导入配置文件处理器,以后编写配置就有提示了
<!--导入配置文件处理器,配置文件进行绑定就会有提示-->
        <dependency>
            <groupId>org.springframework.boot</groupId>
            <artifactId>spring-boot-configuration-processor</artifactId>
            <optional>true</optional>
        </dependency>
调整
| @ConfigurationProperties | @Value | |
|---|---|---|
| 功能 | 批量注入配置文件中的属性 | 一个个指定 |
| 松散绑定(松散语法) | 支持 | 不支持 |
| SpEL | 不支持 | 支持 |
| JSR303数据校验 | 支持 | 不支持 |
| 复杂类型封装 | 支持 |
如果使用value
@Component
public class Person {

    /**
     * <bean class="Person">
     *      <property name="lastName" value="字面量/${key}从环境变量、配置文件中获取值/#{SpEL}"></property>
     * <bean/>
     */

    @Value("${person.last-name}")
    private String lastName;
    @Value("#{11*2}")
    private Integer age;
    @Value("true")
    private Boolean boss;

    private Date birth;
    private Map<String,Object> maps;
    private List<Object> lists;
    private Dog dog;
必须要一个个属性的设置,
并且@ConfigurationProperties支持JSR303数据校验,如下面要求lastName是邮箱格式,只需要加注解@Email
@Component
@ConfigurationProperties(prefix = "person")
@Validated
public class Person {

    /**
     * <bean class="Person">
     *      <property name="lastName" value="字面量/${key}从环境变量、配置文件中获取值/#{SpEL}"></property>
     * <bean/>
     */

   //lastName必须是邮箱格式
    @Email
    private String lastName;

    private Integer age;

    private Boolean boss;

    private Date birth;
    private Map<String,Object> maps;
    private List<Object> lists;
    private Dog dog;
application.properties/application.yml 是全局配置文件
如果我们想读取非全局配置文件的配置,即特定配置文件需要使用
建立 person.properties,将person的设置从application.yml移动到该文件中,此时 @ConfigurationProperties 读取不到
/**
 * 将配置文件中配置的每一个属性的值,映射到这个组件中
 * @ConfigurationProperties:告诉SpringBoot将本类中的所有属性和配置文件中相关的配置进行绑定;
 *      prefix = "person":配置文件中哪个下面的所有属性进行一一映射
 *
 * 只有这个组件是容器中的组件,才能容器提供的@ConfigurationProperties功能;
 *  @ConfigurationProperties(prefix = "person")默认从全局配置文件中获取值;
 *
 */
@PropertySource(value = {"classpath:person.properties"})
@Component
// @ConfigurationProperties(prefix = "person")
public class Person {

    private String lastName;

    private Integer age;

    private Boolean boss;
@ImportResource:导入Spring的配置文件,让配置文件里面的内容生效;
Spring Boot里面没有Spring的配置文件,所编写的Spring配置文件不能被自动识别;
想让Spring的配置文件生效,加载进来,可以使用@ImportResource,标注在一个配置类上
创建 beans.xml
<?xml version="1.0" encoding="UTF-8"?>
<beans xmlns="http://www.springframework.org/schema/beans"
       xmlns:xsi="http://www.w3.org/2001/XMLSchema-instance"
       xsi:schemaLocation="http://www.springframework.org/schema/beans http://www.springframework.org/schema/beans/spring-beans.xsd">


    <bean id="helloService" class="com.atguigu.springboot.service.HelloService"></bean>
</beans>
使用该文件
@ImportResource(locations = {"classpath:beans.xml"})
导入Spring的配置文件让其生效
SpringBoot推荐给容器中添加组件的方式;推荐使用全注解的方式
1、配置类@Configuration 相当于 Spring配置文件
2、使用@Bean
/**
 * @Configuration:指明当前类是一个配置类;就是来替代之前的Spring配置文件
 *
 * 在配置文件中用<bean><bean/>标签添加组件
 *
 */
@Configuration
public class MyAppConfig {

    //将方法的返回值添加到容器中;容器中这个组件默认的id就是方法名
    @Bean
    public HelloService helloService02(){
        System.out.println("配置类@Bean给容器中添加组件了...");
        return new HelloService();
    }
}
配置文件占位符
- 随机数
${random.value}、${random.int}、${random.long}
${random.int(10)}、${random.int[1024,65536]}
person.last-name=张三${random.uuid}
person.age=${random.int}
person.birth=2017/12/15
person.boss=false
person.maps.k1=v1
person.maps.k2=14
person.lists=a,b,c
person.dog.name=${person.hello:hello}_dog
person.dog.age=15
可以在配置文件中引用前面配置过的属性(优先级前面配置过的这里都能用)
${person.hello:默认值}来指定找不到属性时的默认值
1、多Profile文件
我们在主配置文件编写的时候,文件名可以是 application-{profile}.properties/yml
默认使用application.properties的配置;
2、yml支持多文档块方式
server:
  port: 8081
spring:
  profiles:
    active: prod

---
server:
  port: 8083
spring:
  profiles: dev


---

server:
  port: 8084
spring:
  profiles: prod  #指定属于哪个环境
3、激活指定profile
1、在配置文件中指定 spring.profiles.active=dev
2、命令行:
java -jar spring-boot-02-config-0.0.1-SNAPSHOT.jar --spring.profiles.active=dev;
可以直接在测试的时候,配置传入命令行参数
3、虚拟机参数;
配置文件加载位置和顺序
springboot 启动会扫描以下位置的application.properties或者application.yml文件作为Spring boot的默认配置文件
- file:./config/
- file:./
- classpath:/config/
- classpath:/
优先级由高到底,高优先级的配置会覆盖低优先级的配置;
SpringBoot会从这四个位置全部加载主配置文件;互补配置
我们还可以通过spring.config.location来改变默认的配置文件位置
项目打包好以后,我们可以使用命令行参数的形式,启动项目的时候来指定配置文件的新位置;指定配置文件和默认加载的这些配置文件共同起作用形成互补配置;
java -jar spring-boot-02-config-02-0.0.1-SNAPSHOT.jar --spring.config.location=G:/application.properties
外部加载顺序
SpringBoot也可以从以下位置加载配置; 优先级从高到低;高优先级的配置覆盖低优先级的配置,所有的配置会形成互补配置
1.命令行参数
所有的配置都可以在命令行上进行指定
java -jar spring-boot-02-config-02-0.0.1-SNAPSHOT.jar --server.port=8087 --server.context-path=/abc
多个配置用空格分开; --配置项=值
2.来自java:comp/env的JNDI属性
3.Java系统属性(System.getProperties())
4.操作系统环境变量
5.RandomValuePropertySource配置的random.*属性值
由jar包外向jar包内进行寻找;
优先加载带profile
6.jar包外部的application-{profile}.properties或application.yml(带spring.profile)配置文件
7.jar包内部的application-{profile}.properties或application.yml(带spring.profile)配置文件
再来加载不带profile
8.jar包外部的application.properties或application.yml(不带spring.profile)配置文件
9.jar包内部的application.properties或application.yml(不带spring.profile)配置文件
10.@Configuration注解类上的@PropertySource
11.通过SpringApplication.setDefaultProperties指定的默认属性
所有支持的配置加载来源;
自动配置原理
配置文件中可以配置的属性:https://docs.spring.io/spring-boot/docs/current/reference/htmlsingle/#common-application-properties
启动
@SpringBootApplication
public class DemoApplication {

    public static void main(String[] args) {
        SpringApplication.run(DemoApplication.class, args);
    }

}
查看 @SpringBootApplication,发现其有开启自动配置功能的注解 @EnableAutoConfiguration
@Target({ElementType.TYPE})
@Retention(RetentionPolicy.RUNTIME)
@Documented
@Inherited
@SpringBootConfiguration
@EnableAutoConfiguration
@ComponentScan(
    excludeFilters = {@Filter(
    type = FilterType.CUSTOM,
    classes = {TypeExcludeFilter.class}
), @Filter(
    type = FilterType.CUSTOM,
    classes = {AutoConfigurationExcludeFilter.class}
)}
)
public @interface SpringBootApplication {
    ...
}
查看@EnableAutoConfiguration,利用选择器
@Target({ElementType.TYPE})
@Retention(RetentionPolicy.RUNTIME)
@Documented
@Inherited
@AutoConfigurationPackage
@Import({AutoConfigurationImportSelector.class})
public @interface EnableAutoConfiguration {
    String ENABLED_OVERRIDE_PROPERTY = "spring.boot.enableautoconfiguration";

    Class<?>[] exclude() default {};

    String[] excludeName() default {};
}
@EnableAutoConfiguration 作用:
利用AutoConfigurationImportSelector给容器中导入一些组件?可以查看selectImports()方法的内容;
    public String[] selectImports(AnnotationMetadata annotationMetadata) {
        if (!this.isEnabled(annotationMetadata)) {
            return NO_IMPORTS;
        } else {
            AutoConfigurationMetadata autoConfigurationMetadata = AutoConfigurationMetadataLoader.loadMetadata(this.beanClassLoader);
            AutoConfigurationImportSelector.AutoConfigurationEntry autoConfigurationEntry = this.getAutoConfigurationEntry(autoConfigurationMetadata, annotationMetadata);
            return StringUtils.toStringArray(autoConfigurationEntry.getConfigurations());
        }
    }

    protected AutoConfigurationImportSelector.AutoConfigurationEntry getAutoConfigurationEntry(AutoConfigurationMetadata autoConfigurationMetadata, AnnotationMetadata annotationMetadata) {
        if (!this.isEnabled(annotationMetadata)) {
            return EMPTY_ENTRY;
        } else {
            AnnotationAttributes attributes = this.getAttributes(annotationMetadata);
            List<String> configurations = this.getCandidateConfigurations(annotationMetadata, attributes);
            configurations = this.removeDuplicates(configurations);
            Set<String> exclusions = this.getExclusions(annotationMetadata, attributes);
            this.checkExcludedClasses(configurations, exclusions);
            configurations.removeAll(exclusions);
            configurations = this.filter(configurations, autoConfigurationMetadata);
            this.fireAutoConfigurationImportEvents(configurations, exclusions);
            return new AutoConfigurationImportSelector.AutoConfigurationEntry(configurations, exclusions);
        }
    }
List<String> configurations = this.getCandidateConfigurations(annotationMetadata, attributes);
获取候选的配置
    protected List<String> getCandidateConfigurations(AnnotationMetadata metadata, AnnotationAttributes attributes) {
        List<String> configurations = SpringFactoriesLoader.loadFactoryNames(this.getSpringFactoriesLoaderFactoryClass(), this.getBeanClassLoader());
        Assert.notEmpty(configurations, "No auto configuration classes found in META-INF/spring.factories. If you are using a custom packaging, make sure that file is correct.");
        return configurations;
    }
protected Class<?> getSpringFactoriesLoaderFactoryClass() {
        return EnableAutoConfiguration.class;
    }
SpringFactoriesLoader.loadFactoryNames()
- 扫描所有jar包类路径下 META‐INF/spring.factories Enumeration<URL> urls = classLoader != null ? classLoader.getResources("META-INF/spring.factories") : ClassLoader.getSystemResources("META-INF/spring.factories");
- 把扫描到的这些文件的内容包装成properties对象 Properties properties = PropertiesLoaderUtils.loadProperties(resource);
- 从properties中获取到EnableAutoConfiguration.class类(类名)对应的值,然后把他们添加在容器中
public static List<String> loadFactoryNames(Class<?> factoryType, @Nullable ClassLoader classLoader) { String factoryTypeName = factoryType.getName(); return (List)loadSpringFactories(classLoader).getOrDefault(factoryTypeName, Collections.emptyList()); } private static Map<String, List<String>> loadSpringFactories(@Nullable ClassLoader classLoader) { MultiValueMap<String, String> result = (MultiValueMap)cache.get(classLoader); if (result != null) { return result; } else { try { Enumeration<URL> urls = classLoader != null ? classLoader.getResources("META-INF/spring.factories") : ClassLoader.getSystemResources("META-INF/spring.factories"); LinkedMultiValueMap result = new LinkedMultiValueMap(); while(urls.hasMoreElements()) { URL url = (URL)urls.nextElement(); UrlResource resource = new UrlResource(url); Properties properties = PropertiesLoaderUtils.loadProperties(resource); Iterator var6 = properties.entrySet().iterator(); while(var6.hasNext()) { Entry<?, ?> entry = (Entry)var6.next(); String factoryTypeName = ((String)entry.getKey()).trim(); String[] var9 = StringUtils.commaDelimitedListToStringArray((String)entry.getValue()); int var10 = var9.length; for(int var11 = 0; var11 < var10; ++var11) { String factoryImplementationName = var9[var11]; result.add(factoryTypeName, factoryImplementationName.trim()); } } } cache.put(classLoader, result); return result; } catch (IOException var13) { throw new IllegalArgumentException("Unable to load factories from location [META-INF/spring.factories]", var13); } } }
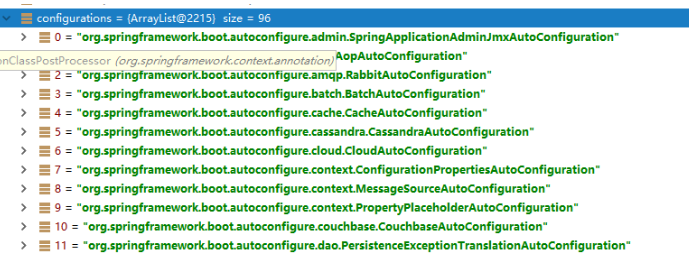
类路径下 META-INF/spring.factories 里面配置的所有EnableAutoConfiguration的值加入到了容器中
# Initializers
org.springframework.context.ApplicationContextInitializer=\
org.springframework.boot.autoconfigure.SharedMetadataReaderFactoryContextInitializer,\
org.springframework.boot.autoconfigure.logging.ConditionEvaluationReportLoggingListener

# Application Listeners
org.springframework.context.ApplicationListener=\
org.springframework.boot.autoconfigure.BackgroundPreinitializer

# Auto Configuration Import Listeners
org.springframework.boot.autoconfigure.AutoConfigurationImportListener=\
org.springframework.boot.autoconfigure.condition.ConditionEvaluationReportAutoConfigurationImportListener

# Auto Configuration Import Filters
org.springframework.boot.autoconfigure.AutoConfigurationImportFilter=\
org.springframework.boot.autoconfigure.condition.OnBeanCondition,\
org.springframework.boot.autoconfigure.condition.OnClassCondition,\
org.springframework.boot.autoconfigure.condition.OnWebApplicationCondition

# Auto Configure
org.springframework.boot.autoconfigure.EnableAutoConfiguration=\
org.springframework.boot.autoconfigure.admin.SpringApplicationAdminJmxAutoConfiguration,\
org.springframework.boot.autoconfigure.aop.AopAutoConfiguration,\
org.springframework.boot.autoconfigure.amqp.RabbitAutoConfiguration,\
org.springframework.boot.autoconfigure.batch.BatchAutoConfiguration,\
org.springframework.boot.autoconfigure.cache.CacheAutoConfiguration,\
org.springframework.boot.autoconfigure.cassandra.CassandraAutoConfiguration,\
org.springframework.boot.autoconfigure.cloud.CloudServiceConnectorsAutoConfiguration,\
org.springframework.boot.autoconfigure.context.ConfigurationPropertiesAutoConfiguration,\
org.springframework.boot.autoconfigure.context.MessageSourceAutoConfiguration,\
org.springframework.boot.autoconfigure.context.PropertyPlaceholderAutoConfiguration,\
org.springframework.boot.autoconfigure.couchbase.CouchbaseAutoConfiguration,\
org.springframework.boot.autoconfigure.dao.PersistenceExceptionTranslationAutoConfiguration,\
org.springframework.boot.autoconfigure.data.cassandra.CassandraDataAutoConfiguration,\
org.springframework.boot.autoconfigure.data.cassandra.CassandraReactiveDataAutoConfiguration,\
org.springframework.boot.autoconfigure.data.cassandra.CassandraReactiveRepositoriesAutoConfiguration,\
org.springframework.boot.autoconfigure.data.cassandra.CassandraRepositoriesAutoConfiguration,\
org.springframework.boot.autoconfigure.data.couchbase.CouchbaseDataAutoConfiguration,\
org.springframework.boot.autoconfigure.data.couchbase.CouchbaseReactiveDataAutoConfiguration,\
org.springframework.boot.autoconfigure.data.couchbase.CouchbaseReactiveRepositoriesAutoConfiguration,\
org.springframework.boot.autoconfigure.data.couchbase.CouchbaseRepositoriesAutoConfiguration,\
org.springframework.boot.autoconfigure.data.elasticsearch.ElasticsearchAutoConfiguration,\
org.springframework.boot.autoconfigure.data.elasticsearch.ElasticsearchDataAutoConfiguration,\
org.springframework.boot.autoconfigure.data.elasticsearch.ElasticsearchRepositoriesAutoConfiguration,\
org.springframework.boot.autoconfigure.data.elasticsearch.ReactiveElasticsearchRepositoriesAutoConfiguration,\
org.springframework.boot.autoconfigure.data.elasticsearch.ReactiveRestClientAutoConfiguration,\
org.springframework.boot.autoconfigure.data.jdbc.JdbcRepositoriesAutoConfiguration,\
org.springframework.boot.autoconfigure.data.jpa.JpaRepositoriesAutoConfiguration,\
org.springframework.boot.autoconfigure.data.ldap.LdapRepositoriesAutoConfiguration,\
org.springframework.boot.autoconfigure.data.mongo.MongoDataAutoConfiguration,\
org.springframework.boot.autoconfigure.data.mongo.MongoReactiveDataAutoConfiguration,\
org.springframework.boot.autoconfigure.data.mongo.MongoReactiveRepositoriesAutoConfiguration,\
org.springframework.boot.autoconfigure.data.mongo.MongoRepositoriesAutoConfiguration,\
org.springframework.boot.autoconfigure.data.neo4j.Neo4jDataAutoConfiguration,\
org.springframework.boot.autoconfigure.data.neo4j.Neo4jRepositoriesAutoConfiguration,\
org.springframework.boot.autoconfigure.data.solr.SolrRepositoriesAutoConfiguration,\
org.springframework.boot.autoconfigure.data.redis.RedisAutoConfiguration,\
org.springframework.boot.autoconfigure.data.redis.RedisReactiveAutoConfiguration,\
org.springframework.boot.autoconfigure.data.redis.RedisRepositoriesAutoConfiguration,\
org.springframework.boot.autoconfigure.data.rest.RepositoryRestMvcAutoConfiguration,\
org.springframework.boot.autoconfigure.data.web.SpringDataWebAutoConfiguration,\
org.springframework.boot.autoconfigure.elasticsearch.jest.JestAutoConfiguration,\
org.springframework.boot.autoconfigure.elasticsearch.rest.RestClientAutoConfiguration,\
org.springframework.boot.autoconfigure.flyway.FlywayAutoConfiguration,\
org.springframework.boot.autoconfigure.freemarker.FreeMarkerAutoConfiguration,\
org.springframework.boot.autoconfigure.gson.GsonAutoConfiguration,\
org.springframework.boot.autoconfigure.h2.H2ConsoleAutoConfiguration,\
org.springframework.boot.autoconfigure.hateoas.HypermediaAutoConfiguration,\
org.springframework.boot.autoconfigure.hazelcast.HazelcastAutoConfiguration,\
org.springframework.boot.autoconfigure.hazelcast.HazelcastJpaDependencyAutoConfiguration,\
org.springframework.boot.autoconfigure.http.HttpMessageConvertersAutoConfiguration,\
org.springframework.boot.autoconfigure.http.codec.CodecsAutoConfiguration,\
org.springframework.boot.autoconfigure.influx.InfluxDbAutoConfiguration,\
org.springframework.boot.autoconfigure.info.ProjectInfoAutoConfiguration,\
org.springframework.boot.autoconfigure.integration.IntegrationAutoConfiguration,\
org.springframework.boot.autoconfigure.jackson.JacksonAutoConfiguration,\
org.springframework.boot.autoconfigure.jdbc.DataSourceAutoConfiguration,\
org.springframework.boot.autoconfigure.jdbc.JdbcTemplateAutoConfiguration,\
org.springframework.boot.autoconfigure.jdbc.JndiDataSourceAutoConfiguration,\
org.springframework.boot.autoconfigure.jdbc.XADataSourceAutoConfiguration,\
org.springframework.boot.autoconfigure.jdbc.DataSourceTransactionManagerAutoConfiguration,\
org.springframework.boot.autoconfigure.jms.JmsAutoConfiguration,\
org.springframework.boot.autoconfigure.jmx.JmxAutoConfiguration,\
org.springframework.boot.autoconfigure.jms.JndiConnectionFactoryAutoConfiguration,\
org.springframework.boot.autoconfigure.jms.activemq.ActiveMQAutoConfiguration,\
org.springframework.boot.autoconfigure.jms.artemis.ArtemisAutoConfiguration,\
org.springframework.boot.autoconfigure.groovy.template.GroovyTemplateAutoConfiguration,\
org.springframework.boot.autoconfigure.jersey.JerseyAutoConfiguration,\
org.springframework.boot.autoconfigure.jooq.JooqAutoConfiguration,\
org.springframework.boot.autoconfigure.jsonb.JsonbAutoConfiguration,\
org.springframework.boot.autoconfigure.kafka.KafkaAutoConfiguration,\
org.springframework.boot.autoconfigure.ldap.embedded.EmbeddedLdapAutoConfiguration,\
org.springframework.boot.autoconfigure.ldap.LdapAutoConfiguration,\
org.springframework.boot.autoconfigure.liquibase.LiquibaseAutoConfiguration,\
org.springframework.boot.autoconfigure.mail.MailSenderAutoConfiguration,\
org.springframework.boot.autoconfigure.mail.MailSenderValidatorAutoConfiguration,\
org.springframework.boot.autoconfigure.mongo.embedded.EmbeddedMongoAutoConfiguration,\
org.springframework.boot.autoconfigure.mongo.MongoAutoConfiguration,\
org.springframework.boot.autoconfigure.mongo.MongoReactiveAutoConfiguration,\
org.springframework.boot.autoconfigure.mustache.MustacheAutoConfiguration,\
org.springframework.boot.autoconfigure.orm.jpa.HibernateJpaAutoConfiguration,\
org.springframework.boot.autoconfigure.quartz.QuartzAutoConfiguration,\
org.springframework.boot.autoconfigure.rsocket.RSocketMessagingAutoConfiguration,\
org.springframework.boot.autoconfigure.rsocket.RSocketRequesterAutoConfiguration,\
org.springframework.boot.autoconfigure.rsocket.RSocketServerAutoConfiguration,\
org.springframework.boot.autoconfigure.rsocket.RSocketStrategiesAutoConfiguration,\
org.springframework.boot.autoconfigure.security.servlet.SecurityAutoConfiguration,\
org.springframework.boot.autoconfigure.security.servlet.UserDetailsServiceAutoConfiguration,\
org.springframework.boot.autoconfigure.security.servlet.SecurityFilterAutoConfiguration,\
org.springframework.boot.autoconfigure.security.reactive.ReactiveSecurityAutoConfiguration,\
org.springframework.boot.autoconfigure.security.reactive.ReactiveUserDetailsServiceAutoConfiguration,\
org.springframework.boot.autoconfigure.security.rsocket.RSocketSecurityAutoConfiguration,\
org.springframework.boot.autoconfigure.security.saml2.Saml2RelyingPartyAutoConfiguration,\
org.springframework.boot.autoconfigure.sendgrid.SendGridAutoConfiguration,\
org.springframework.boot.autoconfigure.session.SessionAutoConfiguration,\
org.springframework.boot.autoconfigure.security.oauth2.client.servlet.OAuth2ClientAutoConfiguration,\
org.springframework.boot.autoconfigure.security.oauth2.client.reactive.ReactiveOAuth2ClientAutoConfiguration,\
org.springframework.boot.autoconfigure.security.oauth2.resource.servlet.OAuth2ResourceServerAutoConfiguration,\
org.springframework.boot.autoconfigure.security.oauth2.resource.reactive.ReactiveOAuth2ResourceServerAutoConfiguration,\
org.springframework.boot.autoconfigure.solr.SolrAutoConfiguration,\
org.springframework.boot.autoconfigure.task.TaskExecutionAutoConfiguration,\
org.springframework.boot.autoconfigure.task.TaskSchedulingAutoConfiguration,\
org.springframework.boot.autoconfigure.thymeleaf.ThymeleafAutoConfiguration,\
org.springframework.boot.autoconfigure.transaction.TransactionAutoConfiguration,\
org.springframework.boot.autoconfigure.transaction.jta.JtaAutoConfiguration,\
org.springframework.boot.autoconfigure.validation.ValidationAutoConfiguration,\
org.springframework.boot.autoconfigure.web.client.RestTemplateAutoConfiguration,\
org.springframework.boot.autoconfigure.web.embedded.EmbeddedWebServerFactoryCustomizerAutoConfiguration,\
org.springframework.boot.autoconfigure.web.reactive.HttpHandlerAutoConfiguration,\
org.springframework.boot.autoconfigure.web.reactive.ReactiveWebServerFactoryAutoConfiguration,\
org.springframework.boot.autoconfigure.web.reactive.WebFluxAutoConfiguration,\
org.springframework.boot.autoconfigure.web.reactive.error.ErrorWebFluxAutoConfiguration,\
org.springframework.boot.autoconfigure.web.reactive.function.client.ClientHttpConnectorAutoConfiguration,\
org.springframework.boot.autoconfigure.web.reactive.function.client.WebClientAutoConfiguration,\
org.springframework.boot.autoconfigure.web.servlet.DispatcherServletAutoConfiguration,\
org.springframework.boot.autoconfigure.web.servlet.ServletWebServerFactoryAutoConfiguration,\
org.springframework.boot.autoconfigure.web.servlet.error.ErrorMvcAutoConfiguration,\
org.springframework.boot.autoconfigure.web.servlet.HttpEncodingAutoConfiguration,\
org.springframework.boot.autoconfigure.web.servlet.MultipartAutoConfiguration,\
org.springframework.boot.autoconfigure.web.servlet.WebMvcAutoConfiguration,\
org.springframework.boot.autoconfigure.websocket.reactive.WebSocketReactiveAutoConfiguration,\
org.springframework.boot.autoconfigure.websocket.servlet.WebSocketServletAutoConfiguration,\
org.springframework.boot.autoconfigure.websocket.servlet.WebSocketMessagingAutoConfiguration,\
org.springframework.boot.autoconfigure.webservices.WebServicesAutoConfiguration,\
org.springframework.boot.autoconfigure.webservices.client.WebServiceTemplateAutoConfiguration

# Failure analyzers
org.springframework.boot.diagnostics.FailureAnalyzer=\
org.springframework.boot.autoconfigure.diagnostics.analyzer.NoSuchBeanDefinitionFailureAnalyzer,\
org.springframework.boot.autoconfigure.flyway.FlywayMigrationScriptMissingFailureAnalyzer,\
org.springframework.boot.autoconfigure.jdbc.DataSourceBeanCreationFailureAnalyzer,\
org.springframework.boot.autoconfigure.jdbc.HikariDriverConfigurationFailureAnalyzer,\
org.springframework.boot.autoconfigure.session.NonUniqueSessionRepositoryFailureAnalyzer

# Template availability providers
org.springframework.boot.autoconfigure.template.TemplateAvailabilityProvider=\
org.springframework.boot.autoconfigure.freemarker.FreeMarkerTemplateAvailabilityProvider,\
org.springframework.boot.autoconfigure.mustache.MustacheTemplateAvailabilityProvider,\
org.springframework.boot.autoconfigure.groovy.template.GroovyTemplateAvailabilityProvider,\
org.springframework.boot.autoconfigure.thymeleaf.ThymeleafTemplateAvailabilityProvider,\
org.springframework.boot.autoconfigure.web.servlet.JspTemplateAvailabilityProvider
上面每一个xxxAutoConfiguration类都是容器中的一个组件,都加入到容器中;用他们来做自动配置;
3)、每一个自动配置类进行自动配置功能;
4)、以HttpEncodingAutoConfiguration(Http编码自动配置)为例解释自动配置原理;
@Configuration( //表示这是一个配置类,以前编写的配置文件一样,也可以给容器中添加组件

    proxyBeanMethods = false
)
@EnableConfigurationProperties({HttpProperties.class}) //启动指定类的
ConfigurationProperties功能;将配置文件中对应的值和HttpProperties绑定起来;并把
HttpProperties加入到ioc容器中

@ConditionalOnWebApplication( //Spring底层@Conditional注解(Spring注解版),根据不同的条件,如果
满足指定的条件,整个配置类里面的配置就会生效; 判断当前应用是否是web应用,如果是,当前配置类生效
    type = Type.SERVLET
)
@ConditionalOnClass({CharacterEncodingFilter.class}) //判断当前项目有没有这个类
CharacterEncodingFilter;SpringMVC中进行乱码解决的过滤器

@ConditionalOnProperty(
    prefix = "spring.http.encoding",
    value = {"enabled"},
    matchIfMissing = true
)/判断配置文件中是否存在某个配置 spring.http.encoding.enabled;如果不存在,判断也是成立的
//即使我们配置文件中不配置pring.http.encoding.enabled=true,也是默认生效的;

public class HttpEncodingAutoConfiguration {

    //他已经和SpringBoot的配置文件映射了
    private final Encoding properties;
    //只有一个有参构造器的情况下,参数的值就会从容器中拿
    public HttpEncodingAutoConfiguration(HttpProperties properties) {
        this.properties = properties.getEncoding();
    }

    @Bean //给容器中添加一个组件,这个组件的某些值需要从properties中获取
    @ConditionalOnMissingBean //判断容器没有这个组件
    public CharacterEncodingFilter characterEncodingFilter() {
        CharacterEncodingFilter filter = new OrderedCharacterEncodingFilter();
        filter.setEncoding(this.properties.getCharset().name());
        filter.setForceRequestEncoding(this.properties.shouldForce(org.springframework.boot.autoconfigure.http.HttpProperties.Encoding.Type.REQUEST));
        filter.setForceResponseEncoding(this.properties.shouldForce(org.springframework.boot.autoconfigure.http.HttpProperties.Encoding.Type.RESPONSE));
        return filter;
    }

}
根据当前不同的条件判断,决定这个配置类是否生效?
一但这个配置类生效;这个配置类就会给容器中添加各种组件;这些组件的属性是从对应的properties类中获取的,这些类里面的每一个属性又是和配置文件绑定的
所有在配置文件中能配置的属性都是在xxxxProperties类中封装者‘;配置文件能配置什么就可以参照某个功能对应的这个属性类
@ConfigurationProperties(
    prefix = "spring.http"
)
public class HttpProperties {
精髓:
1)、SpringBoot启动会加载大量的自动配置类
2)、我们看我们需要的功能有没有SpringBoot默认写好的自动配置类;
3)、我们再来看这个自动配置类中到底配置了哪些组件;(只要我们要用的组件有,我们就不需要再来配置了)
4)、给容器中自动配置类添加组件的时候,会从properties类中获取某些属性。我们就可以在配置文件中指定这些属性的值;
@Conditional&自动配置报告
@Conditional派生注解(Spring注解版原生的@Conditional作用)
作用:必须是@Conditional指定的条件成立,才给容器中添加组件,配置配里面的所有内容才生效;
| @Conditional扩展注解 | 作用(判断是否满足当前指定条件) |
| @ConditionalOnJava | 系统的java版本是否符合要求 |
| @ConditionalOnBean | 容器中存在指定Bean; |
| @ConditionalOnMissingBean | 容器中不存在指定Bean; |
| @ConditionalOnExpression | 满足SpEL表达式指定 |
| @ConditionalOnClass | 系统中有指定的类 |
| @ConditionalOnMissingClass | 系统中没有指定的类 |
| @ConditionalOnSingleCandidate | 容器中只有一个指定的Bean,或者这个Bean是首选Bean |
| @ConditionalOnProperty | 系统中指定的属性是否有指定的值 |
| @ConditionalOnResource | 类路径下是否存在指定资源文件 |
| @ConditionalOnWebApplication | 当前是web环境 |
| @ConditionalOnNotWebApplication | 当前不是web环境 |
| @ConditionalOnJndi | JNDI存在指定项 |
自动配置类必须在一定的条件下才能生效;
我们怎么知道哪些自动配置类生效;
我们可以通过启用 debug=true属性;来让控制台打印自动配置报告,这样我们就可以很方便的知道哪些自动配置类生效
三、日志
日志框架分类和选择
小张;开发一个大型系统;
1、System.out.println("");将关键数据打印在控制台;去掉?写在一个文件?
2、框架来记录系统的一些运行时信息;日志框架 ; zhanglogging.jar;
3、高大上的几个功能?异步模式?自动归档?xxxx? zhanglogging-good.jar?
4、将以前框架卸下来?换上新的框架,重新修改之前相关的API;zhanglogging-perfect.jar;
5、想到JDBC---数据库驱动,写数据库都面向接口编程,只需把数据库的实现放进去就行了,日志框架也可以这么设计
写了一个统一的接口层,日志门面(日志的一个抽象层)logging-abstract.jar,编码的时候只调用这个包里的API。然后给项目中导入具体的日志实现就行了。
我们之前的日志框架都是实现的抽象层。
常用日志框架:
JUL、JCL、Jboss-logging、logback、log4j、log4j2、slf4j....
| 日志门面 (日志的抽象层) | 日志实现 |
| JCL(Jakarta Commons Logging) SLF4j(Simple Logging Facade for Java) jboss-logging |
Log4j JUL(java.util.logging) Log4j2 Logback |
我们一般选择:
- 日志门面: SLF4J;
- 日志实现:Logback;
SpringBoot:底层是Spring框架,Spring框架默认是用JCL;‘
SpringBoot选用 SLF4j和log
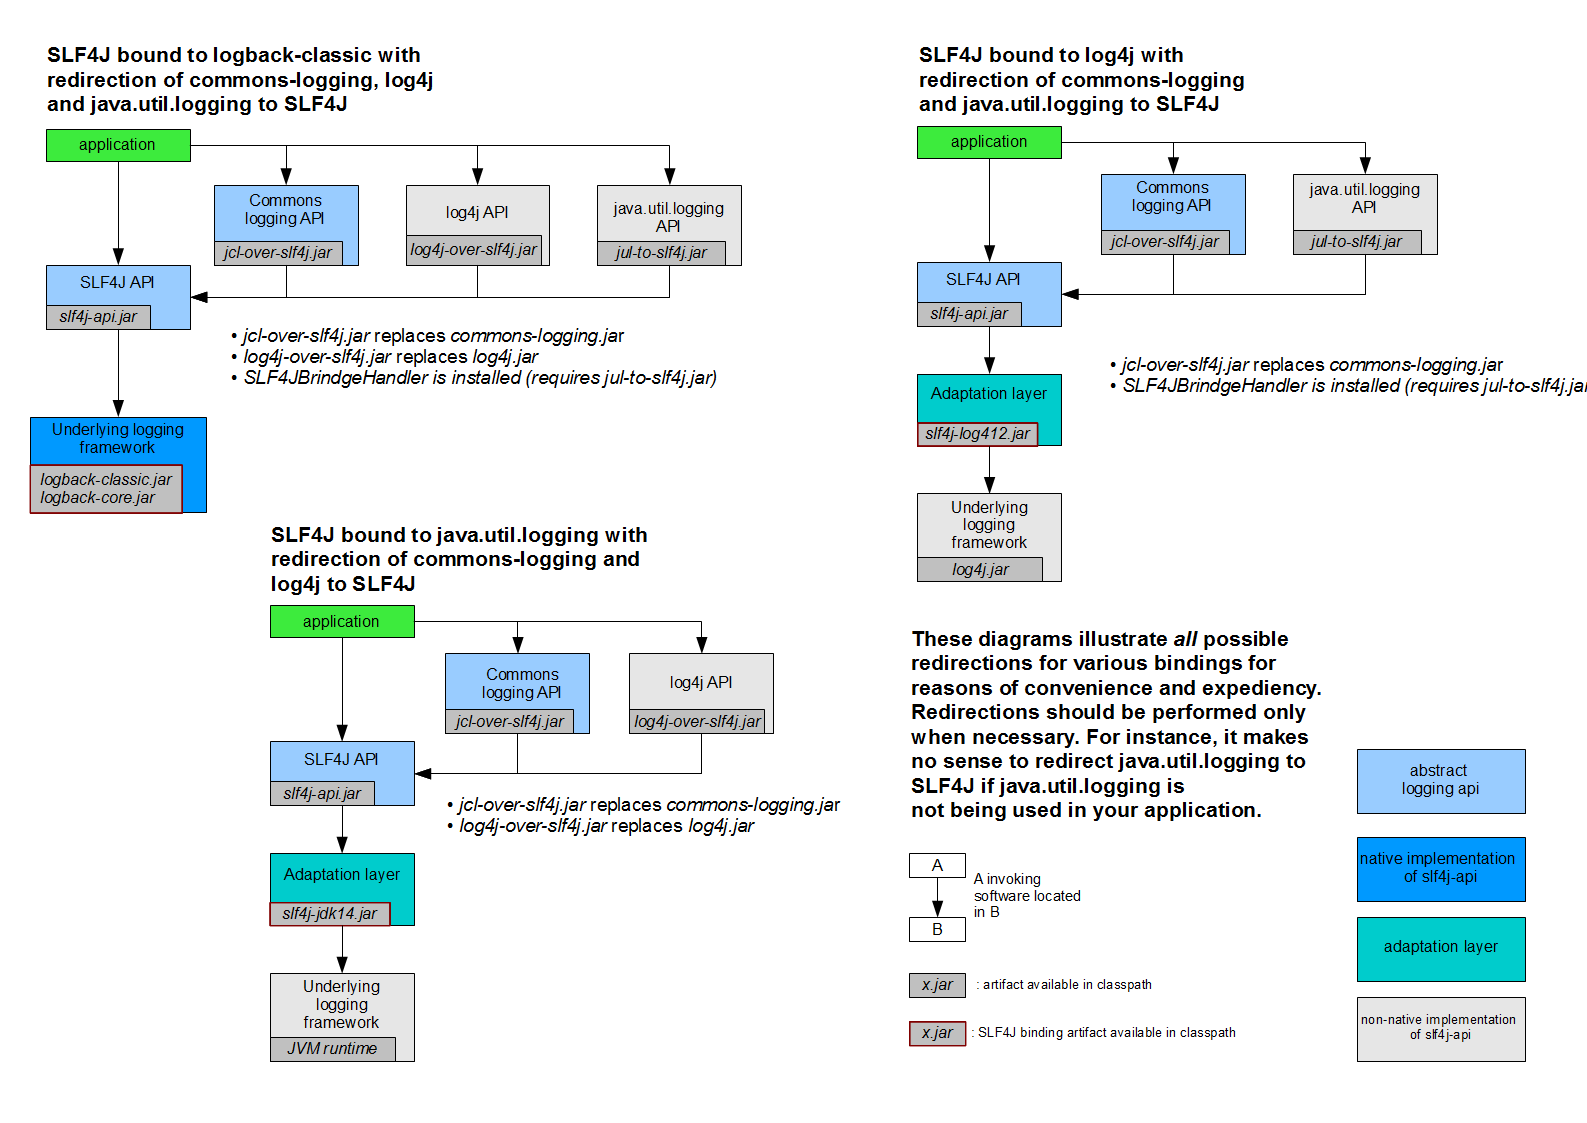
slf4j使用原理
1、如何在系统中使用SLF4j
https://www.slf4j.org
以后开发的时候,日志记录方法的调用,不应该来直接调用日志的实现类,而是调用日志抽象层里面的方法;给系统里面导入slf4j的jar和 logback的实现jar
import org.slf4j.Logger;
import org.slf4j.LoggerFactory;
public class HelloWorld {
    public static void main(String[] args) {
        Logger logger = LoggerFactory.getLogger(HelloWorld.class);
        logger.info("Hello World");
    }
}
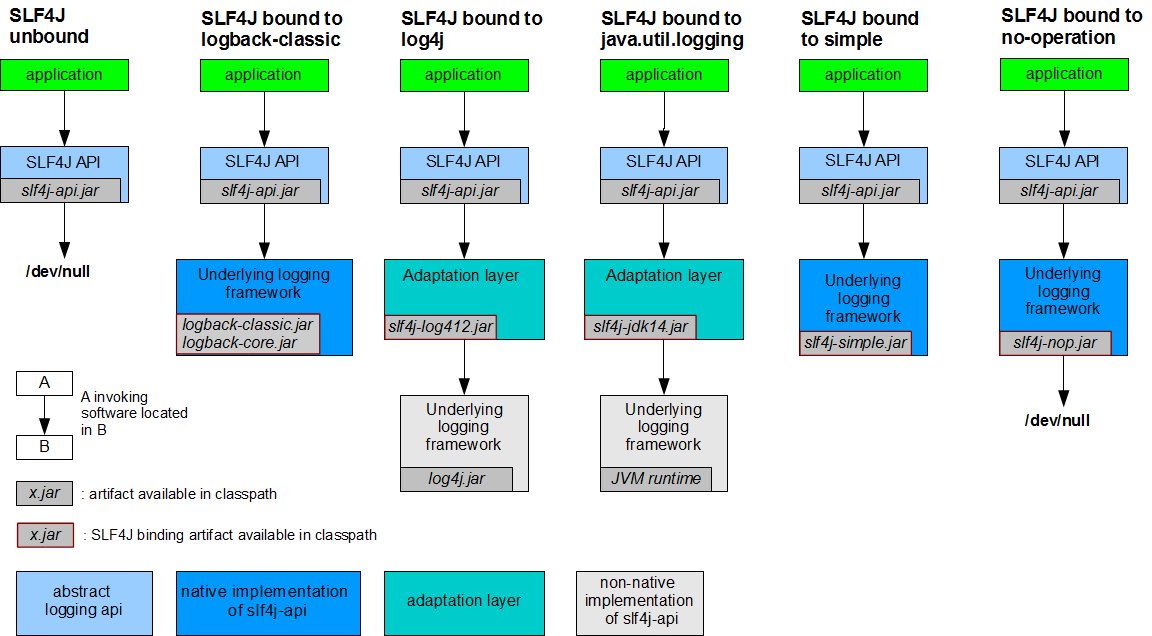
Log4j、 Logback是同一个人写的,开始是Log4j,后来不满意,重写了一个Logback,如果以后再写新的框架怎么办呢?于是写了日志门面SLF4J。Log4j2是阿帕奇对Log4j的重大升级,写的也很好,但用的相对少。
从上图可知,只有SLF4J没有输出,log4j完成以后才有SLF4J,因此需要导入中间的适配层Adapter layer作为桥梁。Logback则不必,只要logback的包和SLF4J的包就可以使用。
其他日志框架统一转换为slf4j
a系统(slf4j+logback)依赖 Spring(commons-logging)、Hibernate(jboss-logging)、MyBatis、xxxx 等框架,但这些框架在底层用的日志各不相同。
统一日志记录,即使是别的框架和我一起统一使用slf4j进行输出,怎么做?
如何让系统中所有的日志都统一到slf4j;
1、将系统中其他日志框架先排除出去;
2、用中间包来替换原有的日志框架;
3、我们导入slf4j其他的实现
SpringBoot日志关系
<dependency>
    <groupId>org.springframework.boot</groupId>
    <artifactId>spring‐boot‐starter</artifactId>
</dependency>
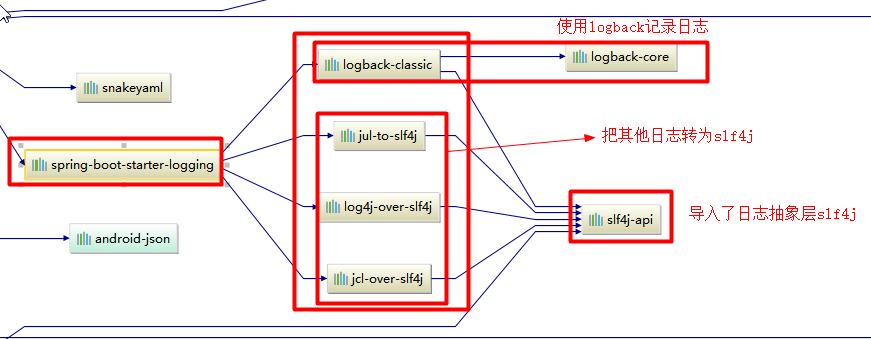
总结:
1)、SpringBoot底层也是使用slf4j+logback的方式进行日志记录
2)、SpringBoot也把其他的日志都替换成了slf4j;
3)、中间替换包?
@SuppressWarnings("rawtypes")
public abstract class LogFactory {
    static String UNSUPPORTED_OPERATION_IN_JCL_OVER_SLF4J = "http://www.slf4j.org/codes.html#unsupported_operation_in_jc
    static LogFactory logFactory = new SLF4JLogFactory();
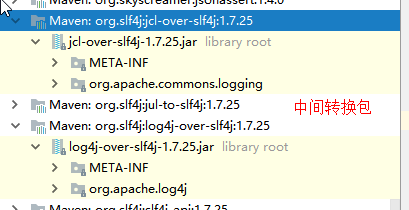
4)、如果我们要引入其他框架?一定要把这个框架的默认日志依赖移除掉?
Spring框架用的是commons-logging,Spring boot对其进行了排除
<dependency>
    <groupId>org.springframework</groupId>
    <artifactId>spring‐core</artifactId>
    <exclusions>
        <exclusion>
            <groupId>commons‐logging</groupId>
            <artifactId>commons‐logging</artifactId>
        </exclusion>
    </exclusions>
</dependency>
SpringBoot能自动适配所有的日志,而且底层使用slf4j+logback的方式记录日志,引入其他框架的时候,只需要把这个框架依赖的日志框架排除掉即可
日志使用
1、默认配置
SpringBoot默认帮我们配置好了日志
//记录器
Logger logger = LoggerFactory.getLogger(getClass());
@Test
public void contextLoads() {
//System.out.println();
//日志的级别;
//由低到高 trace<debug<info<warn<error
//可以调整输出的日志级别;日志就只会在这个级别以以后的高级别生效
logger.trace("这是trace日志...");
logger.debug("这是debug日志...");
//SpringBoot默认给我们使用的是info级别的,没有指定级别的就用SpringBoot默认规定的级别;root级别
logger.info("这是info日志...");
logger.warn("这是warn日志...");
logger.error("这是error日志...");
}
日志输出格式:
%d表示日期时间,
%thread表示线程名,
%‐5level:级别从左显示5个字符宽度
%logger{50} 表示logger名字最长50个字符,否则按照句点分割。
%msg:日志消息,
%n是换行符
‐‐>
%d{yyyy‐MM‐dd HH:mm:ss.SSS} [%thread] %‐5level %logger{50} ‐ %msg%n
SpringBoot修改日志的默认配置
logging.level.com.atguigu=trace
#logging.path=
# 不指定路径在当前项目下生成springboot.log日志
# 可以指定完整的路径;
#logging.file=G:/springboot.log
# 在当前磁盘的根路径下创建spring文件夹和里面的log文件夹;使用 spring.log 作为默认文件
logging.path=/spring/log
# 在控制台输出的日志的格式
logging.pattern.console=%d{yyyy‐MM‐dd} [%thread] %‐5level %logger{50} ‐ %msg%n
# 指定文件中日志输出的格式
logging.pattern.file=%d{yyyy‐MM‐dd} === [%thread] === %‐5level === %logger{50} ==== %msg%n
| logging.file | logging.path | Example | Description |
| (none) | (none) | 只在控制台输出 | |
| 指定文件名 | (none) | my.log | 输出日志到my.log文件 |
| (none) | 指定目录 | /var/log |
输出到指定目录的 spring.log 文件中
|
指定配置
给类路径下放上每个日志框架自己的配置文件即可;SpringBoot就不使用他默认配置的了
| Logging System | Customization |
| Logback | logback-spring.xml , logback-spring.groovy , logback.xml or logback.groovy |
| Log4j2 | log4j2-spring.xml or log4j2.xml |
| JDK (Java Util Logging) |
logging.properties |
logback.xml:直接就被日志框架识别了;
logback-spring.xml:日志框架就不直接加载日志的配置项,由SpringBoot解析日志配置,可以使用SpringBoot的高级Profile功能
<springProfile name="staging">
    <!‐‐ configuration to be enabled when the "staging" profile is active ‐‐>
    可以指定某段配置只在某个环境下生效
</springProfile>
<appender name="stdout" class="ch.qos.logback.core.ConsoleAppender">
    <!‐‐
    日志输出格式:
    %d表示日期时间,
    %thread表示线程名,
    %‐5level:级别从左显示5个字符宽度
    %logger{50} 表示logger名字最长50个字符,否则按照句点分割。
    %msg:日志消息,
    %n是换行符
    ‐‐>
    <layout class="ch.qos.logback.classic.PatternLayout">
        <springProfile name="dev">
            <pattern>%d{yyyy‐MM‐dd HH:mm:ss.SSS} ‐‐‐‐> [%thread] ‐‐‐> %‐5level%logger{50} ‐ %msg%n</pattern>
        </springProfile>
        <springProfile name="!dev">
            <pattern>%d{yyyy‐MM‐dd HH:mm:ss.SSS} ==== [%thread] ==== %‐5level%logger{50} ‐ %msg%n</pattern>
        </springProfile>
    </layout>
</appender>
如果使用logback.xml作为日志配置文件,还要使用profile功能,会有以下错误
no applicable action for [springProfile]
切换日志框架
可以按照slf4j的日志适配图,进行相关的切换;
slf4j+log4j的方式
<dependency>
    <groupId>org.springframework.boot</groupId>
    <artifactId>spring‐boot‐starter‐web</artifactId>
    <exclusions>
        <exclusion>
            <artifactId>logback‐classic</artifactId>
            <groupId>ch.qos.logback</groupId>
        </exclusion>
        <exclusion>
            <artifactId>log4j‐over‐slf4j</artifactId>
            <groupId>org.slf4j</groupId>
        </exclusion>
    </exclusions>
</dependency>
<dependency>
    <groupId>org.slf4j</groupId>
    <artifactId>slf4j‐log4j12</artifactId>
</dependency>
切换为log4j2
<dependency>
    <groupId>org.springframework.boot</groupId>
    <artifactId>spring‐boot‐starter‐web</artifactId>
    <exclusions>
        <exclusion>
            <artifactId>spring‐boot‐starter‐logging</artifactId>
            <groupId>org.springframework.boot</groupId>
        </exclusion>
    </exclusions>
</dependency>
<dependency>
    <groupId>org.springframework.boot</groupId>
    <artifactId>spring‐boot‐starter‐log4j2</artifactId>
</dependency>
四、Spring Boot与Web开发
IDEA热部署
在pom.xml中添加依赖
        ...
        <!--devtools热部署-->
        <dependency>
            <groupId>org.springframework.boot</groupId>
            <artifactId>spring-boot-devtools</artifactId>
            <optional>true</optional>
            <scope>true</scope>
        </dependency>
    </dependencies>

    <build>
        <plugins>
            <plugin>
                <groupId>org.springframework.boot</groupId>
                <artifactId>spring-boot-maven-plugin</artifactId>
                <configuration>
                    <fork>true</fork>
                </configuration>
            </plugin>
        </plugins>
devtools会监听classpath下的文件变动
(1) devtools可以实现页面热部署(即页面修改后会立即生效,这个可以直接在application.properties文件中配置spring.thymeleaf.cache=false来实现),实现类文件热部署(类文件修改后不会立即生效),实现对属性文件的热部署。
(2)配置了true后在修改java文件后也就支持了热启动,不过这种方式是属于项目重启(速度比较快的项目重启),会清空session中的值,也就是如果有用户登陆的话,项目重启后需要重新登陆。采用的虚拟机机制,该项重启是很快的。
默认情况下,/META-INF/maven,/META-INF/resources,/resources,/static,/templates,/public这些文件夹下的文件修改不会使应用重启,但是会重新加载(devtools内嵌了一个LiveReload server,当资源发生改变时,浏览器刷新)
devtools的配置
在application.yml中配置一下devtools
server:
  port: 8080
spring:
  devtools:
    restart:
      enabled: true  #设置开启热部署
      additional-paths: src/main/java #重启目录
      exclude: WEB-INF/**
  freemarker:
    cache: false    #页面不加载缓存,修改即时生效
IDEA中配置
当我们修改了类文件后,idea不会自动编译,得修改idea设置。
(1)File-Settings-Compiler-Build Project automatically
(2)ctrl + shift + alt + / ,选择Registry,勾上 Compiler autoMake allow when app running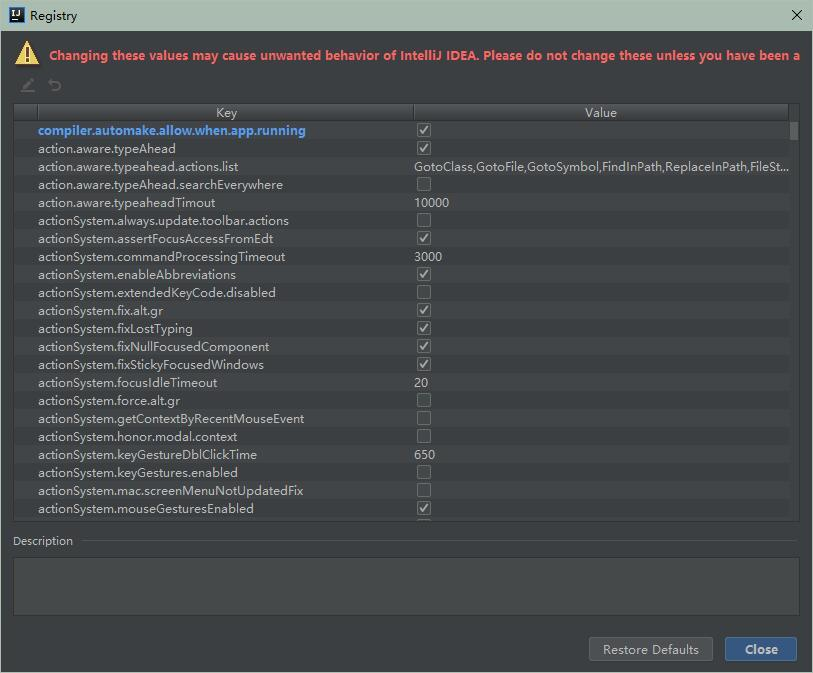
使用SpringBoot
1)、创建SpringBoot应用,选中我们需要的模块;
2)、SpringBoot已经默认将这些场景配置好了,只需要在配置文件中指定少量配置就可以运行起来
3)、自己编写业务代码
最简Spring Boot Web跑起来
配置pom
<?xml version="1.0" encoding="UTF-8"?>
<project xmlns="http://maven.apache.org/POM/4.0.0" xmlns:xsi="http://www.w3.org/2001/XMLSchema-instance"
         xsi:schemaLocation="http://maven.apache.org/POM/4.0.0 https://maven.apache.org/xsd/maven-4.0.0.xsd">
    <modelVersion>4.0.0</modelVersion>
    <parent>
        <groupId>org.springframework.boot</groupId>
        <artifactId>spring-boot-starter-parent</artifactId>
        <version>2.2.6.RELEASE</version>
        <relativePath/> <!-- lookup parent from repository -->
    </parent>
    <groupId>com.aidata</groupId>
    <artifactId>paperweb</artifactId>
    <version>0.0.1-SNAPSHOT</version>
    <name>paperweb</name>
    <description>Demo project for Spring Boot</description>

    <properties>
        <java.version>1.8</java.version>
        <thymeleaf-spring5.version>3.0.9.RELEASE</thymeleaf-spring5.version>
        <thymeleaf-layout-dialect.version>2.2.2</thymeleaf-layout-dialect.version>
    </properties>

    <dependencies>
        <dependency>
            <groupId>org.webjars</groupId>
            <artifactId>jquery</artifactId>
            <version>3.3.1</version>
        </dependency>
        <dependency>
            <groupId>org.webjars</groupId>
            <artifactId>bootstrap</artifactId>
            <version>3.3.7</version>
        </dependency>
        <dependency>
            <groupId>org.springframework.boot</groupId>
            <artifactId>spring-boot-starter-web</artifactId>
        </dependency>
        <dependency>
            <groupId>org.springframework.boot</groupId>
            <artifactId>spring-boot-starter-thymeleaf</artifactId>
        </dependency>
        <dependency>
            <groupId>org.springframework.boot</groupId>
            <artifactId>spring-boot-starter-test</artifactId>
            <scope>test</scope>
            <exclusions>
                <exclusion>
                    <groupId>org.junit.vintage</groupId>
                    <artifactId>junit-vintage-engine</artifactId>
                </exclusion>
            </exclusions>
        </dependency>
        <dependency>
            <groupId>org.mybatis.spring.boot</groupId>
            <artifactId>mybatis-spring-boot-starter</artifactId>
            <version>1.1.1</version>
        </dependency>
        <dependency>
            <groupId>org.mybatis.generator</groupId>
            <artifactId>mybatis-generator</artifactId>
            <version>1.3.5</version>
            <type>pom</type>
        </dependency>
        <dependency>
            <groupId>org.projectlombok</groupId>
            <artifactId>lombok</artifactId>
            <version>1.18.0</version>
        </dependency>
        <dependency>
            <groupId>com.github.pagehelper</groupId>
            <artifactId>pagehelper</artifactId>
            <version>4.2.0</version>
        </dependency>
        <!-- mybatis通用mapper -->
        <dependency>
            <groupId>tk.mybatis</groupId>
            <artifactId>mapper</artifactId>
            <version>3.3.0</version>
        </dependency>
        <!-- mysql连接驱动 -->
        <dependency>
            <groupId>mysql</groupId>
            <artifactId>mysql-connector-java</artifactId>
            <version>5.1.34</version>
        </dependency>
        <!-- druid连接池 -->
        <dependency>
            <groupId>com.alibaba</groupId>
            <artifactId>druid</artifactId>
            <version>1.0.20</version>
        </dependency>
        <!--devtools热部署-->
        <dependency>
            <groupId>org.springframework.boot</groupId>
            <artifactId>spring-boot-devtools</artifactId>
            <optional>true</optional>
            <scope>true</scope>
        </dependency>
    </dependencies>

    <build>
        <plugins>
            <!-- java编译插件 -->
            <plugin>
                <groupId>org.apache.maven.plugins</groupId>
                <artifactId>maven-compiler-plugin</artifactId>
                <configuration>
                    <source>1.8</source>
                    <target>1.8</target>
                    <encoding>UTF-8</encoding>
                </configuration>
            </plugin>
            <plugin>
                <groupId>org.springframework.boot</groupId>
                <artifactId>spring-boot-maven-plugin</artifactId>
                <configuration>
                    <fork>true</fork>
                </configuration>
            </plugin>
            <plugin>
                <groupId>org.apache.maven.plugins</groupId>
                <artifactId>maven-surefire-plugin</artifactId>
                <configuration>
                    <skip>true</skip>
                </configuration>
            </plugin>
        </plugins>
    </build>

</project>
数据库
使用mybatis
import lombok.Data;

@Data
public class Article {
    private int id;
    private String title;
    private String publishdate;
    private String href;
}
import lombok.Data;


@Data
public class Iif extends Article{
    private int id;
    private String title;
    private String publishdate;
    private String href;
}
import lombok.Data;


@Data
public class Rhg extends Article{
    private int id;
    private String title;
    private String publishdate;
    private String href;
}
@Mapper
public interface ArticleMapper {
    @Select("SElECT title, publishdate, href FROM iif ORDER BY publishdate DESC LIMIT 5")
    List<Article> queryAlli();

    @Select("SElECT title, publishdate, href FROM unctad ORDER BY publishdate DESC LIMIT 5")
    List<Article> queryAllu();

    @Select("SElECT title, publishdate, href FROM rhg ORDER BY publishdate DESC LIMIT 5")
    List<Article> queryAllr();

}
配置文件application.yml
server:
  port: 8080
spring:
  datasource:
    username: root
    password: '@Zha23'
    url: jdbc:mysql://localhost:3306/article
    driver-class-name: com.mysql.jdbc.Driver
    type: com.alibaba.druid.pool.DruidDataSource
    # 下面为连接池的补充设置,应用到上面所有数据源中
    # 初始化大小,最小,最大
    initialSize: 5
    minIdle: 5
    maxActive: 20
    # 配置获取连接等待超时的时间
    maxWait: 60000
    # 配置间隔多久才进行一次检测,检测需要关闭的空闲连接,单位是毫秒
    timeBetweenEvictionRunsMillis: 60000
    # 配置一个连接在池中最小生存的时间,单位是毫秒
    minEvictableIdleTimeMillis: 300000
    validationQuery: SELECT 1 FROM DUAL
    testWhileIdle: true
    testOnBorrow: false
    testOnReturn: false
    # 打开PSCache,并且指定每个连接上PSCache的大小
    poolPreparedStatements: true
    maxPoolPreparedStatementPerConnectionSize: 20
    # 配置监控统计拦截的filters,去掉后监控界面sql无法统计,'wall'用于防火墙,此处是filter修改的地方
    filters:
      commons-log.connection-logger-name: stat,wall,log4j
    # 通过connectProperties属性来打开mergeSql功能;慢SQL记录
    connectionProperties: druid.stat.mergeSql=true;druid.stat.slowSqlMillis=5000
    # 合并多个DruidDataSource的监控数据
    useGlobalDataSourceStat: true

  devtools:
    restart:
      enabled: true  #设置开启热部署
      additional-paths: src/main/java #重启目录
      exclude: WEB-INF/**
  freemarker:
    cache: false    #页面不加载缓存,修改即时生效
编写页面
在resources/templates目录创建一个index.html页面。
注意,必须加上命名空间xmlns:th="http://www.thymeleaf.org/,否则Thymeleaf的自定义标签没有提示。
<!DOCTYPE html>
<html lang="en" xmlns:th="http://www.thymeleaf.org">
<head>
    <meta charset="UTF-8">
    <title>最新文章</title>
    <link rel="stylesheet" href="/webjars/bootstrap/3.3.7/css/bootstrap.min.css" />
    <script src="/webjars/jquery/3.3.1/jquery.min.js"></script>
    <script src="/webjars/bootstrap/3.3.7/js/bootstrap.min.js"></script>
</head>
<body>
    <div class="container">
        <div class="row">
            <div class="col-md-12">
                <div class="list-group">
                    <a href="#" class="list-group-item active">
                        IIF
                    </a>
                    <div th:each="article: ${iifarticles}">
                        <a th:href="@{${article.href}}" th:inline="text" class="list-group-item">[[${article.title}]]<span style="padding-right:30px;"></span><span class="label label-primary" th:text="${article.publishdate}">666</span></a>
                    </div>                                          防止覆盖
                </div>

                <div class="list-group">
                    <a href="#" class="list-group-item active">
                        UNCTAD
                    </a>
                    <div th:each="article: ${unarticles}">
                        <a th:href="@{${article.href}}" th:inline="text" class="list-group-item">[[${article.title}]]<span style="padding-right:30px;"></span><span class="label label-primary" th:text="${article.publishdate}">666</span></a>
                    </div>
                </div>
                <div class="list-group">
                    <a href="#" class="list-group-item active">
                        RHG
                    </a>
                    <div th:each="article: ${rhgarticles}">
                        <a th:href="@{${article.href}}" th:inline="text" class="list-group-item">[[${article.title}]]<span style="padding-right:30px;"></span><span class="label label-primary" th:text="${article.publishdate}">666</span></a>
                    </div>
            </div>
      </div>
    </div>
    </div>
</body>
</html>
controller
package com.aidata.paperweb.controller;

import com.aidata.paperweb.dao.Article;
import com.aidata.paperweb.dao.ArticleMapper;
import org.springframework.beans.factory.annotation.Autowired;
import org.springframework.stereotype.Controller;
import org.springframework.web.bind.annotation.RequestMapping;

import java.util.List;
import java.util.Map;

@Controller
public class ArticleController {

    @Autowired
    ArticleMapper articleMapper;

    @RequestMapping("/index")
    String queryAll(Map<String,Object> model){
        List<Article> iifarticles = articleMapper.queryAlli();
        List<Article> unarticles = articleMapper.queryAllu();
        List<Article> rhgarticles = articleMapper.queryAllr();
        System.out.println("llllllllliiiiiiiiii");
        model.put("unarticles", unarticles);
        model.put("iifarticles", iifarticles);
        model.put("rhgarticles", rhgarticles);
        System.out.println(iifarticles);
        for (Article a: iifarticles) {
            System.out.println(a.getHref());
        }
        return "index";
    }

}
如果要上传到linux上
import org.springframework.boot.SpringApplication;
import org.springframework.boot.autoconfigure.SpringBootApplication;
import org.springframework.boot.builder.SpringApplicationBuilder;
import org.springframework.boot.web.servlet.support.SpringBootServletInitializer;

@SpringBootApplication
public class PaperwebApplication extends SpringBootServletInitializer {

    public static void main(String[] args) {
        SpringApplication.run(PaperwebApplication.class, args);
    }

    @Override
    protected SpringApplicationBuilder configure(SpringApplicationBuilder builder) {
        return builder.sources(this.getClass());
    }
}
自动配置原理?
这个场景SpringBoot帮我们配置了什么?能不能修改?能修改哪些配置?能不能扩展?xxx
xxxxAutoConfiguration:帮我们给容器中自动配置组件
xxxxProperties:配置类来封装配置文件的内容
webjars&静态资源映射规则
Spring MVC的配置都在,IDEA中ctrl+N搜索 WebMvcAutoConfiguration
其中有个方法添加资源映射
public void addResourceHandlers(ResourceHandlerRegistry registry) {
            if (!this.resourceProperties.isAddMappings()) {
                logger.debug("Default resource handling disabled");
            } else {
                Duration cachePeriod = this.resourceProperties.getCache().getPeriod();
                CacheControl cacheControl = this.resourceProperties.getCache().getCachecontrol().toHttpCacheControl();
                if (!registry.hasMappingForPattern("/webjars/**")) {
                    this.customizeResourceHandlerRegistration(registry.addResourceHandler(new String[]{"/webjars/**"}).addResourceLocations(new String[]{"classpath:/META-INF/resources/webjars/"}).setCachePeriod(this.getSeconds(cachePeriod)).setCacheControl(cacheControl));
                }

                String staticPathPattern = this.mvcProperties.getStaticPathPattern();
                if (!registry.hasMappingForPattern(staticPathPattern)) {
                    this.customizeResourceHandlerRegistration(registry.addResourceHandler(new String[]{staticPathPattern}).addResourceLocations(WebMvcAutoConfiguration.getResourceLocations(this.resourceProperties.getStaticLocations())).setCachePeriod(this.getSeconds(cachePeriod)).setCacheControl(cacheControl));
                }

            }
        }
1)、所有 /webjars/** ,都去 classpath:/META-INF/resources/webjars/ 找资源
webjars:以jar包的方式引入静态资源
http://www.webjars.org/ WebJars are client-side web libraries (e.g. jQuery & Bootstrap) packaged into JAR (Java Archive) files.
pom文件中引入webjars
<!‐‐引入jquery‐webjar‐‐>在访问的时候只需要写webjars下面资源的名称即可
<dependency>
    <groupId>org.webjars</groupId>
    <artifactId>jquery</artifactId>
    <version>3.3.1</version>
</dependency>
会发现在External Libraries下

此时访问 localhost:8080/webjars/jquery/3.3.1/jquery.js ,出现下面内容,说明访问到了jar包中的资源,因为jar中的路径与映射的路径相同
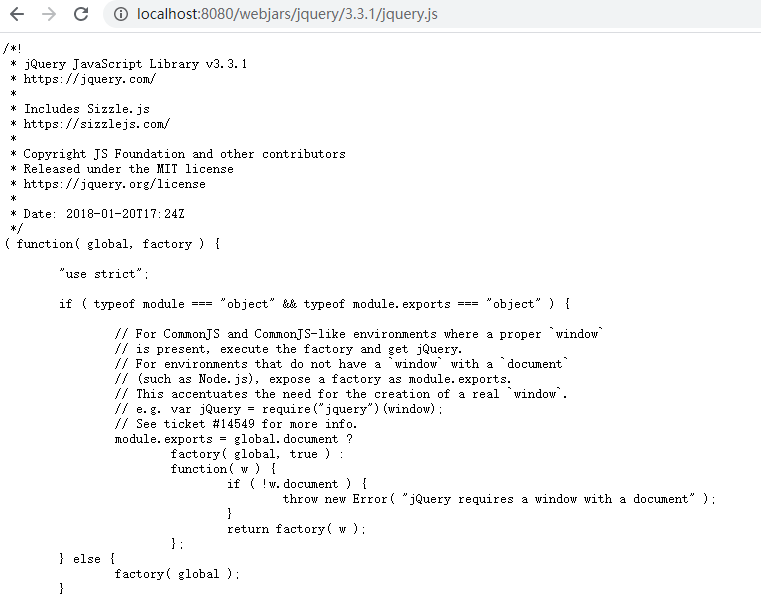
2)、我们自己的静态文件放在哪?"/**" 访问当前项目的任何资源,都去(静态资源的文件夹)找映射
上面 WebMvcAutoConfiguration 中方法的下边是
String staticPathPattern = this.mvcProperties.getStaticPathPattern();
     if (!registry.hasMappingForPattern(staticPathPattern)) {
         this.customizeResourceHandlerRegistration(registry.addResourceHandler(new String[]{staticPathPattern}).
         addResourceLocations(WebMvcAutoConfiguration.getResourceLocations(this.resourceProperties.getStaticLocations()))
         .setCachePeriod(this.getSeconds(cachePeriod)).setCacheControl(cacheControl));
}
添加了资源路径staticPathPattern
而这个资源路径
this.staticPathPattern = "/**";
是指访问当前项目的任何资源,如果没有处置去 staticLocations 找
staticLocations 实质上就是静态资源文件夹
this.staticLocations = CLASSPATH_RESOURCE_LOCATIONS;
常量 CLASSPATH_RESOURCE_LOCATIONS
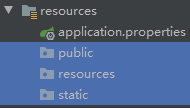
@ConfigurationProperties(
    prefix = "spring.resources",
    ignoreUnknownFields = false
)
public class ResourceProperties {
    private static final String[] CLASSPATH_RESOURCE_LOCATIONS = new String[]{"classpath:/META-INF/resources/", "classpath:/resources/", "classpath:/static/", "classpath:/public/"};
    private String[] staticLocations;
    ...
静态资源文件夹如下
"classpath:/META‐INF/resources/",
"classpath:/resources/",
"classpath:/static/",
"classpath:/public/"
"/":当前项目的根路径
对应IDEA中的文件夹
3)、欢迎页; 静态资源文件夹下的所有index.html页面;被"/**"映射;
localhost:8080/ 找index页面
WebMvcAutoConfiguration 中还有欢迎页的设置方法
        @Bean
        public WelcomePageHandlerMapping welcomePageHandlerMapping(ApplicationContext applicationContext, FormattingConversionService mvcConversionService, ResourceUrlProvider mvcResourceUrlProvider) {
            WelcomePageHandlerMapping welcomePageHandlerMapping = new WelcomePageHandlerMapping(new TemplateAvailabilityProviders(applicationContext), applicationContext, this.getWelcomePage(), this.mvcProperties.getStaticPathPattern());
            welcomePageHandlerMapping.setInterceptors(this.getInterceptors(mvcConversionService, mvcResourceUrlProvider));
            return welcomePageHandlerMapping;
        }
追踪代码,发现会自动去找静态资源文件夹路径+index
4)、所有的 **/favicon.ico 都是在静态资源文件下找
图标放在静态资源文件夹即可
可以自己设置静态资源文件夹
spring.resources.static-locations=classpath:/hello, classpath:/mydir
thymeleaf
springboot是jar包的方式,使用的是嵌入式的tomcat,默认不支持JSP
模板引擎 JSP、Velocity、Freemarker、Thymeleaf 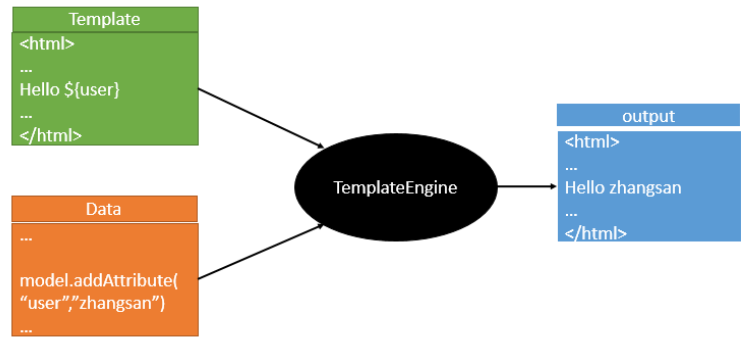
模板和数据经过模板引擎变为输出,不通模板引擎语法不一样
SpringBoot推荐的Thymeleaf;
语法更简单,功能更强大
pom文件中引入
 <dependency>
      <groupId>org.springframework.boot</groupId>
      <artifactId>spring-boot-starter-thymeleaf</artifactId>
</dependency>
版本
    <properties>
        <thymeleaf-spring5.version>3.0.9.RELEASE</thymeleaf-spring5.version>
        <thymeleaf-layout-dialect.version>2.2.2</thymeleaf-layout-dialect.version>
    </properties>
thymeleaf语法
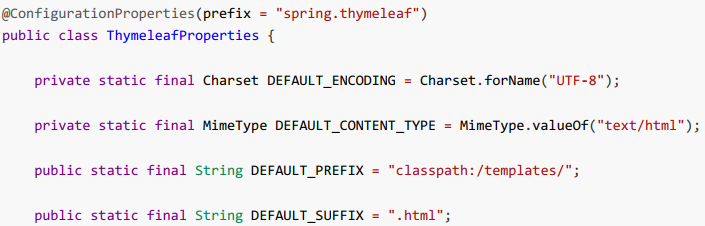
只要我们把HTML页面放在classpath:/templates/,thymeleaf就能自动渲染
1、导入thymeleaf的名称空间
<html lang="en" xmlns:th="http://www.thymeleaf.org">
2、使用thymeleaf语法
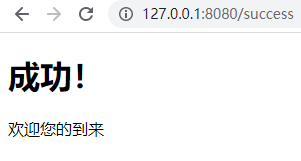
@Controller
public class HelloController {

    @ResponseBody
    @RequestMapping("/hello")
    public String hello(){
        return "Hello World!";
    }

    @RequestMapping("/success")
    public String success(Map<String, Object> map){
        map.put("hello", "欢迎您的到来");
        return "success";
    }
}
success.html
<!DOCTYPE html>
<html lang="en" xmlns:th="http://www.thymeleaf.org">
<head>
    <meta charset="UTF-8">
    <title>Title</title>
</head>
<body>
    <h1>成功!</h1>
    <!‐‐th:text 将div里面的文本内容设置为 ‐‐>
    <div th:text="${hello}">这是显示欢迎信息</div>
</body>
</html>
访问 http://127.0.0.1:8080/success
语法规则
1)th:text;改变当前元素里面的文本内容;
th:任意html属性来替换原生属性的值

2)表达式
Simple expressions:(表达式语法)
Variable Expressions: ${...}:获取变量值;OGNL;
    1)、获取对象的属性、调用方法
    2)、使用内置的基本对象:
    #ctx : the context object.
    #vars: the context variables.
    #locale : the context locale.
    #request : (only in Web Contexts) the HttpServletRequest object.
    #response : (only in Web Contexts) the HttpServletResponse object.
    #session : (only in Web Contexts) the HttpSession object.
    #servletContext : (only in Web Contexts) the ServletContext object.
    ${session.foo}
3)、内置的一些工具对象:
    #execInfo : information about the template being processed.
    #messages : methods for obtaining externalized messages inside variables expressions, in the
    same way as they would be obtained using #{…} syntax.
    #uris : methods for escaping parts of URLs/URIs
    #conversions : methods for executing the configured conversion service (if any).
    #dates : methods for java.util.Date objects: formatting, component extraction, etc.
    #calendars : analogous to #dates , but for java.util.Calendar objects.
    #numbers : methods for formatting numeric objects.
    #strings : methods for String objects: contains, startsWith, prepending/appending, etc.
    #objects : methods for objects in general.
    #bools : methods for boolean evaluation.
    #arrays : methods for arrays.
    #lists : methods for lists.
    #sets : methods for sets.
    #maps : methods for maps.
    #aggregates : methods for creating aggregates on arrays or collections.
    #ids : methods for dealing with id attributes that might be repeated (for example, as a
    result of an iteration).

    Selection Variable Expressions: *{...}:选择表达式:和${}在功能上是一样;
    补充:配合 th:object="${session.user}:
    <div th:object="${session.user}">
        <p>Name: <span th:text="*{firstName}">Sebastian</span>.</p>
        <p>Surname: <span th:text="*{lastName}">Pepper</span>.</p>
        <p>Nationality: <span th:text="*{nationality}">Saturn</span>.</p>
    </div>

    Message Expressions: #{...}:获取国际化内容
    Link URL Expressions: @{...}:定义URL;
    @{/order/process(execId=${execId},execType='FAST')}
    Fragment Expressions: ~{...}:片段引用表达式
    <div th:insert="~{commons :: main}">...</div>

Literals(字面量)
    Text literals: 'one text' , 'Another one!' ,…
    Number literals: 0 , 34 , 3.0 , 12.3 ,…
    Boolean literals: true , false
    Null literal: null
    Literal tokens: one , sometext , main ,…
Text operations:(文本操作)
    String concatenation: +
    Literal substitutions: |The name is ${name}|
Arithmetic operations:(数学运算)
    Minus sign (unary operator): ‐
Boolean operations:(布尔运算)
    Binary operators: and , or
    Boolean negation (unary operator): ! , not
Comparisons and equality:(比较运算)
    Comparators: > , < , >= , <= ( gt , lt , ge , le )
    Equality operators: == , != ( eq , ne )
Conditional operators:条件运算(三元运算符)
    If‐then: (if) ? (then)
    If‐then‐else: (if) ? (then) : (else)
    Default: (value) ?: (defaultvalue)
Special tokens:
    No‐Operation: _
SpringMVC自动配置
Spring Boot provides auto-configuration for Spring MVC that works well with most applications.
The auto-configuration adds the following features on top of Spring’s defaults:
- Inclusion of
ContentNegotiatingViewResolverandBeanNameViewResolverbeans. - Support for serving static resources, including support for WebJars .
- Automatic registration of
Converter,GenericConverter,Formatterbeans. - Support for
HttpMessageConverters. - Automatic registration of
MessageCodesResolver. - Static
index.htmlsupport. - Custom
Faviconsupport . - Automatic use of a
ConfigurableWebBindingInitializerbean.
扩展SpringMVC
以前配置springmvc,在配置文件里设置
<mvc:view‐controller path="/hello" view‐name="success"/>
<mvc:interceptors>
    <mvc:interceptor>
        <mvc:mapping path="/hello"/>
        <bean></bean>
    </mvc:interceptor>
</mvc:interceptors>
If you want to keep Spring Boot MVC features, and you just want to add additional MVC configuration (interceptors, formatters, view controllers etc.) you can add your own @Configuration class of type WebMvcConfigurerAdapter, but without @EnableWebMvc. If you wish to provide custom instances of RequestMappingHandlerMapping, RequestMappingHandlerAdapter or ExceptionHandlerExceptionResolver you can declare a WebMvcRegistrationsAdapter instance providing such components.
If you want to take complete control of Spring MVC, you can add your own @Configuration annotated with @EnableWebMvc.
编写一个配置类(@Configuration),是WebMvcConfigurerAdapter类型;不能标注@EnableWebMvc;
既保留了所有的自动配置,也能用我们扩展的配置
例子:增加视图映射
//使用WebMvcConfigurerAdapter可以来扩展SpringMVC的功能
@Configuration
public class MyMvcConfig extends WebMvcConfigurerAdapter {
    @Override
    public void addViewControllers(ViewControllerRegistry registry) {
        // 浏览器发送 /hello 请求来到 success
        registry.addViewController("/hello6").setViewName("success");
    }
}
1)、WebMvcAutoConfiguration是SpringMVC的自动配置类
@Configuration(
    proxyBeanMethods = false
)
@ConditionalOnWebApplication(
    type = Type.SERVLET
)
@ConditionalOnClass({Servlet.class, DispatcherServlet.class, WebMvcConfigurer.class})
@ConditionalOnMissingBean({WebMvcConfigurationSupport.class})
@AutoConfigureOrder(-2147483638)
@AutoConfigureAfter({DispatcherServletAutoConfiguration.class, TaskExecutionAutoConfiguration.class, ValidationAutoConfiguration.class})
public class WebMvcAutoConfiguration {

    ......

    @Configuration(
        proxyBeanMethods = false
    )
    public static class EnableWebMvcConfiguration extends DelegatingWebMvcConfiguration implements ResourceLoaderAware {
        private final ResourceProperties resourceProperties;
        private final WebMvcProperties mvcProperties;
        private final ListableBeanFactory beanFactory;
        private final WebMvcRegistrations mvcRegistrations;
        private ResourceLoader resourceLoader;

        public EnableWebMvcConfiguration(ResourceProperties resourceProperties, ObjectProvider<WebMvcProperties> mvcPropertiesProvider, ObjectProvider<WebMvcRegistrations> mvcRegistrationsProvider, ListableBeanFactory beanFactory) {
            this.resourceProperties = resourceProperties;
            this.mvcProperties = (WebMvcProperties)mvcPropertiesProvider.getIfAvailable();
            this.mvcRegistrations = (WebMvcRegistrations)mvcRegistrationsProvider.getIfUnique();
            this.beanFactory = beanFactory;
        }

    ......

    @Configuration(
        proxyBeanMethods = false
    )
    @Import({WebMvcAutoConfiguration.EnableWebMvcConfiguration.class})
    @EnableConfigurationProperties({WebMvcProperties.class, ResourceProperties.class})
    @Order(0)
    public static class WebMvcAutoConfigurationAdapter implements WebMvcConfigurer {
        private static final Log logger = LogFactory.getLog(WebMvcConfigurer.class);
        private final ResourceProperties resourceProperties;
        private final WebMvcProperties mvcProperties;
        private final ListableBeanFactory beanFactory;
        private final ObjectProvider<HttpMessageConverters> messageConvertersProvider;
        final WebMvcAutoConfiguration.ResourceHandlerRegistrationCustomizer resourceHandlerRegistrationCustomizer;

        public WebMvcAutoConfigurationAdapter(ResourceProperties resourceProperties, WebMvcProperties mvcProperties, ListableBeanFactory beanFactory, ObjectProvider<HttpMessageConverters> messageConvertersProvider, ObjectProvider<WebMvcAutoConfiguration.ResourceHandlerRegistrationCustomizer> resourceHandlerRegistrationCustomizerProvider) {
            this.resourceProperties = resourceProperties;
            this.mvcProperties = mvcProperties;
            this.beanFactory = beanFactory;
            this.messageConvertersProvider = messageConvertersProvider;
            this.resourceHandlerRegistrationCustomizer = (WebMvcAutoConfiguration.ResourceHandlerRegistrationCustomizer)resourceHandlerRegistrationCustomizerProvider.getIfAvailable();
        }

        ......

        @Bean
        @ConditionalOnMissingBean
        @ConditionalOnProperty(
            prefix = "spring.mvc",
            name = {"locale"}
        )
        public LocaleResolver localeResolver() {
            if (this.mvcProperties.getLocaleResolver() == org.springframework.boot.autoconfigure.web.servlet.WebMvcProperties.LocaleResolver.FIXED) {
                return new FixedLocaleResolver(this.mvcProperties.getLocale());
            } else {
                AcceptHeaderLocaleResolver localeResolver = new AcceptHeaderLocaleResolver();
                localeResolver.setDefaultLocale(this.mvcProperties.getLocale());
                return localeResolver;
            }
        }

        public MessageCodesResolver getMessageCodesResolver() {
            if (this.mvcProperties.getMessageCodesResolverFormat() != null) {
                DefaultMessageCodesResolver resolver = new DefaultMessageCodesResolver();
                resolver.setMessageCodeFormatter(this.mvcProperties.getMessageCodesResolverFormat());
                return resolver;
            } else {
                return null;
            }
        }

        public void addFormatters(FormatterRegistry registry) {
            ApplicationConversionService.addBeans(registry, this.beanFactory);
        }

        public void addResourceHandlers(ResourceHandlerRegistry registry) {
            if (!this.resourceProperties.isAddMappings()) {
                logger.debug("Default resource handling disabled");
            } else {
                Duration cachePeriod = this.resourceProperties.getCache().getPeriod();
                CacheControl cacheControl = this.resourceProperties.getCache().getCachecontrol().toHttpCacheControl();
                if (!registry.hasMappingForPattern("/webjars/**")) {
                    this.customizeResourceHandlerRegistration(registry.addResourceHandler(new String[]{"/webjars/**"}).addResourceLocations(new String[]{"classpath:/META-INF/resources/webjars/"}).setCachePeriod(this.getSeconds(cachePeriod)).setCacheControl(cacheControl));
                }

                String staticPathPattern = this.mvcProperties.getStaticPathPattern();
                if (!registry.hasMappingForPattern(staticPathPattern)) {
                    this.customizeResourceHandlerRegistration(registry.addResourceHandler(new String[]{staticPathPattern}).addResourceLocations(WebMvcAutoConfiguration.getResourceLocations(this.resourceProperties.getStaticLocations())).setCachePeriod(this.getSeconds(cachePeriod)).setCacheControl(cacheControl));
                }

            }
        }
        ...
    }
2)、在做其他自动配置时会导入;@Import(EnableWebMvcConfiguration.class)
@Configuration(
    proxyBeanMethods = false
)
public class DelegatingWebMvcConfiguration extends WebMvcConfigurationSupport {
    private final WebMvcConfigurerComposite configurers = new WebMvcConfigurerComposite();

    public DelegatingWebMvcConfiguration() {
    }

    @Autowired(
        required = false
    )
    public void setConfigurers(List<WebMvcConfigurer> configurers) {
        if (!CollectionUtils.isEmpty(configurers)) {
            this.configurers.addWebMvcConfigurers(configurers);
        }

    }
@Autowired 会从容器中获取所有的WebMvcConfigurer 传入到setConfigurers() ,赋值到configurers中去
//一个参考实现;将所有的WebMvcConfigurer相关配置都来一起调用
@Override
// public void addViewControllers(ViewControllerRegistry registry) {
    // for (WebMvcConfigurer delegate : this.delegates) {
    // delegate.addViewControllers(registry);
// }
4)、我们的配置类实现了WebMvcConfigure,因此也会被调用
效果:Spring MVC的自动配置和我们的扩展配置都会起作用
public interface WebMvcConfigurer {

    default void configurePathMatch(PathMatchConfigurer configurer) {
    }

    /**
     * Configure content negotiation options.
     */
    default void configureContentNegotiation(ContentNegotiationConfigurer configurer) {
    }

    /**
     * Configure asynchronous request handling options.
     */
    default void configureAsyncSupport(AsyncSupportConfigurer configurer) {
    }

   ...
}
将原来的继承WebMvcConfigurerAdapter类改为实现WebMvcConfigurer接口,其余的地方都没有变化
/**
 * Spring 5 (或者Spring Boot 2.x)版本配置Web应用程序示例
 */
@Configuration
public class MvcConfigure implements WebMvcConfigurer{

    @Override
    public void configurePathMatch(PathMatchConfigurer configurer) {
        configurer.setUseSuffixPatternMatch(false);
    }

    @Override
    public void addResourceHandlers(ResourceHandlerRegistry registry) {
        registry.addResourceHandler("/**")
                .addResourceLocations("classpath:/static/")
                .addResourceLocations("classpath:/public/")
                .addResourceLocations("classpath:/resources/");
    }
}
全面接管SpringMVC
SpringBoot对SpringMVC的自动配置不需要了,所有都是我们自己配置,所有的SpringMVC的自动配置都失效了
我们需要在配置类中添加@EnableWebMvc即可
// 自动配置失效
@EnableWebMvc
@Configuration
public class MyMvcConfig extends WebMvcConfigurerAdapter {
    @Override
    public void addViewControllers(ViewControllerRegistry registry) {
        // 浏览器发送 /hello 请求来到 success
        registry.addViewController("/hello6").setViewName("success");
    }
}
1)@EnableWebMvc的核心
@Import(DelegatingWebMvcConfiguration.class)
public @interface EnableWebMvc {
2)
@Configuration
public class DelegatingWebMvcConfiguration extends WebMvcConfigurationSupport {
3)
@Configuration
@ConditionalOnWebApplication
@ConditionalOnClass({ Servlet.class, DispatcherServlet.class,
WebMvcConfigurerAdapter.class })
//容器中没有这个组件的时候,这个自动配置类才生效
@ConditionalOnMissingBean(WebMvcConfigurationSupport.class)
@AutoConfigureOrder(Ordered.HIGHEST_PRECEDENCE + 10)
@AutoConfigureAfter({ DispatcherServletAutoConfiguration.class,
ValidationAutoConfiguration.class })
public class WebMvcAutoConfiguration {
4)@EnableWebMvc将WebMvcConfigurationSupport组件导入进来;
5)导入的WebMvcConfigurationSupport只是SpringMVC最基本的功能;
RestfulCRUD
项目结构
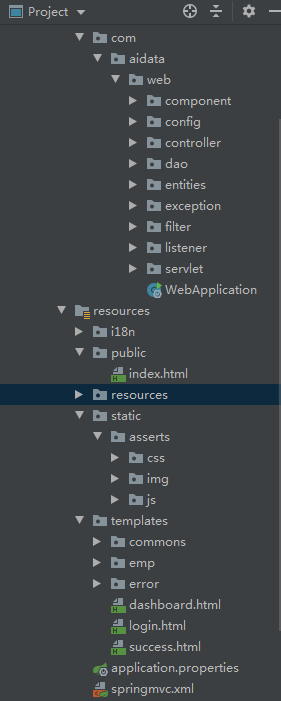
html页面不要放在静态资源文件夹中
"classpath:/META‐INF/resources/",
"classpath:/resources/",
"classpath:/static/",
"classpath:/public/"
"/":当前项目的根路径
放在 templates 文件夹中,thymeleaf 模板引擎才能进行解析
我们要求项目默认访问首页
进行配置
前面我们知道扩展Spring boot MVC ,要编写一个配置类(@Configuration),继承了WebMvcConfigurerAdapter,且不能标注@EnableWebMvc;
从Spring 5开始,WebMvcConfigure接口包含了WebMvcConfigurerAdapter类中所有方法的默认实现
public interface WebMvcConfigurer {
    default void configurePathMatch(PathMatchConfigurer configurer) {
    }

    default void configureContentNegotiation(ContentNegotiationConfigurer configurer) {
    }

    default void configureAsyncSupport(AsyncSupportConfigurer configurer) {
    }

    default void configureDefaultServletHandling(DefaultServletHandlerConfigurer configurer) {
    }

    default void addFormatters(FormatterRegistry registry) {
    }

    default void addInterceptors(InterceptorRegistry registry) {
    }

    default void addResourceHandlers(ResourceHandlerRegistry registry) {
    }

    default void addCorsMappings(CorsRegistry registry) {
    }

    default void addViewControllers(ViewControllerRegistry registry) {
    }

    default void configureViewResolvers(ViewResolverRegistry registry) {
    }

    default void addArgumentResolvers(List<HandlerMethodArgumentResolver> resolvers) {
    }

    default void addReturnValueHandlers(List<HandlerMethodReturnValueHandler> handlers) {
    }

    default void configureMessageConverters(List<HttpMessageConverter<?>> converters) {
    }

    default void extendMessageConverters(List<HttpMessageConverter<?>> converters) {
    }

    default void configureHandlerExceptionResolvers(List<HandlerExceptionResolver> resolvers) {
    }

    default void extendHandlerExceptionResolvers(List<HandlerExceptionResolver> resolvers) {
    }

    @Nullable
    default Validator getValidator() {
        return null;
    }

    @Nullable
    default MessageCodesResolver getMessageCodesResolver() {
        return null;
    }
}
因此我们实现该接口
package com.aidata.web.config;

import org.springframework.context.annotation.Bean;
import org.springframework.context.annotation.Configuration;
import org.springframework.web.servlet.config.annotation.ViewControllerRegistry;
import org.springframework.web.servlet.config.annotation.WebMvcConfigurer;
import org.springframework.web.servlet.config.annotation.WebMvcConfigurerAdapter;

@Configuration
public class MyMvcConfig implements WebMvcConfigurer {

    @Override
    public void addViewControllers(ViewControllerRegistry registry) {
        registry.addViewController("/success").setViewName("success");
    }


    @Bean
    public WebMvcConfigurer webMvcConfigurer(){
        WebMvcConfigurer configurer = new WebMvcConfigurer() {
            @Override
            public void addViewControllers(ViewControllerRegistry registry) {
                registry.addViewController("/").setViewName("login");
                registry.addViewController("/index.html").setViewName("login");
            }
        };
        return  configurer;
    }

//    @Bean
//    public WebMvcConfigurerAdapter webMvcConfigurerAdapter(){
//        WebMvcConfigurerAdapter webMvcConfigurer = new WebMvcConfigurerAdapter() {
//            @Override
//            public void addViewControllers(ViewControllerRegistry registry) {
//                registry.addViewController("/").setViewName("login");
//                registry.addViewController("/index.html").setViewName("login");
//            }
//        };
//        return webMvcConfigurer;
//    }
}
配置类继承了configure,既可以重写其方法,也这可以在配置类中添加Bean
国际化
原来SpringMVC:
1)、编写国际化配置文件;
2)、使用ResourceBundleMessageSource管理国际化资源文件
3)、在页面使用fmt:message取出国际化内容
Spring Boot使用步骤:
1)编写国际化配置文件
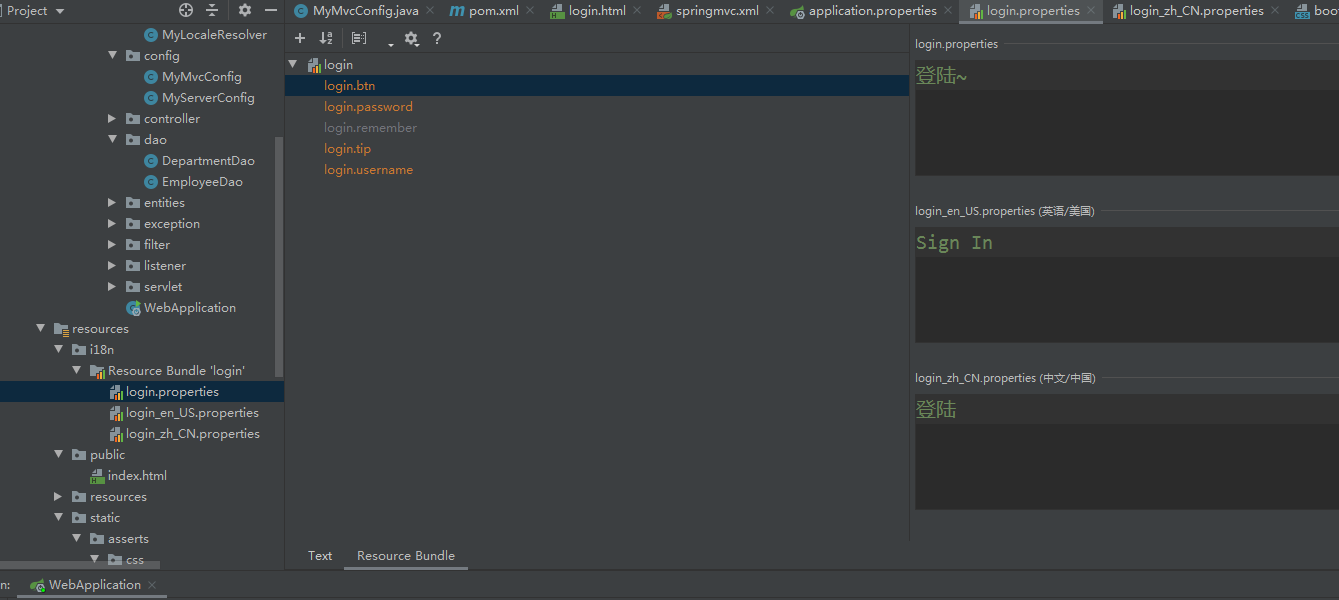
login.properties
login.btn=登陆~
login.password=密码~
login.remember=记住我~
login.tip=请登陆~
login.username=用户名~
login_en_US.properties
login.btn=Sign In
login.password=Password
login.remember=Remember Me
login.tip=Please sign in
login.username=UserName
login_zh_CN.properties
login.btn=登陆
login.password=密码
login.remember=记住我
login.tip=请登录
login.username=用户名
2)、SpringBoot自动配置好了管理国际化资源文件的组件
通过 MessageSourceAutoConfiguration 类来进行自动配置的
@Configuration(
    proxyBeanMethods = false
)
@ConditionalOnMissingBean(
    name = {"messageSource"},
    search = SearchStrategy.CURRENT
)
@AutoConfigureOrder(-2147483648)
@Conditional({MessageSourceAutoConfiguration.ResourceBundleCondition.class})
@EnableConfigurationProperties
public class MessageSourceAutoConfiguration {
    private static final Resource[] NO_RESOURCES = new Resource[0];

    public MessageSourceAutoConfiguration() {
    }

    @Bean
    @ConfigurationProperties(
        prefix = "spring.messages"
    )
    public MessageSourceProperties messageSourceProperties() {
        return new MessageSourceProperties();
    }

    @Bean
    public MessageSource messageSource(MessageSourceProperties properties) {
        ResourceBundleMessageSource messageSource = new ResourceBundleMessageSource();
        if (StringUtils.hasText(properties.getBasename())) {
            messageSource.setBasenames(StringUtils.commaDelimitedListToStringArray(StringUtils.trimAllWhitespace(properties.getBasename())));
        }

        if (properties.getEncoding() != null) {
            messageSource.setDefaultEncoding(properties.getEncoding().name());
        }

        messageSource.setFallbackToSystemLocale(properties.isFallbackToSystemLocale());
        Duration cacheDuration = properties.getCacheDuration();
        if (cacheDuration != null) {
            messageSource.setCacheMillis(cacheDuration.toMillis());
        }

        messageSource.setAlwaysUseMessageFormat(properties.isAlwaysUseMessageFormat());
        messageSource.setUseCodeAsDefaultMessage(properties.isUseCodeAsDefaultMessage());
        return messageSource;
    }
Spring MVC中使用了ResourceBundleMessageSource,上面自动配置也使用了
关于 basename
       public ConditionOutcome getMatchOutcome(ConditionContext context, AnnotatedTypeMetadata metadata) {
            String basename = context.getEnvironment().getProperty("spring.messages.basename", "messages");
            ConditionOutcome outcome = (ConditionOutcome)cache.get(basename);
            if (outcome == null) {
                outcome = this.getMatchOutcomeForBasename(context, basename);
                cache.put(basename, outcome);
            }

            return outcome;
        }
getProperty() 方法
    public String getProperty(String key, String defaultValue) {
        String value = this.getProperty(key);
        return value != null ? value : defaultValue;
    }
可以知道basename那么默认值是 messages
什么是basename
StringUtils.commaDelimitedListToStringArray(StringUtils.trimAllWhitespace(properties.getBasename()))
我们设置的国际化文件的名称为 login_zh_CN.properties,上面的代码会使名字只剩下 login,basename就是login
如果不设置,默认的basename是messages,因此我们在类下创建messages.properties文件,进行配置即可
但我们这里是放在了i18n目录下,因此需要在配置文件中进行修改,从注解可知,只要在配置文件中修改 spring.messages 即可
application.properties
spring.messages.basename=i18n.login
注意设置idea的编码格式

3)、html页面设置
<!DOCTYPE html>
<html lang="en"  xmlns:th="http://www.thymeleaf.org">
    <head>
        <meta http-equiv="Content-Type" content="text/html; charset=UTF-8">
        <meta name="viewport" content="width=device-width, initial-scale=1, shrink-to-fit=no">
        <meta name="description" content="">
        <meta name="author" content="">
        <title>Signin Template for Bootstrap</title>
        <!-- Bootstrap core CSS -->
        <link href="asserts/css/bootstrap.min.css" th:href="@{/webjars/bootstrap/4.0.0/css/bootstrap.css}" rel="stylesheet">
        <!-- Custom styles for this template -->
        <link href="asserts/css/signin.css" th:href="@{/asserts/css/signin.css}" rel="stylesheet">
    </head>
    <body class="text-center">
        <form class="form-signin" action="dashboard.html" th:action="@{/user/login}" method="post">
            <img class="mb-4" th:src="@{/asserts/img/bootstrap-solid.svg}" src="asserts/img/bootstrap-solid.svg" alt="" width="72" height="72">
            <h1 class="h3 mb-3 font-weight-normal" th:text="#{login.tip}">Please sign in</h1>
            <!--判断-->
            <p style="color: red" th:text="${msg}" th:if="${not #strings.isEmpty(msg)}"></p>
            <label class="sr-only" th:text="#{login.username}">Username</label>
            <input type="text"  name="username" class="form-control" placeholder="Username" th:placeholder="#{login.username}" required="" autofocus="">
            <label class="sr-only" th:text="#{login.password}">Password</label>
            <input type="password" name="password" class="form-control" placeholder="Password" th:placeholder="#{login.password}" required="">
            <div class="checkbox mb-3">
                <label>
                      <input type="checkbox" value="remember-me"/> [[#{login.remember}]]
                </label>
            </div>
            <button class="btn btn-lg btn-primary btn-block" type="submit" th:text="#{login.btn}">Sign in</button>
            <p class="mt-5 mb-3 text-muted">© 2017-2018</p>
            <a class="btn btn-sm" th:href="@{/index.html(l='zh_CN')}">中文</a>
            <a class="btn btn-sm" th:href="@{/index.html(l='en_US')}">English</a>
        </form>
    </body>

</html>
登陆
package com.aidata.web.controller;

import org.springframework.stereotype.Controller;
import org.springframework.util.StringUtils;
import org.springframework.web.bind.annotation.*;

import javax.servlet.http.HttpSession;
import java.util.Map;

@Controller
public class LoginController {

//    @DeleteMapping
//    @PutMapping
//    @GetMapping

    //@RequestMapping(value = "/user/login",method = RequestMethod.POST)
    @PostMapping(value = "/user/login")
    public String login(@RequestParam("username") String username,
                        @RequestParam("password") String password,
                        Map<String,Object> map){
        if(!StringUtils.isEmpty(username) && "123456".equals(password)){
            //登陆成功,防止表单重复提交,可以重定向到主页
            return "redirect:/main.html";
        }else{
            //登陆失败

            map.put("msg","用户名密码错误");
            return  "login";
        }

    }
}
使用重定向,防止表单重复提交
需要在配置类中增加视图映射
    @Bean
    public WebMvcConfigurer webMvcConfigurer(){
        WebMvcConfigurer configurer = new WebMvcConfigurer() {
            @Override
            public void addViewControllers(ViewControllerRegistry registry) {
                registry.addViewController("/").setViewName("login");
                registry.addViewController("/index.html").setViewName("login");
                registry.addViewController("/main.html").setViewName("dashboard");
            }
        };
        return  configurer;
    }
HTML页面中登陆错误消息的显示
<p style="color: red" th:text="${msg}" th:if="${not #strings.isEmpty(msg)}"></p>
小技巧:
开发期间模板引擎页面修改以后,要实时生效
1)、禁用模板引擎的缓存
# 禁用缓存
spring.thymeleaf.cache=false
2)、页面修改完成以后ctrl+f9:重新编译
拦截器
上面我们输入main.html不登录可以直接进入dashboard页面,因此需要设置拦截器
增加 HttpSession参数
    @PostMapping(value = "/user/login")
    public String login(@RequestParam("username") String username,
                        @RequestParam("password") String password,
                        Map<String,Object> map, HttpSession session){
        if(!StringUtils.isEmpty(username) && "123456".equals(password)){
            //登陆成功,防止表单重复提交,可以重定向到主页
            session.setAttribute("loginUser",username);
            return "redirect:/main.html";
        }else{
            //登陆失败

            map.put("msg","用户名密码错误");
            return  "login";
        }
    }
}
拦截器
package com.aidata.web.component;

import org.springframework.web.servlet.HandlerInterceptor;
import org.springframework.web.servlet.ModelAndView;

import javax.servlet.http.HttpServletRequest;
import javax.servlet.http.HttpServletResponse;

/**
 * 登陆检查,
 */
public class LoginHandlerInterceptor implements HandlerInterceptor {
    //目标方法执行之前
    @Override
    public boolean preHandle(HttpServletRequest request, HttpServletResponse response, Object handler) throws Exception {
        Object user = request.getSession().getAttribute("loginUser");
        if(user == null){
            //未登陆,返回登陆页面
            request.setAttribute("msg","没有权限请先登陆");
            request.getRequestDispatcher("/index.html").forward(request,response); // 转发到 登陆页面
            return false;
        }else{
            //已登陆,放行请求
            return true;
        }

    }

    @Override
    public void postHandle(HttpServletRequest request, HttpServletResponse response, Object handler, ModelAndView modelAndView) throws Exception {

    }

    @Override
    public void afterCompletion(HttpServletRequest request, HttpServletResponse response, Object handler, Exception ex) throws Exception {

    }
}
在配置类中注册拦截器
    @Bean
    public WebMvcConfigurer webMvcConfigurer(){
        WebMvcConfigurer configurer = new WebMvcConfigurer() {
            @Override
            public void addViewControllers(ViewControllerRegistry registry) {
                registry.addViewController("/").setViewName("login");
                registry.addViewController("/index.html").setViewName("login");
                registry.addViewController("/main.html").setViewName("dashboard");
            }

            @Override
            public void addInterceptors(InterceptorRegistry registry) {
                registry.addInterceptor(new LoginHandlerInterceptor()).addPathPatterns("/**").excludePathPatterns("/index.html","/","/user/login");
            }
        };
        return  configurer;
    }
一个*:只匹配字符,不匹配路径(/)
两个**:匹配字符,和路径(/)
- /**: 匹配所有路径
- - /admin/**:匹配 /admin/ 下的所有路径
- - /secure/*:只匹配 /secure/user,不匹配 /secure/user/info
不登录访问 main.html
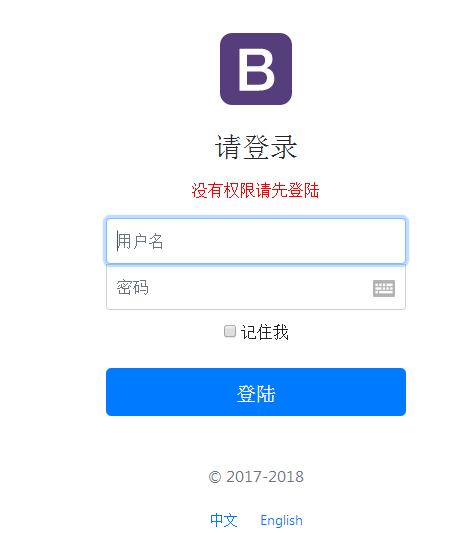
CRUD-员工列表
要求
1)、RestfulCRUD:CRUD满足Rest风格
URI: /资源名称/资源标识 HTTP请求方式区分对资源CRUD操作
| 普通CRUD(uri来区分操作) | RestfulCRUD | |
| 查询 | getEmp | emp---GET |
| 添加 | addEmp?xxx | emp---POST |
| 修改 | updateEmp?id=xxx&xxx=xx | emp/{id}---PUT |
| 删除 | deleteEmp?id=1 | emp/{id}---DELETE |
2)、实验的请求架构
| 实验功能 | 请求URI | 请求方式 |
| 查询所有员工 | emps | GET |
| 查询某个员工(来到修改页面) | emp/1 | GET |
| 来到添加页面 | emp | GET |
| 添加员工 | emp | POST |
| 来到修改页面(查出员工进行信息回显) | emp/1 | GET |
| 修改员工 | emp | PUT |
| 删除员工 | emp/1 | DELETE |
3)、员工列表
设置与员工相关的Controller
package com.aidata.web.controller;


import com.aidata.web.dao.DepartmentDao;
import com.aidata.web.dao.EmployeeDao;
import com.aidata.web.entities.Department;
import com.aidata.web.entities.Employee;
import org.springframework.beans.factory.annotation.Autowired;
import org.springframework.stereotype.Controller;
import org.springframework.ui.Model;
import org.springframework.web.bind.annotation.*;

import java.util.Collection;

@Controller
public class EmployeeController {
    @Autowired
    EmployeeDao employeeDao;

    @Autowired
    DepartmentDao departmentDao;

    //查询所有员工返回列表页面
    @GetMapping("/emps")
    public String  list(Model model){
        Collection<Employee> employees = employeeDao.getAll();

        //放在请求域中
        model.addAttribute("emps",employees);
        // thymeleaf默认就会拼串
        // classpath:/templates/xxxx.html
        return "emp/list";
    }

    //来到员工添加页面
    @GetMapping("/emp")
    public String toAddPage(Model model){
        //来到添加页面,查出所有的部门,在页面显示
        Collection<Department> departments = departmentDao.getDepartments();
        model.addAttribute("depts",departments);
        return "emp/add";
    }

    //员工添加
    //SpringMVC自动将请求参数和入参对象的属性进行一一绑定;要求请求参数的名字和javaBean入参的对象里面的属性名是一样的
    @PostMapping("/emp")
    public String addEmp(Employee employee){
        //来到员工列表页面

        System.out.println("保存的员工信息:"+employee);
        //保存员工
        employeeDao.save(employee);
        // redirect: 表示重定向到一个地址  /代表当前项目路径
        // forward: 表示转发到一个地址
        return "redirect:/emps";
    }

    //来到修改页面,查出当前员工,在页面回显
    @GetMapping("/emp/{id}")
    public String toEditPage(@PathVariable("id") Integer id,Model model){
        Employee employee = employeeDao.get(id);
        model.addAttribute("emp",employee);

        //页面要显示所有的部门列表
        Collection<Department> departments = departmentDao.getDepartments();
        model.addAttribute("depts",departments);
        //回到修改页面(add是一个修改添加二合一的页面);
        return "emp/add";
    }

    //员工修改;需要提交员工id;
    @PutMapping("/emp")
    public String updateEmployee(Employee employee){
        System.out.println("修改的员工数据:"+employee);
        employeeDao.save(employee);
        return "redirect:/emps";
    }

    //员工删除
    @DeleteMapping("/emp/{id}")
    public String deleteEmployee(@PathVariable("id") Integer id){
        employeeDao.delete(id);
        return "redirect:/emps";
    }


}
公共页抽取
1、抽取公共片段
<div th:fragment="copy">
© 2011 The Good Thymes Virtual Grocery
</div>
2、引入公共片段
<div th:insert="~{footer :: copy}"></div>
~{templatename::selector}:模板名::选择器
~{templatename::fragmentname}:模板名::片段名
3、默认效果:
insert的公共片段在div标签中
如果使用th:insert等属性进行引入,可以不用写~{}:
行内写法可以加上:[[~{}]];[(~{})];
三种引入公共片段的th属性:
th:insert:将公共片段整个插入到声明引入的元素中
th:replace:将声明引入的元素替换为公共片段
th:include:将被引入的片段的内容包含进这个标签中
<footer th:fragment="copy"> © 2011 The Good Thymes Virtual Grocery </footer> 引入方式 <div th:insert="footer :: copy"></div> <div th:replace="footer :: copy"></div> <div th:include="footer :: copy"></div> 效果 <div> <footer> © 2011 The Good Thymes Virtual Grocery </footer> </div>
<footer> © 2011 The Good Thymes Virtual Grocery </footer>
<div> © 2011 The Good Thymes Virtual Grocery </div>
commos目录下bar.html
th:replace="commons/bar::topbar 后面的topbar是fragment
th:replace="commons/bar::#sidebar(activeUri='emps') 使用选择器 # 后面是,括号里是参数
<!DOCTYPE html>
<!-- saved from url=(0052)http://getbootstrap.com/docs/4.0/examples/dashboard/ -->
<html lang="en" xmlns:th="http://www.thymeleaf.org">

    <head>
        <meta http-equiv="Content-Type" content="text/html; charset=UTF-8">
        <meta name="viewport" content="width=device-width, initial-scale=1, shrink-to-fit=no">
        <meta name="description" content="">
        <meta name="author" content="">

        <title>Dashboard Template for Bootstrap</title>
        <!-- Bootstrap core CSS -->
        <link href="asserts/css/bootstrap.min.css" th:href="@{/webjars/bootstrap/4.0.0/css/bootstrap.css}" rel="stylesheet">

        <!-- Custom styles for this template -->
        <link href="asserts/css/dashboard.css" th:href="@{/asserts/css/dashboard.css}" rel="stylesheet">
        <style type="text/css">
            /* Chart.js */

            @-webkit-keyframes chartjs-render-animation {
                from {
                    opacity: 0.99
                }
                to {
                    opacity: 1
                }
            }

            @keyframes chartjs-render-animation {
                from {
                    opacity: 0.99
                }
                to {
                    opacity: 1
                }
            }

            .chartjs-render-monitor {
                -webkit-animation: chartjs-render-animation 0.001s;
                animation: chartjs-render-animation 0.001s;
            }
        </style>
    </head>

    <body>
        <!--引入抽取的topbar-->
        <!--模板名:会使用thymeleaf的前后缀配置规则进行解析-->
        <div th:replace="commons/bar::topbar"></div>

        <div class="container-fluid">
            <div class="row">
                <!--引入侧边栏-->
                <div th:replace="commons/bar::#sidebar(activeUri='emps')"></div>

                <main role="main" class="col-md-9 ml-sm-auto col-lg-10 pt-3 px-4">
                    <h2><a class="btn btn-sm btn-success" href="emp" th:href="@{/emp}">员工添加</a></h2>
                    <div class="table-responsive">
                        <table class="table table-striped table-sm">
                            <thead>
                                <tr>
                                    <th>#</th>
                                    <th>lastName</th>
                                    <th>email</th>
                                    <th>gender</th>
                                    <th>department</th>
                                    <th>birth</th>
                                    <th>操作</th>
                                </tr>
                            </thead>
                            <tbody>
                                <tr th:each="emp:${emps}">   这个emps是controller传过来的
                                    <td th:text="${emp.id}"></td>
                                    <td>[[${emp.lastName}]]</td>
                                    <td th:text="${emp.email}"></td>
                                    <td th:text="${emp.gender}==0?'女':'男'"></td>
                                    <td th:text="${emp.department.departmentName}"></td>
                                    <td th:text="${#dates.format(emp.birth, 'yyyy-MM-dd HH:mm')}"></td>
                                    <td>
                                        <a class="btn btn-sm btn-primary" th:href="@{/emp/}+${emp.id}">编辑</a>
                                        <button th:attr="del_uri=@{/emp/}+${emp.id}" class="btn btn-sm btn-danger deleteBtn">删除</button>
                                    </td>
                                </tr>
                            </tbody>
                        </table>
                    </div>
                </main>
                <form id="deleteEmpForm"  method="post">
                    <input type="hidden" name="_method" value="delete"/>
                </form>
            </div>
        </div>

        <!-- Bootstrap core JavaScript
    ================================================== -->
        <!-- Placed at the end of the document so the pages load faster -->
        <script type="text/javascript" src="asserts/js/jquery-3.2.1.slim.min.js" th:src="@{/webjars/jquery/3.3.1/jquery.js}"></script>
        <script type="text/javascript" src="asserts/js/popper.min.js" th:src="@{/webjars/popper.js/1.11.1/dist/popper.js}"></script>
        <script type="text/javascript" src="asserts/js/bootstrap.min.js" th:src="@{/webjars/bootstrap/4.0.0/js/bootstrap.js}"></script>

        <!-- Icons -->
        <script type="text/javascript" src="asserts/js/feather.min.js" th:src="@{/asserts/js/feather.min.js}"></script>
        <script>
            feather.replace()
        </script>
        <script>
            $(".deleteBtn").click(function(){
                //删除当前员工的
                $("#deleteEmpForm").attr("action",$(this).attr("del_uri")).submit();
                return false;
            });
        </script>
    </body>
</html>
bar.html
th:class="${activeUri=='main.html'?'nav-link active':'nav-link'}",如果传入的参数activeUri是main.html,属性就是nav-link active,高亮显示,而这个在dashboard页面中参数是main.html
同理,下面的的那个出入参数是emps,高亮,在list.html中才会让参数为emps,也就是点员工管理的时候,展示的是list.html页面,此时高亮属性被激活
<!DOCTYPE html>
<html lang="en" xmlns:th="http://www.thymeleaf.org">
<head>
    <meta charset="UTF-8">
    <title>Title</title>
</head>
<body>
<!--topbar-->
<nav class="navbar navbar-dark sticky-top bg-dark flex-md-nowrap p-0" th:fragment="topbar">
    <a class="navbar-brand col-sm-3 col-md-2 mr-0" href="http://getbootstrap.com/docs/4.0/examples/dashboard/#">[[${session.loginUser}]]</a>
    <input class="form-control form-control-dark w-100" type="text" placeholder="Search" aria-label="Search">
    <ul class="navbar-nav px-3">
        <li class="nav-item text-nowrap">
            <a class="nav-link" href="http://getbootstrap.com/docs/4.0/examples/dashboard/#">Sign out</a>
        </li>
    </ul>
</nav>

<!--sidebar-->
<nav class="col-md-2 d-none d-md-block bg-light sidebar" id="sidebar">
    <div class="sidebar-sticky">
        <ul class="nav flex-column">
            <li class="nav-item">
                <a class="nav-link active"
                   th:class="${activeUri=='main.html'?'nav-link active':'nav-link'}"
                   href="#" th:href="@{/main.html}">
                    <svg xmlns="http://www.w3.org/2000/svg" width="24" height="24" viewBox="0 0 24 24" fill="none" stroke="currentColor" stroke-width="2" stroke-linecap="round" stroke-linejoin="round" class="feather feather-home">
                        <path d="M3 9l9-7 9 7v11a2 2 0 0 1-2 2H5a2 2 0 0 1-2-2z"></path>
                        <polyline points="9 22 9 12 15 12 15 22"></polyline>
                    </svg>
                    Dashboard <span class="sr-only">(current)</span>
                </a>
            </li>
            <li class="nav-item">
                <a class="nav-link"
                   href="http://getbootstrap.com/docs/4.0/examples/dashboard/#">
                    <svg xmlns="http://www.w3.org/2000/svg" width="24" height="24" viewBox="0 0 24 24" fill="none" stroke="currentColor" stroke-width="2" stroke-linecap="round" stroke-linejoin="round" class="feather feather-file">
                        <path d="M13 2H6a2 2 0 0 0-2 2v16a2 2 0 0 0 2 2h12a2 2 0 0 0 2-2V9z"></path>
                        <polyline points="13 2 13 9 20 9"></polyline>
                    </svg>
                    Orders
                </a>
            </li>
            <li class="nav-item">
                <a class="nav-link" href="http://getbootstrap.com/docs/4.0/examples/dashboard/#">
                    <svg xmlns="http://www.w3.org/2000/svg" width="24" height="24" viewBox="0 0 24 24" fill="none" stroke="currentColor" stroke-width="2" stroke-linecap="round" stroke-linejoin="round" class="feather feather-shopping-cart">
                        <circle cx="9" cy="21" r="1"></circle>
                        <circle cx="20" cy="21" r="1"></circle>
                        <path d="M1 1h4l2.68 13.39a2 2 0 0 0 2 1.61h9.72a2 2 0 0 0 2-1.61L23 6H6"></path>
                    </svg>
                    Products
                </a>
            </li>
            <li class="nav-item">
                <a class="nav-link active" href="#" th:href="@{/emps}"
                th:class="${activeUri=='emps'?'nav-link active':'nav-link'}">
                    <svg xmlns="http://www.w3.org/2000/svg" width="24" height="24" viewBox="0 0 24 24" fill="none" stroke="currentColor" stroke-width="2" stroke-linecap="round" stroke-linejoin="round" class="feather feather-users">
                        <path d="M17 21v-2a4 4 0 0 0-4-4H5a4 4 0 0 0-4 4v2"></path>
                        <circle cx="9" cy="7" r="4"></circle>
                        <path d="M23 21v-2a4 4 0 0 0-3-3.87"></path>
                        <path d="M16 3.13a4 4 0 0 1 0 7.75"></path>
                    </svg>
                    员工管理
                </a>
            </li>
            <li class="nav-item">
                <a class="nav-link" href="http://getbootstrap.com/docs/4.0/examples/dashboard/#">
                    <svg xmlns="http://www.w3.org/2000/svg" width="24" height="24" viewBox="0 0 24 24" fill="none" stroke="currentColor" stroke-width="2" stroke-linecap="round" stroke-linejoin="round" class="feather feather-bar-chart-2">
                        <line x1="18" y1="20" x2="18" y2="10"></line>
                        <line x1="12" y1="20" x2="12" y2="4"></line>
                        <line x1="6" y1="20" x2="6" y2="14"></line>
                    </svg>
                    Reports
                </a>
            </li>
            <li class="nav-item">
                <a class="nav-link" href="http://getbootstrap.com/docs/4.0/examples/dashboard/#">
                    <svg xmlns="http://www.w3.org/2000/svg" width="24" height="24" viewBox="0 0 24 24" fill="none" stroke="currentColor" stroke-width="2" stroke-linecap="round" stroke-linejoin="round" class="feather feather-layers">
                        <polygon points="12 2 2 7 12 12 22 7 12 2"></polygon>
                        <polyline points="2 17 12 22 22 17"></polyline>
                        <polyline points="2 12 12 17 22 12"></polyline>
                    </svg>
                    Integrations
                </a>
            </li>
        </ul>

        <h6 class="sidebar-heading d-flex justify-content-between align-items-center px-3 mt-4 mb-1 text-muted">
            <span>Saved reports</span>
            <a class="d-flex align-items-center text-muted" href="http://getbootstrap.com/docs/4.0/examples/dashboard/#">
                <svg xmlns="http://www.w3.org/2000/svg" width="24" height="24" viewBox="0 0 24 24" fill="none" stroke="currentColor" stroke-width="2" stroke-linecap="round" stroke-linejoin="round" class="feather feather-plus-circle"><circle cx="12" cy="12" r="10"></circle><line x1="12" y1="8" x2="12" y2="16"></line><line x1="8" y1="12" x2="16" y2="12"></line></svg>
            </a>
        </h6>
        <ul class="nav flex-column mb-2">
            <li class="nav-item">
                <a class="nav-link" href="http://getbootstrap.com/docs/4.0/examples/dashboard/#">
                    <svg xmlns="http://www.w3.org/2000/svg" width="24" height="24" viewBox="0 0 24 24" fill="none" stroke="currentColor" stroke-width="2" stroke-linecap="round" stroke-linejoin="round" class="feather feather-file-text">
                        <path d="M14 2H6a2 2 0 0 0-2 2v16a2 2 0 0 0 2 2h12a2 2 0 0 0 2-2V8z"></path>
                        <polyline points="14 2 14 8 20 8"></polyline>
                        <line x1="16" y1="13" x2="8" y2="13"></line>
                        <line x1="16" y1="17" x2="8" y2="17"></line>
                        <polyline points="10 9 9 9 8 9"></polyline>
                    </svg>
                    Current month
                </a>
            </li>
            <li class="nav-item">
                <a class="nav-link" href="http://getbootstrap.com/docs/4.0/examples/dashboard/#">
                    <svg xmlns="http://www.w3.org/2000/svg" width="24" height="24" viewBox="0 0 24 24" fill="none" stroke="currentColor" stroke-width="2" stroke-linecap="round" stroke-linejoin="round" class="feather feather-file-text">
                        <path d="M14 2H6a2 2 0 0 0-2 2v16a2 2 0 0 0 2 2h12a2 2 0 0 0 2-2V8z"></path>
                        <polyline points="14 2 14 8 20 8"></polyline>
                        <line x1="16" y1="13" x2="8" y2="13"></line>
                        <line x1="16" y1="17" x2="8" y2="17"></line>
                        <polyline points="10 9 9 9 8 9"></polyline>
                    </svg>
                    Last quarter
                </a>
            </li>
            <li class="nav-item">
                <a class="nav-link" href="http://getbootstrap.com/docs/4.0/examples/dashboard/#">
                    <svg xmlns="http://www.w3.org/2000/svg" width="24" height="24" viewBox="0 0 24 24" fill="none" stroke="currentColor" stroke-width="2" stroke-linecap="round" stroke-linejoin="round" class="feather feather-file-text">
                        <path d="M14 2H6a2 2 0 0 0-2 2v16a2 2 0 0 0 2 2h12a2 2 0 0 0 2-2V8z"></path>
                        <polyline points="14 2 14 8 20 8"></polyline>
                        <line x1="16" y1="13" x2="8" y2="13"></line>
                        <line x1="16" y1="17" x2="8" y2="17"></line>
                        <polyline points="10 9 9 9 8 9"></polyline>
                    </svg>
                    Social engagement
                </a>
            </li>
            <li class="nav-item">
                <a class="nav-link" href="http://getbootstrap.com/docs/4.0/examples/dashboard/#">
                    <svg xmlns="http://www.w3.org/2000/svg" width="24" height="24" viewBox="0 0 24 24" fill="none" stroke="currentColor" stroke-width="2" stroke-linecap="round" stroke-linejoin="round" class="feather feather-file-text">
                        <path d="M14 2H6a2 2 0 0 0-2 2v16a2 2 0 0 0 2 2h12a2 2 0 0 0 2-2V8z"></path>
                        <polyline points="14 2 14 8 20 8"></polyline>
                        <line x1="16" y1="13" x2="8" y2="13"></line>
                        <line x1="16" y1="17" x2="8" y2="17"></line>
                        <polyline points="10 9 9 9 8 9"></polyline>
                    </svg>
                    Year-end sale
                </a>
            </li>
        </ul>
    </div>
</nav>

</body>
</html>
员工添加
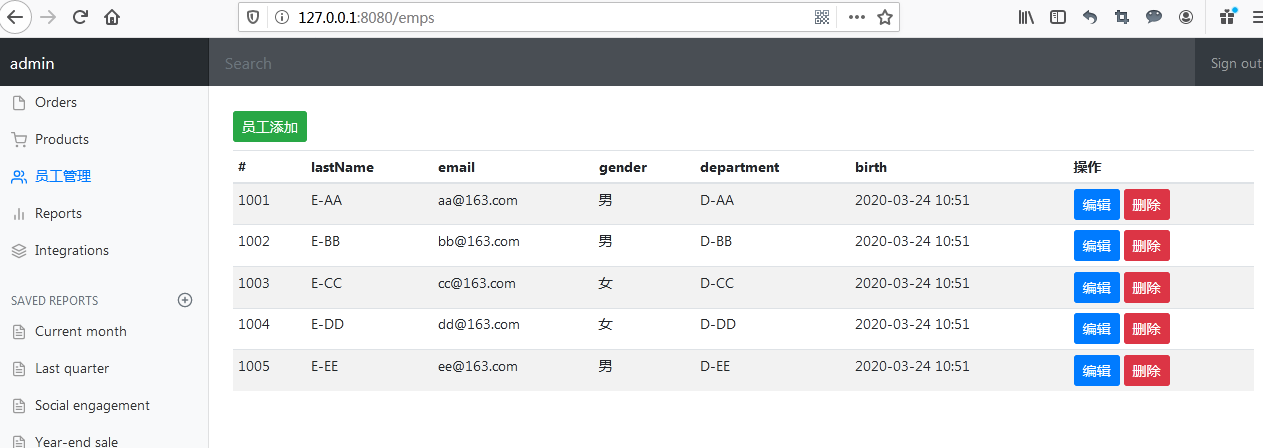
HTML上的添加按钮
<h2><a class="btn btn-sm btn-success" href="emp" th:href="@{/emp}">员工添加</a></h2>
点击添加会访问 /emp
控制器来处理 /emp访问
    //来到员工添加页面
    @GetMapping("/emp")
    public String toAddPage(Model model){
        //来到添加页面,查出所有的部门,在页面显示
        Collection<Department> departments = departmentDao.getDepartments();
        model.addAttribute("depts",departments);
        return "emp/add";
    }
控制器会让网页转到/emp/add.html
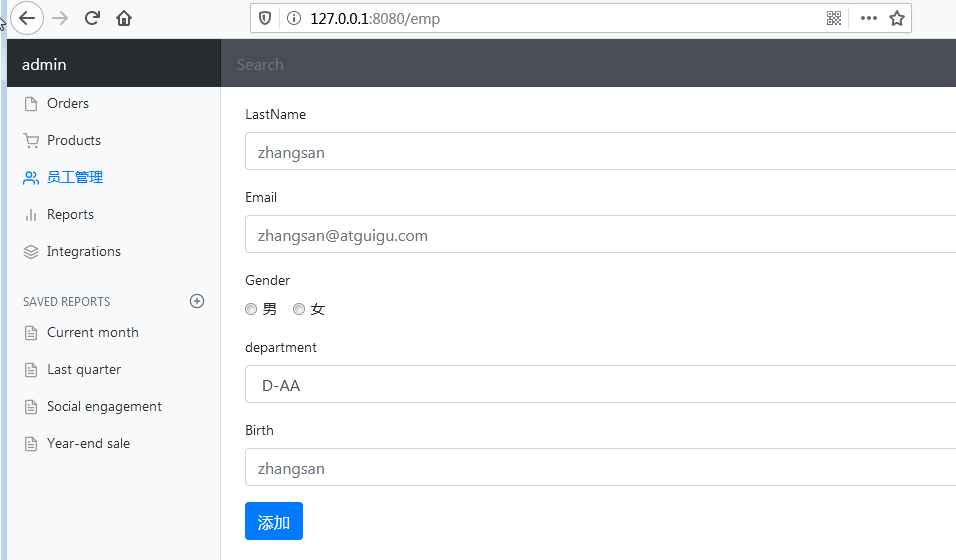
<!DOCTYPE html>
<!-- saved from url=(0052)http://getbootstrap.com/docs/4.0/examples/dashboard/ -->
<html lang="en" xmlns:th="http://www.thymeleaf.org">

    <head>
        <meta http-equiv="Content-Type" content="text/html; charset=UTF-8">
        <meta name="viewport" content="width=device-width, initial-scale=1, shrink-to-fit=no">
        <meta name="description" content="">
        <meta name="author" content="">

        <title>Dashboard Template for Bootstrap</title>
        <!-- Bootstrap core CSS -->
        <link href="asserts/css/bootstrap.min.css" th:href="@{/webjars/bootstrap/4.0.0/css/bootstrap.css}" rel="stylesheet">

        <!-- Custom styles for this template -->
        <link href="asserts/css/dashboard.css" th:href="@{/asserts/css/dashboard.css}" rel="stylesheet">
        <style type="text/css">
            /* Chart.js */

            @-webkit-keyframes chartjs-render-animation {
                from {
                    opacity: 0.99
                }
                to {
                    opacity: 1
                }
            }

            @keyframes chartjs-render-animation {
                from {
                    opacity: 0.99
                }
                to {
                    opacity: 1
                }
            }

            .chartjs-render-monitor {
                -webkit-animation: chartjs-render-animation 0.001s;
                animation: chartjs-render-animation 0.001s;
            }
        </style>
    </head>

    <body>
        <!--引入抽取的topbar-->
        <!--模板名:会使用thymeleaf的前后缀配置规则进行解析-->
        <div th:replace="commons/bar::topbar"></div>

        <div class="container-fluid">
            <div class="row">
                <!--引入侧边栏-->
                <div th:replace="commons/bar::#sidebar(activeUri='emps')"></div>

                <main role="main" class="col-md-9 ml-sm-auto col-lg-10 pt-3 px-4">

                    <form th:action="@{/emp}" method="post">

                        <div class="form-group">
                            <label>LastName</label>
                            <input name="lastName" type="text" class="form-control" placeholder="zhangsan">
                        </div>
                        <div class="form-group">
                            <label>Email</label>
                            <input name="email" type="email" class="form-control" placeholder="zhangsan@atguigu.com">
                        </div>
                        <div class="form-group">
                            <label>Gender</label><br/>
                            <div class="form-check form-check-inline">
                                <input class="form-check-input" type="radio" name="gender" value="1">
                                <label class="form-check-label">男</label>
                            </div>
                            <div class="form-check form-check-inline">
                                <input class="form-check-input" type="radio" name="gender" value="0">
                                <label class="form-check-label">女</label>
                            </div>
                        </div>
                        <div class="form-group">
                            <label>department</label>
                            <!--提交的是部门的id-->
                            <select class="form-control" name="department.id">
                                <option th:selected="${emp!=null}?${dept.id == emp.department.id}">1</option>
                            </select>
                        </div>
                        <div class="form-group">
                            <label>Birth</label>
                            <input name="birth" type="text" class="form-control" placeholder="zhangsan">
                        </div>
                        <button type="submit" class="btn btn-primary">添加</button>
                    </form>
                </main>
            </div>
        </div>

        <!-- Bootstrap core JavaScript
    ================================================== -->
        <!-- Placed at the end of the document so the pages load faster -->
        <script type="text/javascript" src="asserts/js/jquery-3.2.1.slim.min.js" th:src="@{/webjars/jquery/3.3.1/jquery.js}"></script>
        <script type="text/javascript" src="asserts/js/popper.min.js" th:src="@{/webjars/popper.js/1.11.1/dist/popper.js}"></script>
        <script type="text/javascript" src="asserts/js/bootstrap.min.js" th:src="@{/webjars/bootstrap/4.0.0/js/bootstrap.js}"></script>

        <!-- Icons -->
        <script type="text/javascript" src="asserts/js/feather.min.js" th:src="@{/asserts/js/feather.min.js}"></script>
        <script>
            feather.replace()
        </script>

    </body>

</html>
点添加按钮,会提交表格
<form th:action="@{/emp}" method="post">
发现请求 /emp,且方法是 post,由下面的controller处理
 //员工添加
    //SpringMVC自动将请求参数和入参对象的属性进行一一绑定;要求请求参数的名字和javaBean入参的对象里面的属性名是一样的
    @PostMapping("/emp")
    public String addEmp(Employee employee){
        //来到员工列表页
        System.out.println("保存的员工信息:"+employee);
        //保存员工
        employeeDao.save(employee);
        // redirect: 表示重定向到一个地址  /代表当前项目路径
        // forward: 表示转发到一个地址
        return "redirect:/emps";
    }
如果添加成功会重定向到 /emps
如果提交数据格式不对,会出错
默认日期是按照/的方式 ,想设置为其他格式可以在配置文件中修改
spring.mvc.date-format=yyyy-MM-dd
员工修改
点击编辑按钮,进入修改页面
按钮
<a class="btn btn-sm btn-primary" th:href="@{/emp/}+${emp.id}">编辑</a>
处理按钮请求的controller
需要回显,使用model
    //来到修改页面,查出当前员工,在页面回显
    @GetMapping("/emp/{id}")
    public String toEditPage(@PathVariable("id") Integer id,Model model){
        Employee employee = employeeDao.get(id);
        model.addAttribute("emp",employee);

        //页面要显示所有的部门列表
        Collection<Department> departments = departmentDao.getDepartments();
        model.addAttribute("depts",departments);
        //回到修改页面(add是一个修改添加二合一的页面);
        return "emp/add";
    }
和增加页面是一样的,但是需要改造下该页面
需要回显,按钮文本是修改
修改的话 model 中会有 emp对象
发送put请求
发送put请求修改员工数据
    1、SpringMVC中配置HiddenHttpMethodFilter;(SpringBoot自动配置好的)
    2、页面创建一个post表单
    3、创建一个input项,name="_method";值就是我们指定的请求方式
<main role="main" class="col-md-9 ml-sm-auto col-lg-10 pt-3 px-4">
                    <!--需要区分是员工修改还是添加;-->
                    <form th:action="@{/emp}" method="post">
                        <!--发送put请求修改员工数据-->
                        <!--
                        1、SpringMVC中配置HiddenHttpMethodFilter;(SpringBoot自动配置好的)
                        2、页面创建一个post表单
                        3、创建一个input项,name="_method";值就是我们指定的请求方式
                        -->
                        <input type="hidden" name="_method" value="put" th:if="${emp!=null}"/>
                        <input type="hidden" name="id" th:if="${emp!=null}" th:value="${emp.id}">
                        <div class="form-group">
                            <label>LastName</label>
                            <input name="lastName" type="text" class="form-control" placeholder="zhangsan" th:value="${emp!=null}?${emp.lastName}">
                        </div>
                        <div class="form-group">
                            <label>Email</label>
                            <input name="email" type="email" class="form-control" placeholder="zhangsan@atguigu.com" th:value="${emp!=null}?${emp.email}">
                        </div>
                        <div class="form-group">
                            <label>Gender</label><br/>
                            <div class="form-check form-check-inline">
                                <input class="form-check-input" type="radio" name="gender" value="1" th:checked="${emp!=null}?${emp.gender==1}">
                                <label class="form-check-label">男</label>
                            </div>
                            <div class="form-check form-check-inline">
                                <input class="form-check-input" type="radio" name="gender" value="0" th:checked="${emp!=null}?${emp.gender==0}">
                                <label class="form-check-label">女</label>
                            </div>
                        </div>
                        <div class="form-group">
                            <label>department</label>
                            <!--提交的是部门的id-->
                            <select class="form-control" name="department.id">
                                <option th:selected="${emp!=null}?${dept.id == emp.department.id}" th:value="${dept.id}" th:each="dept:${depts}" th:text="${dept.departmentName}">1</option>
                            </select>
                        </div>
                        <div class="form-group">
                            <label>Birth</label>
                            <input name="birth" type="text" class="form-control" placeholder="zhangsan" th:value="${emp!=null}?${#dates.format(emp.birth, 'yyyy-MM-dd HH:mm')}">
                        </div>
                        <button type="submit" class="btn btn-primary" th:text="${emp!=null}?'修改':'添加'">添加</button>
                    </form>
                </main>
点击修改会提交input的value,如果没有id,则id为null,因此在隐藏域中添加修改的id
接收put请求
    //员工修改;需要提交员工id;
    @PutMapping("/emp")
    public String updateEmployee(Employee employee){
        System.out.println("修改的员工数据:"+employee);
        employeeDao.save(employee);
        return "redirect:/emps";
    }
员工删除
按钮
<button th:attr="del_uri=@{/emp/}+${emp.id}" class="btn btn-sm btn-danger deleteBtn">删除</button>
自定义属性 th:attr="del_uri=@{/emp/}+${emp.id}"
        <form id="deleteEmpForm"  method="post">
              <input type="hidden" name="_method" value="delete"/>
        </form>
点按钮会激活js,js会让表单的action属性的值为del_uri,也就是 @{/emp/}+${emp.id},submit 提交,发送请求,方法为delete
        <script>
            $(".deleteBtn").click(function(){
                //删除当前员工的
                $("#deleteEmpForm").attr("action",$(this).attr("del_uri")).submit();
                return false;
            });
        </script>
处理上面请求的 controller
    //员工删除
    @DeleteMapping("/emp/{id}")
    public String deleteEmployee(@PathVariable("id") Integer id){
        employeeDao.delete(id);
        return "redirect:/emps";
    }
错误处理
默认效果:
1)、浏览器,返回一个默认的错误页面
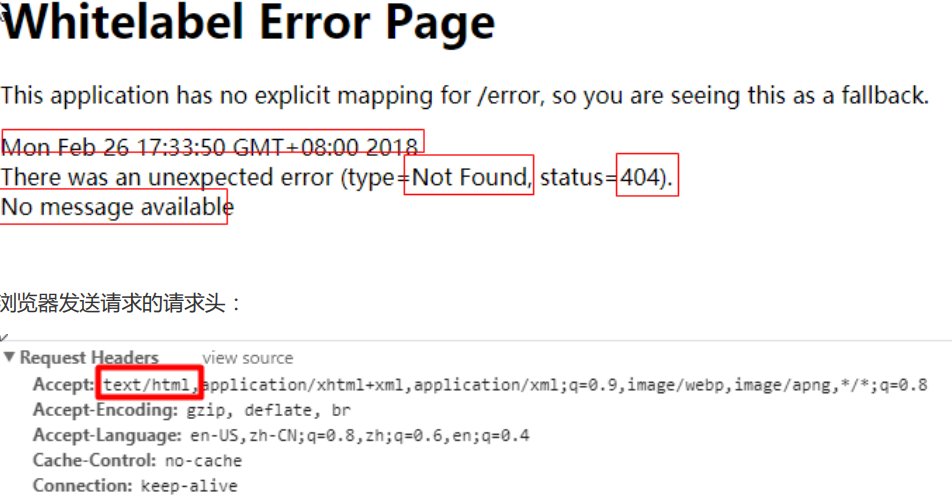
2)、如果是其他客户端,默认响应一个json数据
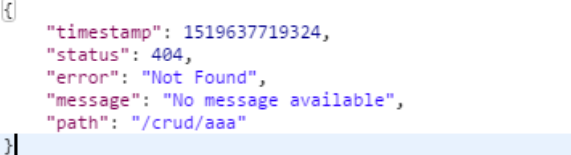
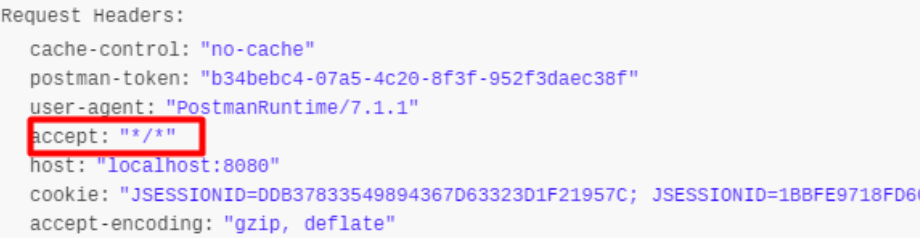
原理:
可以参照ErrorMvcAutoConfiguration;错误处理的自动配置;
给容器中添加了以下组件
1、DefaultErrorAttributes:
    // 在页面共享信息
    public Map<String, Object> getErrorAttributes(WebRequest webRequest, boolean includeStackTrace) {
        Map<String, Object> errorAttributes = new LinkedHashMap();
        errorAttributes.put("timestamp", new Date());
        this.addStatus(errorAttributes, webRequest);
        this.addErrorDetails(errorAttributes, webRequest, includeStackTrace);
        this.addPath(errorAttributes, webRequest);
        return errorAttributes;
    }
2、BasicErrorController:处理默认/error请求
@Controller
@RequestMapping({"${server.error.path:${error.path:/error}}"})
public class BasicErrorController extends AbstractErrorController {

    @RequestMapping(
        produces = {"text/html"} //产生html类型的数据;浏览器发送的请求来到这个方法处理

    )
    public ModelAndView errorHtml(HttpServletRequest request, HttpServletResponse response) {
        HttpStatus status = this.getStatus(request);
        Map<String, Object> model = Collections.unmodifiableMap(this.getErrorAttributes(request, this.isIncludeStackTrace(request, MediaType.TEXT_HTML)));
        response.setStatus(status.value());
        // 去哪个页面作为错误页面,包含页面地址和页面内容
        ModelAndView modelAndView = this.resolveErrorView(request, response, status, model);
        return modelAndView != null ? modelAndView : new ModelAndView("error", model);
    }

    @RequestMapping //产生json数据,其他客户端来到这个方法处理
    public ResponseEntity<Map<String, Object>> error(HttpServletRequest request) {
        HttpStatus status = this.getStatus(request);
        if (status == HttpStatus.NO_CONTENT) {
            return new ResponseEntity(status);
        } else {
            Map<String, Object> body = this.getErrorAttributes(request, this.isIncludeStackTrace(request, MediaType.ALL));
            return new ResponseEntity(body, status);
        }
    }
3、ErrorPageCustomizer
@Value("${error.path:/error}")
private String path = "/error"; 系统出现错误以后来到error请求进行处理;(web.xml注册的错误页面规则)
4、DefaultErrorViewResolver
public ModelAndView resolveErrorView(HttpServletRequest request, HttpStatus status, Map<String, Object> model) {
        ModelAndView modelAndView = this.resolve(String.valueOf(status.value()), model);
        if (modelAndView == null && SERIES_VIEWS.containsKey(status.series())) {
            modelAndView = this.resolve((String)SERIES_VIEWS.get(status.series()), model);
        }

        return modelAndView;
    }

    private ModelAndView resolve(String viewName, Map<String, Object> model) {
        // 默认SpringBoot可以去找到一个页面? error/404
        String errorViewName = "error/" + viewName;
        // 模板引擎可以解析这个页面地址就用模板引擎解析
        TemplateAvailabilityProvider provider = this.templateAvailabilityProviders.getProvider(errorViewName, this.applicationContext);
// 模板引擎可用的情况下返回到errorViewName指定的视图地址
// 模板引擎不可用,就在静态资源文件夹下找errorViewName对应的页面 error/404.html
        return provider != null ? new ModelAndView(errorViewName, model) : this.resolveResource(errorViewName, model);
    }
步骤:
一但系统出现4xx或者5xx之类的错误;ErrorPageCustomizer就会生效(定制错误的响应规则);就会来到/error请求;就会被BasicErrorController处理;
1 响应页面;去哪个页面是由DefaultErrorViewResolver解析得到的
2 如果定制错误响应:
如何定制错误的页面
1)、有模板引擎的情况下;error/状态码; 【将错误页面命名为 错误状态码.html 放在模板引擎文件夹里面的
error文件夹下】,发生此状态码的错误就会来到 对应的页面;
我们可以使用4xx和5xx作为错误页面的文件名来匹配这种类型的所有错误,精确优先(优先寻找精确的状态
码.html);
页面能获取的信息;
timestamp:时间戳
status:状态码
error:错误提示
exception:异常对象
message:异常消息
errors:JSR303数据校验的错误都在这里
2)、没有模板引擎(模板引擎找不到这个错误页面),静态资源文件夹下找;
3)、以上都没有错误页面,就是默认来到SpringBoot默认的错误提示页面;
如何定制错误的json数据
1)、自定义异常处理&返回定制json数据
package com.aidata.web.controller;

import com.aidata.web.exception.UserNotExistException;
import org.springframework.web.bind.annotation.ControllerAdvice;
import org.springframework.web.bind.annotation.ExceptionHandler;
import org.springframework.web.bind.annotation.ResponseBody;

import javax.servlet.http.HttpServletRequest;
import java.util.HashMap;
import java.util.Map;

@ControllerAdvice
public class MyExceptionHandler {

    //1、浏览器客户端返回的都是json
//    @ResponseBody
//    @ExceptionHandler(UserNotExistException.class)
//    public Map<String,Object> handleException(Exception e){
//        Map<String,Object> map = new HashMap<>();
//        map.put("code","user.notexist");
//        map.put("message",e.getMessage());
//        return map;
//    }
// 没有自适应
}
2)、转发到/error进行自适应响应效果处理
@ExceptionHandler(UserNotExistException.class)
public String handleException(Exception e, HttpServletRequest request){
    Map<String,Object> map = new HashMap<>();
    //传入我们自己的错误状态码 4xx 5xx,否则就不会进入定制错误页面的解析流程
    /**
    * Integer statusCode = (Integer) request
    .getAttribute("javax.servlet.error.status_code");
    */
    request.setAttribute("javax.servlet.error.status_code",500);
    map.put("code","user.notexist");
    map.put("message",e.getMessage());
    //转发到/error
    return "forward:/error";
}
3)、将我们的定制数据携带出去;
出现错误以后,会来到/error请求,会被BasicErrorController处理,响应出去可以获取的数据是由
getErrorAttributes得到的(是AbstractErrorController(ErrorController)规定的方法);
1、完全来编写一个ErrorController的实现类【或者是编写AbstractErrorController的子类】,放在容器中;
2、页面上能用的数据,或者是json返回能用的数据都是通过errorAttributes.getErrorAttributes得到;
容器中DefaultErrorAttributes.getErrorAttributes();默认进行数据处理的;
自定义ErrorAttributes
package com.aidata.web.component;

import org.springframework.boot.web.servlet.error.DefaultErrorAttributes;
import org.springframework.stereotype.Component;
import org.springframework.web.context.request.WebRequest;
import java.util.Map;

//给容器中加入我们自己定义的ErrorAttributes
@Component
public class MyErrorAttributes extends DefaultErrorAttributes {

    //返回值的map就是页面和json能获取的所有字段
    @Override
    public Map<String, Object> getErrorAttributes(WebRequest webRequest, boolean includeStackTrace) {
        Map<String, Object> map = super.getErrorAttributes(webRequest, includeStackTrace);
        map.put("company","atguigu");

        //我们的异常处理器携带的数据
        Map<String,Object> ext = (Map<String, Object>) webRequest.getAttribute("ext", 0);
        map.put("ext",ext);
        return map;
    }
}
嵌入式Servlet容器配置修改
默认使用tomcat作为嵌入式容器
如何定制和修改Servlet容器的相关配置
在外部可以直接修改配置文件,内嵌的怎么改呢?
1、修改和server有关的配置(ServerProperties【也是EmbeddedServletContainerCustomizer】)
server.port=8081
server.context‐path=/crud
server.tomcat.uri‐encoding=UTF‐8
//通用的Servlet容器设置
server.xxx
//Tomcat的设置
server.tomcat.xxx
2、编写一个EmbeddedServletContainerCustomizer:嵌入式的Servlet容器的定制器;来修改Servlet容器的配置
package com.aidata.web.config;

import com.aidata.web.filter.MyFilter;
import com.aidata.web.listener.MyListener;
import com.aidata.web.servlet.MyServlet;
import org.springframework.boot.web.servlet.FilterRegistrationBean;
import org.springframework.boot.web.servlet.ServletListenerRegistrationBean;
import org.springframework.boot.web.servlet.ServletRegistrationBean;
import org.springframework.context.annotation.Bean;
import org.springframework.context.annotation.Configuration;
import java.util.Arrays;

@Configuration
public class MyServerConfig {

//    //配置嵌入式的Servlet容器
//    @Bean
//    public EmbeddedServletContainerCustomizer embeddedServletContainerCustomizer(){
//        return new EmbeddedServletContainerCustomizer() {
//
//            //定制嵌入式的Servlet容器相关的规则
//            @Override
//            public void customize(ConfigurableEmbeddedServletContainer container) {
//                container.setPort(8083);
//            }
//        };
//    }

}
如何注册Servlet三大组件【Servlet、Filter、Listener】
由于SpringBoot默认是以jar包的方式启动嵌入式的Servlet容器来启动SpringBoot的web应用,没有web.xml文
件。
注册三大组件用以下方式
ServletRegistrationBean 、FilterRegistrationBean 和 ServletListenerRegistrationBean
package com.aidata.web.config;

import com.aidata.web.filter.MyFilter;
import com.aidata.web.listener.MyListener;
import com.aidata.web.servlet.MyServlet;
import org.springframework.boot.web.servlet.FilterRegistrationBean;
import org.springframework.boot.web.servlet.ServletListenerRegistrationBean;
import org.springframework.boot.web.servlet.ServletRegistrationBean;
import org.springframework.context.annotation.Bean;
import org.springframework.context.annotation.Configuration;
import java.util.Arrays;

@Configuration
public class MyServerConfig {

    //注册三大组件
    @Bean
    public ServletRegistrationBean myServlet(){
        ServletRegistrationBean registrationBean = new ServletRegistrationBean(new MyServlet(),"/myServlet");
        registrationBean.setLoadOnStartup(1);
        return registrationBean;
    }

    @Bean
    public FilterRegistrationBean myFilter(){
        FilterRegistrationBean registrationBean = new FilterRegistrationBean();
        registrationBean.setFilter(new MyFilter());
        registrationBean.setUrlPatterns(Arrays.asList("/hello","/myServlet"));
        return registrationBean;
    }

    @Bean
    public ServletListenerRegistrationBean myListener(){
        ServletListenerRegistrationBean<MyListener> registrationBean = new ServletListenerRegistrationBean<>(new MyListener());
        return registrationBean;
    }


//    //配置嵌入式的Servlet容器
//    @Bean
//    public EmbeddedServletContainerCustomizer embeddedServletContainerCustomizer(){
//        return new EmbeddedServletContainerCustomizer() {
//
//            //定制嵌入式的Servlet容器相关的规则
//            @Override
//            public void customize(ConfigurableEmbeddedServletContainer container) {
//                container.setPort(8083);
//            }
//        };
//    }

}
SpringBoot帮我们自动SpringMVC的时候,自动的注册SpringMVC的前端控制器;DIspatcherServlet;
DispatcherServletAutoConfiguration中
 @Bean(
            name = {"dispatcherServletRegistration"}
        )
        @ConditionalOnBean(
            value = {DispatcherServlet.class},
            name = {"dispatcherServlet"}
        )
        public DispatcherServletRegistrationBean dispatcherServletRegistration(DispatcherServlet dispatcherServlet, WebMvcProperties webMvcProperties, ObjectProvider<MultipartConfigElement> multipartConfig) {
            DispatcherServletRegistrationBean registration = new DispatcherServletRegistrationBean(dispatcherServlet, webMvcProperties.getServlet().getPath());
            // 默认拦截: / 所有请求;包静态资源,但是不拦截jsp请求; /*会拦截jsp
            // 可以通过server.servletPath来修改SpringMVC前端控制器默认拦截的请求路径
            registration.setName("dispatcherServlet");
            registration.setLoadOnStartup(webMvcProperties.getServlet().getLoadOnStartup());
            multipartConfig.ifAvailable(registration::setMultipartConfig);
            return registration;
        }
    }
如何替换为其他嵌入式Servlet容器
默认 tomcat
我们在前面配置过嵌入式的内置容器 Spring1.5.x
    //配置嵌入式的Servlet容器
    @Bean
    public EmbeddedServletContainerCustomizer embeddedServletContainerCustomizer(){
        return new EmbeddedServletContainerCustomizer() {

            //定制嵌入式的Servlet容器相关的规则
            @Override
            public void customize(ConfigurableEmbeddedServletContainer container) {
                container.setPort(8083);
            }
        };
    }
选中ConfigurableEmbeddedServletContainer Ctrl + h
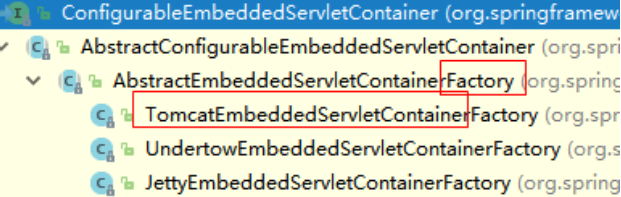
其他Servlet容器
- Jetty
- Undertow(不支持JSP)
Spring2.x
    @Bean
    public WebServerFactoryCustomizer webServerFactoryCustomizer(){
        return new WebServerFactoryCustomizer<ConfigurableServletWebServerFactory>() {

            @Override
            public void customize(ConfigurableServletWebServerFactory factory) {
                factory.setPort(8083);
            }
        };
    }

tomcat是默认配置,引入web模块默认就是使用嵌入式的Tomcat作为Servlet容器;
<dependency>
    <groupId>org.springframework.boot</groupId>
    <artifactId>spring‐boot‐starter‐web</artifactId>
</dependency>
Jetty
<!‐‐ 引入web模块 ‐‐>
<dependency>
    <groupId>org.springframework.boot</groupId>
    <artifactId>spring‐boot‐starter‐web</artifactId>
    <exclusions>
        <exclusion>
            <artifactId>spring‐boot‐starter‐tomcat</artifactId>
            <groupId>org.springframework.boot</groupId>
        </exclusion>
    </exclusions>
</dependency>
<!‐‐引入其他的Servlet容器‐‐>
<dependency>
    <artifactId>spring‐boot‐starter‐jetty</artifactId>
    <groupId>org.springframework.boot</groupId>
</dependency>
Undertow
<!‐‐ 引入web模块 ‐‐>
<dependency>
    <groupId>org.springframework.boot</groupId>
    <artifactId>spring‐boot‐starter‐web</artifactId>
    <exclusions>
        <exclusion>
            <artifactId>spring‐boot‐starter‐tomcat</artifactId>
            <groupId>org.springframework.boot</groupId>
        </exclusion>
    </exclusions>
</dependency>
<!‐‐引入其他的Servlet容器‐‐>
<dependency>
    <artifactId>spring‐boot‐starter‐undertow</artifactId>
    <groupId>org.springframework.boot</groupId>
</dependency>
嵌入式Servlet容器自动配置原理
嵌入式Servlet容器启动原理
使用外置的Servlet容器
五、Spring Boot与数据访问


 浙公网安备 33010602011771号