Flume速览
Flume是一个分布式的、可靠的、高可用的海量日志采集、聚合和传输的系统。Java实现,插件丰富,模块分明。

数据流模型:Source-Channel-Sink
事务机制保证了消息传递的可靠性
一、基本组件
Event:消息的基本单位,有header和body组成。header是键值对的形式,body是字节数组,存储具体数据
Agent:JVM进程,负责将一端外部来源产生的消息转发到另一端外部的目的地
- Source:从外部来源读取event,并写入channel
- Channel:event暂存组件,source写入后,event将会一直保存,直到被sink成功消费
- Sink:从channel读入event,并写入目的地

二、Flume常见数据流
简单数据流

复杂数据流1
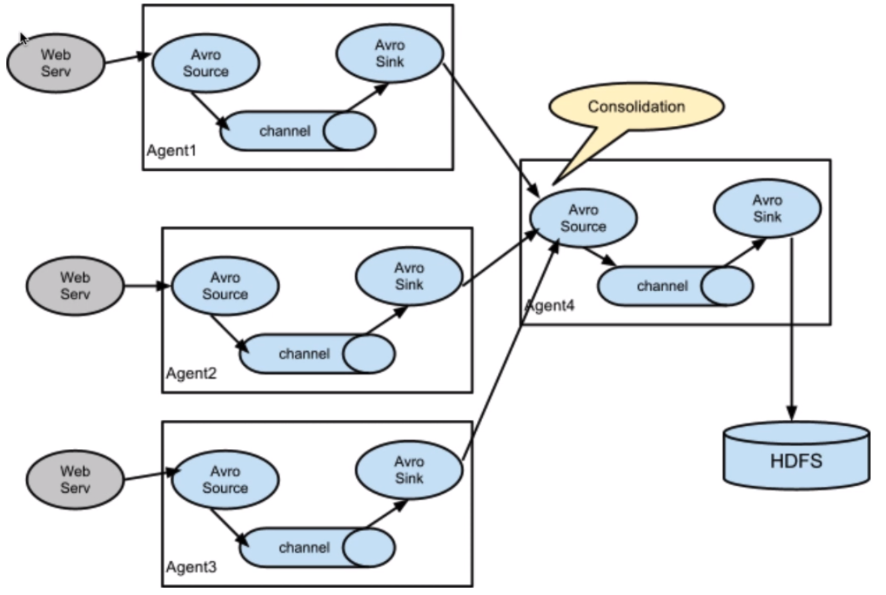
复杂数据流 2

三、完整的传输处理流程
一个event在一个agent中的传输处理流程如下:
source--interceptor--selector-->channel-->sink processor-->sink中心存储/下一级agent

除了source、channel和sink三个基本组件外,还有可选组件Intercptor、Selector和SinkProcessor
source从数据源中获取数据后封装为event,event包含header头信息和body
source收集到event需要发送到channel里临时存储
在发送到channel之前,如果配置了拦截器和选择器,
首先经过拦截器,拦截器可以处理event中的header信息,可以在header中添加消息处理的时间戳,还可以添加主机名称,一些静态值等等。也可以根据正则表达式对event进行过滤,决定哪些event可以继续向后进行传输,哪些删除终止。可以配置多个拦截器,多个拦截器顺序执行。
然后传给选择器,可以决定用哪种方式把event写入到channel当中
event存入sink之后,可以用SinkProcessor,根据配置可以选择故障转移处理器和负载均衡处理器,sink把event发送到中心存储或后续的agent
四、Source组件
对接各种外部数据源,将收集到的event发送到Channel中,一个source可以向多个channel发送event,Flume内置非常丰富的Source,同时用户可以自定义Source
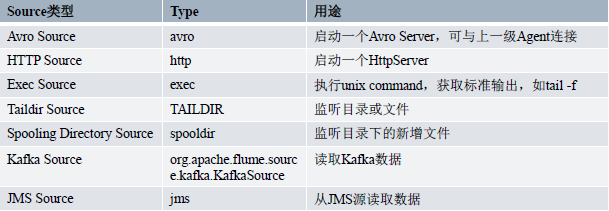
1.Avro Source
支持Avro协议,接收RPC事件请求。Avro Source通过监听Avro端口接收外部Avro客户端流事件(event),在Flume的多层架构中经常被使用接收上游Avro Sink发送的event
关键参数说明:
- type:类型名称avro
- bind:绑定的IP
- port:监听的端口
- threads:接收请求的线程数,当需要接收多个avro客户端的数据流时要设置合适的线程数,否则会造成avro客户端数据流积压。
- compression-type:是否使用压缩,如果使用压缩则设置为”deflate“,avro source一般用于多个Agent组成的数据流,接收来自avro sink的event,如果avro source设置了压缩,那么上一阶段的avro sink也要设置压缩,默认值none
- channels:Source对接的Channel名称
2.Exec Source
支持Linux命令,收集标准输出数据或者通过tail -f file的方式监听指定文件
可以实现实时的消息传递,但是它并不记录已经读取文件的位置,不支持断电续传,当Exec Source重启或者挂掉都会造成后续增加的消息丢失,一般在测试环境使用
关键参数:
- type:source类型为exec
- command:Linux命令
- channels:Source对接的Channel名称
在flume的conf目录中,建立source目录
创建avrosource.conf
avroagent.sources = r1
avroagent.channels = c1
avroagent.sinks = k1
avroagent.sources.r1.type = avro
avroagent.sources.r1.bind = 192.168.99.151
avroagent.sources.r1.port = 8888
avroagent.sources.r1.threads= 3
avroagent.sources.r1.channels = c1
avroagent.channels.c1.type = memory
avroagent.channels.c1.capacity = 10000
avroagent.channels.c1.transactionCapacity = 1000
avroagent.sinks.k1.type = logger
avroagent.sinks.k1.channel = c1
创建execsource.conf
execagent.sources = r1
execagent.channels = c1
execagent.sinks = k1
execagent.sources.r1.type = exec
execagent.sources.r1.command = tail -F /bigdata/log/exec/exectest.log
execagent.sources.r1.channels = c1
execagent.channels.c1.type = memory
execagent.channels.c1.capacity = 10000
execagent.channels.c1.transactionCapacity = 1000
execagent.sinks.k1.type = avro
execagent.sinks.k1.channel = c1
execagent.sinks.k1.hostname = 192.168.99.151
execagent.sinks.k1.port = 8888
## 1.exec和avro source演示
#两个agent组成的数据采集流程
execagent  -> avroagent

启动一个avrosource的agent
bin/flume-ng agent --conf conf --conf-file conf/source/avrosource.conf --name avroagent -Dflume.root.logger=INFO,console

启动一个execsource的agent,向avroagent以rpc的方式发送收集的数据
bin/flume-ng agent --conf conf --conf-file conf/source/execsource.conf --name execagent

监听/bigdata/log/exec/exectest.log文件
3.Spooling Directory Source
监听一个文件夹,收集文件夹下文件数据,收集完文件数据会将文件名称的后缀改为.COMPLETED
缺点不支持已存在文件新增数据的收集
关键参数:
- spoolDtype:source类型为spooldir
- spooDir:source监听的文件夹
- fileHeader:是否添加文件的绝对路径到event的header中,默认值false
- fileHeaderKey:添加到event header中文件绝对路径的键值,默认值false
- fileSuffix:收集完新的文件数据结合文件添加的后缀名称,默认值:.COMPLETED
- channels:Source对接的Channel名称
4.Taildir Source
监听一个文件夹或者文件,通过正则表达式匹配需要监听的数据源文件,Taildir Source通过将监听的文件位置写入到文件中来实现断点续传,并且能够保证没有重复数据的读取
关键参数:
type:source类型TAILDIR
positionFile:保存监听文件读取位置的文件(文件名和已经采集的位置)路径
idleTimeout:关闭空闲文件延迟时间,如果有新的记录添加到已关闭的空闲文件taildir source,将继续打开该空闲文件,默认值120000毫秒(2分钟)
writePosInterval:向保存数据位置文件中写入读取文件位置的时间间隔,默认值3000毫秒
batchSize:批量写入channel最大event数,默认值100
maxBackoffSleep:每次最后一次尝试没有获取到监听文件最新数据的最大延迟时间,默认值5000毫秒
cachePatternMatching:对应监听的文件夹下,通过正则表达式匹配的文件可能数量会很多,将匹配成功的监听文件列表、读取文件的顺序都提那就到缓存中,可以提高性能,默认值true
fileHeader:是否添加文件的绝对路径到event的header中,默认值false
flleHeaderKey:添加到vent header中文件绝对路径的键值,默认值是false
filegroups:监听的文件组列表,taildirsource通过文件组监听多个目录或文件
filegroups.<filegroupName>:使用正则表达式标识监听文件的路径
channels:Source对接的Channel名称
创建taildirsource.conf
taildiragent.sources = r1
taildiragent.channels = c1
taildiragent.sinks = k1
taildiragent.sources.r1.type = TAILDIR
taildiragent.sources.r1.positionFile = /bigdata/flume/taildir/position/taildir_position.json
taildiragent.sources.r1.filegroups = f1 f2
taildiragent.sources.r1.filegroups.f1 = /bigdata/taildir_log/test1/test.log
taildiragent.sources.r1.filegroups.f2 = /bigdata/taildir_log/test2/.*\\.log
taildiragent.sources.r1.channels = c1
taildiragent.channels.c1.type = memory
taildiragent.channels.c1.capacity = 10000
taildiragent.channels.c1.transactionCapacity = 1000
taildiragent.sinks.k1.type = logger
taildiragent.sinks.k1.channel = c1
运行
## 2.taildir source演示

bin/flume-ng agent --conf conf --conf-file conf/source/taildirsource.conf --name taildiragent -Dflume.root.logger=INFO,console
5.Kafka Source
对接分布式消息队列Kafka,作为Kafka的消费者持续从Kafka中拉取数据,如果多个Kafka source同时消费Kafka中同一个主题(topic),则Kafka source的Kafka.consumer.group.id应该设置成相同的组id,多个Kafka source之不会消费重复的数据,每一个source都会拉取topic下的不同数据
关键参数:
type:类型设置为kafkasource的类路径,org.apache.flume.source.kafka.KafkaSource
channels:Source对接的Channel名称
kafka.bootstrap.servers:Kafka broker列表,格式为ip1:port1,ip2:port2...,建议配置多个值提高容错能力,多个值之间用逗号隔开
kafka.topics:消费的topic名称
kafka.consumer.group.id:Kafka source所属组id,默认值flume
batchSize:批量写入channel的最大消息数,默认值1000
batchDurationMillis:等待批量写入channel的最长时间,这个参数和batchSize两个参数只有一个先满足都会触发批量写入channel操作,默认值1000毫秒
创建 kafkasource.conf
kafkasourceagent.sources = r1
kafkasourceagent.channels = c1
kafkasourceagent.sinks = k1
kafkasourceagent.sources.r1.type = org.apache.flume.source.kafka.KafkaSource
kafkasourceagent.sources.r1.channels = c1
kafkasourceagent.sources.r1.kafka.bootstrap.servers = 192.168.99.151:9092,192.168.99.152:9092,192.168.99.153:9092
kafkasourceagent.sources.r1.kafka.topics = flumetopictest1
kafkasourceagent.sources.r1.kafka.consumer.group.id = flumecg
kafkasourceagent.channels.c1.type = memory
kafkasourceagent.sinks.k1.type = logger
kafkasourceagent.sinks.k1.channel = c1
运行
## 3.kafka source演示
在kafka中创建主题
bin/kafka-topics.sh --create --zookeeper 192.168.99.151:2181 --replication-factor 1 --partitions 3 --topic flumetopictest
查看主题
bin/kafka-topics.sh --list --zookeeper 192.168.99.151:2181
向flumetopictest1发送消息
bin/kafka-console-producer.sh --broker-list 192.168.99.151:9092,192.168.99.152:9092,192.168.99.153:9092 --topic flumetopictest

#启动flume agent
bin/flume-ng agent --conf conf --conf-file conf/source/kafkasource.conf --name kafkasourceagent -Dflume.root.logger=INFO,console
五、Channel组件
channel被设计为event中转暂存区,存储Source收集并且没有被Sink消费的event,为了平衡source收集和sink读取数据的速度,可视为Flume内部的消息队列
channel是线程安全的并且具有事务性,支持source写失败重复写和sink读失败重复读等操作
常用的Channel类型:
Memory Channel
File Channel
Kafka Channel等
1.Memory Channel
使用内存作为Channel,Memory Channel读写速度快,但是存储数据量小,Flume进程挂掉、服务器停机或者重启都会导致数据丢失。部属Flume Agent的线上服务器内存资源充足、不关心数据丢失的场景下可以使用
参数说明:

2.File Channel
将event写入到磁盘文件中,与Memory Channel相比存储容量大,无数据丢失风险
Flume将Event顺序写入到File Channel文件的末尾,在配置文件中通过设置maxFileSize参数设置数据文件大小上限
当一个已关闭的只读数据文件中的Event被完全读取完成,并且Sink已经提交读取完成的事务,则Flume将删除存储该数据文件
参数说明:
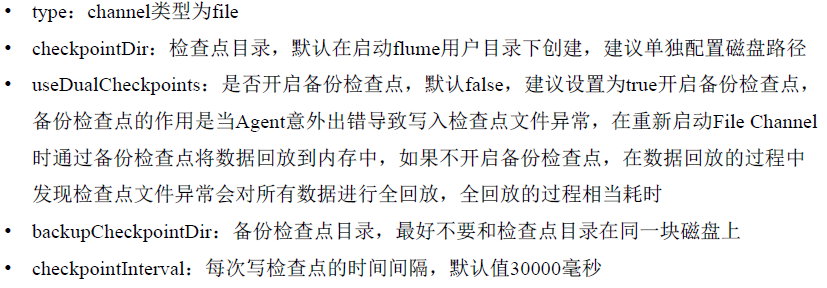

创建channel目录,创建filechannel.conf
a1.sources = r1
a1.channels = c1
a1.sinks = k1
a1.sources.r1.type = netcat
a1.sources.r1.bind = localhost
a1.sources.r1.port = 44444
a1.sources.r1.channels = c1
a1.channels.c1.type = file
a1.channels.c1.dataDirs = /bigdata/flume/filechannel/data
a1.channels.c1.checkpointDir = /bigdata/flume/filechannel/checkpoint
a1.channels.c1.useDualCheckpoints = true
a1.channels.c1.backupCheckpointDir = /bigdata/flume/filechannel/backup
a1.sinks.k1.type = logger
a1.sinks.k1.channel = c1
运行
## 1.file channel演示
在/bigdata/flume/filechannel目录手动创建backup、checkpoint、data文件夹

bin/flume-ng agent --conf conf --conf-file conf/channel/filechannle.conf --name a1 -Dflume.root.logger=INFO,console

使用telnet发送数据
telnet localhost 44444
3.Kafka Channel
将分布式消息队列Kafka作为channel
相比于Memory Channel和File Channel存储容量更大、容错能力更强,弥补了其他两种Channel的短板,如果合理利用Kafka的性能,能够达到事半功倍的效果
参数说明:
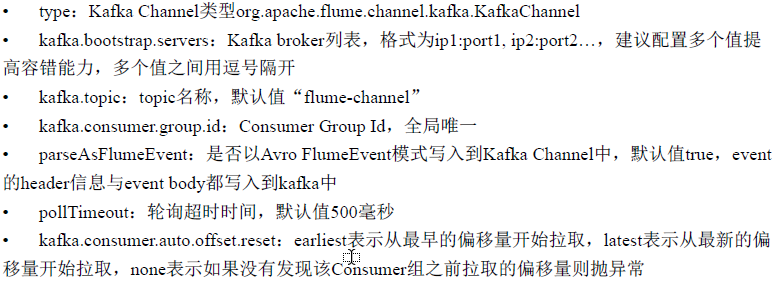
创建kafkachannel.conf
a1.sources = r1
a1.channels = c1
a1.sinks = k1
a1.sources.r1.type = netcat
a1.sources.r1.bind = localhost
a1.sources.r1.port = 44444
a1.sources.r1.channels = c1
a1.channels.c1.type = org.apache.flume.channel.kafka.KafkaChannel
a1.channels.c1.kafka.bootstrap.servers = 192.168.99.151:9092,192.168.99.152:9092,192.168.99.153:9092
a1.channels.c1.kafka.topic = flumechannel1
a1.channels.c1.kafka.consumer.group.id = flumecg1
a1.sinks.k1.type = logger
a1.sinks.k1.channel = c1
运行
## 2.kafka channel演示

bin/kafka-topics.sh --create --zookeeper 192.168.99.151:2181 --replication-factor 1 --partitions 3 --topic kafkachannel
查看主题
bin/kafka-topics.sh --list --zookeeper 192.168.99.151:2181

bin/flume-ng agent --conf conf --conf-file conf/channel/kafkachannel.conf --name a1 -Dflume.root.logger=INFO,console

使用telnet发送数据
telnet localhost 44444
六、Interceptor拦截器
Source经event写入到Channel之前调用拦截器
Source和Channel之间可以有多个拦截器,不同的拦截器使用不同的规则处理Event
可选、轻量级、可插拔的插件
通过实现Interceptor接口实现自定义的拦截器
内置拦截器:Timestamp Interceptor、Host Interceptor、UUID Interceptor、Static Interceptor、Regex Filtering Interceptor等

1.Timestmap Interceptor
Flume使用时间戳拦截器在event头信息中添加时间戳信息,Key为timestamp,Value为拦截器拦截Event时的时间戳
头信息时间戳的作用,比如HDFS存储的数据采用时间分区存储,Sink可以根据Event头信息中的时间戳将Event按照时间分区写入到HDFS
参数说明:

2.Host Intercepor
Flume使用主机拦截器在Event头信息中添加主机名称或者IP
主机拦截器的作用:比如Source将Event按照主机名称写入到不同的Channel中便于后续的Sink对不同Channel中的数据分开处理
参数说明:

3.Static Intercepor
Flume使用static interceptor静态拦截器在event头信息添加静态信息
参数说明:

七、Sink组件
从Channel消费event,输出到外部存储,或者输出到下一个阶段的agent
一个Sink只能从一个Channel中消费event
当Sink写出event成功后,会向Channel提交事务。Sink事务提交成功,处理完成的event将会被Channel删除。否则Channel会等待Sink重新消费处理失败的event
Flume提供了丰富的Sink组件,如Avro Sink、HDFS Sink、Kafka Sink、File Roll Sink、HTTP Sink等
1.Avro Sink
常用于对接下一层的Avro Source,通过发送RPC请求将Event发送到下一层的Avro Source
为了减少Event传输占用大量的网络资源,Avro Sink提供了端到端的批量压缩数据传输
参数说明:

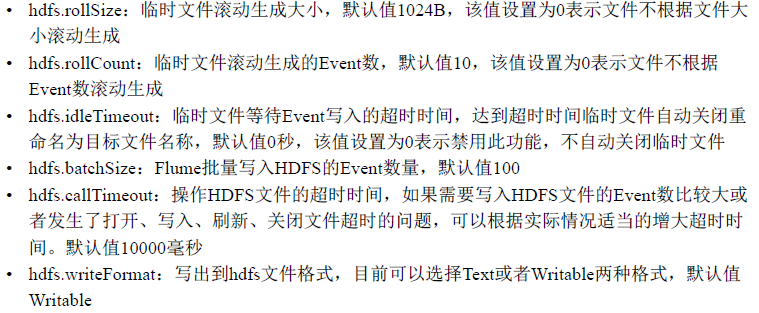
2.HDFS Sink
将Event写入到HDFS中持久化存储
提供了强大的时间戳转义功能,根据Event头信息中的timestamp时间戳信息转义成日期格式,在HDFS中以日期目录分层存储
参数说明:


创建HDFS目录,创建hdfssink.conf
a1.sources = r1
a1.channels = c1
a1.sinks = k1
a1.sources.r1.type = netcat
a1.sources.r1.bind = localhost
a1.sources.r1.port = 44444
a1.sources.r1.interceptors = i1
a1.sources.r1.interceptors.i1.type = timestamp
a1.sources.r1.channels = c1
a1.channels.c1.type = memory
a1.sinks.k1.type = hdfs
a1.sinks.k1.channel = c1
a1.sinks.k1.hdfs.path = /data/flume/%Y%m%d/%H%M
a1.sinks.k1.hdfs.filePrefix = hdfssink-
a1.sinks.k1.hdfs.fileSuffix = .log
a1.sinks.k1.hdfs.fileType = DataStream
a1.sinks.k1.hdfs.writeFormat = Text
a1.sinks.k1.hdfs.round = true
a1.sinks.k1.hdfs.roundValue = 2
a1.sinks.k1.hdfs.roundUnit = minute
a1.sinks.k1.hdfs.rollInterval = 30
a1.sinks.k1.hdfs.rollSize = 0
a1.sinks.k1.hdfs.rollCount = 0
运行
## 1.hdfs sink演示

bin/flume-ng agent --conf conf --conf-file conf/sink/hdfssink.conf --name a1 -Dflume.root.logger=INFO,console

使用telnet发送数据
telnet localhost 44444
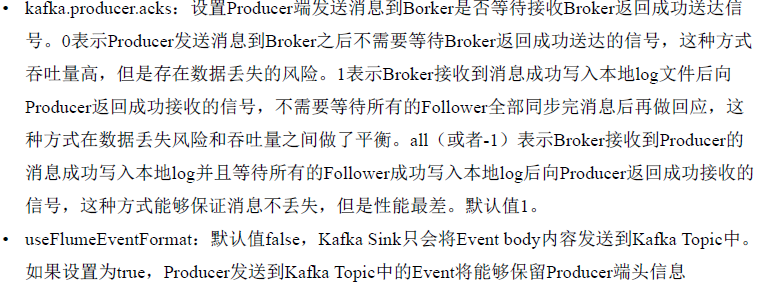
3.Kafka Sink
Flume通过KafkaSink将Event写入到Kafka指定的主题中
参数说明

创建kafkasink.conf
a1.sources = r1
a1.channels = c1
a1.sinks = k1
a1.sources.r1.type = netcat
a1.sources.r1.bind = localhost
a1.sources.r1.port = 44444
a1.sources.r1.channels = c1
a1.channels.c1.type = memory
a1.sinks.k1.type = org.apache.flume.sink.kafka.KafkaSink
a1.sinks.k1.channel = c1
a1.sinks.k1.kafka.topic = kafkasink
a1.sinks.k1.kafka.bootstrap.servers = 192.168.99.151:9092,192.168.99.152:9092,192.168.99.153:9092
a1.sinks.k1.kafka.flumeBatchSize = 100
a1.sinks.k1.kafka.producer.acks = 1
运行
## 2.kafka sink演示
创建主题FlumeKafkaSinkTopic1
bin/kafka-topics.sh --create --zookeeper 192.168.99.151:2181 --replication-factor 1 --partitions 3 --topic kafkasink
查看主题
bin/kafka-topics.sh --list --zookeeper 192.168.99.151:2181

bin/flume-ng agent --conf conf --conf-file conf/sink/kafkasink.conf --name a1 >/dev/null 2>&1 &

bin/kafka-console-consumer.sh --zookeeper 192.168.99.151:2181 --from-beginning --topic kafkasink

使用telnet发送数据
telnet localhost 44444
八、Selector选择器
Source将event写入到Channel之前调用拦截器,如果配置了Interceptor拦截器,则Selector在拦截器全部处理完之后调用。通过selector决定event写入Channel的方式
内置Replicating Channel Selector复制Channel选择器、Multiplexing Channel Selector复用Channel选择器
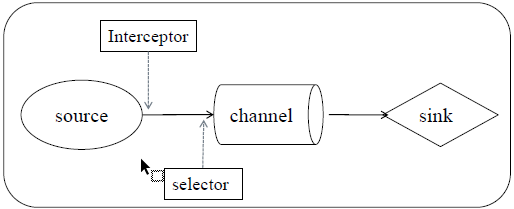
1.Replicating Channel Selector
如果Channel选择器没有指定,默认值。即一个Source以复制的方式将一个event同时写入到多个Channel中,不同的Sink可以从不同的Channel中获取相同的event
参数说明:

创建replicating_selector目录,创建replicating_selector.conf
a1.sources = r1
a1.channels = c1 c2
a1.sinks = k1 k2
#定义source
a1.sources.r1.type = netcat
a1.sources.r1.bind = localhost
a1.sources.r1.port = 44444
#设置复制选择器
a1.sources.r1.selector.type = replicating
#设置required channel
a1.sources.r1.channels = c1 c2
#设置channel c1
a1.channels.c1.type = memory
#设置channel c2
a1.channels.c2.type = memory
#设置kafka sink
a1.sinks.k1.channel = c1
a1.sinks.k1.type = org.apache.flume.sink.kafka.KafkaSink
a1.sinks.k1.kafka.topic = flumeselector
a1.sinks.k1.kafka.bootstrap.servers = 192.168.99.151:9092,192.168.99.152:9092
a1.sinks.k1.kafka.flumeBatchSize = 10
a1.sinks.k1.kafka.producer.acks = 1
#设置file sink
a1.sinks.k2.channel = c2
a1.sinks.k2.type = file_roll
a1.sinks.k2.sink.directory = /bigdata/flume/selector
a1.sinks.k2.sink.rollInterval = 60
运行
## 1.replicating selector演示

一个source将一个event拷贝到多个channel,通过不同的sink消费不同的channel,将相同的event输出到不同的地方
配置文件:replicating_selector.conf
分别写入到kafka和文件中

创建主题flumeselector
bin/kafka-topics.sh --create --zookeeper 192.168.99.151:2181 --replication-factor 1 --partitions 3 --topic flumeselector

启动flume agent
bin/flume-ng agent --conf conf --conf-file conf/replicating_selector/replicating_selector.conf --name a1

查看kafka FlumeSelectorTopic1主题数据
bin/kafka-console-consumer.sh --zookeeper 192.168.99.151:2181 --from-beginning --topic flumeselector

使用telnet发送数据
telnet localhost 44444

查看/bigdata/flume/selector路径下的数据
2.Multiplexing Channle Selector
多路复用选择器根据evetn的头信息中不同键值数据来判断Event应该被写入到哪个Channel中。
参数说明:

创建multiplexing_selector目录
创建avro_sink1.conf
agent1.sources = r1
agent1.channels = c1
agent1.sinks = k1
agent1.sources.r1.type = netcat
agent1.sources.r1.bind = localhost
agent1.sources.r1.port = 44444
agent1.sources.r1.interceptors = i1 // 拦截器
agent1.sources.r1.interceptors.i1.type = static // 动态
agent1.sources.r1.interceptors.i1.key = logtype // event头信息中添加静态信息,key是logtype
agent1.sources.r1.interceptors.i1.value = ad // 静态信息的value是ad
agent1.sources.r1.channels = c1
agent1.channels.c1.type = memory
agent1.sinks.k1.type = avro
agent1.sinks.k1.channel = c1
agent1.sinks.k1.hostname = 192.168.99.151 // 发送目标avrosource的IP
agent1.sinks.k1.port = 8888
创建avro_sink2.conf
agent2.sources = r1
agent2.channels = c1
agent2.sinks = k1
agent2.sources.r1.type = netcat
agent2.sources.r1.bind = localhost
agent2.sources.r1.port = 44445
agent2.sources.r1.interceptors = i1
agent2.sources.r1.interceptors.i1.type = static
agent2.sources.r1.interceptors.i1.key = logtype
agent2.sources.r1.interceptors.i1.value = search
agent2.sources.r1.channels = c1
agent2.channels.c1.type = memory
agent2.sinks.k1.type = avro
agent2.sinks.k1.channel = c1
agent2.sinks.k1.hostname = 192.168.99.151
agent2.sinks.k1.port = 8888
创建avro_sink3.conf
agent3.sources = r1
agent3.channels = c1
agent3.sinks = k1
agent3.sources.r1.type = netcat
agent3.sources.r1.bind = localhost
agent3.sources.r1.port = 44446
agent3.sources.r1.interceptors = i1
agent3.sources.r1.interceptors.i1.type = static
agent3.sources.r1.interceptors.i1.key = logtype
agent3.sources.r1.interceptors.i1.value = other
agent3.sources.r1.channels = c1
agent3.channels.c1.type = memory
agent3.sinks.k1.type = avro
agent3.sinks.k1.channel = c1
agent3.sinks.k1.hostname = 192.168.99.151
agent3.sinks.k1.port = 8888
创建multiplexing_selector.conf
a3.sources = r1
a3.channels = c1 c2 c3
a3.sinks = k1 k2 k3
a3.sources.r1.type = avro
a3.sources.r1.bind = 192.168.99.151
a3.sources.r1.port = 8888
a3.sources.r1.threads= 3
#设置multiplexing selector
a3.sources.r1.selector.type = multiplexing
a3.sources.r1.selector.header = logtype  // 设置header为logtype,在发送的event的头信息里,应该有logtype对应的键,选择器会从event头信息里找到logtype的键对应的值
#通过header中logtype键对应的值来选择不同的sink
a3.sources.r1.selector.mapping.ad = c1 // 当logtype对应的值是ad时,放在c1中
a3.sources.r1.selector.mapping.search = c2 // 当logtype是search的时候,放在c2中
a3.sources.r1.selector.default = c3
a3.sources.r1.channels = c1 c2 c3
a3.channels.c1.type = memory
a3.channels.c2.type = memory
a3.channels.c3.type = memory
#分别设置三个sink的不同输出
a3.sinks.k1.type = file_roll // 磁盘里滚动生成文件
a3.sinks.k1.channel = c1
a3.sinks.k1.sink.directory = /bigdata/flume/multiplexing/k1
a3.sinks.k1.sink.rollInterval = 60 // 滚动生成文件的时间是60秒
a3.sinks.k2.channel = c2
a3.sinks.k2.type = file_roll
a3.sinks.k2.sink.directory = /bigdata/flume/multiplexing/k2
a3.sinks.k2.sink.rollInterval = 60
a3.sinks.k3.channel = c3
a3.sinks.k3.type = file_roll
a3.sinks.k3.sink.directory = /bigdata/flume/multiplexing/k3
a3.sinks.k3.sink.rollInterval = 60
运行
## 2.multiplexing selector演示

配置文件multiplexing_selector.conf、avro_sink1.conf、avro_sink2.conf、avro_sink3.conf
向不同的avro_sink对应的配置文件的agent发送数据,不同的avro_sink配置文件通过static interceptor在event头信息中写入不同的静态数据
multiplexing_selector根据event头信息中不同的静态数据类型分别发送到不同的目的地

在/bigdata/flume/multiplexing目录下分别创建看k1 k2 k3目录

bin/flume-ng agent --conf conf --conf-file conf/multiplexing_selector/multiplexing_selector.conf --name a3 -Dflume.root.logger=INFO,console

bin/flume-ng agent --conf conf --conf-file conf/multiplexing_selector/avro_sink1.conf --name agent1 >/dev/null 2>&1 &
bin/flume-ng agent --conf conf --conf-file conf/multiplexing_selector/avro_sink2.conf --name agent2 >/dev/null 2>&1 &
bin/flume-ng agent --conf conf --conf-file conf/multiplexing_selector/avro_sink3.conf --name agent3 >/dev/null 2>&1 &

使用telnet发送数据
telnet localhost 44444
telnet localhost 44445
telnet localhost 44446
telnet 是source --> 根据不同端口发送给三个agent1、2、3 -->发送给a3
九、Sink Processor
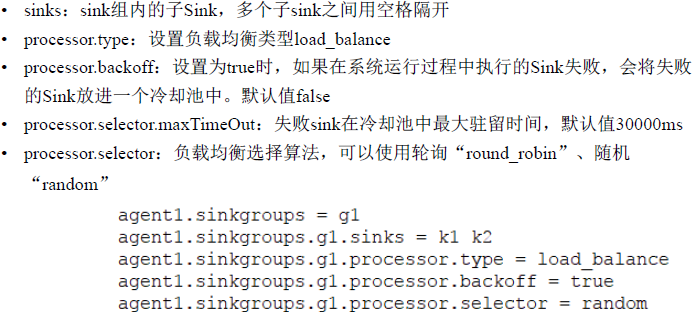
协调多个sink间进行load balance和failover

1.Load-Balance Sink Processor
负载均衡处理器
参数说明:
2.Failover Sink Processor
容错处理器,可定义一个sink优先级列表,根据优先级选择使用的sink
参数说明:

创建failover目录
创建collector1.conf
collector1.sources = r1
collector1.channels = c1
collector1.sinks = k1
collector1.sources.r1.type = avro
collector1.sources.r1.bind = 192.168.99.151
collector1.sources.r1.port = 8888
collector1.sources.r1.threads= 3
collector1.sources.r1.channels = c1
collector1.channels.c1.type = memory
collector1.sinks.k1.type = logger
collector1.sinks.k1.channel = c1
创建collector2.conf
collector2.sources = r1
collector2.channels = c1
collector2.sinks = k1
collector2.sources.r1.type = avro
collector2.sources.r1.bind = 192.168.99.151
collector2.sources.r1.port = 8889
collector2.sources.r1.threads= 3
collector2.sources.r1.channels = c1
collector2.channels.c1.type = memory
collector2.sinks.k1.type = logger
collector2.sinks.k1.channel = c1
创建failover.conf
agent1.sources = r1
agent1.channels = c1
agent1.sinks = k1 k2
agent1.sources.r1.type = netcat
agent1.sources.r1.bind = localhost
agent1.sources.r1.port = 44444
agent1.sources.r1.channels = c1
agent1.channels.c1.type = memory
agent1.sinkgroups = g1
agent1.sinkgroups.g1.sinks = k1 k2
agent1.sinkgroups.g1.processor.type = failover
agent1.sinkgroups.g1.processor.priority.k1 = 10
agent1.sinkgroups.g1.processor.priority.k2 = 5
agent1.sinks.k1.type = avro
agent1.sinks.k1.channel = c1
agent1.sinks.k1.hostname = 192.168.99.151
agent1.sinks.k1.port = 8888
agent1.sinks.k2.type = avro
agent1.sinks.k2.channel = c1
agent1.sinks.k2.hostname = 192.168.99.151
agent1.sinks.k2.port = 8889
运行
## 1.failover processor演示
分别启动两个collector agent
bin/flume-ng agent --conf conf --conf-file conf/failover/collector1.conf --name collector1 -Dflume.root.logger=INFO,console

bin/flume-ng agent --conf conf --conf-file conf/failover/collector2.conf --name collector2 -Dflume.root.logger=INFO,console


agent1通过failover方式,配置sink优先级列表,k1发送到collector1,k2发送到collector2。k1的优先级高于k2,所以在启动的时候
source将event发送到collector1,杀掉collector1,agent1会切换发送到collector2,实现高可用
bin/flume-ng agent --conf conf --conf-file conf/failover/failover.conf --name agent1 -Dflume.root.logger=INFO,console
agent1连接到collector1和collector2,collector1优先级高,先接收消息,当1崩了,collector2才接收消息,恢复collector1,会重新接收消息
3.Failover应用场景
分布式日志收集场景
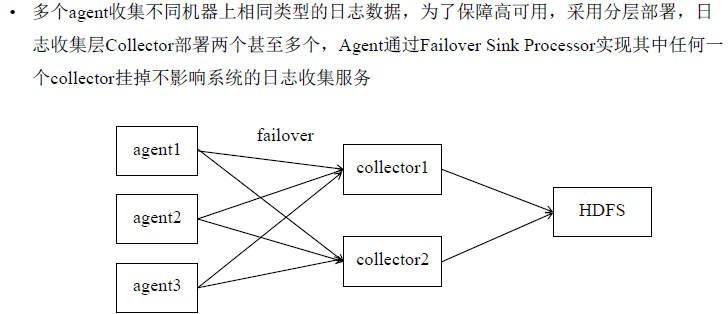
任何一个collector挂掉,会转发到另一个collector上
十、数据收集系统实现
单层日志收集架构
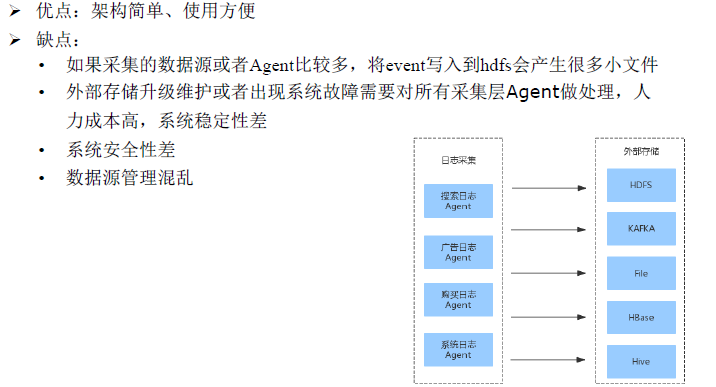
分层日志收集架构

案例flume+kafka
Producer
kafka0.10.2版本官方文档地址:http://kafka.apache.org/0102/documentation.html
1.在Maven项目的pom.xml文件中添加kafka客户端相关依赖,本项目使用的是kafka0.10版本的API
<properties>
    <kafka-version>0.10.2.0</kafka-version>
</properties>
<dependencies>
    <dependency>
        <groupId>org.apache.kafka</groupId>
        <artifactId>kafka-clients</artifactId>
        <version>${kafka-version}</version>
    </dependency>
</dependencies>
2.Producer生产逻辑
1)配置Producer相关参数
2)创建Producer实例
3)构建待发送的消息
4)发送消息
5)关闭Producer实例
3.Producer相关参数说明
Producer相关配置文档:http://kafka.apache.org/0102/documentation.html#producerconfigs
bootstrap.servers(必选项):通过该参数设置producer连接kafka集群所需的broker地址列表。
格式:host1:port1,host2:post2,...可以设置一个或者多个地址,中间用逗号隔开,该参数默认值是""。
注意:该参数值建议设置两个及以上broker地址,这样可以保障任意一个broker宕机不可用,producer还可以连接到kafka。可以不设置全部的broker地址,因为producer可以从给定的broker里查找其它broker信息。
key.serializer和value.serializer(必选项):这两个参数用于设置key和value的序列化器,producer需要通过序列化器将key和value序列化成字节数组通过网络发送到kafka。
kafka客户端内置的序列化器:String / Double / Long / Integer / ByteArray / ByteBuffer / Bytes
注意:在配置序列化器的时候,要写序列化器的全路径,如:org.apache.kafka.common.serialization.StringSerializer
client.id(可选项):用户设置客户端id,如果不设置,kafka客户端会自动生成一个非空字符串作为客户端id,自动生成的客户端id形式“producer-1”
acks(可选项):默认是值是1,可选值范围[all, -1, 0, 1]。用于设置Producer发送消息到Borker是否等待接收Broker返回成功送达信号。
0:表示Producer发送消息到Broker之后不需要等待Broker返回成功送达的信号,这种方式吞吐量高,但是存在数据丢失的风险,“retries”参数配置的发送消息失败重试次数将失效。
1:表示Broker接收到消息成功写入本地log文件后,向Producer返回成功接收的信号,不需要等待所有的Follower全部同步完消息后再做回应,这种方式在数据丢失风险和吞吐量之间做了平衡。
-1(或者all):表示Broker接收到Producer的消息成功写入本地log并且等待所有的Follower成功写入本地log后,向Producer返回成功接收的信号,这种方式能够保证消息不丢失,但是性能最差。
retries:Producer发送消息失败后的重试次数。默认值是0,即发送消息出现异常不做任何重试。
retry.backoff.ms:用来设置两次重试之间的时间间隔,默认值是100ms。
4.ProducerConfig工具类
注意:在平时的开发过程中,由于kafka的参数非常多,为了防止由于人为书写错误,导致参数名出错,kafka客户端提供了ProducerConfig工具类,在ProducerConfig工具类中定义个kafka相关的各种参数。
ProducerConfig的定义如下:

5.kafka客户端代码请参考本课时资料中的ProducerClient.java文件
在ProducerClient类中定义了4个客户端发送消息的方法,每个方法实现了一种发送消息的方法,可以参考ProducerClient类的具体实现,学习kafka Producer Java API的使用。
package bigdata.kafka;


import org.apache.kafka.clients.producer.*;
import org.apache.kafka.common.serialization.StringSerializer;

import java.util.Properties;
import java.util.concurrent.ExecutionException;

public class ProducerClient {
    //broker列表
    public static final String brokers = "192.168.196.130:9092, 192.168.196.131:9092, 192.168.196.132:9092";
    //producer要发送的主题名称
    public static final String topic = "topic_producer_client1";

    /**
     * 初始化配置kafka producer客户端相关参数
     * @return
     *  Properties对象
     */
    public static Properties initConfig(){
        Properties props = new Properties();
        //设置bootstrap.servers参数值,producer客户端连接的borker地址列表
        props.put(ProducerConfig.BOOTSTRAP_SERVERS_CONFIG, brokers);

        //防止参数的键和值由于人为原因写错,可以使用kafka客户端内置的工具类进行优化

        //设置key和value使用String类型的序列化器

        //props.put("key.serializer", "org.apache.kafka.common.serialization.StringSerializer");
        //下一行代码是等价设置
        props.put(ProducerConfig.KEY_SERIALIZER_CLASS_CONFIG, StringSerializer.class.getName());

        //props.put("value.serializer", "org.apache.kafka.common.serialization.StringSerializer");
        //下一行代码是等价设置
        props.put(ProducerConfig.VALUE_SERIALIZER_CLASS_CONFIG, StringSerializer.class.getName());

        //(可选项)设置客户端等待接收Broker返回成功送达信号的方式
        //props.put("acks","1");
        //下一行代码是等价设置
        props.put(ProducerConfig.ACKS_CONFIG,"1");

        //(可选项)设置客户端发送消息失败后的重试次数
        props.put(ProducerConfig.RETRIES_CONFIG,"3");

        //(可选项)设置producer客户端id
        props.put(ProducerConfig.CLIENT_ID_CONFIG,"producer.client.id.test1");

        return props;
    }

    /**
     * key为空的情况,producer客户端向kafka指定主题发送value
     * 客户端发送消息方式:异步,无回调函数
     * @param topic :主题名称
     * @param value :发送的value值
     */
    public void sendMessage(String topic,String value){
        //1)配置Producer相关参数
        Properties props = initConfig();
        //2)创建Producer实例
        KafkaProducer<String, String> producer = new KafkaProducer<String,String>(props);
        //3)构建待发送的消息ProducerRecord,ProducerRecord<String, String>泛型中的两个String类型指的是Key和Value的类型
        ProducerRecord record = new ProducerRecord<String, String>(topic,value);
        //4)发送消息
        producer.send(record);//send方法默认是异步发送消息
        //5)关闭Producer实例
        producer.close();
    }

    /**
     * key为空的情况,producer客户端向kafka指定主题发送value
     * 客户端发送消息方式:异步,有回调函数
     * @param topic :主题名称
     * @param value :发送的value值
     */
    public void sendMessageCallback(String topic,String value){
        //1)配置Producer相关参数
        Properties props = initConfig();
        //2)创建Producer实例
        KafkaProducer<String, String> producer = new KafkaProducer<String,String>(props);
        //3)构建待发送的消息ProducerRecord,ProducerRecord<String, String>泛型中的两个String类型指的是Key和Value的类型
        ProducerRecord record = new ProducerRecord<String, String>(topic,value);
        //4)发送消息
        //异步发送消息,通过自定义回调函数处理消息发送后等待服务端响应
        producer.send(record, new Callback() {
            @Override
            public void onCompletion(RecordMetadata recordMetadata, Exception e) {
                if(e != null){
                    //如果发送消息发生异常,打印出异常信息
                    e.printStackTrace();
                }else{
                    //打印发送成功的消息的元数据信息
                    System.out.println("topic:" + recordMetadata.topic());
                    System.out.println("partition:" + recordMetadata.partition());//消息被发送到的分区号
                    System.out.println("offset:" + recordMetadata.offset());//消息在分区中的偏移量
                }
            }
        });

        //5)关闭Producer实例
        producer.close();
    }

    /**
     * key不为空的情况,producer客户端向kafka指定主题发送value
     * 客户端发送消息方式:异步
     * @param topic :主题名称
     * @param key :发送的key值
     * @param value :发送的value值
     */
    public void sendMessage(String topic,String key,String value){
        Properties props = initConfig();
        KafkaProducer<String, String> producer = new KafkaProducer<String,String>(props);
        ProducerRecord record = new ProducerRecord<String, String>(topic,key,value);
        producer.send(record);
        producer.close();
    }

    /**
     * key不为空的情况,producer客户端向kafka指定主题发送value
     * 客户端发送消息方式:同步
     * @param topic :主题名称
     * @param key :发送的key值
     * @param value :发送的value值
     */
    public void sendMessageSync(String topic,String key,String value){
        Properties props = initConfig();
        KafkaProducer<String, String> producer = new KafkaProducer<String,String>(props);
        ProducerRecord record = new ProducerRecord<String, String>(topic,key,value);
        try {
            //在调用完send方法后链式地调用get方法,会同步阻塞,等待消息发送成功或者发生异常
            producer.send(record).get();
        } catch (InterruptedException e) {
            e.printStackTrace();
        } catch (ExecutionException e) {
            e.printStackTrace();
        }
        producer.close();
    }
    public static void main(String[] args) {
        ProducerClient producer = new ProducerClient();

        //调用不需要传key的发送消息的方法
        producer.sendMessage(topic,"hello kafka 1"); //异步发送消息,没有设置回调函数
        producer.sendMessageCallback(topic,"hello kafka callback1"); //异步发送消息,并设置回调函数

        //调用传入自定义key值的发送消息的方法
        producer.sendMessage(topic,"key2","hello kafka 2");//异步发送消息
        producer.sendMessageSync(topic,"key3","hello kafka sync 2");//同步发送消息
    }
}
Consumer
package bigdata.kafka;

import org.apache.kafka.clients.consumer.ConsumerConfig;
import org.apache.kafka.clients.consumer.ConsumerRecord;
import org.apache.kafka.clients.consumer.ConsumerRecords;
import org.apache.kafka.clients.consumer.KafkaConsumer;
import org.apache.kafka.clients.producer.ProducerConfig;
import org.apache.kafka.common.TopicPartition;
import org.apache.kafka.common.serialization.StringDeserializer;

import java.util.Arrays;
import java.util.Properties;
import java.util.concurrent.atomic.AtomicBoolean;

public class ConsumerClient {
    public static final String brokers = "192.168.196.130:9092,192.168.196.131:9092,192.168.196.132:9092";
    public static final String groupId = "cg1";
    public static final AtomicBoolean isRunning = new AtomicBoolean(true);

    /**
     * 配置consumer相关参数
     * @return
     */
    public static Properties initConfig(){
        Properties props = new Properties();
        //设置bootstrap.servers参数值,consumer客户端连接的borker地址列表
        props.put(ProducerConfig.BOOTSTRAP_SERVERS_CONFIG, brokers);

        //防止参数的键和值由于人为原因写错,可以使用kafka客户端内置的工具类进行优化

        //设置key和value使用String类型的反序列化器

        //props.put("key.deserializer", "org.apache.kafka.common.serialization.StringDeserializer");
        //下一行代码是等价设置
        props.put(ConsumerConfig.KEY_DESERIALIZER_CLASS_CONFIG, StringDeserializer.class.getName());

        //props.put("value.deserializer", "org.apache.kafka.common.serialization.StringDeserializer");
        //下一行代码是等价设置
        props.put(ConsumerConfig.VALUE_DESERIALIZER_CLASS_CONFIG, StringDeserializer.class.getName());

        //consumer组id
        props.put(ConsumerConfig.GROUP_ID_CONFIG,groupId);

        return props;
    }

    /**
     * 从订阅的主题中拉取消息消费,自动提交offset
     * @param topic 订阅的主题
     */
    public void pollMessage(String topic){
        //1)配置consumer相关参数
        Properties props = initConfig();

        //2)创建Consumer实例
        KafkaConsumer<String,String> consumer = new KafkaConsumer<String, String>(props);

        //3)订阅主题
        consumer.subscribe(Arrays.asList(topic));

        //4)拉取消息并消费
        //通过重复轮询的方式,consumer客户端通过poll方法从订阅的topic中拉取消息
        while(isRunning.get()){
            //在poll方法中需要传入一个timeout超时时间(单位毫秒),timeout超时时间用来控制poll方法的阻塞时间
            ConsumerRecords<String,String> records = consumer.poll(500);
            System.out.println("拉取到的消息个数:" + records.count());

            for(ConsumerRecord<String,String> record : records){
                System.out.println("topic:" + record.topic());
                System.out.println("partition:" + record.partition());
                System.out.println("offset:" + record.offset());
                System.out.println("value:" + record.value());
            }
        }

        //5)提交消费的消息偏移量(offset),默认consumer客户端每隔5秒自动提交offset

        //6)关闭消费者实例
        consumer.close();
    }

    /**
     * 按照分区处理消息,自动提交offset
     * @param topic 订阅的主题
     */
    public void pollMessageDealByPartition(String topic){
        //1)配置consumer相关参数
        Properties props = initConfig();

        //2)创建Consumer实例
        KafkaConsumer<String,String> consumer = new KafkaConsumer<String, String>(props);

        //3)订阅主题
        consumer.subscribe(Arrays.asList(topic));

        //4)拉取消息并消费
        while(isRunning.get()){
            ConsumerRecords<String,String> records = consumer.poll(500);
            System.out.println("拉取到的消息个数:" + records.count());
            //按照分区处理消息
            for(TopicPartition partition : records.partitions()){
                System.out.println(">>>>>>>>> 正在处理的partition = " + partition.partition());
                //处理每个分区里的消息
                for(ConsumerRecord<String,String> record : records.records(partition)){
                    System.out.println("topic:" + record.topic());
                    System.out.println("partition:" + record.partition());
                    System.out.println("offset:" + record.offset());
                    System.out.println("value:" + record.value());
                }
            }
        }

        //5)提交消费的消息偏移量(offset),默认consumer客户端每隔5秒自动提交offset

        //6)关闭消费者实例
        consumer.close();
    }

    public static void main(String[] args) {
        String topic = "topic_client1";
        ConsumerClient consumer = new ConsumerClient();
        // 测试1:从订阅的主题中拉取消息消费,自动提交offset
        // consumer.pollMessage(topic);

        // 测试2:从订阅的主题中拉取消息,按照分区处理消息,自动提交offset
        // consumer.pollMessageDealByPartition(topic);
    }
}
Consumer客户端消费逻辑步骤
1)配置Consumer相关参数
2)创建Consumer实例
3)订阅主题
4)拉取消息并消费
5)提交已消费的消息的偏移量
6)关闭Consumer实例
Consumer相关参数说明
1)bootstrap.servers
(必选项)通过该参数设置producer连接kafka集群所需的broker地址列表。
格式:host1:port1,host2:post2,...可以设置一个或者多个地址,中间用逗号隔开,该参数默认值是""。
2)group.id
(必选项)消费者所属的消费者组id,默认值为“”。
3)key.deserializer和value.deserializer
(必选项)这两个参数用于设置key和value的反序列化器,consumer需要通过反序列化器将key和value反序列化成原对象格式。
注意在配置序列化器的时候,要写序列化器的全路径,如:org.apache.kafka.common.serialization.StringDeserializer
4)auto.offset.reset
当一个新的消费者组被建立,之前没有这个新的消费者组消费的offset记录。或者之前存储的某个Consumer已消费的offset被删除了,查询不到该Consumer已消费的offset。诸如上述的两种情况,消费者找不到已消费的offset记录时,就会根据客户端参数auto.offset.reset参数的配置来决定从哪里开始消费。
该参数默认值是“latest”,表示从分区的末尾开始消费消息。
如果设置值为“earliest”,表示从从分区的最早的一条消息开始消费。
如果设置值为“none”,表示从如果查询不到该消费者已消费的offset,就抛出异常。
Consumer客户端消费消息的方式
Kafka Consumer采用从指定topic拉取消息的方式消费数据,并不是kafka服务器主动将消息推送给Consumer。Consumer通过不断地轮询,反复调用poll方法从订阅的主题的分区中拉取消息。
poll方法定义:public ConsumerRecords<K, V> poll(long timeout)
调用poll方法时需要传入long类型的timeout超时时间,单位毫秒,返回值是拉取到的消息的集合ConsumerRecords。timeout超时时间用来控制poll方法的阻塞时间,当poll方法拉取到消息时,会直接将拉取到的数据集返回;当使用poll方法没有拉取到消息时,则poll方法阻塞等待订阅的主题中有新的消息可以消费,直到到达超时时间。
消息偏移量offset
在kafka的分区中,每条消息都有一个唯一的offset,用来表示消息在分区中的位置。消费者使用offset来表示消费到分区中的某个消息所在的位置,并且消费者要保存已消费消息的offset,消费者下次拉取新消息会从已消费的offset之后拉取。
Kafka Consumer默认是由客户端自动提交offset,在kafka老的版本中将Consumer已消费的offset保存在Zookeeper中,在Kafka0.10版本之后将已消费的消息的offset保存在kafka的__consumer_offsets中。Consumer客户端通过enable.auto.commit参数设置是否自动提交offset,默认值是true自动提交。自动提交的时间间隔由auto.commit.interval.ms参数控制,默认值是5秒。所以Consumer客户端默认情况下是每隔5秒钟提交一次已消费的消息的offset。


