Android Material Design 之 Toolbar的使用
Material Design是谷歌提出来的最新ui设计规范,我想actionbar大家也许并不陌生,toolbar简单而言可以看做为actionbar的升级版,相比较actionbar而言,toolbar可以随处放,显得比较自由,下面我们来看一下如何使用toolbar:
在 Android studio的编译环境中:
1:需要v7包的支持在build.gradle里面导入v7jar包
dependencies {
    compile fileTree(dir: 'libs', include: ['*.jar'])
    compile 'com.android.support:appcompat-v7:23.1.1'
}
2.在style 里面将主题里面的action bar给屏蔽掉
<style name="AppBaseTheme" parent="Theme.AppCompat.Light.NoActionBar">
        <!-- toolbar(actionbar)颜色 -->
        <item name="colorPrimary">#4876FF</item>
        <!-- 状态栏颜色 -->
        <item name="colorPrimaryDark">#3A5FCD</item>
        <!-- 窗口的背景颜色 -->
        <item name="android:windowBackground">@android:color/white</item>
    </style>
3.在xml布局中 定义toolbar,一般情况,我们都是单独一个布局,在其他需要的布局中直接include 就ok了
<android.support.v7.widget.Toolbar xmlns:android="http://schemas.android.com/apk/res/android"
    xmlns:app="http://schemas.android.com/apk/res/com.example.toolbar"
    android:id="@+id/toolbar"
    android:layout_width="match_parent"
    android:layout_height="wrap_content"
    android:background="?attr/colorPrimary"
    android:minHeight="?attr/actionBarSize"
    app:popupTheme="@style/ThemeOverlay.AppCompat.Light"
    app:theme="@style/ThemeOverlay.AppCompat.ActionBar" >
   android:fitsSystemWindows="true"
</android.support.v7.widget.Toolbar>
4.在activity里设置用 setSupportActionBar 设定,Toolbar即能取代原本的 actionbar 了
private Toolbar mToolbar;
    @Override
    protected void onCreate(Bundle savedInstanceState) {
        super.onCreate(savedInstanceState);

        mToolbar=(Toolbar)findViewById(R.id.toolbar);
        setSupportActionBar(mToolbar);
        //设置是否有返回箭头
        getSupportActionBar().setDisplayHomeAsUpEnabled(true);

    }
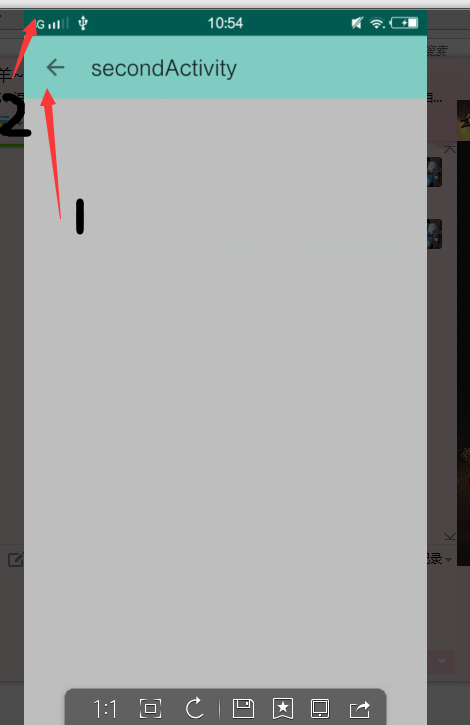
到这一步基本就可以出来效果了 如下图:2代表的是,使用的是沉浸式状态栏,下一篇会提到

1代表返回箭头,如何让toolbar 上显示返回箭头,有两种方式,在对应actvity里面定义(建议这些操作放在baseActivity里面)
第一种:在Androidmanifest里面直接定义它的父activity,子activity就会显示返回箭头
 <activity
            android:name=".secondActivity"
            android:label="@string/title_activity_second"
            android:parentActivityName=".MainActivity">
            <!-- Parent activity meta-data to support 4.0 and lower -->
           目前支持4.0以上的,meta-data是为了让低版本也支持
            <meta-data
                android:name="android.support.PARENT_ACTIVITY"
                android:value=".MainActivity" />
        </activity>
第二种:代码设置,有的时候我们会出现一种布局多用的情况,这时候,他的父activity就不只一个了,这个时候,我们就不能像第一种那样设置 了,我们需要在代码里面设置
在父类activity里面设置:
Intent intent= new Intent(this);
intent.putString("parent_activity_name",getClass().getSimpleName());getClass().getSimpleName()获取当前类名
tostarActivityf(SuccessfulActivity.class, intent);
在子activity里面复写getSupportParentActivityIntent()方法
@Override
    public Intent getSupportParentActivityIntent() {
       Intent parentIntent = getIntent();
        String className = parentIntent.getStringExtra("parent_activity_name");
        Intent newIntent = null;
        try {
            //you need to define the class with package name
            newIntent = new Intent(SuccessfulActivity.this, Class.forName(getPackageName() + className));
        } catch (ClassNotFoundException e) {
            e.printStackTrace();
        }
        return newIntent;
    }
我自己测试了一下,感觉这个方法好像没有调用,也许是我在baseActivity里面重写以下方法,将他直接finish,大家可以研究一下。
  @Override
    public boolean onOptionsItemSelected(MenuItem item) {
        switch (item.getItemId()) {
            //重写ToolBar返回按钮的行为,防止重新打开父Activity重走生命周期方法
            case android.R.id.home:
                finish();
                return true;
        }
        return super.onOptionsItemSelected(item);
    }


