

ros micro-ros 自定义消息接口
本节课最终效果是:通过自定义的服务接口控制开发板上的OLED显示器的内容。
ros2 service call /oled_control fishbot_interfaces/srv/OledControl "{px: 0, py: 0 ,data: 'oled control by service~'}"
一、新建工程添加依赖
新建example14_custom_interface ,注意请不要将工程放置于文档目录下,因为自定义接口编译时目录拼接存在Bug
修改platformio.ini
[env:featheresp32]
platform = espressif32
board = featheresp32
framework = arduino
lib_deps =
    https://gitee.com/ohhuo/micro_ros_platformio.git
    adafruit/Adafruit SSD1306@^2.5.7
这里除了添加micro_ros库之外再添加oled驱动库。
二、添加自定义接口
添加自定义接口一共需要三步。
1.创建extra_packages文件夹并创建接口功能包
2.编译功能包(主要为了测试功能包是否正常)
3.删除.pio/libdeps/featheresp32/micro_ros_platformio/libmicroros文件夹,重新编译
2.1 创建功能包
在工程的主目录下创建extra_packages文件夹,接着在文件夹下创建fishbot_interfaces功能包
cd example14_custom_interface
mkdir extra_packages
cd extra_packages
ros2 pkg create fishbot_interfaces
接着添加服务接口文件并修改CMakeLists.txt
文件extra_packages/fishbot_interfaces/srv/OledControl.srv
int32 px
int32 py
string data
---
int32 result
文件extra_packages/fishbot_interfaces/CMakeLists.txt
cmake_minimum_required(VERSION 3.5)
project(fishbot_interfaces)


if(CMAKE_COMPILER_IS_GNUCXX OR CMAKE_CXX_COMPILER_ID MATCHES "Clang")
  add_compile_options(-Wall -Wextra -Wpedantic)
endif()

# find dependencies
find_package(ament_cmake REQUIRED)
# uncomment the following section in order to fill in
# further dependencies manually.
# find_package(<dependency> REQUIRED)

if(BUILD_TESTING)
  find_package(ament_lint_auto REQUIRED)
  # the following line skips the linter which checks for copyrights
  # uncomment the line when a copyright and license is not present in all source files
  #set(ament_cmake_copyright_FOUND TRUE)
  # the following line skips cpplint (only works in a git repo)
  # uncomment the line when this package is not in a git repo
  #set(ament_cmake_cpplint_FOUND TRUE)
  ament_lint_auto_find_test_dependencies()
endif()

find_package(rosidl_default_generators REQUIRED)

rosidl_generate_interfaces(${PROJECT_NAME}
  "srv/OledControl.srv"
 )

ament_package()
2.2 编译功能包
cd extra_packages/
colcon build
2.3 重新编译工程
编译前需要删除.pio/libdeps/featheresp32/micro_ros_platformio/libmicroros文件夹,使用Ctrl+Alt+B重新重新编译工程。

三、编写代码
和两数相加服务相似的代码,只不过更换了接口并添加了OLED的驱动。
#include <Arduino.h>
#include <micro_ros_platformio.h>

#include <rcl/rcl.h>
#include <rclc/rclc.h>
#include <rclc/executor.h>
#include <micro_ros_utilities/string_utilities.h>

#include "Wire.h"
#include <Adafruit_GFX.h>     // 加载Adafruit_GFX库
#include <Adafruit_SSD1306.h> // 加载Adafruit_SSD1306库

#include <fishbot_interfaces/srv/oled_control.h> // 添加接口

rclc_executor_t executor;
rclc_support_t support;
rcl_allocator_t allocator;
rcl_node_t node;
// 定义服务
rcl_service_t service;

// 服务请求和返回消息定义
fishbot_interfaces__srv__OledControl_Request req;
fishbot_interfaces__srv__OledControl_Response res;

Adafruit_SSD1306 display;

// 服务回调函数
void service_callback(const void *req, void *res)
{
  fishbot_interfaces__srv__OledControl_Request *req_in = (fishbot_interfaces__srv__OledControl_Request *)req;
  fishbot_interfaces__srv__OledControl_Response *res_in = (fishbot_interfaces__srv__OledControl_Response *)res;
  // 计算sum
  display.clearDisplay();                    // 清空屏幕
  display.setCursor(req_in->px, req_in->py); // 设置开始显示文字的坐标
  display.println(req_in->data.data);        // 输出的字符
  display.display();
  res_in->result = 0;
}

void setup()
{
  Serial.begin(115200);
  // 设置通过串口进行MicroROS通信
  set_microros_serial_transports(Serial);
  // 延时时一段时间,等待设置完成
  delay(2000);
  // 初始化内存分配器
  allocator = rcl_get_default_allocator();
  // 创建初始化选项
  rclc_support_init(&support, 0, NULL, &allocator);
  // 创建节点 hello_microros
  rclc_node_init_default(&node, "example14_interface", "", &support);
  // 使用默认配置创建服务
  rclc_service_init_default(&service, &node, ROSIDL_GET_SRV_TYPE_SUPPORT(fishbot_interfaces, srv, OledControl), "/oled_control");
  // 创建执行器
  rclc_executor_init(&executor, &support.context, 1, &allocator);
  // 执行器添加服务
  rclc_executor_add_service(&executor, &service, &req, &res, service_callback);
  // 重要,为string类型消息分配空间
  req.data = micro_ros_string_utilities_init_with_size(100);

  /*========================OLED初始化====================================*/
  Wire.begin(18, 19);
  display = Adafruit_SSD1306(128, 64, &Wire);
  display.begin(SSD1306_SWITCHCAPVCC, 0x3C); // 设置OLED的I2C地址
  display.clearDisplay();                    // 清空屏幕
  display.setTextSize(1);                    // 设置字体大小
  display.setCursor(0, 0);                   // 设置开始显示文字的坐标
  display.setTextColor(SSD1306_WHITE);       // 设置字体颜色
  display.println("hello fishros!");         // 输出的字符
  display.display();
}

void loop()
{
  delay(100);
  // 循环处理数据
  rclc_executor_spin_some(&executor, RCL_MS_TO_NS(100));
}
四、代码讲解
这里对新增的几行主要代码进行讲解
#include <micro_ros_utilities/string_utilities.h> 添加string工具类
req.data = micro_ros_string_utilities_init_with_size(100); 使用string类型内存分配工具为data分配100字节e的空间
主要就是这两部分,值得注意的是,如果不提前为string类型的数据分配内容空间,最终会导致无法正常接收数据。
五、下载测试
5.1 编译下载
连接开发板,编译下载。

5.2 启动Agent
接着打开终端启动agent
sudo docker run -it --rm -v /dev:/dev -v /dev/shm:/dev/shm --privileged --net=host microros/micro-ros-agent:$ROS_DISTRO serial --dev /dev/ttyUSB0 -v
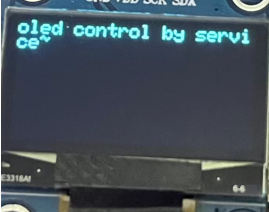
点击下RST按钮,重启开发板,正常可以看到下图内容

5.3 查看是否连通
接着打开终端查看节点和话题
ros2 node list
ros2 service list

4.4 测试控制
进入extra_packages,source环境
source install/setup.bash
显示nihao
ros2 service call /oled_control fishbot_interfaces/srv/OledControl "{px: 0, py: 0 , data: 'nihao'}"

ros2 service call /oled_control fishbot_interfaces/srv/OledControl "{px: 0, py: 0 ,data: 'oled control by service~'}"

六、总结
本节通过使用自定义服务接口控制oled显示的例程,学习了如何在工程中添加自己的功能包和接口文件。下一节我们将学习如何让开发板的时间和上位机的时间进行同步。

 浙公网安备 33010602011771号