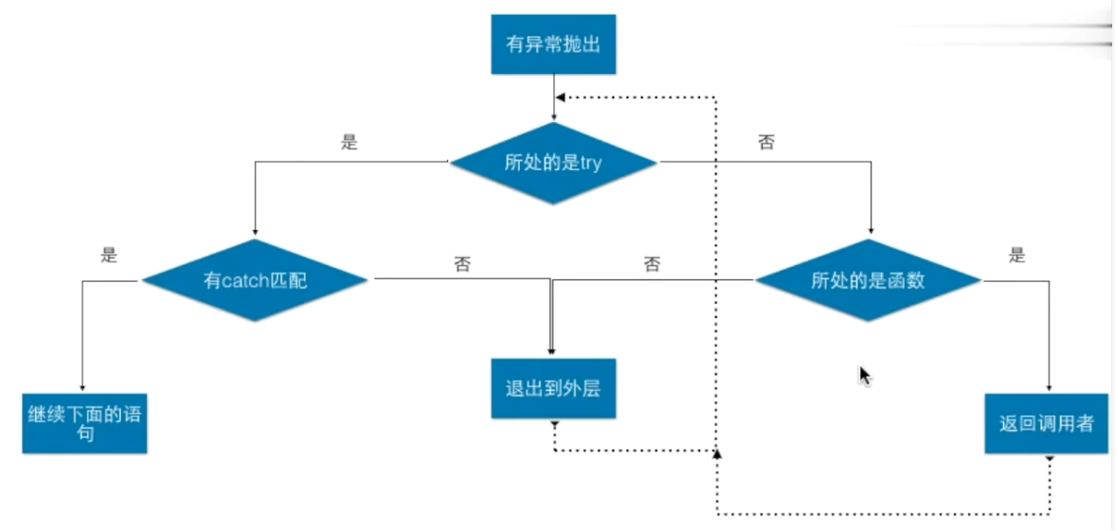
异常捕捉机制和捕捉到的异常
- 异常捕捉机制格式:
try{
//程序代码块
}catch(Type1 id1){
//处理Type1异常的代码
}catch(Type2 id2){
//处理Type2异常的代码
}catch(Type3 id3){
//处理Type3异常的代码
}
try后面可以跟多个catch处理不同异常的解决方案

    public static void  f(){
        int[] arr = new int[10];
        arr[10] = 10;
    }
    public static void main(String[] args) {
        try {
            f();
        } catch (Exception e) {
            System.out.println("b");
        }
        System.out.println("main");
    }
在这段代码中,我们在try中调用了函数,他会通过函数中抛出的异常去执行相匹配的catch
- 异常捕捉机制:
捕捉到的异常
public static void  f(){
    int[] arr = new int[10];
    arr[10] = 10;
}
public static void main(String[] args) {
    try {
        f();
    } catch (Exception e) {
        System.out.println("b");
        System.out.println(e.getMessage());
        System.out.println(e);
        e.printStackTrace();
    }
    System.out.println("main");
}
如果我们捕捉到了异常e,我们可以将e这个值直接输出,通过e.getMessage()来获取哪个值报的异常,也可以通过e.printStackTrace()来获取异常的全部信息

try {
            f();
        } catch (Exception e) {
            System.out.println("b");
            System.out.println(e.getMessage());
            System.out.println(e);
            e.printStackTrace();
            throw e;
        }
我们也可以通过throw e将异常再次抛出

 浙公网安备 33010602011771号