HTTP认证
1.开启插件
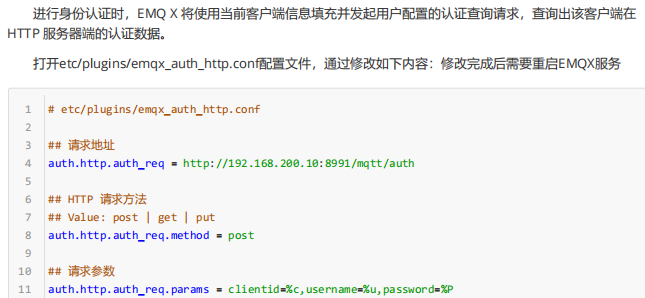
HTTP 认证使用外部自建 HTTP 应用认证数据源,根据 HTTP API 返回的数据判定认证结果,能够实现复杂的认证鉴权逻辑。启用该功能需要将 emqx_auth_http 插件启用,并且修改该插件的配置文件,在里面指定HTTP认证接口的url。 emqx_auth_http 插件同时还包含了ACL的功能,我们暂时还用不上,通过注释将其禁用。
1:在Dashboard中中开启 emqx_auth_http 插件,同时为了避免误判我们可以停止通过username,clientID
进行认证的插件 emqx_auth_clientid , emqx_auth_username
2.认证原理
EMQ X 在设备连接事件中使用当前客户端相关信息作为参数,向用户自定义的认证服务发起请求查询权限,通过返回的 HTTP 响应状态码 (HTTP statusCode) 来处理认证请求。
- 认证失败:API 返回 4xx 状态码
- 认证成功:API 返回 200 状态码
- 忽略认证:API 返回 200 状态码且消息体 ignore
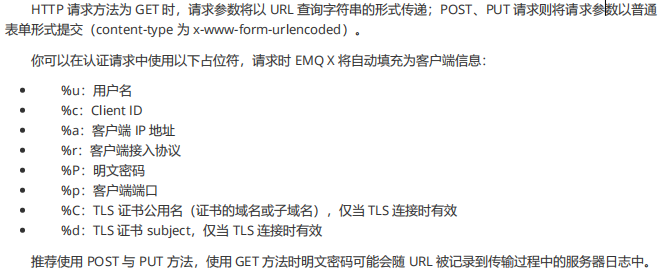
3.HTTP请求信息
# etc/plugins/emqx_auth_http.conf
## 重试设置
auth.http.request.retry_times = 3
auth.http.request.retry_interval = 1s
auth.http.request.retry_backoff = 2.0
4.认证请求


5.认证服务开发
创建基于springboot2.3.0.RELEASE的应用程序: emq-demo
1.pom.xml
<dependencies>
    <dependency>
        <groupId>org.springframework.boot</groupId>
        <artifactId>spring-boot=starter-wen</artifactId>
    </dependency>
    <dependency>
        <groupId>org.springframework.boot</groupId>
        <artifactId>spring-boot-devtools</artifactId>
        <scope>runtime</scope>
        <optional>true</optional>
    </dependency>
    <dependency>
        <groupId>org.springframework.boot</groupId>
        <artifactId>spring-boot-configuration-processor</artifactId>
        <optional>true</optional>
    </dependency>
    <dependency>
        <groupId>org.springframework.boot</groupId>
        <artifactId>spring-boot-starter-test</artifactId>
        <scope>test</scope>
        <exclusions>
            <exclusion>
                <groupId>org.junit.vintage</groupId>
                <artifactId>junit-vintage-engine</artifactId>
            </exclusion>
        </exclusions>
    </dependency>
</dependencies>
<build>
    <plugins>
        <plugin>
            <groupId>org.springframework.boot</groupId>
            <artifactId>spring-boot-maven-plugin</artifactId>
        </plugin>
    </plugins>
</build>
  2.创建application.yml
  server:
    port: 8991
  spring:
    application:
      name: emq-demo

  3.创建Controller:AuthController
@RestController
@RequestMapping("/mqtt")
public class AuthController {
    private static final Logger log = LoggerFactory.getLogger(AuthController.class);
    private HashMap<String,String> users;
    @PostConstruct
    public void init(){
        users = new HashMap<>();
        users.put("user","123456");
        users.put("emq-client2","123456");
        users.put("emq-client3","123456");
    }
    @PostMapping("/auth")
    public ResponseEntity auth(@RequestParam("clientid") String clientid,
                               @RequestParam("username") String username,
                               @RequestParam("password") String password){
        log.info("emqx http认证组件开始调用任务服务完成认证,clientid={},username={},password={}",clientid,username,password);
        String value = users.get(username);
        if(StringUtils.isEmpty(value)){
            return new ResponseEntity(HttpStatus.UNAUTHORIZED);
        }
        if(!value.equals(password)){
            return new ResponseEntity(HttpStatus.UNAUTHORIZED);
        }
        return new ResponseEntity(HttpStatus.OK);
    }
}
6.MQTTX客户端验证

这个地方的Client-ID随便输入,因为在验证的代码里没有对该字段做校验,之后点连接,发现会连接成功,然后可以去自定义的认证服务中查看控制台输出,证明基于外部的http验证接口生效了。在实际项目开发过程中,HTTP接口校验的代码不会这么简单,账号和密码之类的数据肯定会存在后端数据库中,代码会通过传入的数据和数据库中的数据做校验,如果成功才会校验成功,否则校验失败。
当然EMQ X除了支持我们之前讲过的几种认证方式外,还支持其他的认证方式,比如:MySQL认证、PostgreSQL认证、Redis认证、MongoDB认证,对于其他这些认证方式只需要开启对应的EMQ X插件并且配置对应的配置文件,将对应的数据保存到相应的数据源即可。


