Vue2.5 去哪儿 app实战总结
技术栈:
Vue:Vue Vue-router Vuex Vue-cli
插件:vue-awesome-swiper better-scroll axios
Css: stylus
Api: 静态json数据
项目结构
首页部分:
iconfont引入和使用
图片轮播组件
图标区域轮播组件的使用
axios获取接口数据
组件间数据传递
城市选择也部分
字母表布局
better-scroll的使用
函数节流实现列表性能优化
搜索逻辑实现
Vuex实现数据共享
LocalStorage实现页面数据存储
keep-alive 优化路由性能
详情页部分
Banner布局
动态路由配置
公用画廊组件拆分
实现fixed header渐隐渐现效果
递归组件实现详情类别
transition slot插槽实现animation简单动画效果
项目依赖包
fastClick:处理click 300ms延迟
npm i fastclick --save
在main.js引入 import FastClick form ‘fastclick’
FastClick.attach(document.body) // 使用
stylus:css预处理
下载 stylus 和 stylus-loader --save
vue-awesome-swiper:实现轮播插件 npm i vue-awesome-swiper --save 本项目使用2.6.7的版本
在main.js引入 import VueAwesomeAwiper form ‘vue-awesome-swiper’
axios:第三方交互插件 npm i axios --save
哪里使用哪里引入 import Axios form ‘axios’
better-scroll:实现滚动插件 npm i better-scroll --save
哪里使用哪里引入 import BScroll form ‘better-scroll’
首页
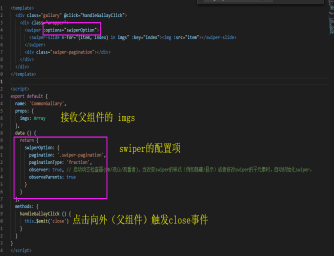
HomeSwiper : 使用vue-awesome-swiper轮播插件
<swiper :options=“swiperOption></swiper>
在data里写swiperOption:{} 根据swiper3的api设置配置项
HomeIcons:使用swiper实现多页自动分页功能
computed: {
    pages () {
      const pages = []
      this.iconsList.forEach((item, index) => {
        const page = Math.floor(index / 8)
        if (!pages[page]) {
          pages[page] = []
        }
        pages[page].push(item)
      })
      return pages
    }
  }
index-ajax:使用axios进行ajax请求
gitignore设置:添加文件目录,推送到仓库是,忽略添加的文件
设置json数据,开发环境转发代理
设置 config 文件夹下的 index.js
设置 module.exports 下 dev 的 proxyTable 代理
webpack-dev-server 工具会自动将 /api 替换成 /static/data
城市页
router-link:实现页面跳转
<router-link to='/'> 返回根目录 </router-link>
City-list使用better-scroll插件实现上下滚动效果
html结构外层需写 ref=‘wrapper’
在文件里引入
import BScroll from 'better-scroll'

 mounted () {
    this.scroll = new BScroll(this.$refs.wrapper)
  },
city-ajax:同home-ajax 获取数据,并在其他组件中使用
获取数据分布等于data中定义的cities{} hotCities:[]
并在各个组件中绑定数据
<city-header></city-header>
    <city-search :cities="cities"></city-search>
    <list :cities="cities" :hotCities="hotCities" :letter="letter"></list>
    <city-alphabet :cities="cities" @change="handleLetterChange"></city-alphabet>
在各个组件中使用props介绍这些数据 在html中使用这些接收的数据 以list.vue为例
    <div class="area">
        <div class="title border-topbottom">
          热门城市
        </div>
        <div class="button-list">
          <div class="button-wrapper" v-for="item in hotCities" :key="item.id" @click="handleCityClick(item.name)">
              <div class="button">{{item.name}}</div>
          </div>
        </div>
      </div>
      <div class="area" v-for="(citiesItem, key) of cities" :key="key" :ref="key">
        <div class="title border-topbottom">
          {{key}}
        </div>
        <div class="item-list" v-for="item in citiesItem" :key="item.id" @click="handleCityClick(item.name)">
            <div class="item">
              {{item.name}}
            </div>
        </div>
      </div>
City-alphabet:26个字母,要获取 city-list的数据(兄弟组件间的联动)
子组件Alphabet.vue数据传递给父组件city.vue,通过父组件city.vue传递给子组件list.vue
<template>
  <ul class="alphabet">
    <li
      class="alphabetItem"
      v-for="item of letters"
      :key="item"
      :ref="item"
      @touchstart.prevent="handleTouchStart"
      @touchmove="handleTouchMove"
      @touchend="handleTouchEnd"
      @click="handleLetterClick"
    >
      {{item}}
    </li>
  </ul>
</template>
在city.vue中箭头change事件
<city-alphabet :cities="cities" @change="handleLetterChange"></city-alphabet>
在 methods 中定义事件 handleLetterClick,传递 letter 参数。
  methods: {
    handleLetterChange (letter) {
      this.letter = letter
    }
  },
并在 data 中定义数据 letter。
  data () {
    return {
      cities: {},
      hotCities: [],
      letter: ''  // Alphabet 通过 change 事件传递过来的数据
    }
  }
并传递给list.vue
<list :cities="cities" :hotCities="hotCities" :letter="letter"></list>
然后在list.vue子组件props中接收letter
 props: {
    cities: Object,
    hotCities: Array,
    letter: String
  },
并通过watch监听letter的变化
 watch: {
    letter () {
      this.scroll.scrollToElement(this.$refs[this.letter][0])
    }
  }
alphabet滑动逻辑:
上下滑动时,取字母位置的逻辑
获取A字母距离顶部高度
滑动时,取当前位置距离顶部高度
计算差值,得到当前手指位置与A字母顶部差值
差值除以每个字母的高度,得出当前的字母,触发change事件给外部
<template>
  <ul class="alphabet">
    <li
      class="alphabetItem"
      v-for="item of letters"
      :key="item"
      :ref="item"
      @touchstart.prevent="handleTouchStart"
      @touchmove="handleTouchMove"
      @touchend="handleTouchEnd"
      @click="handleLetterClick"
    >
      {{item}}
    </li>
  </ul>
</template>

<script>
export default {
  name: 'CityAlphabet',
  props: {
    cities: Object
  },
  data () {
    return {
      touchStatus: false,
      startY: 0,
      timer: null
    }
  },
  updated () {
    this.startY = this.$refs['A'][0].offsetTop
  },
  computed: {
    letters () {
      const letters = []
      for (let i in this.cities) {
        letters.push(i)
      }
      return letters
    }
  },
  methods: {
    handleLetterClick (e) {
      this.$emit('change', e.target.innerText)
    },
    handleTouchStart () {
      this.touchStatus = true
    },
    handleTouchMove (e) {
      if (this.touchStatus) {
        if (this.timer) {
          clearTimeout(this.timer)
        }
        this.timer = setTimeout(() => {
          const touchY = e.touches[0].clientY - 83
          const index = Math.floor((touchY - this.startY) / 20)
          if (index >= 0 && index < this.letters.length) {
            this.$emit('change', this.letters[index])
          }
        }, 16)

      }
    },
    handleTouchEnd () {
      this.touchStatus = false
    }
  }
}
</script>
city-search搜索功能逻辑
使用v-model做双向绑定
在data中定义keyword(搜索的内容)keywordList(要显示的内容)、timer(做节流优化)
<template>
  <div>
    <div class="search">
      <input v-model="keyword" class="search-input" type="text" placeholder="输入城市名或拼音">
    </div>
    <div class="search-content" ref="search" v-show="keyword">
      <ul>
        <li class=" search-item border-bottom" v-for="item of keywordList" :key="item.id" @click="handleCityClick(item.name)">{{item.name}}</li>
        <li class="search-item" v-show="!keywordList.length">
          没有匹配数据
        </li>
      </ul>
    </div>
  </div>
</template>

<script>
import BScroll from 'better-scroll'
import { mapMutations } from 'vuex'
export default {
  name: 'CitySearch',
  props: {
    cities: Object
  },
  data () {
    return {
      keyword: '',
      keywordList: [],
      timer: null
    }
  },
  watch: {
    keyword () {
      if (!this.keyword) {
        this.keywordList = []
      }
      if (this.timer) {
        clearTimeout(this.timer)
      }
      this.timer = setTimeout(() => {
        const result = []
        for (let i in this.cities) {
          this.cities[i].forEach((value) => {
            if (value.name.indexOf(this.keyword) > -1 || value.spell.indexOf(this.keyword) > -1) {
              result.push(value)
            }
          })
        }
        this.keywordList = result
      }, 100)
    }
  },
  methods: {
    handleCityClick (city) {
      this.changeCity(city)
      this.$router.push('/')
    },
    ...mapMutations(['changeCity'])
  },
  mounted () {
    this.scroll = new BScroll(this.$refs.search)
  }
}
</script>
使用Vuex实现数据共享npm i vuex --save
创建文件夹 store,建index.js,state里放置全局公用数据city
import Vue from 'vue'
import Vuex from 'vuex'
Vue.use(Vuex)
export default new Vuex.Store({

  state: {

    city: '上海'

  },

  mutations: {

    changeCity (state, city) {

      state.city = city

    }

  }

})
在main.js中引入store
import store from './store' //引入 store
new Vue({
el: '#app',
router: router,
store: store, //传递进入根实例的 store
components: { App },
template: '<App/>'
})
在list.vue和search.vue组件中的城市选项绑定click事件handleCityClick
@click="handleCityClick(item.name)
在methods中:
  methods: {
    handleCityClick (city) {
      console.log(city)
      this.$store.commit('changeCity', city) // 通过commit提交mutation
     // this.changeCity(city)
      this.$router.push('/')   // 点击之后跳到home页
    },
   // ...mapMutations(['changeCity'])
  },
localStorage的使用 store index.js
export default new Vuex.Store({
state: {
city: localStorage.city || '上海'
},
mutations: {
changeCity (state, city) {
state.city = city
localStorage.city = city
}
}
})
有可能当用户使用隐身模式或禁用 localStorage,会导致浏览器报错。所以建议使用 try catch 进行优化
let defalutCity = '上海'

try {

  if (localStorage.city) {

    defaultCity = localStorage.city

  }

} catch (e) {}


export default new Vuex.Store({

  state: {

    city: defaultCity

  },

  mutations: {

    changeCity (state, city) {

      state.city = city

      try {

        localStorage.city = city

      } catch (e) {}

    }

  }

})
Keep-alive 优化 :作用是把数据放到内存中,下次使用是无需重新加载组件,从内存中拿出以前的内容显示就可以了
在本项目中,<keep-alive></keeo-alive>中包裹这<router-view/>意思是路由内的内容被加载一次之后,把路由的内容放到了内存中,下次使用无需再次加载(导致页面切换时,不同城市,请求的数据是一样的,在network中可以查看)
两种解决方法:1、使用activated生命周期构造
在home.vue中,定义lastCity:‘’
  data () {
    return {
      swiperList: [],
      iconsList: [],
      weekendList: [],
      recommendList: [],
      lastCity: ''
    }
  },
  mounted () {
    this.lastCity = this.city
    this.getHomeInfo()
  },
 activated () {
    if (this.lastCity !== this.city) {
      this.lastCity = this.city
      this.getHomeInfo()
    }
  },
方法2、
 <keep-alive exclude="Detail">  // exclude =“”表示那个页面不被缓存

      <router-view/>

  </keep-alive>
详情页 :to实现动态路由
<router-link tag="div"

    class="recommend-list border-bottom"

    v-for="item in itemList"

    :key="item.id"

    :to="'/detail/' + item.id"

></router-link>
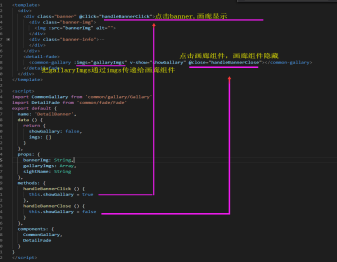
全局画廊组件
新建common 用来放置全局组件,建立gallary.vue画廊组件,并在build/webpack.base.conf.js 中进行路径别名(alias)执行的设置
‘common’: resolve(‘src/common’)
画廊组件:
在banner.vue中引入画廊组件调用
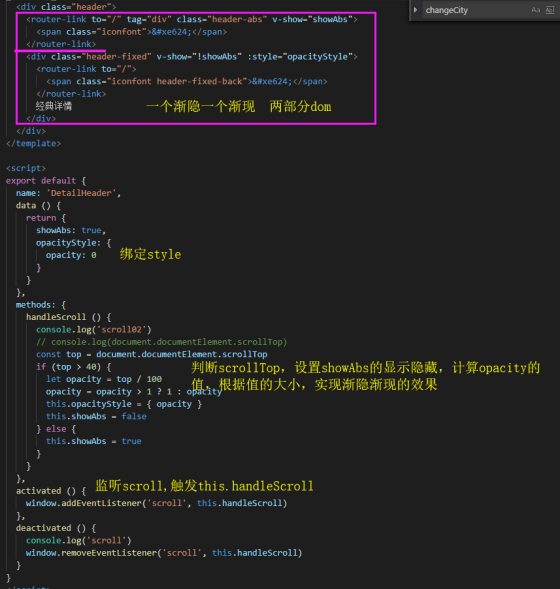
header.vue渐隐渐现效果实现
递归组件:
之所以在组件当中需要一个 name 属性,也是为了方便在组件自身调用自身出现递归的时候便于调用。下面可以看到,在下一个 div 标签中做一个 v-if 判断,如果存在 item.children。就把 item.children 当做 list 再传递给自身,进行递归调用。
<template>

  <div class="lists">

    <div class="item" v-for="(item, index) of list" :key="index">

      <div class="item-title border-bottom">

        <span class="item-title-icon"></span>

        {{item.title}}

      </div>

      <div v-if="item.children">

        <detail-list :list="item.children"></detail-list>

      </div>

    </div>

  </div>

</template>

<script>

export default {

  name: 'DetailList',

  props: {

    list: Array

  }

}
解决exclude带来的bug
在app.vue中使用了exclude,那么在Detail下的Header.vue中就不会执行activated构造,但是会执行created钩子。这是header的渐隐渐现效果就不显示了,所以在监听scroll的事件中,把scroll写到created中,就可以解决这个bug了
 created () {

    window.addEventListener('scroll', this.handleScroll)

  }
解决每次切换页面,页面不在顶部的bug
在main.js中引入一下代码
router.afterEach((to, from, next) => {
  // to and from are both route objects.
  window.scrollTo(0, 0)
})

《虽然官网有其他解决方法在router文件夹里的index.js里写scrollBehavior(to,from,savedPosition){return {x:0,y:0}}但是我写了没有用》
animation动画效果
在common中新建fade.vue
<template>
  <div class="fade">
    <transition>
      <slot></slot>
    </transition>
  </div>
</template>

<script>
export default {
  name: 'DetailFade'
}
</script>

<style lang="stylus" scoped>
  .v-enter, .v-leave-to
    opacity 0
  .v-enter-active, .v-leave-active
    transition opacity .5s
</style>
在其他组件使用的时候直接引入此组件,并在<detail-fade></detail-fade>中包裹需要animation的内容即可 如:
<detail-fade>
      <common-gallary :imgs="gallaryImgs" v-show="showGallary" @close="handleBannerClose"></common-gallary>
</detail-fade>
再下就是接口联调,不做总结了
项目源码 地址:https://github.com/adongP/Travel ,https://gitee.com/adong2269/Travel(第一次用码云,不知道能不能下载) 下载之后,运行的时候把localhost改成电脑的ip地址,可以访问,或者在package.json中找到--host 0.0.0.0 去掉正常运行
多谢指教

 浙公网安备 33010602011771号