Spring 事件监听机制及原理分析
欢迎大家关注我的个人博客—精灵王,获取更好的阅读体验以及最新的文章分享~
简介
在JAVA体系中,有支持实现事件监听机制,在Spring 中也专门提供了一套事件机制的接口,方便我们实现。比如我们可以实现当用户注册后,给他发送一封邮件告诉他注册成功的一些信息,比如用户订阅的主题更新了,通知用户注意及时查看等。
观察者模式
观察者模式还有很多其他的称谓,如发布-订阅(Publish/Subscribe)模式、模型-视图(Model/View)模式、源-监听器(Source/Listener)模式或从属者(Dependents)模式。观察者模式定义了一种一对多的依赖关系,让多个观察者对象同时监听某一个主题对象。这个主题对象在状态上发生变化时,会通知所有观察者对象,使它们能够自动更新自己。
观察者模式一般包含以下几个对象:
Subject:
被观察的对象。它提供一系列方法来增加和删除观察者对象,同时它定义了通知方法notify()。目标类可以是接口,也可以是抽象类或具体类。
ConcreteSubject:
具体的观察对象。Subject的具体实现类,在这里实现通知事件。
Observer:
观察者。这里是抽象的观察者,观察者有一个或者多个。
ConcreteObserver:
具体的观察者。在这里维护观察对象的具体操作。
Java 中的事件机制
Java中提供了基本的事件处理基类:
- EventObject:所有事件状态对象都将从其派生的根类;
- EventListener:所有事件侦听器接口必须扩展的标记接口;
非常经典的开门案例:
一、创建事件对象
@Getter
@Setter
public class DoorEvent extends EventObject{

    int state;

    public DoorEvent(Object source){
        super(source);
    }
    public DoorEvent(Object source,int state){
        super(source);
        this.state = state;
    }
}
二、事件监听器
public interface DoorListener extends EventListener{
    void doorEvent(DoorEvent doorEvent);
}
public class CloseDoorEvent implements DoorListener{
    @Override
    public void doorEvent(DoorEvent doorEvent){
        if(doorEvent.getState() == -1){
            System.out.println("门关上了");
        }
    }
}
public class OpenDoorListener implements DoorListener{
    @Override
    public void doorEvent(DoorEvent doorEvent){
        if(doorEvent.getState() == 1){
            System.out.println("门打开了");
        }
    }
}
三、测试
public static void main(String[] args){
    List<DoorListener> list = new ArrayList<>();
    list.add(new OpenDoorListener());
    list.add(new CloseDoorEvent());
    for(DoorListener listener : list){
        listener.doorEvent(new DoorEvent(-1,-1));
        listener.doorEvent(new DoorEvent(1,1));
    }
}
四、输出结果
门打开了
门关上了
Spring 中的事件机制
在 Spring 容器中通过ApplicationEven类和 ApplicationListener接口来实现事件监听机制,每次Event 被发布到Spring容器中时都会通知该Listener。需要注意的是,Spring 的事件默认是同步的,调用 publishEvent 方法发布事件后,它会处于阻塞状态,直到Listener接收到事件并处理返回之后才继续执行下去。
代码示例:
一、定义事件对象
@Getter
@Setter
@ToString
public class UserDTO extends ApplicationEvent{
    private Integer userId;
    private String name;
    private Integer age;

    public UserDTO(Object source){
        super(source);
    }
}
二、定义事件监听器,可以通过注解或者实现接口来实现。
@Component
public class UserRegisterSmsListener{

    // 通过注解实现监听器
    @EventListener
    public void handleUserEvent(UserDTO userDTO){
        System.out.println("监听到用户注册,准备发送短信,user:"+userDTO.toString());
    }
}

// 通过实现接口实现监听器
@Component
public class UserRegisterEmailListener implements ApplicationListener<UserDTO>{
    @Override
    public void onApplicationEvent(UserDTO userDTO){
        System.out.println("监听到用户注册,准备发送邮件,user:" + userDTO.toString());
    }
}
@Component
public class UserRegisterMessageListener implements ApplicationListener<UserDTO>{
    @Override
    public void onApplicationEvent(UserDTO userDTO){
        System.out.println("监听到用户注册,给新用户发送首条站内短消息,user:" + userDTO.toString());
    }
}
三、注册服务
public interface UserService{
    void register();
}
@Service
public class UserServiceImpl implements UserService{
    @Autowired
    private ApplicationEventPublisher eventPublisher;
    @Override
    public void register(){
        UserDTO userDTO = new UserDTO(this);
        userDTO.setAge(18);
        userDTO.setName("精灵王jingling.im");
        userDTO.setUserId(1001);
        System.out.println("register user");
        eventPublisher.publishEvent(userDTO);
    }
}
四、测试
@Autowired
private UserService userService;

@Test
public void testUserEvent(){
    userService.register();
}
五、输出结果
register user
监听到用户注册,准备发送短信,user:UserDTO(userId=1001, name=精灵王jingling.im, age=18)
监听到用户注册,准备发送邮件,user:UserDTO(userId=1001, name=精灵王jingling.im, age=18)
监听到用户注册,给新用户发送首条站内短消息,user:UserDTO(userId=1001, name=精灵王jingling.im, age=18)
指定监听器的顺序
监听器的发布顺序是按照 bean 自然装载的顺序执行的,Spring 支持两种方式来实现有序
一、实现SmartApplicationListener接口指定顺序。
把上面三个Listener都改成实现SmartApplicationListener接口,并指定getOrder的返回值,返回值越小,优先级越高。
@Component
public class UserRegisterMessageListener implements SmartApplicationListener{

    @Override
    public boolean supportsEventType(Class<? extends ApplicationEvent> eventType){
        return eventType == UserDTO.class;
    }

    @Override
    public boolean supportsSourceType(Class<?> sourceType){
        return true;
    }

    @Override
    public void onApplicationEvent(ApplicationEvent event){
        System.out.println("监听到用户注册,给新用户发送首条站内短消息,user:" + event.toString());
    }

    @Override
    public int getOrder(){
        return -1;
    }
}
另外两个监听器的改造省略,指定改造后的UserRegisterSmsListener返回order为0,UserRegisterEmailListener的getOrder返回1,测试输出结果如下:
register user
监听到用户注册,给新用户发送首条站内短消息,user:UserDTO(userId=1001, name=精灵王jingling.im, age=18)
监听到用户注册,准备发送短信,user:UserDTO(userId=1001, name=精灵王jingling.im, age=18)
监听到用户注册,准备发送邮件,user:UserDTO(userId=1001, name=精灵王jingling.im age=18)
二、使用注解@Order()
@Component
public class UserRegisterSmsListener{

    @Order(-2)
    @EventListener
    public void handleUserEvent(UserDTO userDTO){
        System.out.println("监听到用户注册,准备发送短信,user:"+userDTO.toString());
    }
}
测试输出结果如下:
register user
监听到用户注册,准备发送短信,user:UserDTO(userId=1001, name=精灵王jingling.im, age=18)
监听到用户注册,给新用户发送首条站内短消息,user:UserDTO(userId=1001, name=精灵王jingling.im, age=18)
监听到用户注册,准备发送邮件,user:UserDTO(userId=1001, name=精灵王jingling.im, age=18)
可以发现,短信监听器最先执行。
异步支持
Spring 事件机制默认是同步阻塞的,如果 ApplicationEventPublisher 发布事件之后他会一直阻塞等待listener 响应,多个 listener 的情况下前面的没有执行完后面的会一直被阻塞。这时候我们可以利用 Spring 提供的线程池注解 @Async 来实现异步线程
一、使用 @Async 之前需要先开启线程池,在 启动类上添加 @EnableAsync 注解即可。
@EnableAsync
@SpringBootApplication
public class DemoApplication {
	public static void main(String[] args) {
		SpringApplication.run(DemoApplication.class, args);
	}
}
二、监听器使用异步线程
自定义异步线程池
@Configuration
public class AsyncConfig{

    @Bean("asyncThreadPool")
    public Executor getAsyncExecutor(){
        System.out.println("asyncThreadPool init");
        Executor executor = new ThreadPoolExecutor(
                10,20,60L,TimeUnit.SECONDS
                ,new ArrayBlockingQueue<>(100),new MyThreadFactory());
        return executor;
    }

    class MyThreadFactory implements ThreadFactory{
        final AtomicInteger threadNumber = new AtomicInteger(0);
        @Override
        public Thread newThread(Runnable r){
            Thread t = new Thread(r);
            t.setName("async-thread-"+threadNumber.getAndIncrement());
            t.setDaemon(true);
            return t;
        }
    }
}
指定监听器的线程池
@Component
public class UserRegisterSmsListener{

    @Order(-2)
    @Async("asyncThreadPool")
    @EventListener
    public void handleUserEvent(UserDTO userDTO){
        System.out.println(Thread.currentThread().getName() + " 监听到用户注册,准备发送短信,user:"+userDTO.toString());
    }
}
三、测试输出结果
register user
监听到用户注册,给新用户发送首条站内短消息,user:UserDTO(userId=1001, name=admol, age=18)
监听到用户注册,准备发送邮件,user:UserDTO(userId=1001, name=admol, age=18)
async-thread-0 监听到用户注册,准备发送短信,user:UserDTO(userId=1001, name=admol, age=18)
Spring事件机制原理分析
Spring事件机制涉及的重要类主要有以下四个:
ApplicationEvent:
事件对象,继承至JDK的类EventObject ,可以携带事件的时间戳
ApplicationListener:
事件监听器,继承至JDK的接口EventListener,该接口被所有的事件监听器实现,比如支持指定顺序的SmartApplicationListener
ApplicationEventMulticaster:
事件管理者,管理监听器和发布事件,ApplicationContext通过委托ApplicationEventMulticaster来 发布事件
ApplicationEventPublisher:
事件发布者,该接口封装了事件有关的公共方法,作为ApplicationContext的超级街廓,也是委托 ApplicationEventMulticaster完成事件发布。
源码展示
ApplicationEvent
事件对象ApplicationEvent的主要源代码如下,继承了JAVA的 EventObject 对象:
public abstract class ApplicationEvent extends EventObject {
	private static final long serialVersionUID = 7099057708183571937L;
	private final long timestamp; // 多了一个时间戳属性
	public ApplicationEvent(Object source) {
		super(source);
		this.timestamp = System.currentTimeMillis(); // 初始当前化时间戳
	}
	public final long getTimestamp() {
		return this.timestamp;
	}
}
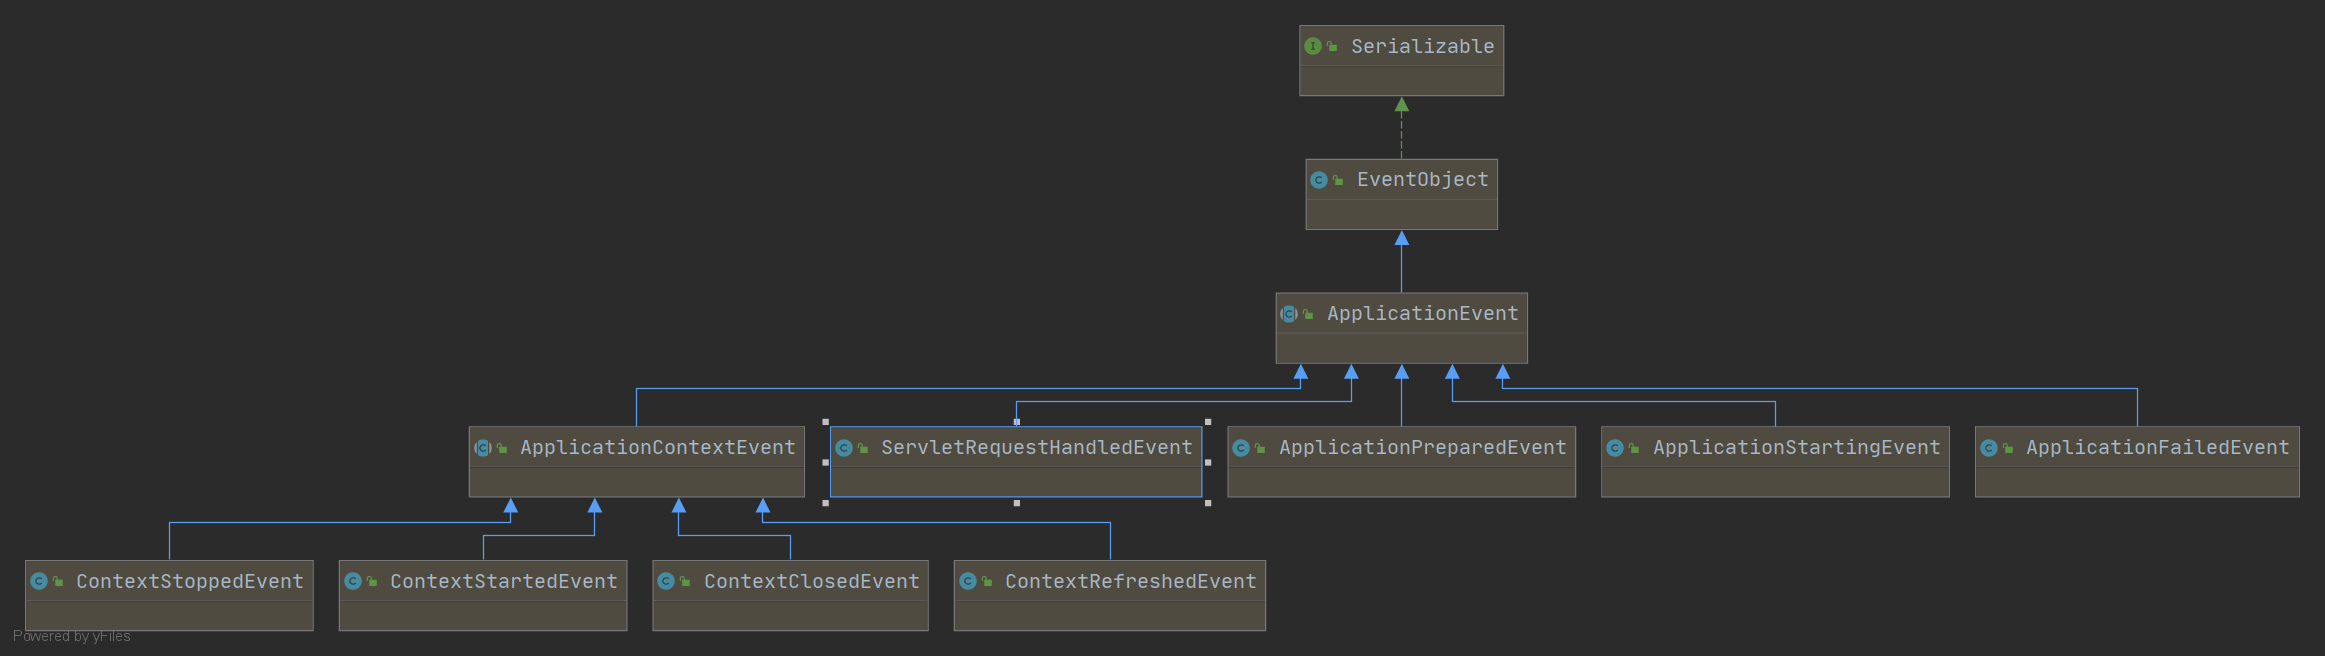
从上面ApplicationEvent的子类关系图种可以发现,ApplicationEvent有一个重要的子类ApplicationContextEvent,而ApplicationContextEvent又有4个重要的子类ContextStartedEvent、ContextRefreshedEvent、ContextClosedEvent、ContextStoppedEvent。
从名字就可以看出,这4个事件都和Spring容器有关系的:
- ContextRefreshedEvent:当spring容器context刷新时触发
- ContextStartedEvent:当spring容器context启动后触发
- ContextStoppedEvent:当spring容器context停止时触发
- ContextClosedEvent:当spring容器context关闭时触发,容器被关闭时,其管理的所有单例Bean都被销毁。
当每个事件触发时,相关的监听器就会监听到相应事件,然后触发onApplicationEvent方法。
ApplicationListener
事件监听器,继承DK的接口EventListener
/* ...
 * @author Rod Johnson
 * @author Juergen Hoeller
 * @param <E> the specific ApplicationEvent subclass to listen to
 * @see org.springframework.context.event.ApplicationEventMulticaster
 */
public interface ApplicationListener<E extends ApplicationEvent> extends EventListener {

	/**
	 * Handle an application event. by jingling.im
	 * @param event the event to respond to
	 */
	void onApplicationEvent(E event);

}
注释@param <E> the specific ApplicationEvent subclass to listen to@see ApplicationEventMulticaster 里面说明了事件的广播在ApplicationEventMulticaster类。
ApplicationEventMulticaster
ApplicationEventMulticaster是一个接口,负责管理监听器和发布事件,定义了如下方法:
addApplicationListener(ApplicationListener<?> listener):新增一个listener;addApplicationListenerBean(String listenerBeanName):新增一个listener,参数为bean name;removeApplicationListener(ApplicationListener<?> listener):删除listener;void removeAllListeners():删除所有的ListenerremoveApplicationListenerBean(String listenerBeanName):根据bean name 删除listener;multicastEvent(ApplicationEvent event):广播事件;multicastEvent(ApplicationEvent event, @Nullable ResolvableType eventType):广播事件,指定事件的source类型。
AbstractApplicationEventMulticaster 实现了 ApplicationEventMulticaster接口,SimpleApplicationEventMulticaster 继承了AbstractApplicationEventMulticaster ;
-
AbstractApplicationEventMulticaster 主要实现了管理监听器的方法(上面接口的前5个方法)
-
SimpleApplicationEventMulticaster 主要实现了事件广播相关的方法(上面接口的最后2个方法)
两个类分别继承了部分上面的方法。
一、先看新增Listener方法实现逻辑:
public abstract class AbstractApplicationEventMulticaster
		implements ApplicationEventMulticaster, BeanClassLoaderAware, BeanFactoryAware {

		private final ListenerRetriever defaultRetriever = new ListenerRetriever(false);

...
		@Override
		public void addApplicationListener(ApplicationListener<?> listener) {
			synchronized (this.retrievalMutex) { // 加排他锁
				// Explicitly remove target for a proxy, if registered already,
				// in order to avoid double invocations of the same listener.
				Object singletonTarget = AopProxyUtils.getSingletonTarget(listener);
				if (singletonTarget instanceof ApplicationListener) {
                                        // 删除,避免重复调用
					this.defaultRetriever.applicationListeners.remove(singletonTarget);
				}
                                // 加入到Set LinkedHashSet 集合中
				this.defaultRetriever.applicationListeners.add(listener);
				this.retrieverCache.clear(); // 缓存
			}
		}
...
}
最核心的一句代码:this.defaultRetriever.applicationListeners.add(listener);
ListenerRetriever类是AbstractApplicationEventMulticaster类的内部类,里面有两个集合,用来记录维护事件监听器。
private class ListenerRetriever {

		public final Set<ApplicationListener<?>> applicationListeners = new LinkedHashSet<>();
		public final Set<String> applicationListenerBeans = new LinkedHashSet<>();
		...
}
这就和设计模式中的发布订阅模式一样了,维护一个List,用来管理所有的订阅者,当发布者发布消息时,遍历对应的订阅者列表,执行各自的回调handler。
二、看SimpleApplicationEventMulticaster类实现的广播事件逻辑:
@Override
public void multicastEvent(ApplicationEvent event) {
	multicastEvent(event, resolveDefaultEventType(event)); // 继续调用下面的广播方法
}

@Override
public void multicastEvent(final ApplicationEvent event, ResolvableType eventType) {
	ResolvableType type = (eventType != null ? eventType : resolveDefaultEventType(event));
  // 遍历监听器列表
	for (final ApplicationListener<?> listener : getApplicationListeners(event, type)) {
		Executor executor = getTaskExecutor();
		if (executor != null) { // 是否指定了线程池
			executor.execute(new Runnable() {
				@Override
				public void run() { // 线程池执行
					invokeListener(listener, event);
				}
			});
		}
		else { // 普通执行
			invokeListener(listener, event);
		}
	}
}
代码分析:
- 首先根据事件类型,获取事件监听器列表:
getApplicationListeners(event, type) - 遍历监听器列表,for循环
- 判断是否有线程池,如果有,在线程池执行
- 否则直接执行
我们再看看 invokeListener方法的逻辑:
protected void invokeListener(ApplicationListener<?> listener, ApplicationEvent event) {
		ErrorHandler errorHandler = getErrorHandler();
		if (errorHandler != null) { // 是否有错误处理
			try {
				doInvokeListener(listener, event);
			} catch (Throwable err) {
				errorHandler.handleError(err);
			}
		} else {
			doInvokeListener(listener, event); // 直接执行
		}
	}
核心逻辑就是继续调用doInvokeListener方法:
private void doInvokeListener(ApplicationListener listener, ApplicationEvent event) {
		try {
			listener.onApplicationEvent(event);// 执行监听器事件
		}
		catch (ClassCastException ex) {
			String msg = ex.getMessage();
			if (msg == null || msg.startsWith(event.getClass().getName())) {
				// Possibly a lambda-defined listener which we could not resolve the generic event type for
				Log logger = LogFactory.getLog(getClass());
				if (logger.isDebugEnabled()) {
					logger.debug("Non-matching event type for listener: " + listener, ex);
				}
			}
			else {
				throw ex;
			}
		}
	}
发现最后实际就是调用的 listener.onApplicationEvent(event); 也就是我们通过实现接口ApplicationListener的方式来实现监听器的onApplicationEvent实现逻辑。
ApplicationEventPublisher类
在我们的发布事件逻辑代码的地方,通过查看 eventPublisher.publishEvent(userDTO);方法可以发现ApplicationEventPublisher是一个接口,publishEvent方法的逻辑实现主要在类AbstractApplicationContext中:
public abstract class AbstractApplicationContext extends DefaultResourceLoader
		implements ConfigurableApplicationContext, DisposableBean {
...
		private Set<ApplicationEvent> earlyApplicationEvents;
...
		@Override
		public void publishEvent(ApplicationEvent event) {
			publishEvent(event, null); // 调用下面的方法
		}
                // 发布事件主要逻辑
		protected void publishEvent(Object event, ResolvableType eventType) {
				Assert.notNull(event, "Event must not be null");
				if (logger.isTraceEnabled()) {
					logger.trace("Publishing event in " + getDisplayName() + ": " + event);
				}

				// 事件装饰为 ApplicationEvent
				ApplicationEvent applicationEvent;
				if (event instanceof ApplicationEvent) {
					applicationEvent = (ApplicationEvent) event;
				} else {
					applicationEvent = new PayloadApplicationEvent<Object>(this, event);
					if (eventType == null) {
						eventType = ((PayloadApplicationEvent) applicationEvent).getResolvableType();
					}
				}

				// 容器启动的时候 earlyApplicationEvents 可能还没有初始化
				if (this.earlyApplicationEvents != null) {
					this.earlyApplicationEvents.add(applicationEvent); // 加入到集合,同一广播
				} else {
                                        // 还没初始化,直接广播事件
					getApplicationEventMulticaster().multicastEvent(applicationEvent, eventType);
				}

				// 通过父上下文发布事件.
				if (this.parent != null) {
					if (this.parent instanceof AbstractApplicationContext) {
						((AbstractApplicationContext) this.parent).publishEvent(event, eventType);
					}
					else {
						this.parent.publishEvent(event);
					}
				}
			}
...
}
这段代码的主要逻辑在这:
if (this.earlyApplicationEvents != null) {
	this.earlyApplicationEvents.add(applicationEvent);
}
else {
	getApplicationEventMulticaster().multicastEvent(applicationEvent, eventType);
}
可以发现earlyApplicationEvents也是一个Set集合,如果这个集合已经初始化了,就把事件加入到集合中,否则直接调用multicastEvent执行事件监听逻辑。
我们跟踪找到初始化这个集合的地方,发现在方法protected void prepareRefresh()中:
protected void prepareRefresh() {
		this.startupDate = System.currentTimeMillis();
		this.closed.set(false);
		this.active.set(true);

		if (logger.isInfoEnabled()) {
			logger.info("Refreshing " + this);
		}

		initPropertySources();

		getEnvironment().validateRequiredProperties();

		**this.earlyApplicationEvents = new LinkedHashSet<ApplicationEvent>();**
	}
继续跟踪调用这个方法的地方,发现在AbstractApplicationContext.refresh()方法中,而这个方法是Spring容器初始化必须要调用的过程,非常的重要。
那在什么地方使用到了这个集合呢?我们继续跟踪发现在 protected void registerListeners() 方法中,代码如下:
protected void registerListeners() {
		// Register statically specified listeners first.
		for (ApplicationListener<?> listener : getApplicationListeners()) {
			getApplicationEventMulticaster().addApplicationListener(listener);
		}

		// Do not initialize FactoryBeans here: We need to leave all regular beans
		// uninitialized to let post-processors apply to them! jingling.im
		String[] listenerBeanNames = getBeanNamesForType(ApplicationListener.class, true, false);
		for (String listenerBeanName : listenerBeanNames) {
			getApplicationEventMulticaster().addApplicationListenerBean(listenerBeanName);
		}

		// 拿到集合引用
		Set<ApplicationEvent> ****earlyEventsToProcess = this.earlyApplicationEvents;
		this.earlyApplicationEvents = null; // 把之前的集合置为null
		if (earlyEventsToProcess != null) { // 如果集合不为空,则广播里面的事件
			for (ApplicationEvent earlyEvent : earlyEventsToProcess) {
				getApplicationEventMulticaster().multicastEvent(earlyEvent);
			}
		}
	}
逻辑是先获得该集合的引用,然后置空之前的集合,然后遍历集合,进行广播事件multicastEvent,这个方法的逻辑上面已经说过了。
而registerListeners这个方法是在什么时候调用的呢?通过跟踪发现也是在AbstractApplicationContext.refresh()方法中。
只不过基本是在方法逻辑的最后,也就是Spring已经容器初始化完成了。
@Override
	public void refresh() throws BeansException, IllegalStateException {
		synchronized (this.startupShutdownMonitor) {
			// Prepare this context for refreshing.
			**prepareRefresh**();

			....
			try {
				onRefresh();

				// Check for listener beans and register them.
				**registerListeners**();

				// Instantiate all remaining (non-lazy-init) singletons.
				finishBeanFactoryInitialization(beanFactory);

				// Last step: publish corresponding event.
				**finishRefresh**();
			}

			catch (BeansException ex) {
			...
			}

			finally {
				...
			}
		}
	}
容器初始化之前和之后都有可能进行广播事件。
总结
- 事件监听机制和观察者模式非常相似
- JDK 也有实现提供事件监听机制
- Spring 的事件机制也是基于JDK 来扩展的
- Spring 的事件机制默认是同步阻塞的
- Spring 容器初始化前后都可能进行广播事件
个人博客:精灵王

 浙公网安备 33010602011771号