Spring IoC容器
通过前面装配电脑的例子中,我们知道了在Spring中,实现控制反转的是IoC容器,其实现方法是依赖注入。Spring会提供IoC容器来管理对应的资源(容纳我们所开发的各种Bean,并且我们可以从中获取各种发布在Spring IoC容器里的Bean)。这样的好处在于降低了对象之间的耦合,在一个系统中有些类,具体如何实现并不需要取理解,只需要知道它一什么用就可以了。只是这里对象的产生依靠于IoC容器,而不是开发者主动的行为——控制反转。基于降低开发难度,对模块解耦,同时也有利于测试的原则,Spring IoC理念在各种JavaEE开发中广泛应用。
Spring IoC容器的设计
Spring IoC容器的设计主要是基于BeanFactory和ApplicationContext两个接口,其中ApplicationContext是BeanFactory的子接口之一,换句话说,BeanFactory是Spring IoC容器所定义的最底层的接口,而ApplicationContext是其高级接口之一,并且对BeanFactory功能做了许多有用的扩展,在大部分场景下,都会使用ApplicationContext作为Spring IoC容器。

从这张设计图中我们可以看到BeanFactory位于设计的最底层,它提供了Spring IoC最底层的设计,先看看其源代码:
1 2 3 4 5 6 7 8 9 10 11 12 13 14 15 16 17 18 19 20 21 22 23 24 25 26 27 28 29 30 31 32 33 34 35 36 | package org.springframework.beans.factory;import org.springframework.beans.BeansException;import org.springframework.core.ResolvableType;import org.springframework.lang.Nullable;public interface BeanFactory { String FACTORY_BEAN_PREFIX = "&"; Object getBean(String name, Object... args) throws BeansException; <T> T getBean(Class<T> requiredType) throws BeansException; <T> T getBean(Class<T> requiredType, Object... args) throws BeansException; <T> ObjectProvider<T> getBeanProvider(Class<T> requiredType); <T> ObjectProvider<T> getBeanProvider(ResolvableType requiredType); boolean containsBean(String name); boolean isSingleton(String name) throws NoSuchBeanDefinitionException; boolean isPrototype(String name) throws NoSuchBeanDefinitionException; boolean isTypeMatch(String name, ResolvableType typeToMatch) throws NoSuchBeanDefinitionException; boolean isTypeMatch(String name, Class<?> typeToMatch) throws NoSuchBeanDefinitionException; @Nullable Class<?> getType(String name) throws NoSuchBeanDefinitionException;<br> @Nullable Class<?> getType(String name, boolean allowFactoryBeanInit) throws NoSuchBeanDefinitionException;<br> String[] getAliases(String name);} |
Spring IoC容器的初始化和依赖注入
Bean的定义和初始化在容器Spring IoC容器中分为两大步骤,它是先定义,然后初始化和依赖注入的。
Bean的定义分为三步:
- Resource定位,Spring IoC容器根据开发者的配置,进行资源定位,在Spring的开发中,通过xml或者注解代码的方式都是十分常见的方式,定位的内容由开发者提供。
- BeanDefinition的载入,将Resource定位到的信息保存到Bean的定义中(BeanDefinition)中,此时并不会创建Bean的实例。
- BeanDefinition的注册,将BeanDefinition的信息发布到Spring IoC容器中。注意,此时仍旧没有对应的Bean的实例创建。
做完这三步,Bean在Spring IoC容器中被定义了,而没有初始化,更没有完成依赖注入,也就是没有注入其配置的资源给Bean,那么它还不能完成使用。对于初始化和依赖注入,Spring Bean还有一个配置选项——lazy-init,其含义就是是否延迟初始化Bean,在没有任何的配置的情况下默认值是default,实际值是fasle,也就是Spring IoC容器默认会自动初始化Bean。如果将其设置为true,那么只有当我们使用Spring IoC容器的genBean方法获取它的时候,它才会进行Bean的初始化,完成依赖注入
Spring Bean的生命周期
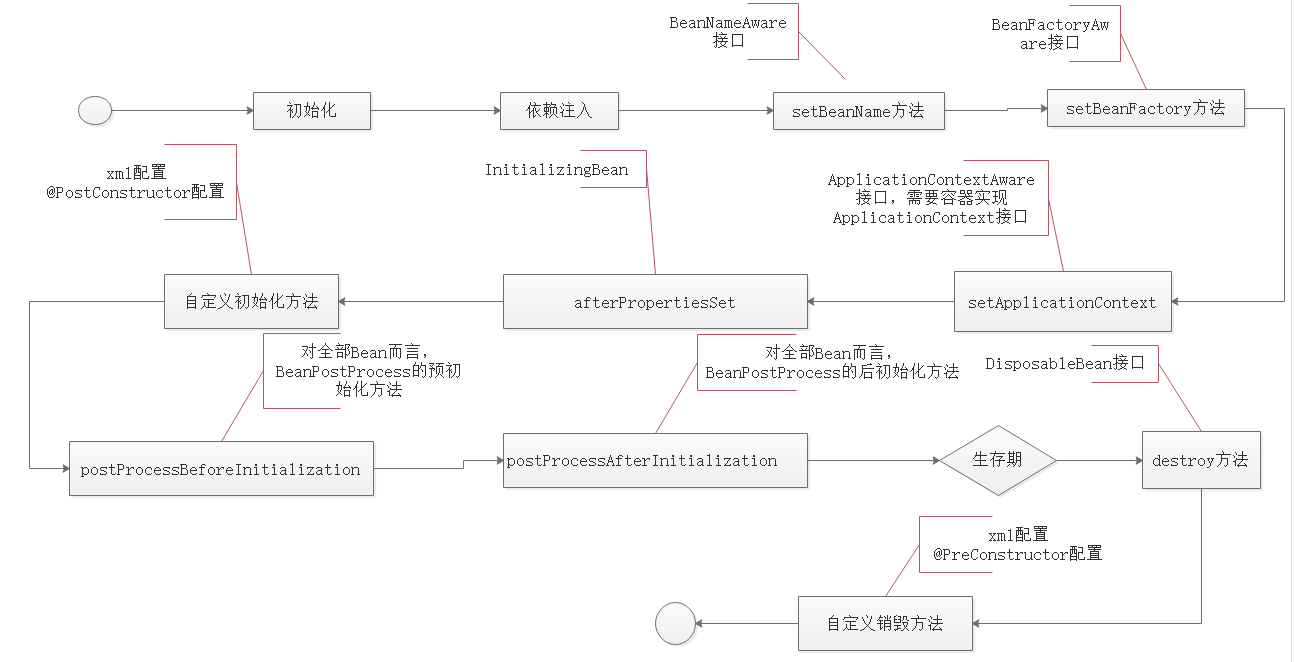
Spring IoC容器的本质目的是为了管理Bean,对于Bean而言,在容器中存在生命周期,它的初始化和销毁也需要一个过程,在一些需要自定义的过程中,我们可以插入代码去改变它的一些行为以满足特定的需求,这就需要了解Spring Bean的生命周期。Spring管理Bean的生命周期比较复杂,正确理解Bean 的生命周期非常重要,因为Spring对Bean的管理可扩展性非常强。通过对它的了解就可以知道如何在初始化和销毁的时候加入自定义的方法,以满足特定的需求。下面展示了一个Bean的构造过程

如上图所示,Bean 的生命周期还是比较复杂的,下面来对上图每一个步骤做文字描述:
- Spring启动,查找并加载需要被Spring管理的bean,进行Bean的实例化
- Bean实例化后对将Bean的引入和值注入到Bean的属性中
- 如果Bean实现了BeanNameAware接口的话,Spring将Bean的id传递给setBeanName()方法
- 如果Bean实现了BeanFactoryAware接口的话,Spring将调用setBeanFactory()方法,将BeanFactory容器实例传入
- 如果Bean实现了ApplicationContextAware接口的且Spring IoC容器必须是一个ApplicationContext实现的类,Spring将调用Bean的setApplicationContext()方法,将bean所在应用上下文引用传入进来
- 如果Bean 实现了InitializingBean接口,Spring将调用他们的afterPropertiesSet()方法
- 如果Bean定义了自己的初始化方法,就会调用已定义的初始化方法
- 如果Bean实现了BeanPostProcessor接口,Spring就将调用他们的postProcessBeforeInitialization()方法。
- 如果Bean 实现了BeanPostProcessor接口,Spring就将调用他们的postProcessAfterInitialization()方法。此时,Bean已经准备就绪,可以被应用程序使用了。他们将一直驻留在应用上下文中,直到应用上下文被销毁。
- 如果Bean 实现了DisposableBean接口,Spring将调用它的destory()接口方法,
- 如果Bean 定义了自定义销毁方法,就会调用已定义的销毁方法。
对Spring Bean生命周期测试
package edu.uestc.avatar.computer;

import org.springframework.beans.BeansException;
import org.springframework.beans.factory.*;
import org.springframework.beans.factory.config.BeanPostProcessor;
import org.springframework.context.ApplicationContext;
import org.springframework.context.ApplicationContextAware;

/**
 * 测试spring bean的生命周期
 */
public class Computer2 implements BeanNameAware, BeanFactoryAware,
        ApplicationContextAware, BeanPostProcessor, InitializingBean,
        DisposableBean {
    private Mainboard mainboard;//主板

    public Computer2(){
        System.out.println("computer2的初始化。。。");
    }

    //电脑的显示器、鼠标键等其它属性省略
    public void setMainboard(Mainboard mainboard) {
    this.mainboard = mainboard;
    }

    public void doWork(){
        System.out.println("开始工作...");
        for(int i=0;i<100;i++)
        System.out.print(i+"  ");
        System.out.println("结束工作!");
    }
    public void start(){
        mainboard.startPower();
    }
    public void shutdown(){
    mainboard.shutdownPower();
    }
    public double getPrice(){
        return mainboard.getPrice()+mainboard.getCpu().getPrice()+mainboard.getRam().getPrice();
    }
    public String getSetting(){//读取电脑配置信息以及价格总额
        String ret;
        ret="电脑组成如下!主板:"+mainboard.getName()+",CPU:"+mainboard.getCpu().getName()+",内存:"+mainboard.getRam().getName()+"\n";
        ret+="这个配置的价格为:"+getPrice();
        return ret;
    }

    @Override
    public void setBeanName(String name) {
        System.out.println("setBeanName:" + name);
    }

    @Override
    public void setBeanFactory(BeanFactory beanFactory) throws BeansException {
        System.out.println("setBeanFactory:" + beanFactory);
    }

    @Override
    public void setApplicationContext(ApplicationContext applicationContext) throws BeansException {
        System.out.println("setApplicationContext:" + applicationContext);
    }

    /**
     * 对全部Bean而言,BeanPostProcess的预初始化方法
     */
    @Override
    public Object postProcessBeforeInitialization(Object bean, String beanName) throws BeansException {
        System.out.println("对全部Bean而言,BeanPostProcess的预初始化方法:" + beanName);
        return BeanPostProcessor.super.postProcessBeforeInitialization(bean, beanName);
    }

    @Override
    public void afterPropertiesSet() throws Exception {
        System.out.println("afterPropertiesSet.....");
    }

    public void init(){
        System.out.println("自定义初始化方法.....");
    }

    /**
     * 对全部Bean而言,BeanPostProcess的后初始化方法
     */
    @Override
    public Object postProcessAfterInitialization(Object bean, String beanName) throws BeansException {
        System.out.println("postProcessAfterInitialization:" + beanName);
        return BeanPostProcessor.super.postProcessAfterInitialization(bean, beanName);
    }

    @Override
    public void destroy() throws Exception {
        System.out.println("destroy......");
    }

    public void destroy2(){
        System.out.println("自定义销毁方法");
    }
}
运行结果
setBeanName:asus
setBeanFactory:org.springframework.beans.factory.support.DefaultListableBeanFactory@1fc2b765: defining beans [intelCpu,amdCpu,kingmaxRam,kingstoneRam,asusMainBoard,asusMainBoard2,intelMainBoard,lenovo,dell,asus]; root of factory hierarchy
setApplicationContext:org.springframework.context.support.ClassPathXmlApplicationContext@2d8e6db6, started on Mon Jun 13 16:45:56 CST 2022
afterPropertiesSet.....
自定义初始化方法.....
对全部Bean而言,BeanPostProcess的预初始化方法:amdCpu
postProcessAfterInitialization:amdCpu
对全部Bean而言,BeanPostProcess的预初始化方法:kingmaxRam
postProcessAfterInitialization:kingmaxRam
对全部Bean而言,BeanPostProcess的预初始化方法:asusMainBoard2
postProcessAfterInitialization:asusMainBoard2
对全部Bean而言,BeanPostProcess的预初始化方法:intelMainBoard
postProcessAfterInitialization:intelMainBoard
computer的初始化。。。
对全部Bean而言,BeanPostProcess的预初始化方法:lenovo
postProcessAfterInitialization:lenovo
true
开始工作...
0 1 2 3 4 5 6 7 8 9 10 11 12 13 14 15 16 17 18 19 20 21 22 23 24 25 26 27 28 29 30 31 32 33 34 35 36 37 38 39 40 41 42 43 44 45 46 47 48 49 50 51 52 53 54 55 56 57 58 59 60 61 62 63 64 65 66 67 68 69 70 71 72 73 74 75 76 77 78 79 80 81 82 83 84 85 86 87 88 89 90 91 92 93 94 95 96 97 98 99 结束工作!
电脑组成如下!主板:Intel主板,CPU:IntelCPU,内存:Kingmax内存
这个配置的价格为:6300.0
+======================================+
computer的初始化。。。
对全部Bean而言,BeanPostProcess的预初始化方法:dell
postProcessAfterInitialization:dell
电脑组成如下!主板:AUSU主板,CPU:IntelCPU,内存:Kingstone内存
这个配置的价格为:5700.0
destroy......
自定义销毁方法


【推荐】国内首个AI IDE,深度理解中文开发场景,立即下载体验Trae
【推荐】编程新体验,更懂你的AI,立即体验豆包MarsCode编程助手
【推荐】抖音旗下AI助手豆包,你的智能百科全书,全免费不限次数
【推荐】轻量又高性能的 SSH 工具 IShell:AI 加持,快人一步
· 25岁的心里话
· 闲置电脑爆改个人服务器(超详细) #公网映射 #Vmware虚拟网络编辑器
· 基于 Docker 搭建 FRP 内网穿透开源项目(很简单哒)
· 零经验选手,Compose 一天开发一款小游戏!
· 一起来玩mcp_server_sqlite,让AI帮你做增删改查!!