集合
集合
- 1)可以动态保存任意多个对象,使用比较方便!!!
- 2)提供了一系列方便的操作对象的方法:add,remove,set,get等
- 3)使用集合添加,删除新元素的示意代码 --- 简洁明了
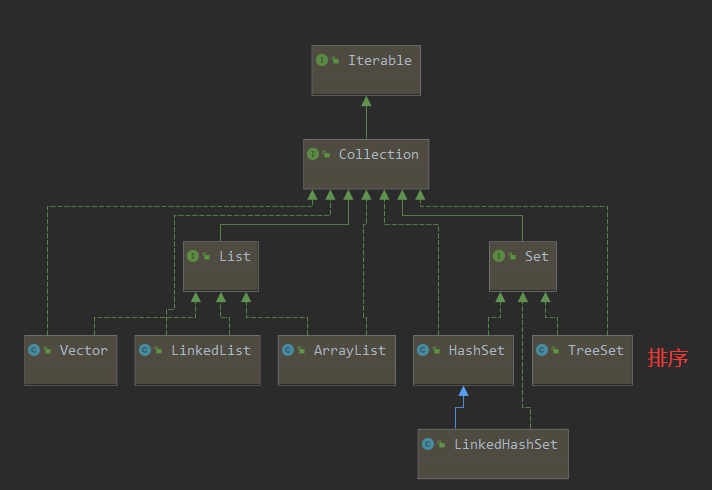
集合框架体系
- 单列
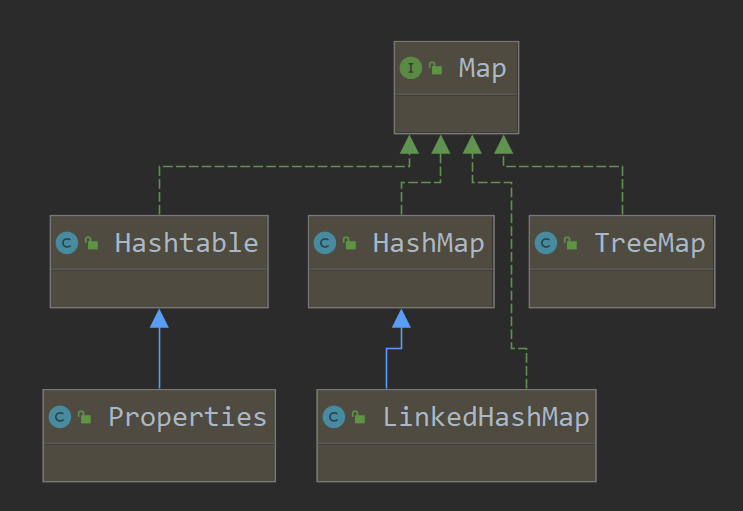
- 双列
注意:在 AbstractCollection () 中重写了 toString() 方法
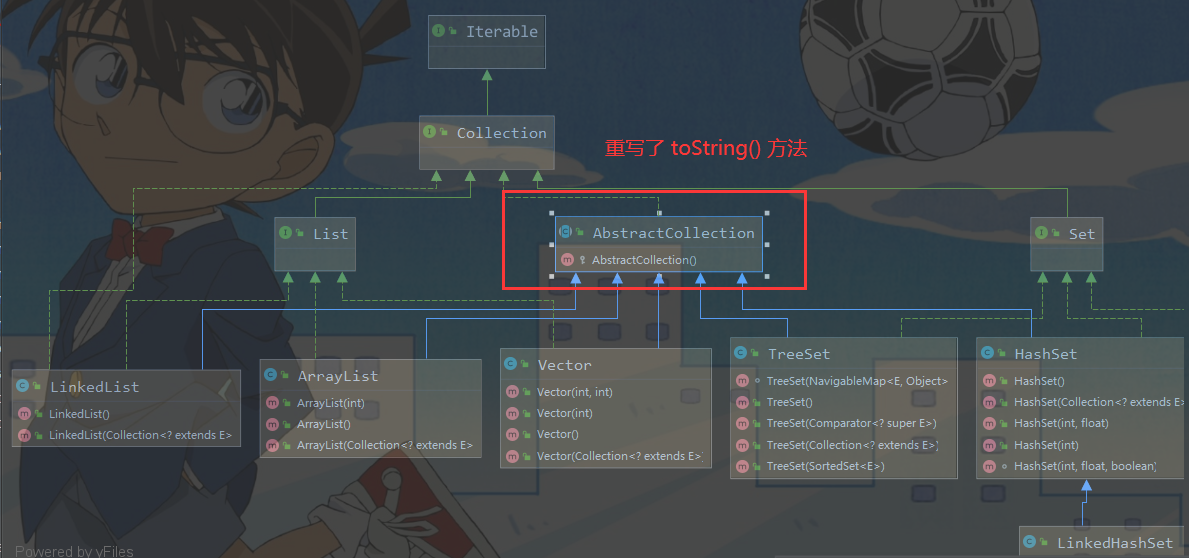
public String toString() {
    Iterator<E> it = iterator();
    if (! it.hasNext())
        return "[]";

    StringBuilder sb = new StringBuilder();
    sb.append('[');
    for (;;) {
        E e = it.next();
        sb.append(e == this ? "(this Collection)" : e);
        if (! it.hasNext())
            return sb.append(']').toString();
        sb.append(',').append(' ');
    }
}
一、Collection(单列集合)
Collection接口实现类的特点
- collection 实现子类可以存放多个元素,每个元素可以是 Object
- 有些Collection 的实现类,可以存放重复的元素,有些不可以
- 有些Collection 的实现类,有些是有序的(List),有些不是有序(Set)
- Collection 接口没有直接的实现子类,是通过它的子接口 Set 和 List来实现的
常用方法:
| 方法名 | 作用 |
|---|---|
| add | 添加单个元素 |
| remove | 删除 |
| contains | 查找元素是否存在 |
| size | 获取元素个数 |
| isEmpty | 判断元素是否为空 |
| clear | 清空 |
| addAll | 添加多个元素 |
| containsAll | 查找多个元素是否存在 |
| reomveAll | 删除多个元素 |
List list = new ArrayList();
list.add(10);	//list.add(new Integer(10));
remove方法有2种情况:
- remove(Object o):返回 boolean
- remove(Object index):返回被删除的对象
- 由于整数类型既可以看作int,又可以视为Object,当我们从 List 中移除一个整数时候,是有歧义的,正确方法如下
int value = 250;
//	移除List 中下标为 250 的元素
list.remove(value);
//	移除List 中首个数值等于 250 的元素
list.remove((Integer)value);
//	我们想要从 List 中移除一个整数,一定要先将其转换为 Integer
//	而且每次只能移除一个元素,如果有多个值相同的,需要通过以下代码判断是否已经完全删除
boolean finish = !list.contains((Integer)value);
迭代器遍历
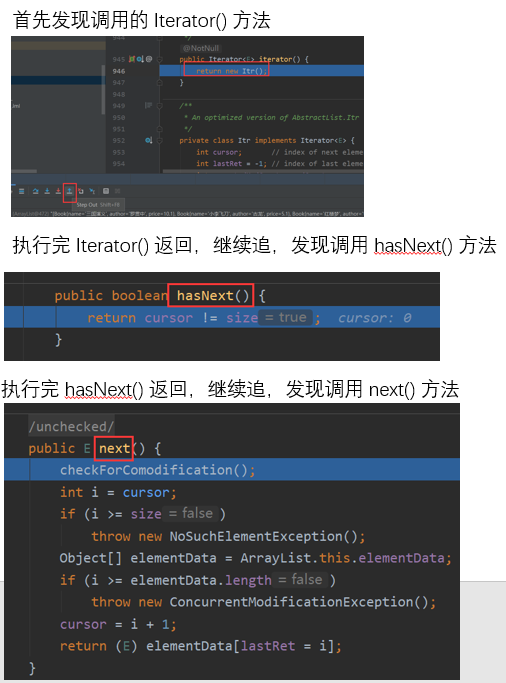
通过 iterator() 方法,可以返回 Iterator
public interface Iterable<T> {
    /**
     * Returns an iterator over elements of type {@code T}.
     *
     * @return an Iterator.
     */
    Iterator<T> iterator();
- Iterator对象称为迭代器,主要用于遍历 Collection集合中的元素
- 所有实现了Collection接口的集合类都有一个 iterator()方法,用以返回一个实现了Iterator接口的对象,即可以返回一个迭代器
- Iterator的结构
- Iterator 仅用于遍历集合,Iterator本身并不存放对象
配合 hasNext() 和 next() 方法一起使用
public interface Iterator<E> {
    /**
     * Returns {@code true} if the iteration has more elements.
     * (In other words, returns {@code true} if {@link #next} would
     * return an element rather than throwing an exception.)
     *
     * @return {@code true} if the iteration has more elements
     */
    boolean hasNext();

    /**
     * Returns the next element in the iteration.
     *
     * @return the next element in the iteration
     * @throws NoSuchElementException if the iteration has no more elements
     */
    E next();
//	next() 方法有2个作用
//	1)下移
//	2)将下移以后集合位置上的元素返回
System.out.println(iterator.next());
while快捷键:itit
while (iterator.hasNext()) {
    Object next =  iterator.next();
}
//	当退出while循环后,这时 iterator迭代器,指向最后的元素
//	iterator.next():NoSuchElementException
//	如果希望再次遍历,需要重置我们的迭代器
//	iterator = col.iterator();
System.out.println("========第二次遍历===========");
while (iterator.hasNext()) {
    Object next =  iterator.next();
}
使用 Ctrl + j:显示所有的快捷键
集合增强 for
可以代替iterator迭代器,特点:增强for就是简化版的 iterator,本质一样,只能用于遍历j集合或数组。
package com.collection_;

import java.util.ArrayList;
import java.util.Collection;

/**
 * @Author: Ronnie LEE
 * @Date: 2022/1/9 - 01 - 09 - 23:46
 * @Description: com.collection_
 * @version: 1.0
 */
public class CollectionFor {
    public static void main(String[] args) {
        Collection col = new ArrayList();
        col.add(new Book("三国演义", "罗贯中", 10.1));
        col.add(new Book("小李飞刀", "古龙", 5.1));
        col.add(new Book("红楼梦", "曹雪芹", 34.6));
        //  老韩解读
        //  1. 使用增强 for 循环,在Collection集合
        //  2. 增强for,底层仍然是迭代器
        //  3. 增强for可以理解成就是简化版本的 迭代器遍历
        //  4. 快捷方式 I
       for (Object book : col){
           System.out.println("book=" + book);
       }
//        //  增强 for, 也可以直接在数组使用
//        int[] nums = {1, 8, 10, 90};
//        for (int i : nums){
//            System.out.println("i = " + i);
//        }
    }
}
1. List
List接口是 Collection 接口的子接口
- List集合中元素有序(即:添加顺序和取出顺序一致),且可重复
- List容器中的每一个元素都有其对应的顺序索引,即支持索引
- List容器中的元素都对应一个整数型的序号记载其在容器中的位置,可以根据序号存取容器中的元素
- JDK API中 List接口的实现类有:AbstractList , AbstractSequentialList , ArrayList , AttributeList , CopyOnWriteArrayList(并发) , LinkedList , RoleList , RoleUnresolvedList , Stack , Vector
注意:这里的 List 指的是:util 包下的 util
java.util.List
常用方法
| 方法名 | 作用 |
|---|---|
| void add(int index, Object ele) | 在index位置,插入ele元素 |
| boolean addAll(int index, Collection eles) | 从index位置开始,将eles中的所有元素添加进来 |
| Object get(int index) | 获取指定index位置的元素 |
| int indexOf(Object obj) | 返回 obj 在集合中首次出现的位置 |
| int lastIndexOf(Object obj) | 返回 obj 在集合中末次出现的位置 |
| Object remove(int index) | 移除指定 index 位置的元素,并返回此元素 |
| Object set(int index, Object ele) | 设置指定 index 位置的元素为 ele,相当于是替换 |
| List subList(int fromIndex, int toIndex) | 返回从 fromIndex 到 toIndex 位置的子集合 |
三种遍历方式
-
使用 iterator迭代器
Iterator iter = list.iterator(); while(iter.hasNext()){ Object o = iter.next(); } -
使用增强for
for(Object o : list){ } -
使用普通for
for(int i = 0; i < list.size(); i++){
    object o = list.get(i);
}
List 练习:
普通冒泡排序
public static int[] bubble(int[] arr){
    for (int e = arr.length - 1; e > 0; e--) {
        for (int i = 0; i < e; i++) {	//	每次确定一个数
            if (arr[i] > arr[i + 1]){
                swap(arr, i, i + 1);
            }
        }
    }
    return arr;
}
//	交换
public static void swap(int[] arr, int i, int j) {
    arr[i] = arr[i] ^ arr[j];
    arr[j] = arr[i] ^ arr[j];
    arr[i] = arr[i] ^ arr[j];
}
//	打印
public static void printArray(int[] arr) {
    if (arr == null) {
        return;
    }
    for (int i = 0; i < arr.length; i++) {
        System.out.print(arr[i] + " ");
    }
    System.out.println();
}
如何对集合进行排序:
public static void sort(List list){
    for (int e = list.size() - 1; e > 0; e--) {
        for (int i = 0; i < e; i++) {
            //  取出对象 Book
            Book book1 = (Book)(list.get(i));
            Book book2 = (Book)(list.get(i + 1));
            if (book1.getPrice() > book2.getPrice()){   //  交换
                list.set(i, book2);
                list.set(i + 1, book1);
            }
        }
    }
}
实现子类
1.1 ArrayList
Arraylist基本定义
- 允许所有元素,包括 null,可以放置多个 null
- 底层是数组
- ArrayList基本等同于 Vector,但是 ArrayList是线程不安全的(执行效率高),多线程下不建议使用
//	ArrayList 是线程不安全的,可以看源码,没有 synchronized 关键字
public boolean add(E e) {
        modCount++;
        add(e, elementData, size);
        return true;
}
ArrayList扩容机制
-
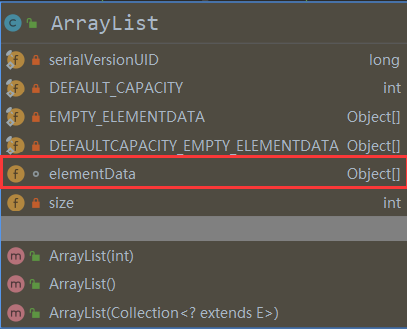
ArrayList中维护了一个Object 类型的数组 elementData 【Debug看源码】
-
transient Object[] elementData; // transient 表示 瞬间,短暂的,表示该属性不会被序列化
-
当创建ArrayList对象时
-
如果使用的是无参构造器,则初始elementData容量为 0,第1次添加,则扩容elementData 为10,如需要再次扩容,则扩容elementData为1.5倍。【0 ---> 10 ---> 15 ---> 15 + (15 / 2) = 22】
-
如果使用的是指定大小的构造器,则初始elementData容量为指定大小,如果需要扩容,则直接扩容 elementData为1.5倍
-
   /**
     * The array buffer into which the elements of the ArrayList are stored.
     * The capacity of the ArrayList is the length of this array buffer. Any
     * empty ArrayList with elementData == DEFAULTCAPACITY_EMPTY_ELEMENTDATA
     * will be expanded to DEFAULT_CAPACITY when the first element is added.
     */
    transient Object[] elementData; // non-private to simplify nested class access
ArrayList底层源码
无参构造器,初始为一个 null 数组
/**
     * Shared empty array instance used for default sized empty instances. We
     * distinguish this from EMPTY_ELEMENTDATA to know how much to inflate when
     * first element is added.
     */
private static final Object[] DEFAULTCAPACITY_EMPTY_ELEMENTDATA = {};

//	无参构造器
public ArrayList() {
    this.elementData = DEFAULTCAPACITY_EMPTY_ELEMENTDATA;	//	初始化为一个 null 数组
}
使用 for 循环添加数据,int 会先装箱成 Integer ,再进行添加
//  使用for循环添加 1 -10 数据
for (int i = 1; i < 10; i++) {
    list.add(i);	//	会将 int 进行装箱成 Integer
}

@HotSpotIntrinsicCandidate
public static Integer valueOf(int i) {
    if (i >= IntegerCache.low && i <= IntegerCache.high)
        return IntegerCache.cache[i + (-IntegerCache.low)];
    return new Integer(i);
}
开始添加,调用 boolean add(E e)方法 ----> add(E e,Object[] elementData, int s)
//	开始添加,调用 boolean add(E e)
 public boolean add(E e) {
        modCount++;	//	记录当前集合被修改的次数,防止有多个线程同时去修改,如果同时修改会抛出异常
        add(e, elementData, size);
        return true;
  }

private void add(E e, Object[] elementData, int s) {
    if (s == elementData.length)	//	第二次添加2的时候,由于 1 != 10,就不执行 grow() 方法了
        elementData = grow();
    elementData[s] = e;
    size = s + 1;
}
调用 grow() 方法 ---> grow(int minCapacity)
当添加11时,调用 grow()---> grow(11),minCapacity:当前需要的最小空间
- oldCapacity = elementData.length【当前集合大小】
- newCapacity = ArraySupport.newLength(oldCapacity, minCapacity - oldCapacity, oldCapacity >> 1)
- newCapacity = ArraySupport.newLength(10,11 - 10,10 >> 1) = ArraySupport.newLength(10,1,5);
- newCapacity = 10 + 5 =15
private Object[] grow() {
    return grow(size + 1);
}

private Object[] grow(int minCapacity) {
    int oldCapacity = elementData.length;
    if (oldCapacity > 0 || elementData != DEFAULTCAPACITY_EMPTY_ELEMENTDATA) {	//	不是初始化时,判定新的大小 newCapacity
        int newCapacity = ArraysSupport.newLength(oldCapacity,
                                                  minCapacity - oldCapacity, /* minimum growth */
                                                  oldCapacity >> 1           /* preferred growth */);
        return elementData = Arrays.copyOf(elementData, newCapacity);
    } else {//	如果 elementData 是一个 null 数组,直接扩容为大小为 10 的数组
        return elementData = new Object[Math.max(DEFAULT_CAPACITY, minCapacity)];
    }
}

private static final int DEFAULT_CAPACITY = 10;	//	默认大小为:10
newLength()方法,来判定是否扩容
扩容使用的是:Arrays.copyOf(elementData, newCapacity) 方法
public static final int MAX_ARRAY_LENGTH = Integer.MAX_VALUE - 8;

public static int newLength(int oldLength, int minGrowth, int prefGrowth) {
        // assert oldLength >= 0
        // assert minGrowth > 0

        int newLength = Math.max(minGrowth, prefGrowth) + oldLength;	//	nweLenth = Math.max() + 10;
        if (newLength - MAX_ARRAY_LENGTH <= 0) {	//	不越界的情况
            return newLength;
        }
        return hugeLength(oldLength, minGrowth);
    }
 private static int hugeLength(int oldLength, int minGrowth) {
        int minLength = oldLength + minGrowth;
        if (minLength < 0) { // overflow
            throw new OutOfMemoryError("Required array length too large");
        }
        if (minLength <= MAX_ARRAY_LENGTH) {
            return MAX_ARRAY_LENGTH;
        }
        return Integer.MAX_VALUE;
    }
注意:IDEA工具,默认情况下,Debug显示的数据是简化后的,所以,你有些数据看不到。如果想要看到完整的数据,需要做设置
将 Data Views ---> Java 中的 Enable alternative view for Collections classed 拿掉

使用有参构造器的情况
除了初始大小不是10,其余完全一样
ArrayList list = new ArrayList(8);
 public ArrayList(int initialCapacity) {
     if (initialCapacity > 0) {
         this.elementData = new Object[initialCapacity];
     } else if (initialCapacity == 0) {
         this.elementData = EMPTY_ELEMENTDATA;
     } else {
         throw new IllegalArgumentException("Illegal Capacity: "+
                                            initialCapacity);
     }
 }
private void add(E e, Object[] elementData, int s) {
    if (s == elementData.length)	8 == 8
        elementData = grow();
    elementData[s] = e;
    size = s + 1;
}
private Object[] grow() {
    return grow(size + 1);	//	grow(9)
}
grow(9):
- oldCapacity = elementData.length = 8【当前集合大小】
- newCapacity = ArraySupport.newLength(oldCapacity, minCapacity - oldCapacity, oldCapacity >> 1)
- newCapacity = ArraySupport.newLength(8,9 - 1,8 >> 1) = ArraySupport.newLength(8,1,4);
- newCapacity = 10 + 4 =12
    private Object[] grow(int minCapacity) {
        int oldCapacity = elementData.length;
        if (oldCapacity > 0 || elementData != DEFAULTCAPACITY_EMPTY_ELEMENTDATA) {
            int newCapacity = ArraysSupport.newLength(oldCapacity,
                    minCapacity - oldCapacity, /* minimum growth */
                    oldCapacity >> 1           /* preferred growth */);
            return elementData = Arrays.copyOf(elementData, newCapacity);
        } else {
            return elementData = new Object[Math.max(DEFAULT_CAPACITY, minCapacity)];
        }
    }
1.2 LinkedList

LinkedList说明
- LinkedList实现了双向链表和双端队列特点
- 可以添加任意元素(元素可以重复),包括 null
- 线程不安全,没有实现同步
LinkedList底层操作机制
- LinkedList底层维护了一个 双向链表
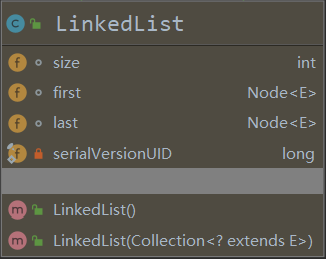
- LinkedList中维护了两个属性 first 和 last 分别指向 首节点和尾节点
- 每个节点(Node对象),里面又维护了pre、next、item三个属性,其中通过 prev 指向前一个,通过 next 指向后一个节点。最终实现双向链表
- 由于LinkedList元素添加和删除,不是通过数组完成的,效率高(因为不涉及数组的扩容)
- 模拟模拟一个简单的双向链表
public class LinkedList01 {
    public static void main(String[] args) {
        //  模拟一个简单的双向链表
        Node jack = new Node("jack");
        Node tom = new Node("tom");
        Node hsp = new Node("老韩");

        //  连接3个结点,形成双向链表
        //  jack --> tom --> hsp
        jack.next = tom;
        tom.next = hsp;
        //  hsp --> tom --> jack
        hsp.pre = tom;
        tom.pre = jack;

        Node first = jack; //   让first引用指向 jack,就是双向链表的头结点
        Node last = hsp; //   让last引用指向 hsp,就是双向链表的尾结点


        //  演示:从头到尾进行遍历
        System.out.println("=====从头到尾进行遍历======");
        while (true) {
            if (first == null) {
                break;
            }
            //  输出 first 信息
            System.out.println(first);
            first = first.next;
        }

        //  演示:从尾到头进行遍历
        System.out.println("=====从尾到头进行遍历======");
        while (true) {
            if (last == null) {
                break;
            }
            //  输出 last 信息
            System.out.println(last);
            last = last.pre;
        }

        //  演示:链表的添加对象 / 数据,是多么的方便
        //  要求:是在 tom --- 老韩 之间插入一个对象 “smith”

        //  1. 先创建一个 Node 结点,name 就是 smith
        Node smith = new Node("smith");
        //  下面就把smith 加入到双向链表了	[4条线,从自己开始]
        smith.next = hsp;
        smith.pre = tom;
        hsp.pre = smith;
        tom.next = smith;

        //  由于之前在遍历的时候,first 已经走到最后了,所以现在要让 first 重新指向 开头的 jack
        first = jack;
        //  演示:从头到尾进行遍历
        System.out.println("=====从头到尾进行遍历======");
        while (true) {
            if (first == null) {
                break;
            }
            //  输出 first 信息
            System.out.println(first);
            first = first.next;
        }

        //  同理,如果要重新倒序排列的时候,要将 last 重新指向 最后一个元素 "老韩"
        last = hsp;
        //  演示:从尾到头进行遍历
        System.out.println("=====从尾到头进行遍历======");
        while (true) {
            if (last == null) {
                break;
            }
            //  输出 last 信息
            System.out.println(last);
            last = last.pre;
        }
    }
}

//  定义一个Node 类, Node 对象表示双向链表的一个结点。
class Node{
    public Object item; //  真正存放数据
    public Node next;   //  指向后一个结点
    public Node pre;    //  指向前一个结点
    public Node(Object name) {
        this.item = name;
    }

    public String toString() {
        return "Node name=" + item;
    }
}
LinkedList CRUD案例
增加 add
LinkedList linkedList = new LinkedList();
linkedList.add(1);
linkedList.add(2);
linkedList.add(3);
System.out.println("linkedList=" + linkedList);
add()方法
public boolean add(E e) {
    linkLast(e);
    return true;
}
linkLast(e) 方法
void linkLast(E e) {
    final Node<E> l = last;	//	l 指向未添加前的尾节点
    final Node<E> newNode = new Node<>(l, e, null);	//	new Node(pre, element, next)
    last = newNode;
    if (l == null)	//	假如当前节点为 null,则 first 指向新节点
        first = newNode;
    else
        l.next = newNode;
    size++;	//	链表长度
    modCount++;	//	链表操作次数
}
调用构造器创建新的节点 Node
private static class Node<E> {
    E item;
    Node<E> next;
    Node<E> prev;

    Node(Node<E> prev, E element, Node<E> next) {
        this.item = element;
        this.next = next;
        this.prev = prev;
    }
}
删除 remove() <===> removeFirst() 删除头结点
删除一个结点的源码
linkedList.remove();
public E remove() {
    return removeFirst();
}
调用 removeFirst() 方法
public E removeFirst() {
    final Node<E> f = first;
    if (f == null)
        throw new NoSuchElementException();
    return unlinkFirst(f);
}
调用 unlinkFirst() 方法,将 f 指向的双向链表的第一个结点 拿掉
private E unlinkFirst(Node<E> f) {	//	f 为 不为 null 的头指针
    // assert f == first && f != null;
    final E element = f.item;	//	该方法返回头指针指向结点的 item
    final Node<E> next = f.next;	//	next:头指针的下一结点

    //	1)头指针 item 置空,next置空,指针右移,当前结点的 pre 置空
    f.item = null;
    f.next = null; // help GC ---> 将 item 也置空的原因
    first = next;
    if (next == null)
        last = null;
    else
        next.prev = null;
    size--;
    modCount++;
    return element;	//	返回被删除的内容
}
修改 set
linkedList.set(1, 999);
调用 E set(int index, E element)
public E set(int index, E element) {
    checkElementIndex(index);
    Node<E> x = node(index);
    E oldVal = x.item;
    x.item = element;	//	更新旧值为 element

    return oldVal;	//	返回的是旧值
}
private void checkElementIndex(int index) {
    if (!isElementIndex(index)){
        throw new IndexOutOfBoundsException(outOfBoundsMsg(index));
    }
}
private boolean isElementIndex(int index) {	//	判断该索引确实存在元素
	return index >= 0 && index < size;
}
返回指定索引的 非null 结点
Node<E> node(int index) {
    // assert isElementIndex(index);
    if (index < (size >> 1)) {	//	折半查找
        Node<E> x = first;
        for (int i = 0; i < index; i++)
            x = x.next;	//	前半段:从前往后找
        return x;
    } else {
        Node<E> x = last;
        for (int i = size - 1; i > index; i--)
            x = x.prev;
        return x;	//	后半段:从后往前找
    }
}
查询 get
得到某个结点的对象
//	get(1):得到双向链表的第 2 个对象
Object o = linkedList.get(1);
public E get(int index) {
    checkElementIndex(index);	//	确认该索引处,确实存在元素
    return node(index).item;	//	利用二分法,得到该结点,最后返回结点的 item
}
LinkedList和ArrayList比较
| 底层结构 | 增删的效率 | 改查的效率 | |
|---|---|---|---|
| ArrayList | 可变数组 | 较低(数组扩容) | 较高(通过索引) |
| LinkedList | 双向链表 | 较高(通过链表追加) | 较低 |
一般来说:
实际开发中,很大部分都是查询,因此大部分会选择 ArrayList
在一个项目中,可以灵活选择,一个模块使用的是 ArrayList,另一个模块使用 LinkedList
1.3 Vector
Vector基本定义
- Vector类的定义说明
public class Vector<E>
    extends AbstractList<E>
    implements List<E>, RandomAccess, Cloneable, java.io.Serializable
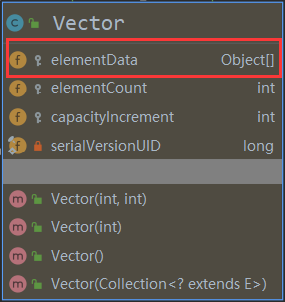
- 底层也是一个对象数组
protected Object[] elementData;
- 线程同步,即线程安全,Vector类的常用方法带有 synchronized
public synchronized E get(int index) {
    if (index >= elementCount)
        throw new ArrayIndexOutOfBoundsException(index);

    return elementData(index);
}
- 在开发中,需要线程同步安全时,考虑使用 Vector
Vector和ArrayList比较
| 底层结构 | 版本 | 线程安全(同步)效率 | 扩容倍数 | |
|---|---|---|---|---|
| ArrayList | 可变数组 | jdk1.2 | 不安全,效率高 | 有参:1.5(无参:10) |
| Vector | 可变数组 | jdk1.0 | 安全,效率不高(线程同步,每个方法都会做安全校验) | 有参:2(无参:10) |
Vector扩容机制
public class Vector_ {
    public static void main(String[] args) {
        //  无参构造器
        Vector vector = new Vector();
        for (int i = 0; i < 10; i++) {
            vector.add(i);
        }
        vector.add(100);
        System.out.println("vector=" + vector);
    }
}
public Vector() {
    this(10);	//	initialCapacity:10
}

public Vector(int initialCapacity) {
    this(initialCapacity, 0);
}

public Vector(int initialCapacity, int capacityIncrement) {
    super();
    if (initialCapacity < 0)
        throw new IllegalArgumentException("Illegal Capacity: "+
                                           initialCapacity);
    this.elementData = new Object[initialCapacity];
    this.capacityIncrement = capacityIncrement;
}
调用 add()方法
public synchronized boolean add(E e) {
    modCount++;
    add(e, elementData, elementCount);
    return true;
}
调用 add(E e, Object[] elements, int s) 方法
private void add(E e, Object[] elementData, int s) {
    if (s == elementData.length)	//	0 != 10,不扩容
        elementData = grow();
    elementData[s] = e;
    elementCount = s + 1;
}
当添加第 11个元素时:
(s == elementData.length) = 10; // 调用 grow() 方法
调用grow(element + 1) ---> grow(11)
private Object[] grow() {
    return grow(elementCount + 1);
}
调用 grow(11)
- oldCapacity = 10
- newCapacity = ArraySupport.newLength(10,1,10) = 20 = oldCapacity + oldCapacity = 2 * oldCapacity
//	由于 capacityIncrement 默认是0,所以 三元运算符 运算后,只能取到 oldCapacity
private Object[] grow(int minCapacity) {
    int oldCapacity = elementData.length;
    int newCapacity = ArraysSupport.newLength(oldCapacity,
                                              minCapacity - oldCapacity, /* minimum growth */
                                              capacityIncrement > 0 ? capacityIncrement : oldCapacity
                                              /* preferred growth */);
    return elementData = Arrays.copyOf(elementData, newCapacity);
}
public static int newLength(int oldLength, int minGrowth, int prefGrowth) {
    // assert oldLength >= 0
    // assert minGrowth > 0

    int newLength = Math.max(minGrowth, prefGrowth) + oldLength;
    if (newLength - MAX_ARRAY_LENGTH <= 0) {
        return newLength;
    }
    return hugeLength(oldLength, minGrowth);
}
有参构造器类似
2. Set
Set接口是 Collection 接口的子接口
- 无序(添加和取出的顺序不一致),没有索引
- 不允许重复元素,所以最多包含一个 null
- JDK API 中Set 接口的实现类有:AbstractSet , ConcurrentSkipListSet , CopyOnWriteArraySet , EnumSet , HashSet , JobStateReasons , LinkedHashSet , TreeSet
常用方法
和List接口一样,Set接口也是 Collection的子接口,因此,常用方法和 Collection 接口一样
两种遍历方式
- 迭代器
- 增强 for
注意:不能用普通索引的方式获取,因为 Set 没有索引
实现子类
2.1 HashSet [只有当 hashCode() 和 equals() 都相同时才加不进去]
- HashSet实现了 Set 接口
- HashSet实际上是 HashMap
- 可以存放 null 值,但是只能有一个 null
- HashSet不保证元素是有序的,取决于 hash后,再确定索引的结果(即:不保证存放元素的顺序和取出的顺序一致)
- 不能有重复的元素 / 对象,在前面 Set 接口使用已经说过
Set set = new HashSet();
set.add("lucy");	//	T	都指向常量池(都是字符串常量)
set.add("lucy");	//	F
set.add(new Dog("tom"));	//	T
set.add(new Dog("tom"));	//	T
再加深一下,非常经典的面试题
//	看源码,即:add() 方法到底发生了什么
set.add(new String("hsp"));
set.add(new String("hsp"));	//	False
- remove() 指定删除某个对象
//	看下构造器,发现 HashSet的底层是 HashMap
Set set = new HashSet();
/**
     * Constructs a new, empty set; the backing {@code HashMap} instance has
     * default initial capacity (16) and load factor (0.75).
     */
/**
	* 构造一个新的空集
	* 后备 {@code HashMap} 实例具有
	* 默认的初始容量 (16)
	* 负载因子 (0.75)
	*/
public HashSet() {
    map = new HashMap<>();
}

public HashMap() {
    this.loadFactor = DEFAULT_LOAD_FACTOR; // all other fields defaulted
}
//  说明
//  1. 在执行add 方法后,会返回一个 boolean值
//  2. 如果成功了,返回 true;否则返回 false
//  3. 可以通过 remove 指定删除具体某个对象
System.out.println(set.add("john"));    //  T
System.out.println(set.add("lucy"));    //  T
System.out.println(set.add("john"));    //  F
System.out.println(set.add("jack"));    //  T
System.out.println(set.add("Rose"));    //  T
set.remove("john");
System.out.println("set" + set);    //  3个 顺序不保证哦
1. HashSet底层机制
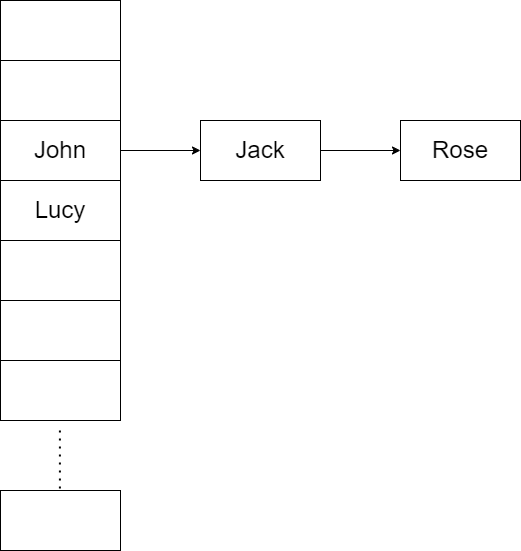
分析 HashSet底层是 HashMap,而 HashMap底层是(数组 + 链表 + 红黑树)
当它的链表到达一定量的时候,而且满足数组的大小,在某一范围的时候,就会把链表进行树化,变成一个红黑树
模拟简单的 数组 + 链表 的结构
public class HashSetStructure {
    public static void main(String[] args) {
        //  模拟一个HashSet的底层 (HashMap 的底层结构)

        //  1. 创建一个数组,数组的类型就是 Node
        //  2. 有些人,直接把 Node[] 数组称为表
        Node[] table = new Node[16];
        System.out.println("table=" + table);
        //  3. 创建结点
        Node john = new Node("john", null);
        table[2] = john;
        Node jack = new Node("jack", null);
        john.next = jack;   //  将 jack 结点挂载到 john
        Node rose = new Node("Rose", null);
        jack.next = rose;   //  将 rose 结点挂载到 jack

        Node lucy = new Node("lucy", null);
        table[3] = lucy;    //  把lucy 放到 table 表的索引为3的位置
        System.out.println("table" + table);
    }
}

class Node {    //  结点,存储数据,可以指向下一个结点,从而形成链表。
    Object item;    //  存放数据
    Node next;      //  指向下一个结点

    public Node(Object item, Node next) {
        this.item = item;
        this.next = next;
    }
}
2. HashSet 扩容机制(Node<K, V>[] resize() )
-
HashSet 底层是 HashMap
-
添加一个元素时,先得到 hash 值 ---> 会转成 索引值
public V put(K key, V value) {
    return putVal(hash(key), key, value, false, true);
}
计算 hash 值
static final int hash(Object key) {
    int h;
    return (key == null) ? 0 : (h = key.hashCode()) ^ (h >>> 16);
}
再执行 putVal(int hash, K key, V value, boolean onlyIfAbsenet, boolean evict)
得到索引值:
if ((p = tab[i = (n - 1) & hash]) == null)final V putVal(int hash, K key, V value, boolean onlyIfAbsent, boolean evict) { Node<K,V>[] tab; Node<K,V> p; int n, i; if ((tab = table) == null || (n = tab.length) == 0) n = (tab = resize()).length; // n:table 数组大小 if ((p = tab[i = (n - 1) & hash]) == null) // 索引 i = (n - 1) & hash = 15 & 3254803 = 3 tab[i] = newNode(hash, key, value, null); -
找到存储数据表 table,看这个索引位置是否已经存放有元素?
- 没有:直接加入
- 有:调用 equals 比较 【程序员控制 equals 方法具体比较标准】
- 如果相同,就放弃添加
- 如果不相同,则以链表的方式添加
3. 初始化(第一次 add)
public class HashSetSource {
    public static void main(String[] args) {
        HashSet hashSet = new HashSet();
        hashSet.add("java");    //  到此为止,第一次add分析完毕
        hashSet.add("php");     //  到此为止,第二次add分析完毕
        hashSet.add("java");    //  第三次故意写了一个相同的,我们来看看它怎么完成不添加的流程的。
        System.out.println("hashset=" + hashSet);
        //  老韩对 HashSet的源码解读
    }
}
//	key="java", key.hashCode() = 3254818
//	^:异或运算 XOR
//	hash("key")  = 3254818 ^ (3254818 >>> 16) = 3254803

//	计算 key.hashCode() 并将哈希的较高位传播(XOR)到较低位。由于该表使用二次幂掩码,因此仅在当前掩码之上位变化的散列集将始终发生冲突。 (已知的例子是在小表中保存连续整数的 Float 键集。)因此,我们应用了一种变换,将高位的影响向下传播。在位扩展的速度、实用性和质量之间存在折衷。因为许多常见的散列集已经合理分布(所以不要从传播中受益),并且因为我们使用树来处理 bin 中的大量冲突,我们只是以最便宜的方式对一些移位的位进行异或,以减少系统损失,以及合并最高位的影响,否则由于表边界,这些最高位将永远不会用于索引计算。

//右移16位是为了让高16位也参与运算,可以更好的均匀散列,减少碰撞,进一步降低hash冲突的几率
//异或运算是为了更好保留两组32位二进制数中各自的特征

static final int hash(Object key) {
    int h;	//	保存 key 的 哈希值
    return (key == null) ? 0 : (h = key.hashCode()) ^ (h >>> 16);
}

if ((p = tab[i = (n - 1) & hash]) == null)	//	索引 i = (n - 1) & hash = 15 & 3254803 = 3
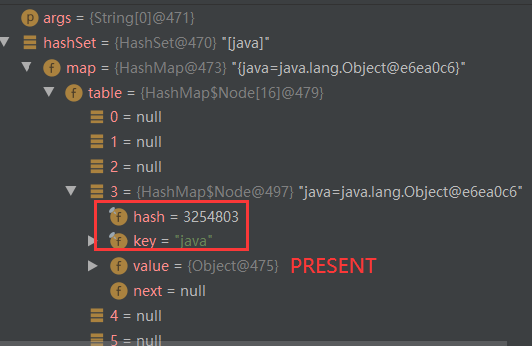
看下 add() 方法
// Dummy value to associate with an Object in the backing Map
//	起到占位的作用
//	为了让 HashSet 使用到 HashMap,它的 value 统一放了一个值 PRESENT
//	将来不管你传进来多少次,key 是变化的,但是 value 始终都是 PRESENT【static:共享的】
private static final Object PRESENT = new Object();

public boolean add(E e) {	//	e = "java"
        return map.put(e, PRESENT)==null;	//	map.put方法,返回 null,就是添加成功了---> true
}
调用 V put(K key, V value) 方法
public V put(K key, V value) {	//	K: 哈希值,V:对象
    return putVal(hash(key), key, value, false, true);
}
调用 int hash(key) 方法
- 得到 key 对应的 哈希值,以便后面确认在 table 中的位置
- 并不完全等价 hashCode,因为要防止冲突
static final int hash(Object key) {
    int h;	//	保存 key 的 哈希值
    return (key == null) ? 0 : (h = key.hashCode()) ^ (h >>> 16);
}
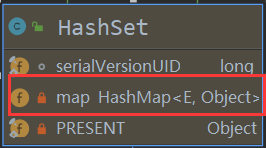
看到 HashSet 中有 map HashMap<E, Object>字段
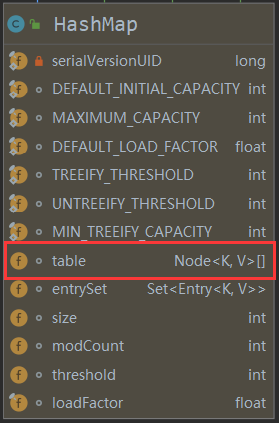
再看下 HashMap中有 table 属性(放 Node 结点的一个数组)
调用 V putVal(int hash, K key, V value, boolean onlyIfAbsent, boolean evict) 方法 (false、true)
/**
     * The table, initialized on first use, and resized as
     * necessary. When allocated, length is always a power of two.
     * (We also tolerate length zero in some operations to allow
     * bootstrapping mechanics that are currently not needed.)
     */
transient Node<K,V>[] table;	//	HashMap的一个属性 【放 Node 结点的一个数组(刚才模拟的那个数组)】
/**
     * Implements Map.put and related methods.
     *
     * @param hash hash for key
     * @param key the key
     * @param value the value to put
     * @param onlyIfAbsent if true, don't change existing value
     * @param evict if false, the table is in creation mode.
     * @return previous value, or null if none
     */
/**
     * 实现 Map.put 和相关方法
     *
     * @param hash:key 的 哈希值
     * @param key :key
     * @param value:要放入的值(对象)
     * @param onlyIfAbsent:如果为真,不要改变现有的值
     * @param evict:如果为假,表处于创建模式
     * @return previous value(返回旧对象), or null if none(如果没有则返回 null)
     */
final V putVal() 方法
final V putVal(int hash, K key, V value, boolean onlyIfAbsent,
               boolean evict) {
    Node<K,V>[] tab; Node<K,V> p; int n, i;	//	定义辅助变量
    if ((tab = table) == null || (n = tab.length) == 0)	//	初始化
        n = (tab = resize()).length;	//	n = 16(初始化容量大小为: 16)
    if ((p = tab[i = (n - 1) & hash]) == null)	//	计算 key 对应的 hash值,去计算该 key 应该在 table 表的哪一个索引位置去存放,并把这个位置的对象 赋给 辅助变量 p
        //	再判断是否为 null
        //	1)如果 p 为 null,表示还没有存放过元素,就创建一个 Node(key="java", value = PRESENT)放在该位置
        //	为什么把 key 对应的 hash 也存进去了,因为将来会去比较,如果再有的话,它会去看,如果相等会往后怼
        tab[i] = newNode(hash, key, value, null);
    else {
        //	辅助变量
        Node<K,V> e; K k;
        if (p.hash == hash &&	//	不能添加
            ((k = p.key) == key || (key != null && key.equals(k))))
            e = p;
        else if (p instanceof TreeNode)	//	树
            e = ((TreeNode<K,V>)p).putTreeVal(this, tab, hash, key, value);
        else {	//	链表【新加入的 Node,与链表中的 Node依次比较】
            for (int binCount = 0; ; ++binCount) {
                if ((e = p.next) == null) {	//	能加的情况,还要看是否要树化,e = null
                    p.next = newNode(hash, key, value, null);
                    if (binCount >= TREEIFY_THRESHOLD - 1) // TREEIFY-THRESHOLD = 8【binCount 从0开始计数,当binCount = 0 时候,表示将要插入到第 2个位置;依次类推,binCount = 1 时,表示要插入到第 3个位置;所以当 binCount = 7时,表要要插入到第 9个位置。此时进行树化
                        treeifyBin(tab, hash);
                    break;
                }
                if (e.hash == hash &&	//	如果在循环过程中,发现有相同,就不添加了 break【e != null】只是替换 value
                    ((k = e.key) == key || (key != null && key.equals(k))))
                    break;
                p = e;
            }
        }
        if (e != null) { // existing mapping for key
            V oldValue = e.value;	//e = p (链表的首位置)
            if (!onlyIfAbsent || oldValue == null)
                e.value = value;	// 更新 e.value = 新传进来的 value
            afterNodeAccess(e);
            return oldValue;
        }
    }
    ++modCount;	//	添加成功的次数
    if (++size > threshold)	//	 1 > threshold = 12 false
        resize();
    afterNodeInsertion(evict);	//	evict 默认是 true,在结点后插入 【对于 HashMap来说是空方法,目的是为了让它的子类去是实现这个方法,再做一些动作的】
    return null;
}
Node<K, V>[] resize() 方法
调用 Node<K, V>[] resize() 方法,初始化或加倍表大小
- 如果为 null,则按照字段阈值中保存的初始容量目标进行分配
- 否则,因为我们使用二次幂展开,每个 bin 中的元素必须保持相同的索引,或者在新表中以二次幂的偏移量移动
/**
     * Initializes or doubles table size.  If null, allocates in
     * accord with initial capacity target held in field threshold.
     * Otherwise, because we are using power-of-two expansion, the
     * elements from each bin must either stay at same index, or move
     * with a power of two offset in the new table.
     *
     * @return the table
     */
//	allocates:分配
//	in accord with :符合
//	power of two:二次幂

final Node<K,V>[] resize() {
    Node<K,V>[] oldTab = table;
    int oldCap = (oldTab == null) ? 0 : oldTab.length;	//	旧容量
    int oldThr = threshold;	//	旧阈值(初始为:0)
    int newCap, newThr = 0;
    if (oldCap > 0) {
        if (oldCap >= MAXIMUM_CAPACITY) {
            threshold = Integer.MAX_VALUE;
            return oldTab;
        }
        else if ((newCap = oldCap << 1) < MAXIMUM_CAPACITY &&
                 oldCap >= DEFAULT_INITIAL_CAPACITY)
            newThr = oldThr << 1; // double threshold
    }
    else if (oldThr > 0) // initial capacity was placed in threshold
        newCap = oldThr;
    else {               // zero initial threshold signifies using defaults(初始化)
        newCap = DEFAULT_INITIAL_CAPACITY;	//	16
        newThr = (int)(DEFAULT_LOAD_FACTOR * DEFAULT_INITIAL_CAPACITY);
    }
    if (newThr == 0) { //	新阈值:16 * 0.75 = 12 != 0【table大小有16,但是只要用了12个,就要开始扩容了】
        float ft = (float)newCap * loadFactor;
        newThr = (newCap < MAXIMUM_CAPACITY && ft < (float)MAXIMUM_CAPACITY ?
                  (int)ft : Integer.MAX_VALUE);
    }
    threshold = newThr;		//	更新 阈值 threshold = 12
    @SuppressWarnings({"rawtypes","unchecked"})
    Node<K,V>[] newTab = (Node<K,V>[])new Node[newCap];	//	创建初始默认容量大小数组(16)
    table = newTab;
    if (oldTab != null) {	//	初始化时,oldTab == null,后面的代码都不执行,直接走到最后的 return
        for (int j = 0; j < oldCap; ++j) {
            Node<K,V> e;
            if ((e = oldTab[j]) != null) {
                oldTab[j] = null;
                if (e.next == null)
                    newTab[e.hash & (newCap - 1)] = e;	//	扩容后 索引位置也会同步更新
                else if (e instanceof TreeNode)
                    ((TreeNode<K,V>)e).split(this, newTab, j, oldCap);
                else { // preserve order
                    Node<K,V> loHead = null, loTail = null;
                    Node<K,V> hiHead = null, hiTail = null;
                    Node<K,V> next;
                    do {
                        next = e.next;
                        if ((e.hash & oldCap) == 0) {
                            if (loTail == null)
                                loHead = e;
                            else
                                loTail.next = e;
                            loTail = e;
                        }
                        else {
                            if (hiTail == null)
                                hiHead = e;
                            else
                                hiTail.next = e;
                            hiTail = e;
                        }
                    } while ((e = next) != null);
                    if (loTail != null) {
                        loTail.next = null;
                        newTab[j] = loHead;
                    }
                    if (hiTail != null) {
                        hiTail.next = null;
                        newTab[j + oldCap] = hiHead;
                    }
                }
            }
        }
    }
    return newTab;	//	返回初始容量大小数组
}
上方 代码 42 行,将 table 容量更新为:16【table = null】
默认初始容量:16
/**
     * The default initial capacity - MUST be a power of two.
     */
static final int DEFAULT_INITIAL_CAPACITY = 1 << 4; // aka 16
默认的加载因子:0.75
/**
     * The load factor used when none specified in constructor.
     */
static final float DEFAULT_LOAD_FACTOR = 0.75f;
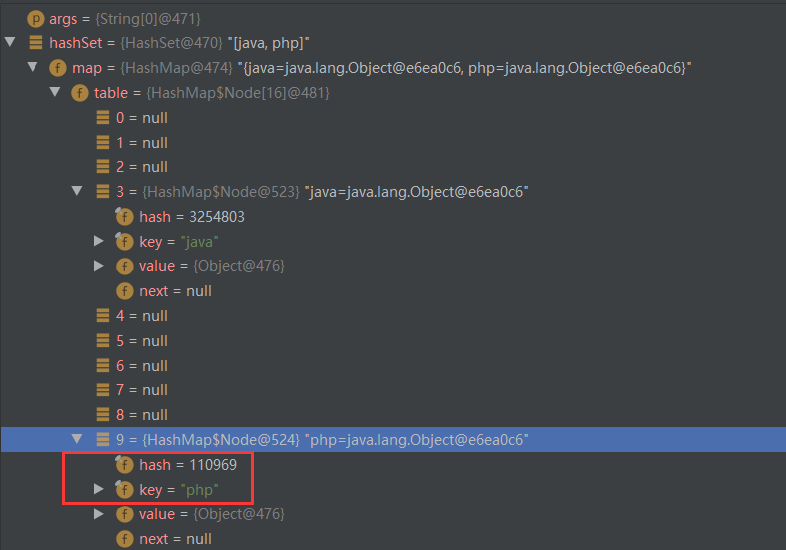
4. 添加不同的元素(第二次 add)
//	hash("php")= 110968 ^ (110968 >>> 16) = 110968 ^ 1 = 110969
//	i = (n - 1) & hash = 15 & 110969 = 9
static final int hash(Object key) {
        int h;
        return (key == null) ? 0 : (h = key.hashCode()) ^ (h >>> 16);
 }
final V putVal(int hash, K key, V value, boolean onlyIfAbsent,
               boolean evict) {
    Node<K,V>[] tab; Node<K,V> p; int n, i;
    if ((tab = table) == null || (n = tab.length) == 0)
        n = (tab = resize()).length;
    if ((p = tab[i = (n - 1) & hash]) == null)	//	计算 key 对应的 hash值,去计算该 key 应该在 table 表的哪一个索引位置去存放,并把这个位置的对象 赋给 辅助变量 p
        tab[i] = newNode(hash, key, value, null);
    else {
        Node<K,V> e; K k;
        if (p.hash == hash &&	//	只有满足 2个条件,才不添加
            ((k = p.key) == key || (key != null && key.equals(k))))
            e = p;
        else if (p instanceof TreeNode)
            e = ((TreeNode<K,V>)p).putTreeVal(this, tab, hash, key, value);
        else {
            for (int binCount = 0; ; ++binCount) {
                if ((e = p.next) == null) {
                    p.next = newNode(hash, key, value, null);
                    if (binCount >= TREEIFY_THRESHOLD - 1) // -1 for 1st
                        treeifyBin(tab, hash);
                    break;
                }
                if (e.hash == hash &&
                    ((k = e.key) == key || (key != null && key.equals(k))))
                    break;
                p = e;
            }
        }
        if (e != null) { // existing mapping for key
            V oldValue = e.value;
            if (!onlyIfAbsent || oldValue == null)
                e.value = value;
            afterNodeAccess(e);
            return oldValue;
        }
    }
    ++modCount;	//	修改的次数:2
    if (++size > threshold)	//	 2 > threshold = 12 false
        resize();
    afterNodeInsertion(evict);	//	evict 默认是 true,在结点后插入
    return null;
}
5. 添加已有元素
再加入一次 "java"
//	key="java", key.hashCode() = 3254818
//	^:异或运算 XOR
//	hash("key")  = 3254818 ^ (3254818 >>> 16) = 3254803

if ((p = tab[i = (n - 1) & hash]) == null)	//	索引 i = (n - 1) & hash = 15 & 3254803 = 3
final V putVal(int hash, K key, V value, boolean onlyIfAbsent,
               boolean evict) {
    Node<K,V>[] tab; Node<K,V> p; int n, i;		//	定义辅助变量
    if ((tab = table) == null || (n = tab.length) == 0)
        n = (tab = resize()).length;
    if ((p = tab[i = (n - 1) & hash]) == null)	//	P指向当前索引对应的链表的第一个元素。【不为 null,走到下方 else 语句】
        tab[i] = newNode(hash, key, value, null);
    else {
        //	开发技巧提示:在需要局部变量(辅助变量)时候,再创建
        Node<K,V> e; K k;
        // [看能否添加]
        if (p.hash == hash && //  如果当前索引位置对应的链表的第一个元素 和 准备添加的 key 的哈希值一样
            ((k = p.key) == key || (key != null && key.equals(k))))	//	并且满足 下面2个条件之一:
        //	1)准备加入的 key 和 p 指向的 Node结点的 key 是同一个对象
        //	2)p 指向的 Node 结点的 key 【k = p.key】和 准备加入的 key 经过 equals()比较后相同 (动态绑定)
            e = p;
        //	[能添加,看是否是一棵树]
        else if (p instanceof TreeNode)		//	再判断 p 是不是一棵红黑树
            e = ((TreeNode<K,V>)p).putTreeVal(this, tab, hash, key, value);
        //	[能添加,且不是树 ===> 索引位置是一个链表]
        else {	//	如果 table 对应索引位置,已经是一个链表,就用 for 循环比较
            //	1)依次和该链表的每一个元素比较后,都不相同,则加入到该链表的最后
            //	注意在把元素添加到链表后,立即判断 该链表是否已经达到 8 个结点:
            //		如果达到了:就调用 treeifyBin() 对当前这个链表进行树化(转成红黑树)
		   //       注意:在转成红黑树时,还进行判断, 如果该 table 数组的大小 < 64,则先调用 resize() 方法对 table表进行扩容
            //	2)依次和该链表的每一个元素比较过程中,如果有相同的情况,就直接break

            for (int binCount = 0; ; ++binCount) {	//	循环比较(死循环)
                if ((e = p.next) == null) {	//	e 指向下一个
                    p.next = newNode(hash, key, value, null);
                    if (binCount >= TREEIFY_THRESHOLD - 1) // -1 for 1st ---> TREEIFY_THRESHOLD - 1 = 7(从 0 开始,当等于7 时,就说明有 8 个元素了)
                        treeifyBin(tab, hash);
                    break;
                }
                if (e.hash == hash &&
                    ((k = e.key) == key || (key != null && key.equals(k))))
                    break;
                p = e;	//	e = p.next (重新循环)
            }
        }
        if (e != null) { // existing mapping for key
            V oldValue = e.value;	//	其实就是我们的 PRESENT
            if (!onlyIfAbsent || oldValue == null)
                e.value = value;
            afterNodeAccess(e);
            return oldValue;	//	返回 oldValue,不为 null,所以最后 add() 方法返回失败
        }
    }
    /*
    该 HashMap 被结构修改的次数 结构修改是那些改变 HashMap 中的映射数量或以其他方式修改其内部结构(例如,rehash)的修改。该字段用于使 HashMap 的集合视图上的迭代器快速失败。 (请参阅并发修改异常)。
    */
    ++modCount;
    if (++size > threshold)
        resize();
    afterNodeInsertion(evict);
    return null;
}
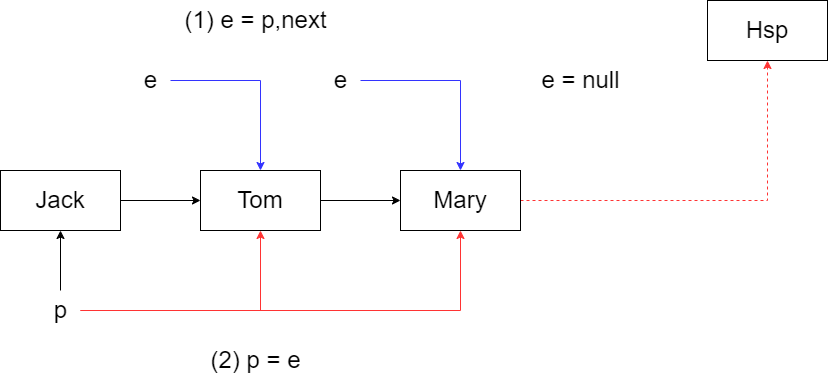
只有2中情况会 break
- e = p.next == null:将新结点挂在后面【++modCount】
- key 和链表中相同,直接 break,return oldValue,添加失败
   /**
     * The bin count threshold for using a tree rather than list for a
     * bin.  Bins are converted to trees when adding an element to a
     * bin with at least this many nodes. The value must be greater
     * than 2 and should be at least 8 to mesh with assumptions in
     * tree removal about conversion back to plain bins upon
     * shrinkage.
     */

	/**
	  * 使用树而不是列表的 bin 计数阈值
	  * 将元素添加到至少具有这么多节点的 bin 时,bin 将转换为树。
	  * 该值必须大于 2 并且应该至少为 8,以便与树移除中关于在收缩时转换回普通 bin 的假设相吻合。
	  */

static final int TREEIFY_THRESHOLD = 8;
/**
     * Replaces all linked nodes in bin at index for given hash unless
     * table is too small, in which case resizes instead.
     */
/**
	替换给定哈希索引处的 bin 中的所有链接节点,除非表太小,在这种情况下调整大小。
*/
final void treeifyBin(Node<K,V>[] tab, int hash) {
    int n, index; Node<K,V> e;
    if (tab == null || (n = tab.length) < MIN_TREEIFY_CAPACITY)	//	64
        resize();
    else if ((e = tab[index = (n - 1) & hash]) != null) {
        TreeNode<K,V> hd = null, tl = null;
        do {
            TreeNode<K,V> p = replacementTreeNode(e, null);
            if (tl == null)
                hd = p;
            else {
                p.prev = tl;
                tl.next = p;
            }
            tl = p;
        } while ((e = e.next) != null);
        if ((tab[index] = hd) != null)
            hd.treeify(tab);
    }
}
/**
     * The smallest table capacity for which bins may be treeified.
     * (Otherwise the table is resized if too many nodes in a bin.)
     * Should be at least 4 * TREEIFY_THRESHOLD to avoid conflicts
     * between resizing and treeification thresholds.
     */
/**
  * 可对其进行树化的 bin 的最小表容量。 (否则,如果 bin 中有太多节点,则调整表的大小。)应至少为 4       * TREEIFY_THRESHOLD 以避免调整大小和树化阈值之间的冲突。
  */

static final int MIN_TREEIFY_CAPACITY = 64;	//	4 * 16 = 64
未达到 64,则先通过 resize() 方法进行扩容
/**
     * Initializes or doubles table size.  If null, allocates in
     * accord with initial capacity target held in field threshold.
     * Otherwise, because we are using power-of-two expansion, the
     * elements from each bin must either stay at same index, or move
     * with a power of two offset in the new table.
     *
     * @return the table
     */
final Node<K,V>[] resize() {
    Node<K,V>[] oldTab = table;
    int oldCap = (oldTab == null) ? 0 : oldTab.length;
    int oldThr = threshold;
    int newCap, newThr = 0;
    if (oldCap > 0) {
        if (oldCap >= MAXIMUM_CAPACITY) {
            threshold = Integer.MAX_VALUE;
            return oldTab;
        }
        else if ((newCap = oldCap << 1) < MAXIMUM_CAPACITY &&
                 oldCap >= DEFAULT_INITIAL_CAPACITY)
            newThr = oldThr << 1; // double threshold
    }
    else if (oldThr > 0) // initial capacity was placed in threshold
        newCap = oldThr;
    else {               // zero initial threshold signifies using defaults
        newCap = DEFAULT_INITIAL_CAPACITY;
        newThr = (int)(DEFAULT_LOAD_FACTOR * DEFAULT_INITIAL_CAPACITY);
    }
    if (newThr == 0) {
        float ft = (float)newCap * loadFactor;
        newThr = (newCap < MAXIMUM_CAPACITY && ft < (float)MAXIMUM_CAPACITY ?
                  (int)ft : Integer.MAX_VALUE);
    }
    threshold = newThr;
    @SuppressWarnings({"rawtypes","unchecked"})
    Node<K,V>[] newTab = (Node<K,V>[])new Node[newCap];
    table = newTab;
    if (oldTab != null) {
        for (int j = 0; j < oldCap; ++j) {
            Node<K,V> e;
            if ((e = oldTab[j]) != null) {
                oldTab[j] = null;
                if (e.next == null)
                    newTab[e.hash & (newCap - 1)] = e;
                else if (e instanceof TreeNode)
                    ((TreeNode<K,V>)e).split(this, newTab, j, oldCap);
                else { // preserve order
                    Node<K,V> loHead = null, loTail = null;
                    Node<K,V> hiHead = null, hiTail = null;
                    Node<K,V> next;
                    do {
                        next = e.next;
                        if ((e.hash & oldCap) == 0) {
                            if (loTail == null)
                                loHead = e;
                            else
                                loTail.next = e;
                            loTail = e;
                        }
                        else {
                            if (hiTail == null)
                                hiHead = e;
                            else
                                hiTail.next = e;
                            hiTail = e;
                        }
                    } while ((e = next) != null);
                    if (loTail != null) {
                        loTail.next = null;
                        newTab[j] = loHead;
                    }
                    if (hiTail != null) {
                        hiTail.next = null;
                        newTab[j + oldCap] = hiHead;
                    }
                }
            }
        }
    }
    return newTab;
}
6. HashSet转成红黑树机制
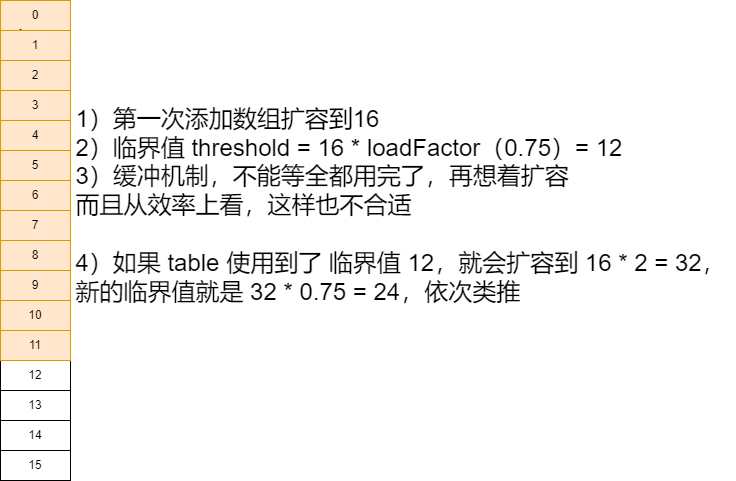
- HashSet底层是 HashMap,第一次添加时,table 数组扩容到 16,临界值(threshold)是 16 * 加载因子(loadFactor = 0.75) = 12
- 如果table 数组使用到了 临界值 12,就会扩容到 16 * 2 = 32,新的临界值就是 32 * 0.75 = 24,依此类推
- 在 Java8 中,如果一条链表的
- 元素个数到达 TREEIFY_THRESHOLD(默认是 8)
- 并且 table 的大小 >= MIN_TREEIFY_CAPACITY(默认是 64),就会进行树化(红黑树),否则仍然采用数组扩容机制
public class HashSetIncrement {
    public static void main(String[] args) {
        /*
        HashSet底层是HashMap,第一次添加时,table 数组扩容到 16,
        临界值(threshold)是 16 * 加载因子(loadFactor)是0.75 = 12
        如果table 数组使用到了临界值 12,就会扩容到 16 * 2 = 32,
        新的临界值就是 32 * 0.75 = 24,依次类推
        */
        HashSet hashSet = new HashSet();
        for (int i = 1; i < 100; i++) {
            hashSet.add(i); //  1,2,3,4,5 ... 100 【数字不同,hash之后得到的索引可能相同】
        }
    }
}
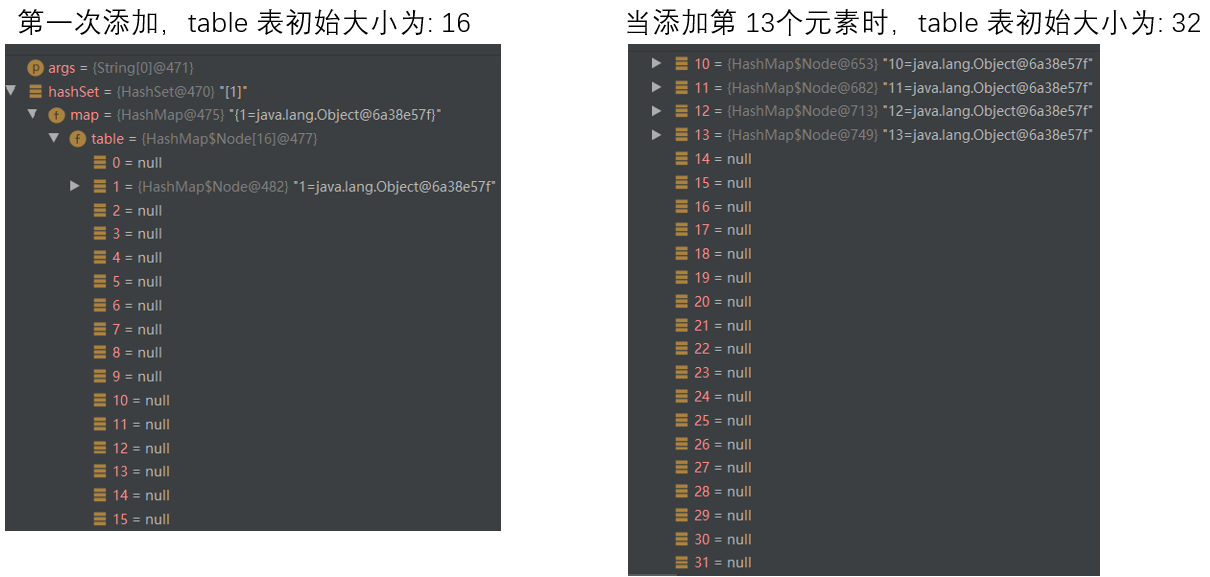
添加第13个元素时
final V putVal(int hash, K key, V value, boolean onlyIfAbsent,
               boolean evict) {
    Node<K,V>[] tab; Node<K,V> p; int n, i;
    if ((tab = table) == null || (n = tab.length) == 0)
        n = (tab = resize()).length;
    if ((p = tab[i = (n - 1) & hash]) == null)
        tab[i] = newNode(hash, key, value, null);	//	添加第 13个元素
    else {
        Node<K,V> e; K k;
        if (p.hash == hash &&	//	hash 相同【首先确保索引相同了】
            ((k = p.key) == key || (key != null && key.equals(k))))	// 链表首位的 k 和要加入的 key 是一个,或者经过人工设定的 equal方法判定相等了 ===> 就舍弃要假如的节点
            e = p;
        else if (p instanceof TreeNode)
            e = ((TreeNode<K,V>)p).putTreeVal(this, tab, hash, key, value);
        else {
            for (int binCount = 0; ; ++binCount) {	//	开启循环比较了
                if ((e = p.next) == null) {
                    p.next = newNode(hash, key, value, null);
                    if (binCount >= TREEIFY_THRESHOLD - 1) // -1 for 1st
                        treeifyBin(tab, hash);
                    break;
                }
                if (e.hash == hash &&
                    ((k = e.key) == key || (key != null && key.equals(k))))
                    break;
                p = e;
            }
        }
        if (e != null) { // existing mapping for key
            V oldValue = e.value;
            if (!onlyIfAbsent || oldValue == null)
                e.value = value;
            afterNodeAccess(e);
            return oldValue;
        }
    }
    ++modCount;	//	13(该表操作了13次)
    if (++size > threshold)	//	++12 > 12
        resize();	//	调用 resize()方法扩容
    afterNodeInsertion(evict);
    return null;
}
调用 resize() 方法扩容
final Node<K,V>[] resize() {
        Node<K,V>[] oldTab = table;
        int oldCap = (oldTab == null) ? 0 : oldTab.length;	//	16
        int oldThr = threshold;	// 12
        int newCap, newThr = 0;
        if (oldCap > 0) {
            if (oldCap >= MAXIMUM_CAPACITY) {	// 12 >= 1<<20 false
                threshold = Integer.MAX_VALUE;
                return oldTab;
            }
            else if ((newCap = oldCap << 1) < MAXIMUM_CAPACITY &&	//	容量翻倍
                     oldCap >= DEFAULT_INITIAL_CAPACITY)
                newThr = oldThr << 1; // double threshold  门限翻倍
        }
        else if (oldThr > 0) // initial capacity was placed in threshold
            newCap = oldThr;
        else {               // zero initial threshold signifies using defaults
            newCap = DEFAULT_INITIAL_CAPACITY;
            newThr = (int)(DEFAULT_LOAD_FACTOR * DEFAULT_INITIAL_CAPACITY);
        }
        if (newThr == 0) {
            float ft = (float)newCap * loadFactor;
            newThr = (newCap < MAXIMUM_CAPACITY && ft < (float)MAXIMUM_CAPACITY ?
                      (int)ft : Integer.MAX_VALUE);
        }
        threshold = newThr;	//	24
        @SuppressWarnings({"rawtypes","unchecked"})
        Node<K,V>[] newTab = (Node<K,V>[])new Node[newCap];	//	新建一个容量 为 32 的 table
        table = newTab;
        if (oldTab != null) {
            for (int j = 0; j < oldCap; ++j) {	// oldCap = 16
                Node<K,V> e;
                if ((e = oldTab[j]) != null) {
                    oldTab[j] = null;
                    if (e.next == null)
                        newTab[e.hash & (newCap - 1)] = e;	//	将 oldTab中的值拷贝到 newTab 中去【扩容之后,索引位置重新计算】
                    else if (e instanceof TreeNode)
                        ((TreeNode<K,V>)e).split(this, newTab, j, oldCap);
                    else { // preserve order
                        Node<K,V> loHead = null, loTail = null;
                        Node<K,V> hiHead = null, hiTail = null;
                        Node<K,V> next;
                        do {
                            next = e.next;
                            if ((e.hash & oldCap) == 0) {
                                if (loTail == null)
                                    loHead = e;
                                else
                                    loTail.next = e;
                                loTail = e;
                            }
                            else {
                                if (hiTail == null)
                                    hiHead = e;
                                else
                                    hiTail.next = e;
                                hiTail = e;
                            }
                        } while ((e = next) != null);
                        if (loTail != null) {
                            loTail.next = null;
                            newTab[j] = loHead;
                        }
                        if (hiTail != null) {
                            hiTail.next = null;
                            newTab[j + oldCap] = hiHead;
                        }
                    }
                }
            }
        }
        return newTab;	//	返回 newTab
}
以此类推,当添加第 25个元素时候:table 的大小变为:64
人为构造 hash 一样,但是 值不同的场景
// 当加入第 9 个元素时,table扩容至 32 【因为 table 的 size 还未达到 64,所以先数组扩容】
| 添加元素个数 | table大小 |
|---|---|
| 1 - 8 | 16 |
| 9 | 32 |
| 10 | 64 |
| 11 | 🌳树化 |
public class HashSetIncrement_1 {
    public static void main(String[] args) {
        HashSet hashSet = new HashSet();

        /*  java8中,如果一条链表的元素个数到达 TREEIFY_THRESHOLD(默认是8),
            并且table的大小 >= MIN_TREEIFY_CAPACITY(默认是64),就会进行树化(红黑树),
            否则仍然采用数组扩容机制
         */
        for (int i = 1; i < 12; i++) {
             hashSet.add(new A(i));
        }
        System.out.println("hashset" + hashSet);

class A {
    private int n;

    public A(int n) {
        this.n = n;
    }

    @Override
    public int hashCode() {
        return 100;
    }
}
可以看到把 1 和 2放到同一条链表上去了
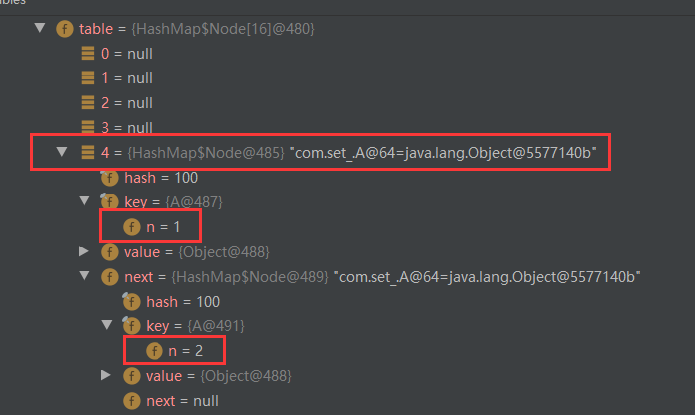
当加入第 9 个元素时,table扩容至 32 【因为 table 的 size 还未达到 64,所以先数组扩容 】
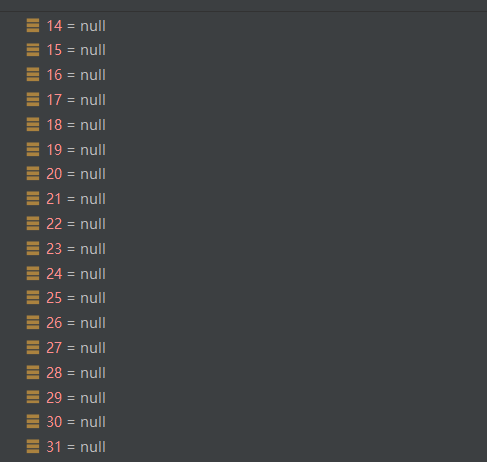
当加入第 10个元素时,还是会触发扩容机制,table 扩容至:64
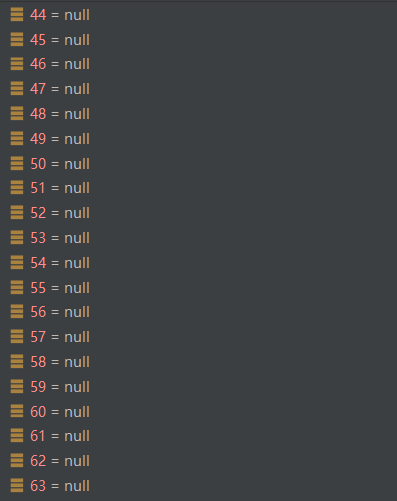
newTab[e.hash & (newCap - 1)] = e
扩容后,索引位置会重新计算
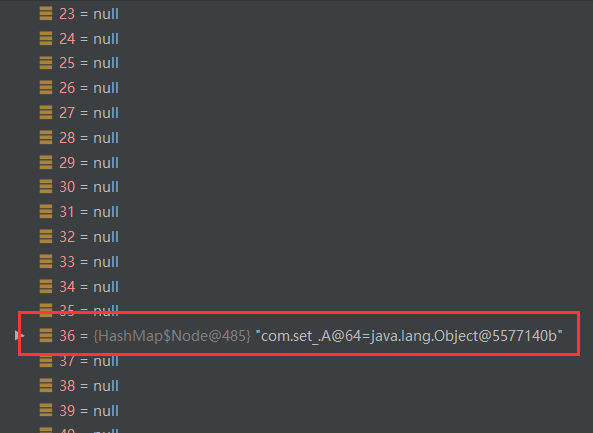
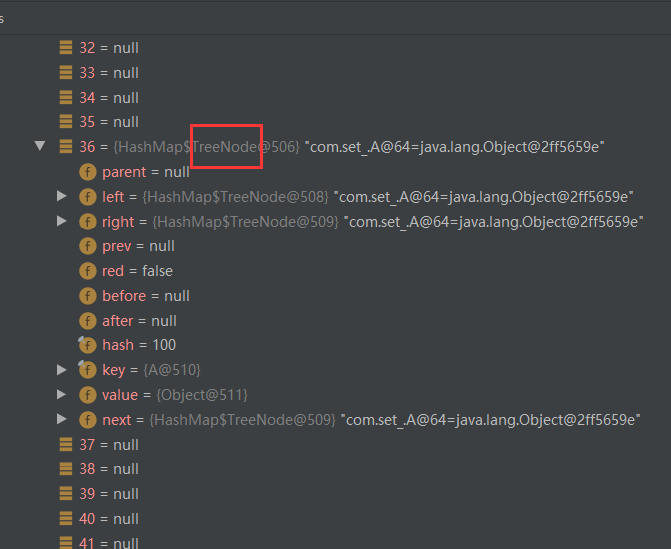
注意:当加入第11个元素时,会进行树化
final V putVal(int hash, K key, V value, boolean onlyIfAbsent,
               boolean evict) {
    Node<K,V>[] tab; Node<K,V> p; int n, i;
    if ((tab = table) == null || (n = tab.length) == 0)
        n = (tab = resize()).length;
    if ((p = tab[i = (n - 1) & hash]) == null)
        tab[i] = newNode(hash, key, value, null);
    else {	//	p != null
        Node<K,V> e; K k;
        if (p.hash == hash &&
            ((k = p.key) == key || (key != null && key.equals(k))))
            e = p;
        else if (p instanceof TreeNode)
            e = ((TreeNode<K,V>)p).putTreeVal(this, tab, hash, key, value);
        else {
            for (int binCount = 0; ; ++binCount) {	//	循环比较
                if ((e = p.next) == null) {
                    p.next = newNode(hash, key, value, null);
                    if (binCount >= TREEIFY_THRESHOLD - 1) // -1 for 1st	bincount = 9 时,执行
                        treeifyBin(tab, hash);
                    break;
                }
                if (e.hash == hash &&
                    ((k = e.key) == key || (key != null && key.equals(k))))
                    break;
                p = e;
            }
        }
        if (e != null) { // existing mapping for key
            V oldValue = e.value;
            if (!onlyIfAbsent || oldValue == null)
                e.value = value;
            afterNodeAccess(e);
            return oldValue;
        }
    }
    ++modCount;
    if (++size > threshold)
        resize();
    afterNodeInsertion(evict);
    return null;
}
final void treeifyBin(Node<K,V>[] tab, int hash) {
    int n, index; Node<K,V> e;
    if (tab == null || (n = tab.length) < MIN_TREEIFY_CAPACITY)	//	n = tab.length = 64 【MIN_TREEIFY_CAPACITY=64】
        resize();
    else if ((e = tab[index = (n - 1) & hash]) != null) {
        TreeNode<K,V> hd = null, tl = null;
        do {
            TreeNode<K,V> p = replacementTreeNode(e, null);	//	替换树
            if (tl == null)
                hd = p;
            else {
                p.prev = tl;
                tl.next = p;
            }
            tl = p;
        } while ((e = e.next) != null);
        if ((tab[index] = hd) != null)
            hd.treeify(tab);
    }
}
// For treeifyBin
TreeNode<K,V> replacementTreeNode(Node<K,V> p, Node<K,V> next) {
    return new TreeNode<>(p.hash, p.key, p.value, next);
}
/**
         * Forms tree of the nodes linked from this node.
         * 从此节点链接的节点的表单树
         */
final void treeify(Node<K,V>[] tab) {
    TreeNode<K,V> root = null;
    for (TreeNode<K,V> x = this, next; x != null; x = next) {
        next = (TreeNode<K,V>)x.next;
        x.left = x.right = null;
        if (root == null) {
            x.parent = null;
            x.red = false;
            root = x;
        }
        else {
            K k = x.key;
            int h = x.hash;
            Class<?> kc = null;
            for (TreeNode<K,V> p = root;;) {
                int dir, ph;
                K pk = p.key;
                if ((ph = p.hash) > h)
                    dir = -1;
                else if (ph < h)
                    dir = 1;
                else if ((kc == null &&
                          (kc = comparableClassFor(k)) == null) ||
                         (dir = compareComparables(kc, k, pk)) == 0)
                    dir = tieBreakOrder(k, pk);

                TreeNode<K,V> xp = p;
                if ((p = (dir <= 0) ? p.left : p.right) == null) {
                    x.parent = xp;
                    if (dir <= 0)
                        xp.left = x;
                    else
                        xp.right = x;
                    root = balanceInsertion(root, x);
                    break;
                }
            }
        }
    }
    moveRootToFront(tab, root);
}
可以看到:类型已经变成 TreeNode
7. 临界值 12
//	size:就是我们每加入一个结点 Node(k, v, hash, next),size ++
//	1)不管你是加在 tab 表的第一个位置
//	2)还是加载 tab 表的某一条链表上
//	都算是一个 size
++modCount;
if (++size > threshold)
    resize();	//	扩容
afterNodeInsertion(evict);
return null;
例子如下:
public class HashSetIncrement_1 {
    public static void main(String[] args) {
        HashSet hashSet = new HashSet();
        /*
             当我们向 hashset增加一个元素, --> Node --> 加入table,就算是增加了一个,size++
         */
        for (int i = 1; i <= 7 ; i++) { //  在table的某一条链条上添加了 7个A对象
            hashSet.add(new A(i));  //
        }

        for (int i = 1; i <= 7 ; i++) { //  在table的另外一条链表上添加了 7个B对象
            hashSet.add(new B(i));  //
        }
    }
}

class B{
    private int n;

    public B(int n) {
        this.n = n;
    }

    @Override
    public int hashCode() {
        return 200;
    }
}

class A {
    private int n;

    public A(int n) {
        this.n = n;
    }

    @Override
    public int hashCode() {
        return 100;
    }
}
8. 最佳实践
- 定义一个Employee类,该类包含:private 成员属性 name, age,要求:
- 创建 3个 Employee 放入 HashSet 中
- 当 name 和 age 值相同时,认为是相同员工,不能添加到 HashSet 集合中
public class GGBoy {
    public static void main(String[] args) {
        HashSet hashSet = new HashSet();
        hashSet.add(new Employee("东七七", 11));
        hashSet.add(new Employee("东七七", 11));
        hashSet.add(new Employee("东七七", 22));
        hashSet.add(new Employee("东66", 11));	//	退100步来说,假设 hashcode 一样,经过 equals 比较后为 false,还是可以添加进去
        System.out.println(hashSet);
    }
}

class Employee{
    private String name;
    private int age;

    public Employee(String name, int age) {
        this.name = name;
        this.age = age;
    }

    @Override
    public boolean equals(Object o) {
        if (this == o) return true;
        if (o == null || getClass() != o.getClass()) return false;
        Employee employee = (Employee) o;
        return age == employee.age &&
            Objects.equals(name, employee.name);
    }

    @Override
    public int hashCode() {
        return Objects.hash(name, age); //  如果 name 和 age 相同,那么 hashCode 就相同 ===> 确定索引
    }

    @Override
    public String toString() {
        return "Employee{" +
            "name='" + name + '\'' +
            ", age=" + age +
            '}';
    }
}
- 定义一个 Employee 类,该类包含:private成员属性 name、sal、birthday(MyDate类型)其中 birthday 为MyDate 类型(属性包含:year,month,day)
- 创建3个 Employee 放入 HashSet 中
- 当 name 和 birthday 的值相同时,认为是相同员工,不能添加到 HashSet 集合中
package collections_;

import java.util.HashSet;
import java.util.Objects;

/**
 * @Author: Ronnie LEE
 * @Date: 2022/11/14 - 11 - 14 - 20:31
 * @Description: collections_
 * @version: 1.0
 */
public class GGBoy {
    public static void main(String[] args) {

        HashSet hashSet = new HashSet();
        hashSet.add(new Employee("faker", 25000, new MyDate("1996", "5", "12")));
        hashSet.add(new Employee("faker", 30000, new MyDate("1996", "5", "12")));
        hashSet.add(new Employee("Bang", 88888, new MyDate("1994", "11", "3")));
        hashSet.add(new Employee("faker", 88888, new MyDate("1994", "11", "22")));
        for (Object o : hashSet) {
            if (o instanceof Employee) {
                Employee employee = (Employee) o;
                System.out.println(employee);
            }
        }
    }
}

class Employee {
    private String name;
    private double sal;
    MyDate birthday;

    public Employee(String name, double sal, MyDate birthday) {
        this.name = name;
        this.sal = sal;
        this.birthday = birthday;
    }

    @Override
    public boolean equals(Object o) {
        if (this == o) return true;
        if (o == null || getClass() != o.getClass()) return false;
        Employee employee = (Employee) o;
        return Objects.equals(name, employee.name) &&
                Objects.equals(birthday, employee.birthday);
    }

    @Override
    public int hashCode() {
        return Objects.hash(name, birthday);
    }

    @Override
    public String toString() {
        return "Employee{" +
                "name='" + name + '\'' +
                ", sal=" + sal +
                ", birthday=" + birthday +
                '}';
    }
}


class MyDate{
    private String year;
    private String month;
    private String day;

    public MyDate(String year, String month, String day) {
        this.year = year;
        this.month = month;
        this.day = day;
    }

    @Override
    public boolean equals(Object o) {
        if (this == o) return true;
        if (o == null || getClass() != o.getClass()) return false;
        MyDate myDate = (MyDate) o;
        return Objects.equals(year, myDate.year) &&
                Objects.equals(month, myDate.month) &&
                Objects.equals(day, myDate.day);
    }

    @Override
    public int hashCode() {
        return Objects.hash(year, month, day);
    }

    @Override
    public String toString() {
        return "MyDate{" +
                "year='" + year + '\'' +
                ", month='" + month + '\'' +
                ", day='" + day + '\'' +
                '}';
    }
}
2.2 LinkedHashSet
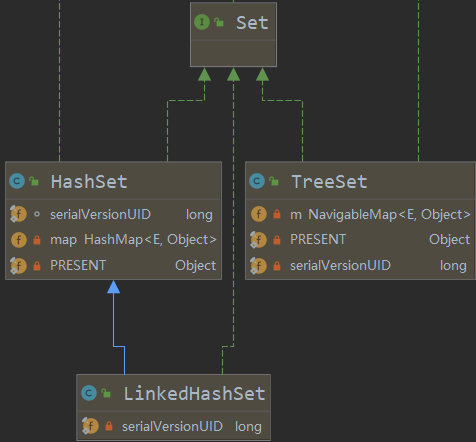
- LinkedHashSet 是 HashSet 的子类
- LinkedHashSet 底层是一个 LinkedHashMap,底层维护了一个 数组 + 双向链表
- LinkedHashSet 根据元素的 hashCode 值来决定元素的位置,同时使用双向链表维护元素的 次序,这使得元素看起来是以插入顺序保存的
- LinkedHastSet 不允许添重复元素
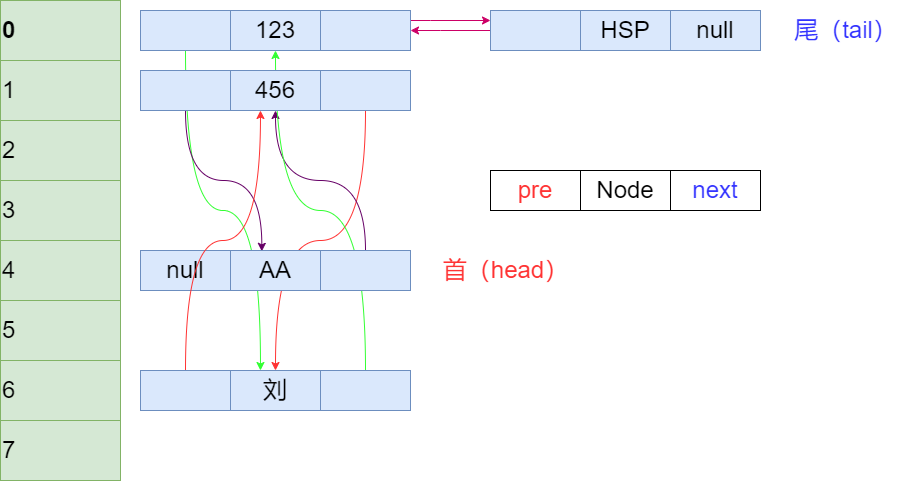
1. LinkedHashSet 底层机制示意图
-
在LinkedHashSet 中维护了一个 hash 表和双向链表(LinkedHashSet 有 head 和 tail)
-
每一个节点有 pre 和 next 属性,这样就可以形成双向链表
-
在添加一个元素时,先求 hash值,再求索引,确定该元素在 hashtable 的位置,然后将添加的元素加入到双向链表(如果已经存在,不添加【原则和 hashset 一样】
tail.next = newElement; // 简单指定 【2条线】 newElement.pre = tail; tail = newElement; // 移动尾指针 -
这样的话,我们遍历 LinkedHashSet 也能确保插入顺序和遍历顺序一致
public class LinkedHashSetSource {
    public static void main(String[] args) {
        //  分析一下LinkedHashSet的底层机制
        Set set = new LinkedHashSet();
        set.add(new String("AA"));
        set.add(456);
        set.add(456);
        set.add(new Customer("刘", 1001));
        set.add(123);
        set.add("HSP");

        System.out.println("set" + set);
        //  老韩解读
        //  1.  LinkedHashSet 加入顺序和取出元素/数据的顺序一致
        //  2.  LinkedHashSet 底层维护的是一个LinkedHashMap(是HashMap的子类)
        //  3.  LinkedHashSet 底层结构(数组table + 双向链表)
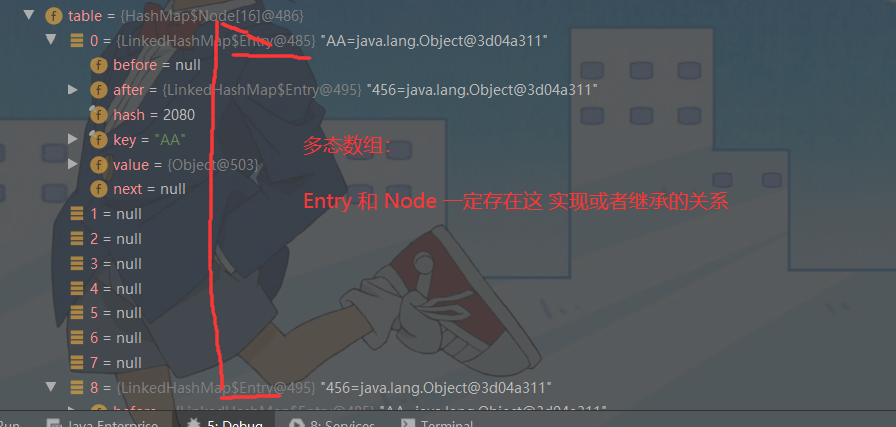
        //  4.  添加第一次时,直接将 数组table 扩容到16,存放的结点类型是 LinkedHashMap$Entry
        //  5.  数组是 HashMap&Node[]  存放的元素/数据是 LinkedHashMap$Entry类型

        /*
             // 继承关系是在内部类完成
             static class Entry<K,V> extends HashMap.Node<K,V> {
                Entry<K,V> before, after;
                Entry(int hash, K key, V value, Node<K,V> next) {
                    super(hash, key, value, next);
                }
             }
         */
    }
}

class Customer{

    private String name;
    private int no;

    public Customer(String name, int no) {
        this.name = name;
        this.no = no;
    }
}
- 数组是 HashMap$Node[] 类型的,
- 存放的元素 / 数据是:LinkedHashMap$Entry 类型
//	在 LinkedHashMap.java 中
//	继承关系是在内部类完成
/**
     * HashMap.Node subclass for normal LinkedHashMap entries.
     */
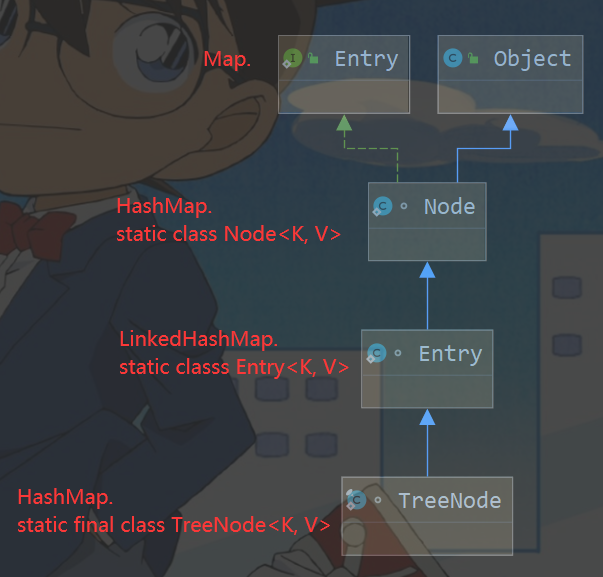
static class Entry<K,V> extends HashMap.Node<K,V> {	//	这个 Node<K, V> 也是静态内部类,为什么做成静态的,因为这个Node<K, V>类是专门为我们 HashMap 这条线使用的
    Entry<K,V> before, after;
    Entry(int hash, K key, V value, Node<K,V> next) {
        super(hash, key, value, next);
    }
}
由于 LinkedHashSet 是 HashSet 的子类,所以走的还是之前的那一套
public boolean add(E e) {
    return map.put(e, PRESENT)==null;
}
2. 课后练习
Car 类(属性:name,price),如果 name 和 price 一样,则认为是相同元素,就不能添加
//	重写 equals 方法 和 hashCode
//	当 name 和 price 相同时,就返回相同的 hashCode 值,equals 返回 true
public class ho123 {
    public static void main(String[] args) {
        Set linkedHashSet = new LinkedHashSet();
        linkedHashSet.add(new Car1("奥拓", 1000));
        linkedHashSet.add(new Car1("奥迪", 300000));
        linkedHashSet.add(new Car1("法拉利", 10000000));
        linkedHashSet.add(new Car1("奥迪", 300000));  //  默认情况下是可以加进去的,因为 hash 不同
        linkedHashSet.add(new Car1("保时捷", 70000000));
        linkedHashSet.add(new Car1("奥迪", 300000));
        for (Object o : linkedHashSet) {
            System.out.println((Car1)o);
        }
    }
}

class Car1{
    private String name;
    private double price;

    public Car1(String name, double price) {
        this.name = name;
        this.price = price;
    }

    @Override
    public boolean equals(Object o) {
        if (this == o) return true;
        if (o == null || getClass() != o.getClass()) return false;
        Car1 car1 = (Car1) o;
        return Double.compare(car1.price, price) == 0 &&
                Objects.equals(name, car1.name);
    }

    @Override
    public int hashCode() {
        return Objects.hash(name, price);
    }

    @Override
    public String toString() {
        return "Car1{" +
                "name='" + name + '\'' +
                ", price=" + price +
                '}';
    }
}
询问:如果只保留hashCode() 方法【舍弃 equals() 方法】会出现什么问题:
- 会造成所有的 Car对象都可以添加
- 因为首先 通过 hashCode方法判定要放入同一位置
- 再通过equals() 方法,如果不重写的话,默认是比较地址,所以肯定不同,所以所有对象都可以添加。
- 总结:只有当 hashCode 和 equals()方法都相同时,才加不进去
2. 3 TreeSet
底层就是 TreeMap
- 在调用 add() 方法添加数据时,会调用 TreeMap的 put() 方法
public boolean add(E e) {
    //	Value 还是用 PRESENT 来代替
    return m.put(e, PRESENT)==null;
}
//	PRESENT 是在 TreeSet 中创建的一个静态的 final 类型的 Object
// Dummy value to associate with an Object in the backing Map
private static final Object PRESENT = new Object();
HashMap中内部类
/**
     * Node in the Tree.  Doubles as a means to pass key-value pairs back to
     * user (see Map.Entry).
     */

static final class Entry<K,V> implements Map.Entry<K,V> {
    K key;
    V value;
    Entry<K,V> left;
    Entry<K,V> right;
    Entry<K,V> parent;
    boolean color = BLACK;

    /**
         * Make a new cell with given key, value, and parent, and with
         * {@code null} child links, and BLACK color.
         */
    Entry(K key, V value, Entry<K,V> parent) {
        this.key = key;
        this.value = value;
        this.parent = parent;
    }

    /**
         * Returns the key.
         *
         * @return the key
         */
    public K getKey() {
        return key;
    }

    /**
         * Returns the value associated with the key.
         *
         * @return the value associated with the key
         */
    public V getValue() {
        return value;
    }

    /**
         * Replaces the value currently associated with the key with the given
         * value.
         *
         * @return the value associated with the key before this method was
         *         called
         */
    public V setValue(V value) {
        V oldValue = this.value;
        this.value = value;
        return oldValue;
    }

    public boolean equals(Object o) {
        if (!(o instanceof Map.Entry))
            return false;
        Map.Entry<?,?> e = (Map.Entry<?,?>)o;

        return valEquals(key,e.getKey()) && valEquals(value,e.getValue());
    }

    public int hashCode() {
        int keyHash = (key==null ? 0 : key.hashCode());
        int valueHash = (value==null ? 0 : value.hashCode());
        return keyHash ^ valueHash;
    }

    public String toString() {
        return key + "=" + value;
    }
}
可以排序
-
当我们使用无参构造器,创建 TreeSet时,仍然是无序的
-
现在希望按照字符串大小来排序
-
使用 TreeSet 提供的一个构造器,可以传入一个比较器(comparator 接口 ---> 有一个 compare 方法:用到 匿名内部类),指定排序规则。
TreeSet treeSet = new TreeSet(new Comparator() {
    @Override
    public int compare(Object o1, Object o2) {
        //  下面 调用String 的 compareTo 方法进行字符串大小比较
        return ((String) o1).compareTo((String) o2);    //  这里返回一个数字,然后赋值给cmp再去进行比较
    }
});
public static int compareTo(byte[] value, byte[] other, int len1, int len2) { int lim = Math.min(len1, len2); for (int k = 0; k < lim; k++) { if (value[k] != other[k]) { return getChar(value, k) - getChar(other, k); } } return len1 - len2; }执行过程:会将匿名内部类传给 TreeSet
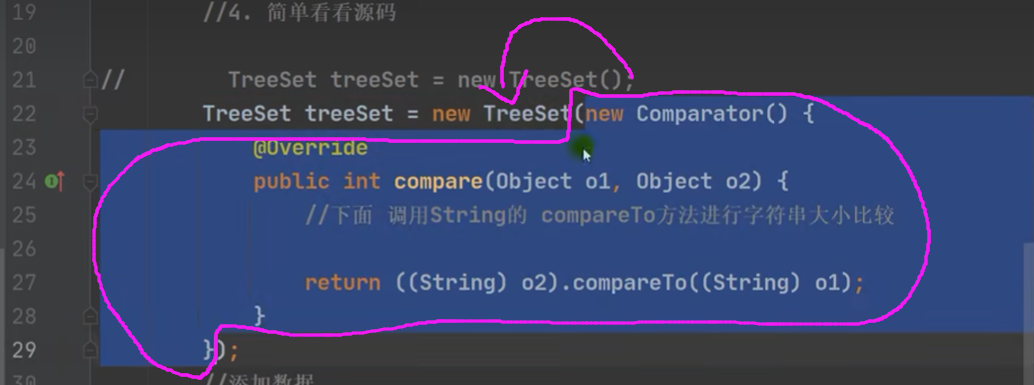
可以 TreeSet的底层是 TreeMap
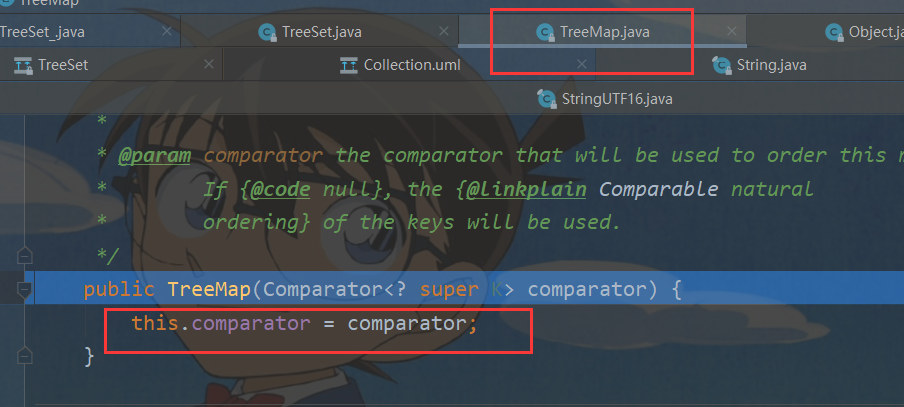
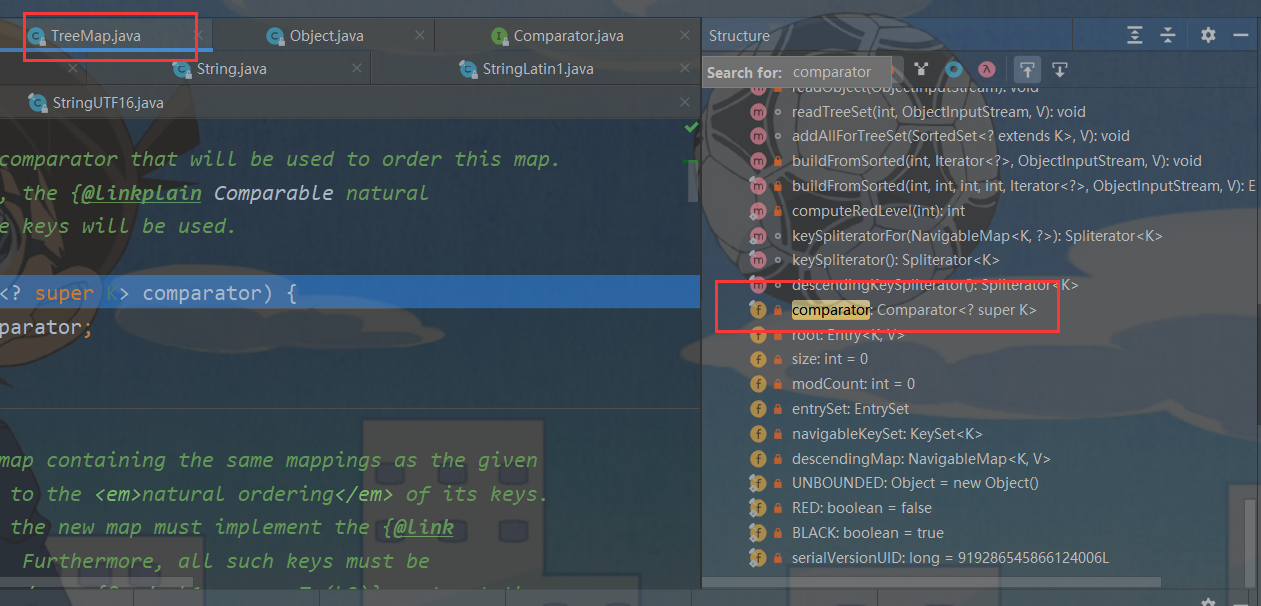
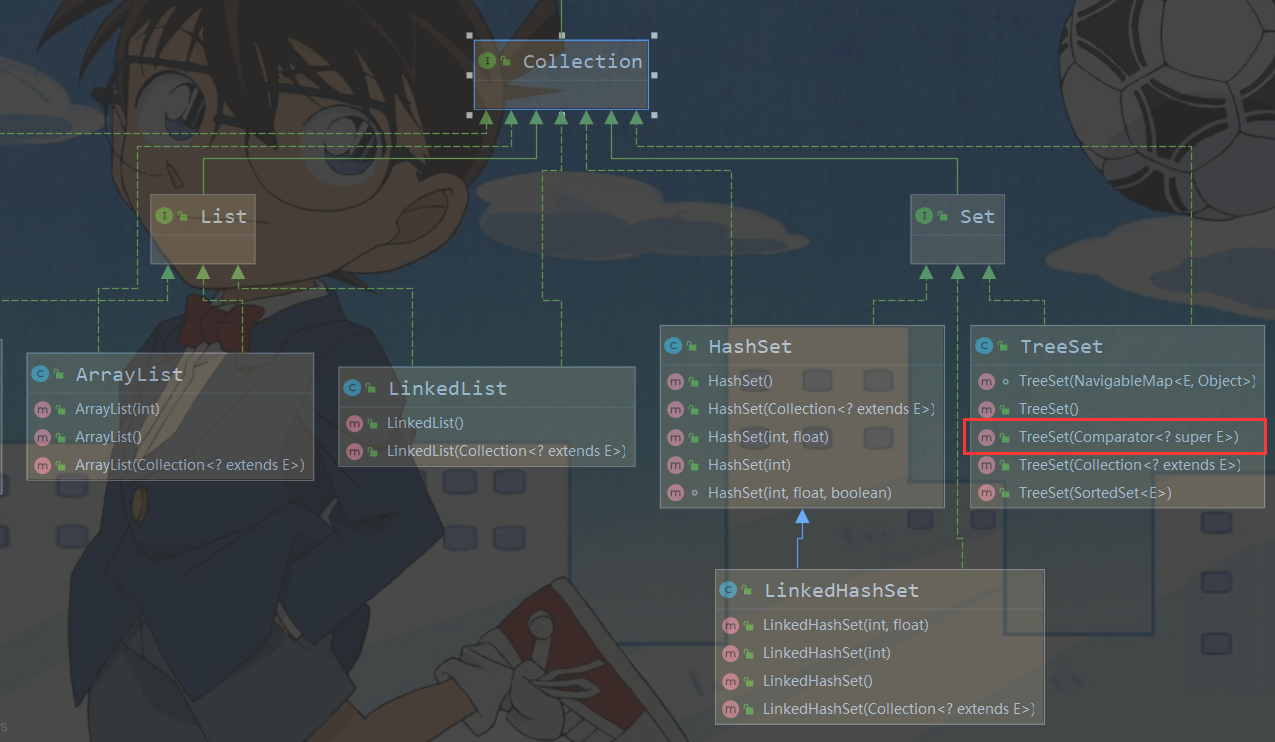
put V
public V put(K key, V value) {
    Entry<K,V> t = root;
    if (t == null) {
        //	第一次添加,将k - v 封装到 Entry 对象,放入 root
        compare(key, key); // type (and possibly null) check

        root = new Entry<>(key, value, null);
        size = 1;
        modCount++;
        return null;
    }
    int cmp;
    Entry<K,V> parent;
    // split comparator and comparable paths
    Comparator<? super K> cpr = comparator;	//	cpr:实现了Comparator接口的匿名内部类(对象)
    if (cpr != null) {
        //	遍历所有的 key,给当前 key 找到适当的位置
        do {
            parent = t;
            cmp = cpr.compare(key, t.key);	//	调用 compare 方法 【key:新加的】
            if (cmp < 0)
                t = t.left;
            else if (cmp > 0)
                t = t.right;
            else	//	如果相等,即返回0,这个数据就没有加入(替换)
                return t.setValue(value);
        } while (t != null);	//	循环比较
    }
    else {
        if (key == null)
            throw new NullPointerException();
        @SuppressWarnings("unchecked")
        Comparable<? super K> k = (Comparable<? super K>) key;
        do {
            parent = t;
            cmp = k.compareTo(t.key);
            if (cmp < 0)
                t = t.left;
            else if (cmp > 0)
                t = t.right;
            else
                return t.setValue(value);
        } while (t != null);
    }
    Entry<K,V> e = new Entry<>(key, value, parent);	//	可以加入,放入新节点【parent 指向的是t(将要插入的位置是这个位置的左或者右,根据 cmp大小来判断)】
    if (cmp < 0)
        parent.left = e;
    else
        parent.right = e;
    fixAfterInsertion(e);
    size++;
    modCount++;
    return null;
}
二、 Map(双列集合)
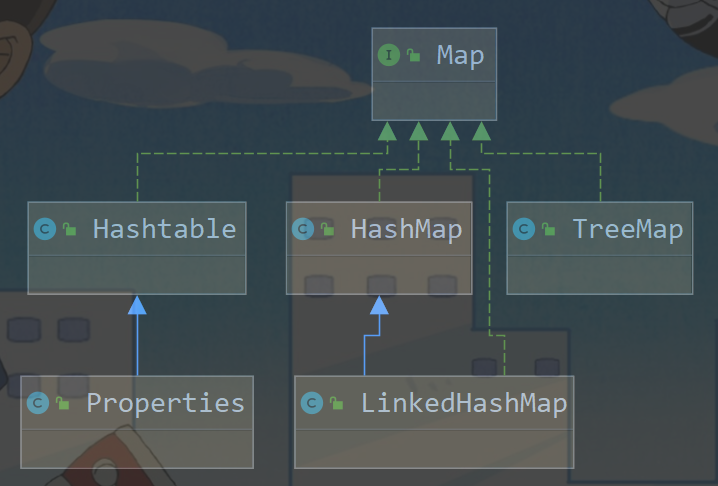
之前讲的Set,底层也是 Map,只不过
- K:要加入的对象
- V:PRESENT 常量对象
1. Map接口实现类的特点 【很实用】
-
Map【双列集合】 与 Collection【单列集合】 并列存在,用于保存具有映射关系的数据:Key - Value
-
Map 中的 key 和 value 可以是任何引用类型的数据,会封装到 HashMap$Node 对象中
-
Map 中的 key 不允许重复 (原因和 HashSet 一样,前面分析过源码)
- 当有相同的 key 时,就等价于 替换
-
Map 中的 value 可以重复
-
Map 中 key 可以为 null,value 也可以为 null,注意 key为 null,只能有一个,value 为 null,可以有多个
-
常用 String 类作为 Map 的 key
-
key 和 value 之间存在单向一对一关系,即通过指定的 key 总能找到对应的 value
-
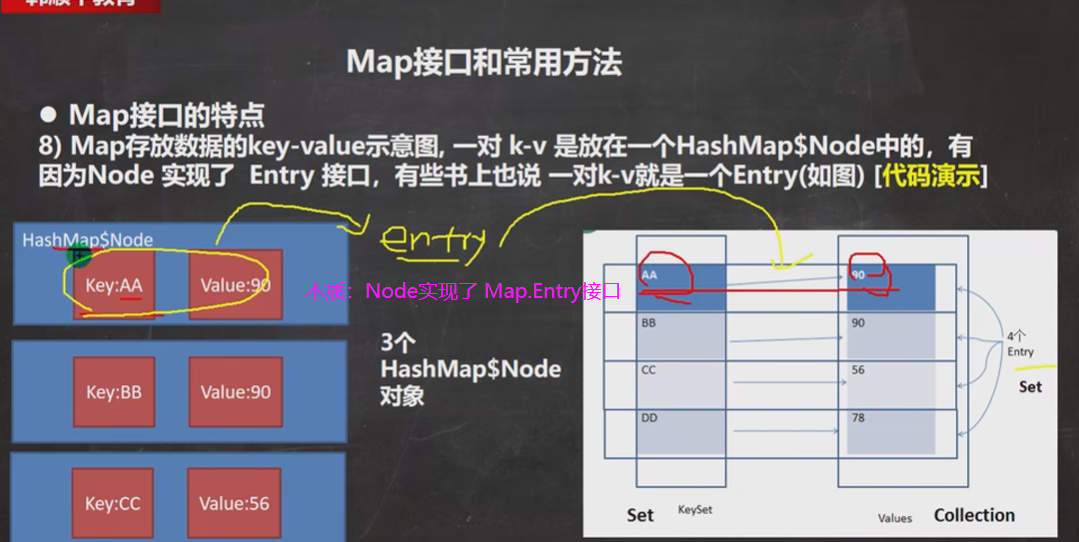
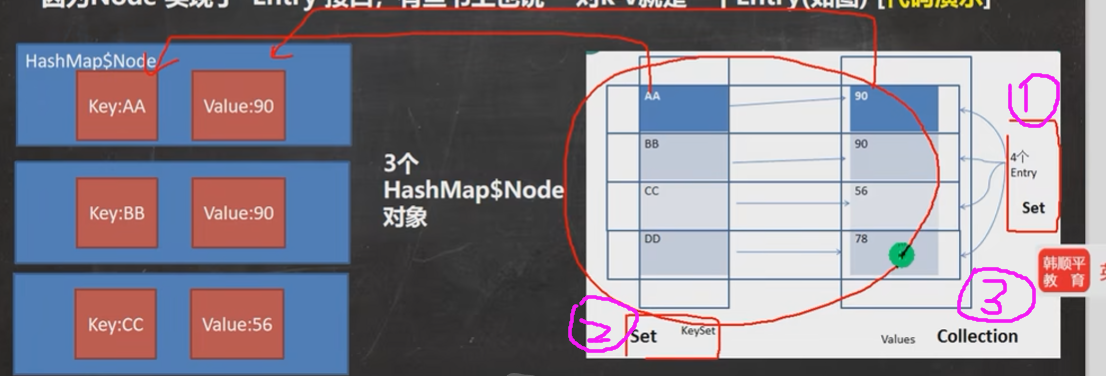
Map 存放数据的 key - value 示意图:

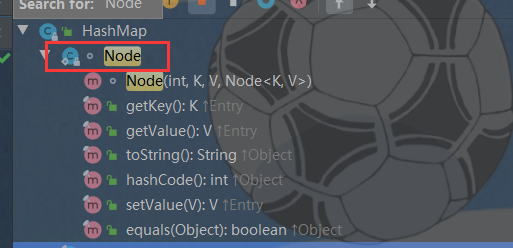
一对 k - v 是放在一个 HashMap$Node【Node是 HashMap的一个静态内部类】中的
if ((p = tab[i = (n - 1) & hash]) == null)	//	计算 key 对应的 hash值,去计算该 key 应该在 table 表的哪一个索引位置去存放,并把这个位置的对象 赋给 辅助变量 p
        //	再判断是否为 null
        //	1)如果 p 为 null,表示还没有存放过元素,就创建一个 Node(key="java", value = PRESENT)放在该位置
        //	为什么把 key 对应的 hash 也存进去了,因为将来会去比较,如果再有的话,它会去看,如果相等会往后怼
        tab[i] = newNode(hash, key, value, null);
这里面返回的 Node 就是 HashMap中的 Node
// Create a regular (non-tree) node
Node<K,V> newNode(int hash, K key, V value, Node<K,V> next) {
    return new Node<>(hash, key, value, next);
}
//	HashMap.java 中
/**
     * Basic hash bin node, used for most entries.  (See below for
     * TreeNode subclass, and in LinkedHashMap for its Entry subclass.)
     */
static class Node<K,V> implements Map.Entry<K,V> {	//	静态内部类 Node<K, V>
    final int hash;
    final K key;
    V value;
    Node<K,V> next;

    Node(int hash, K key, V value, Node<K,V> next) {	//	Node 构造器
        this.hash = hash;
        this.key = key;
        this.value = value;
        this.next = next;
    }

    public final K getKey()        { return key; }
    public final V getValue()      { return value; }
    public final String toString() { return key + "=" + value; }

    public final int hashCode() {
        return Objects.hashCode(key) ^ Objects.hashCode(value);
    }

    public final V setValue(V newValue) {
        V oldValue = value;
        value = newValue;
        return oldValue;
    }

    public final boolean equals(Object o) {
        if (o == this)
            return true;
        if (o instanceof Map.Entry) {
            Map.Entry<?,?> e = (Map.Entry<?,?>)o;
            if (Objects.equals(key, e.getKey()) &&
                Objects.equals(value, e.getValue()))
                return true;
        }
        return false;
    }
}
Entry接口
又因为 Node 实现了 Map.Entry 接口,有些书上也说 一对 k - v 就是一个 Entry
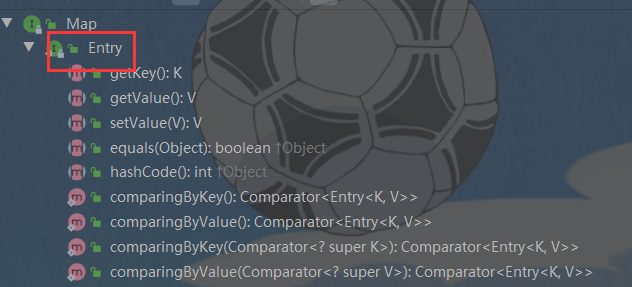
//	同时提供了 2个重要的方法
//	1.
// Views

    /**
     * Returns a {@link Set} view of the keys contained in this map.
     * The set is backed by the map, so changes to the map are
     * reflected in the set, and vice-versa.  If the map is modified
     * while an iteration over the set is in progress (except through
     * the iterator's own {@code remove} operation), the results of
     * the iteration are undefined.  The set supports element removal,
     * which removes the corresponding mapping from the map, via the
     * {@code Iterator.remove}, {@code Set.remove},
     * {@code removeAll}, {@code retainAll}, and {@code clear}
     * operations.  It does not support the {@code add} or {@code addAll}
     * operations.
     *
     * @return a set view of the keys contained in this map
     */
    Set<K> keySet();

    /**
     * Returns a {@link Collection} view of the values contained in this map.
     * The collection is backed by the map, so changes to the map are
     * reflected in the collection, and vice-versa.  If the map is
     * modified while an iteration over the collection is in progress
     * (except through the iterator's own {@code remove} operation),
     * the results of the iteration are undefined.  The collection
     * supports element removal, which removes the corresponding
     * mapping from the map, via the {@code Iterator.remove},
     * {@code Collection.remove}, {@code removeAll},
     * {@code retainAll} and {@code clear} operations.  It does not
     * support the {@code add} or {@code addAll} operations.
     *
     * @return a collection view of the values contained in this map
     */
    Collection<V> values();
HashMap中方法实现:
Set keySet() 方法
//	keySet() 方法实现
/**
     * Returns a {@link Set} view of the keys contained in this map.
     * The set is backed by the map, so changes to the map are
     * reflected in the set, and vice-versa.  If the map is modified
     * while an iteration over the set is in progress (except through
     * the iterator's own {@code remove} operation), the results of
     * the iteration are undefined.  The set supports element removal,
     * which removes the corresponding mapping from the map, via the
     * {@code Iterator.remove}, {@code Set.remove},
     * {@code removeAll}, {@code retainAll}, and {@code clear}
     * operations.  It does not support the {@code add} or {@code addAll}
     * operations.
     *
     * @return a set view of the keys contained in this map
     */
/**
返回此映射中包含的键的 {@link Set} 视图。该集合由map支持,因此对map的更改会反映在集合中,反之亦然。如果在对集合进行迭代时修改映射(除了通过迭代器自己的 {@code remove} 操作),迭代的结果是未定义的。 set支持元素移除,通过{@code Iterator.remove}、{@code Set.remove}、{@code removeAll}、{@code retainAll}和{@code clear从map中移除对应的映射} 操作。它不支持 {@code add} 或 {@code addAll} 操作。 @return 映射中包含的键的集合视图
*/
public Set<K> keySet() {
    Set<K> ks = keySet;
    if (ks == null) {
        ks = new KeySet();
        keySet = ks;
    }
    return ks;
}
Collection values() 方法
// 注解同上
public Collection<V> values() {
    Collection<V> vs = values;
    if (vs == null) {
        vs = new Values();
        values = vs;
    }
    return vs;
}
2. 源码分析
HashMap 的内部类(有很多)

-
k - v 最后是 HashMap$Node node = new Node(hash, key, value, null)
-
k - v 为了方便程序员去遍历,还会创建 EntrySet 集合,该集合存放的元素类型为 Entry
-
而一个 Entry 对象就有 k, v,即:EntrySet<Entry<k, v>>
-
证明:在 HashMap中,有 entrySet 字段,它的类型是 Set<Map.Entry<K, V>>
-
只是简单地一个指向 【为了遍历方便】
- K ---> key
- V ---> value
-
HashMap的 entrySet 字段
transient Set<Map.Entry<K,V>> entrySet;
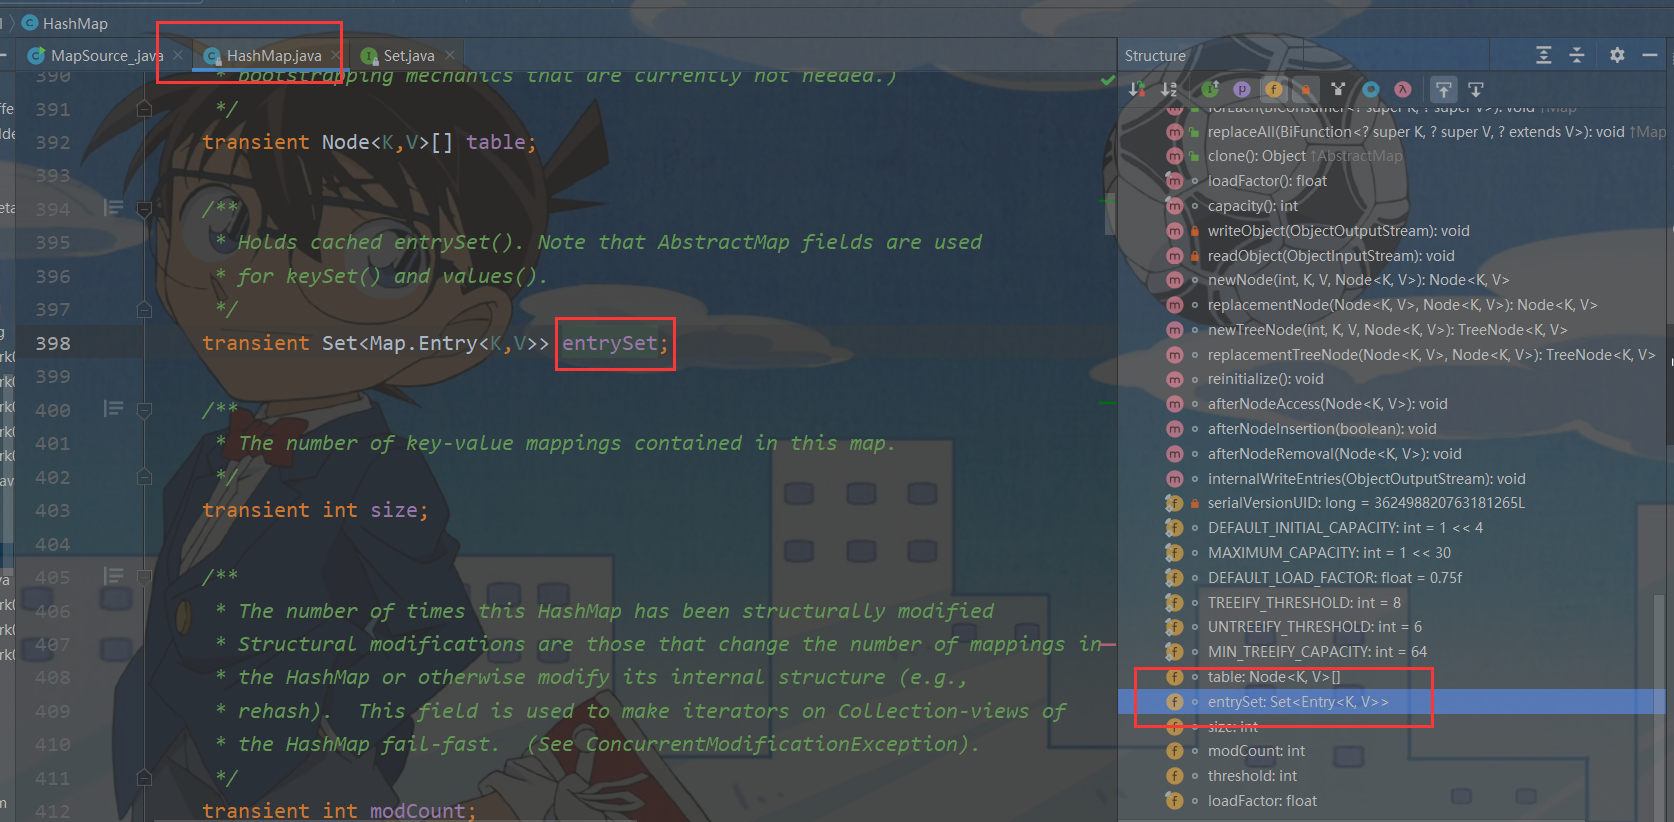
HashMap的 entrySet() 方法
-
通过 map.entrySet() 方法来验证
public Set<Map.Entry<K,V>> entrySet() {
    Set<Map.Entry<K,V>> es;	//	中间变量
    return (es = entrySet) == null ? (entrySet = new EntrySet()) : es;	//	初始化 entrySet = new EntrySet();
}
Set set = map.entrySet(); System.out.println(set.getClass()) // class java.util.HashMap$EntrySet
HashMap的 EntrySet 类
//	HashMap 内部类 EntrySet
final class EntrySet extends AbstractSet<Map.Entry<K,V>> {
    public final int size()                 { return size; }
    public final void clear()               { HashMap.this.clear(); }
    public final Iterator<Map.Entry<K,V>> iterator() {
        return new EntryIterator();
    }
    public final boolean contains(Object o) {
        if (!(o instanceof Map.Entry))
            return false;
        Map.Entry<?,?> e = (Map.Entry<?,?>) o;
        Object key = e.getKey();
        Node<K,V> candidate = getNode(hash(key), key);
        return candidate != null && candidate.equals(e);
    }
    public final boolean remove(Object o) {
        if (o instanceof Map.Entry) {
            Map.Entry<?,?> e = (Map.Entry<?,?>) o;
            Object key = e.getKey();
            Object value = e.getValue();
            return removeNode(hash(key), key, value, true, true) != null;
        }
        return false;
    }
    public final Spliterator<Map.Entry<K,V>> spliterator() {
        return new EntrySpliterator<>(HashMap.this, 0, -1, 0, 0);
    }
    public final void forEach(Consumer<? super Map.Entry<K,V>> action) {
        Node<K,V>[] tab;
        if (action == null)
            throw new NullPointerException();
        if (size > 0 && (tab = table) != null) {
            int mc = modCount;
            for (Node<K,V> e : tab) {
                for (; e != null; e = e.next)
                    action.accept(e);
            }
            if (modCount != mc)
                throw new ConcurrentModificationException();
        }
    }
}
注意:在 entrySet 中,定义的类型是:Map.Entry,但是实际上存放的还是 HashMap$Node,这是因为:
- Node 实现了 Map.Entry 接口
- 接口类型可以指向 实现了这个接口的子类(多态)
-
当把 HashMap$Node 对象存放到 entrySet,就方便我们遍历,因为 Map.Entry 提供了重要方法
K getKey()
V getValue()
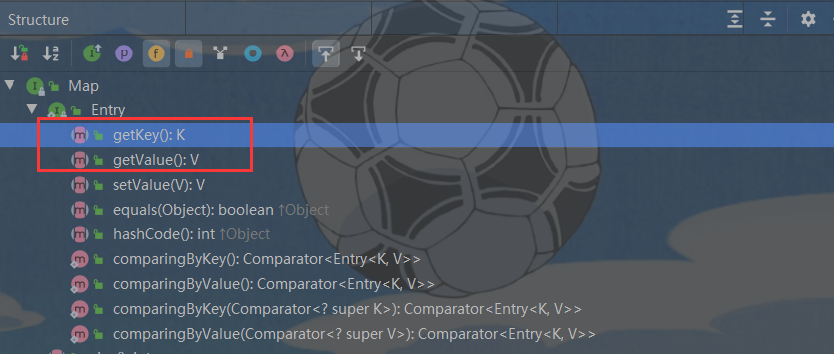
3. 总结
-
首先,你添加的每个数据都会成为一个 HashMap$Node
-
然后由于 HashMap$Node 实现了 Map.Entry 接口【同时 Map.Entry 接口还提供了2个好方法:getKey,getValue】
-
所以为了 方便遍历 ,我们要向上转型成:Map.Entry
-
一个 Node(k - v) 对应一个 Entry(k - v)
-
为了方便管理,HashMap 中定义一个 entrySet 字段,来管理 entry
transient Set<Map.Entry<K,V>> entrySet; -
通过 hashMap.entryset() 进行初始化
public Set<Map.Entry<K,V>> entrySet() { Set<Map.Entry<K,V>> es; // 中间变量 return (es = entrySet) == null ? (entrySet = new EntrySet()) : es; // 初始化 entrySet = new EntrySet(); } -
看下 entrySet 运行类型 EntrySet
final class EntrySet extends AbstractSet<Map.Entry<K,V>> { public final int size() { return size; } public final void clear() { HashMap.this.clear(); } public final Iterator<Map.Entry<K,V>> iterator() { return new EntryIterator(); } public final boolean contains(Object o) { if (!(o instanceof Map.Entry)) return false; Map.Entry<?,?> e = (Map.Entry<?,?>) o; Object key = e.getKey(); Node<K,V> candidate = getNode(hash(key), key); return candidate != null && candidate.equals(e); } public final boolean remove(Object o) { if (o instanceof Map.Entry) { Map.Entry<?,?> e = (Map.Entry<?,?>) o; Object key = e.getKey(); Object value = e.getValue(); return removeNode(hash(key), key, value, true, true) != null; } return false; } public final Spliterator<Map.Entry<K,V>> spliterator() { return new EntrySpliterator<>(HashMap.this, 0, -1, 0, 0); } public final void forEach(Consumer<? super Map.Entry<K,V>> action) { Node<K,V>[] tab; if (action == null) throw new NullPointerException(); if (size > 0 && (tab = table) != null) { int mc = modCount; for (Node<K,V> e : tab) { for (; e != null; e = e.next) action.accept(e); } if (modCount != mc) throw new ConcurrentModificationException(); } } } -
HashMap 对 2个方法的的实现:
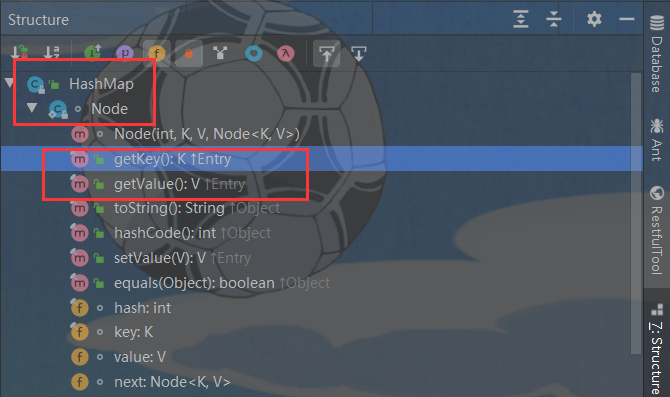
static class Node<K,V> implements Map.Entry<K,V> {
    final int hash;
    final K key;	//	Node 节点的属性
    V value;	//	Node 节点的属性
    Node<K,V> next;

    Node(int hash, K key, V value, Node<K,V> next) {
        this.hash = hash;
        this.key = key;
        this.value = value;
        this.next = next;
    }

    public final K getKey()        { return key; }	//	返回 Node 节点的 key
    public final V getValue()      { return value; }	//	返回 Node 节点的 value
    public final String toString() { return key + "=" + value; }

    public final int hashCode() {
        return Objects.hashCode(key) ^ Objects.hashCode(value);
    }

    public final V setValue(V newValue) {
        V oldValue = value;
        value = newValue;
        return oldValue;
    }

    public final boolean equals(Object o) {
        if (o == this)
            return true;
        if (o instanceof Map.Entry) {
            Map.Entry<?,?> e = (Map.Entry<?,?>)o;
            if (Objects.equals(key, e.getKey()) &&
                Objects.equals(value, e.getValue()))
                return true;
        }
        return false;
    }
}
-
通过断点验证:
Set set = map.entrySet();
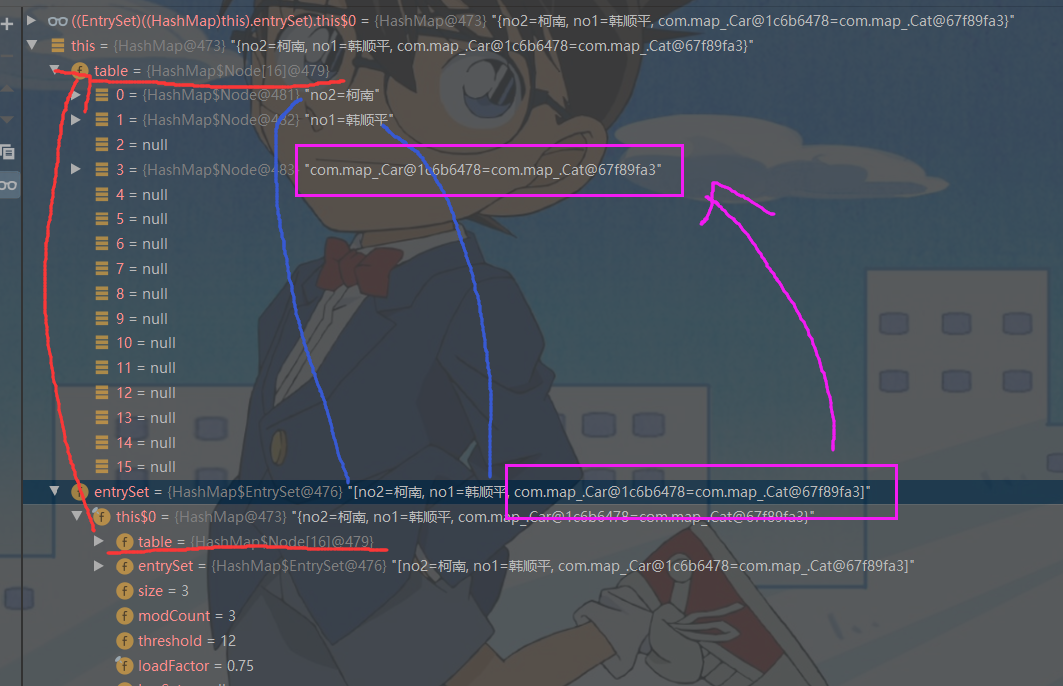
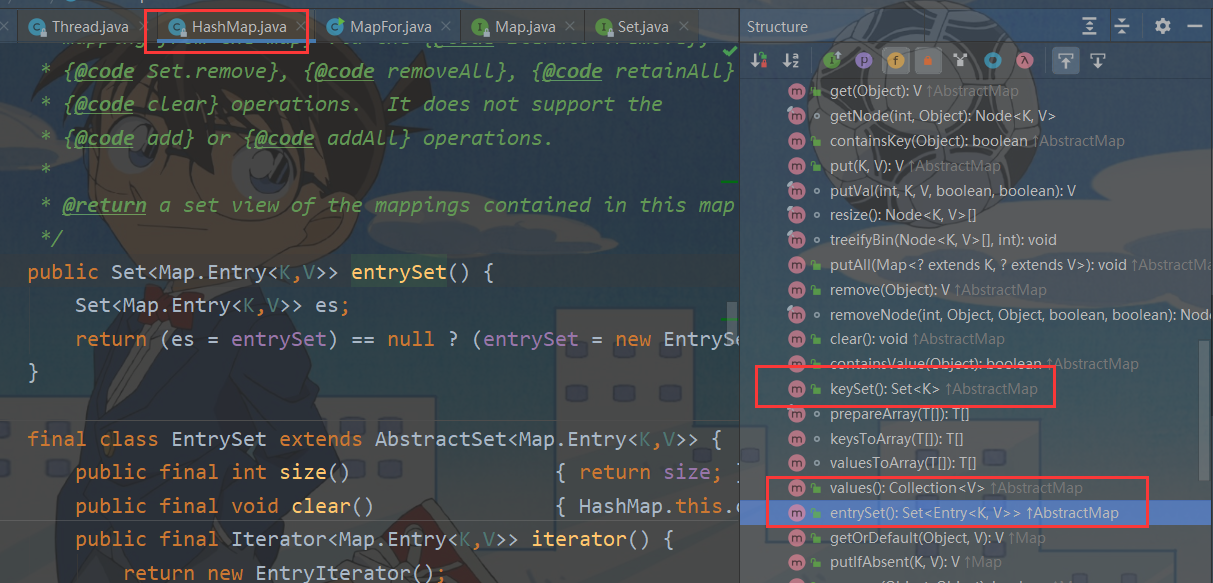
HashMap 3 个方法
1. keySet() 方法【Set 类型】
Set set1 = map.keySet();
2. values() 方法【Collection 类型】
Collection values = map.values();
3. entrySet() 方法【Set 类型】
getKey() 方法
getValue() 方法
由于是 Set 类型,即实现了 Itarable 接口,可以使用迭代器
-
应用迭代器遍历时候,每个 entry 向下转型
Map.Entry entry = (Map.Entry)iterator.next();
System.out.println(entry.getKey() + "-" + entry.getValue());	//	动态绑定到 HashMap$Node 类的 getKey 和 getValue() 方法,对应着 Node 的 key 和 value
4. Map接口常用方法
| 方法 | 作用 |
|---|---|
| put | 添加 |
| remove | 根据键删除映射关系 |
| get | 根据键获取值 |
| size | 获取元素个数 |
| isEmpty | 判断个数是否为0 |
| clear | 清空 |
| containKey | 查找键是否存在 |
5. Map接口的 6大遍历方式
| 方法名 | 作用 |
|---|---|
| containsKey | 查找键是否存在 |
| keySet | 获取所有键盘 |
| entrySet | 获取所有关系 k - v |
| values | 获取所有的值 |
遍历有 3种 方式
- 先取出 所有的 Key,通过 Key 取出对应的Value
- 把所有的values取出来
- 通过EntrySet 来获取 k-v
然后由于
- Set 接口 实现了 Iterable 接口
- Collection 接口实现了 Iterable 接口
- Set 接口实现了 Iterable 接口
public class MapFor {
    public static void main(String[] args) {

        Map map = new HashMap();
        map.put("邓超", new Book("", 100));
        map.put("邓超", "孙俪");
        map.put("王宝强", "马蓉");
        map.put("宋喆", "马蓉");
        map.put("刘令博", null);
        map.put(null, "刘亦菲");
        map.put("鹿晗", "关晓彤");


        //  第一组:先取出 所有的 Key,通过 Kwy 取出对应的Value
        Set keySet = map.keySet();
        //  (1)增强 for
        System.out.println("-----第一种方式-----");
        for (Object key : keySet) {
            System.out.println(key + "-" + map.get(key));
        }
        //  (2)迭代器
        System.out.println("----第二种方式-----");
        Iterator iterator = keySet.iterator();
        while (iterator.hasNext()) {
            Object key =  iterator.next();
            System.out.println(key + "-" + map.get(key));
        }


        //  第二组:把所有的values取出来
        Collection values = map.values();
        //  这里可以使用所有的 Collections 使用的遍历方法
        //  (1)增强 for
        System.out.println("---取出所有的value  增强for----");
        for (Object value : values) {
            System.out.println(value);
        }
        //  (2) 迭代器
        System.out.println("---取出所有的value 迭代器----");
        Iterator iterator1 = values.iterator();
        while (iterator1.hasNext()) {
            Object value = iterator1.next();
            System.out.println(value);
        }

        //  第三组:通过EntrySet 来获取 k-v
        Set entrySet = map.entrySet();  //  EntrySet<Map.Entry<K, V>>
        //  (1)增强 for
        System.out.println("----使用EntrySet的 for增强----");
        for (Object entry : entrySet) { //   此时,entry 类型为:entry
            //  将entry 转成 Map.Entry
            Map.Entry m = (Map.Entry) entry;
            System.out.println(m.getKey() + "-" + m.getValue());
        }
        //  (2)迭代器
        System.out.println("----使用EntrySet 的迭代器(第4种)----");
        Iterator iterator2 = entrySet.iterator();
        while (iterator2.hasNext()) {
            Object entry =  iterator2.next();
            System.out.println(entry.getClass());    //  HashMap$Node ---> 实现了 Map.Entry(getKey, getValue) 【多态传递】
            //  向下转型 Map.Entry
            Map.Entry m = (Map.Entry) entry;
            System.out.println(m.getKey() + "-" + m.getValue());
        }
    }
}
6. Map 接口练习
使用 HashMap 添加3个员工对象
- Key:id
- Value:员工对象
并显示工资大于 180000的员工
员工类 Emeployee(姓名、工资、员工 id)
7. HashMap 小结
-
Map 接口的常用实现类:HashMap、Hashtable、和 Properties
-
HashMap 是 Map 接口使用频率最高的实现类
-
HashMap 是以 key-val 方式存储数据(HashMap$Node类型)【案例 Entry】
-
key 不能重复,但是值可以重复,允许使用 null 键和 null 值
-
如果添加相同的 key,则会覆盖原来的 key-val,等同于修改
map.put"no1", "韩顺平");
//	添加相同的 key
map.put("no1", "张三丰")
// 传入新的 value final V putVal(int hash, K key, V value, boolean onlyIfAbsent,boolean evict) {if (p.hash == hash && ((k = p.key) == key || (key != null && key.equals(k)))){ // “no1="韩顺平" e = p; // p = tab[i = (n - 1) & hash] (类型是 HashMap$Node) } if (e != null) { // existing mapping for key 【是已经存在的 key 的映射】 V oldValue = e.value; if (!onlyIfAbsent || oldValue == null) e.value = value; // e.value = "张三丰" 【而前面有 e = p】,所以更新value afterNodeAccess(e); return oldValue; } -
与 HashSet一样,不保证映射的顺序,因为底层是以 hash 表的方式来存储的
-
JDK 8 的 hashMap 底层:数组 + 链表 + 红黑树 (注意:链表和红黑树可能同时存在)
table = {HashMap$Node[16]@479}
-
-
HashMap 没有实现同步,因此线程是不安全的(方法没有 Synchronized)
8. HashMap
HashMap 底层机制
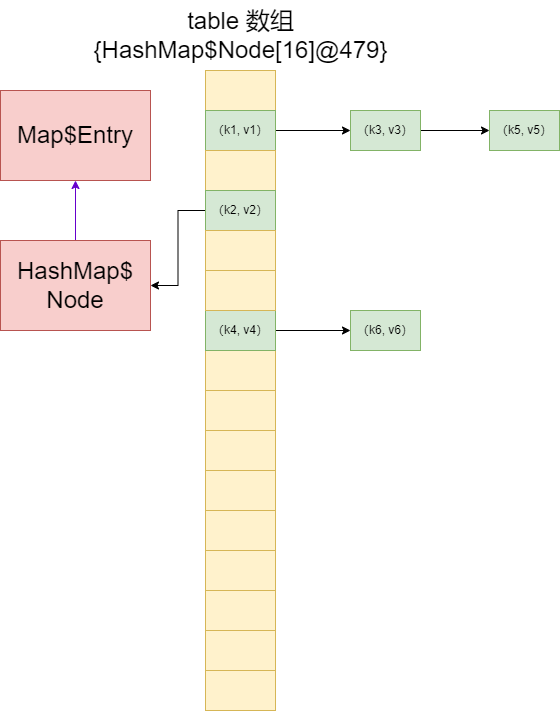
-
HashMap底层维护了 Node 类型的数组 table,默认为 null
/**
     * Basic hash bin node, used for most entries.  (See below for
     * TreeNode subclass, and in LinkedHashMap for its Entry subclass.)
     */
static class Node<K,V> implements Map.Entry<K,V> {
    final int hash;
    final K key;
    V value;
    Node<K,V> next;

    Node(int hash, K key, V value, Node<K,V> next) {
        this.hash = hash;
        this.key = key;
        this.value = value;
        this.next = next;
    }

    public final K getKey()        { return key; }
    public final V getValue()      { return value; }
    public final String toString() { return key + "=" + value; }

    public final int hashCode() {
        return Objects.hashCode(key) ^ Objects.hashCode(value);
    }

    public final V setValue(V newValue) {
        V oldValue = value;
        value = newValue;
        return oldValue;
    }

    public final boolean equals(Object o) {
        if (o == this)
            return true;
        if (o instanceof Map.Entry) {
            Map.Entry<?,?> e = (Map.Entry<?,?>)o;
            if (Objects.equals(key, e.getKey()) &&
                Objects.equals(value, e.getValue()))
                return true;
        }
        return false;
    }
}
/** * The table, initialized on first use, and resized as * necessary. When allocated, length is always a power of two. * (We also tolerate length zero in some operations to allow * bootstrapping mechanics that are currently not needed.) */ transient Node<K,V>[] table; -
当创建对象时,将加载因子(loadfactor)初始化为:0.75
-
当添加 key - val 时,通过 key 的哈希值得到在 table 的索引
- 判断该索引处是否有元素
- 没有
- 直接添加
- 有
- 继续判断该元素(Node)的 key 和 准备加入的 key 是否相等
- 相等
- 则直接替换 val
- 不相等
- 判断是树结构还是链表结构,做出相应处理
- 相等
- 继续判断该元素(Node)的 key 和 准备加入的 key 是否相等
- 没有
- 如果在添加时候发现容量不够,则需要扩容 【 Node<K, V>[] resize() 方法 】
- 判断该索引处是否有元素
-
第 1 次添加,则需要扩容 table 容量为:16,临界值(threshold)为 12 【16 * 0.75】
-
以后再扩容
- 需要扩容 table 容量为原来的 2倍:32
- 临界值 threshold 为原来的2倍:24
-
在 Java8 中,如果
-
一条链表的元素个数超过 TREEIFY_THRESHOLD(默认是 8)
else {
    for (int binCount = 0; ; ++binCount) {	//	开启循环比较了
        if ((e = p.next) == null) {
            p.next = newNode(hash, key, value, null);
            if (binCount >= TREEIFY_THRESHOLD - 1) // -1 for 1st	//	因为 binCount 从 0 开始
                treeifyBin(tab, hash);
            break;
        }
        if (e.hash == hash &&
            ((k = e.key) == key || (key != null && key.equals(k))))
            break;
        p = e;
    }
}
然后调用方法 treeifyBin(tab, hash);
- table 大小 < 64 时,调用 resize() 方法扩容
final void treeifyBin(Node<K,V>[] tab, int hash) { int n, index; Node<K,V> e; if (tab == null || (n = tab.length) < MIN_TREEIFY_CAPACITY) // n = tab.length = 64 【MIN_TREEIFY_CAPACITY=64】 resize(); else if ((e = tab[index = (n - 1) & hash]) != null) { TreeNode<K,V> hd = null, tl = null; do { TreeNode<K,V> p = replacementTreeNode(e, null); // 替换树 if (tl == null) hd = p; else { p.prev = tl; tl.next = p; } tl = p; } while ((e = e.next) != null); if ((tab[index] = hd) != null) hd.treeify(tab); } } -
并且table.length >= MIN_TREEIFY_CAPACITY(默认 64),就会进行树化(红黑树)
// For treeifyBin
TreeNode<K,V> replacementTreeNode(Node<K,V> p, Node<K,V> next) {
    return new TreeNode<>(p.hash, p.key, p.value, next);
}
/** * Forms tree of the nodes linked from this node. * 从此节点链接的节点的表单树 */ final void treeify(Node<K,V>[] tab) { TreeNode<K,V> root = null; for (TreeNode<K,V> x = this, next; x != null; x = next) { next = (TreeNode<K,V>)x.next; x.left = x.right = null; if (root == null) { x.parent = null; x.red = false; root = x; } else { K k = x.key; int h = x.hash; Class<?> kc = null; for (TreeNode<K,V> p = root;;) { int dir, ph; K pk = p.key; if ((ph = p.hash) > h) dir = -1; else if (ph < h) dir = 1; else if ((kc == null && (kc = comparableClassFor(k)) == null) || (dir = compareComparables(kc, k, pk)) == 0) dir = tieBreakOrder(k, pk); TreeNode<K,V> xp = p; if ((p = (dir <= 0) ? p.left : p.right) == null) { x.parent = xp; if (dir <= 0) xp.left = x; else xp.right = x; root = balanceInsertion(root, x); break; } } } } moveRootToFront(tab, root); }
-
HashMap 源码解读
大致类似 HashSet
HashMap 扩容树化触发
treeifyBin(tab, hash)方法
final void treeifyBin(Node<K,V>[] tab, int hash) {
int n, index; Node<K,V> e;
if (tab == null || (n = tab.length) < MIN_TREEIFY_CAPACITY) // n = tab.length = 64 【MIN_TREEIFY_CAPACITY=64】
resize();
else if ((e = tab[index = (n - 1) & hash]) != null) {
TreeNode<K,V> hd = null, tl = null;
do {
TreeNode<K,V> p = replacementTreeNode(e, null); // 替换树
if (tl == null)
hd = p;
else {
p.prev = tl;
tl.next = p;
}
tl = p;
} while ((e = e.next) != null);
if ((tab[index] = hd) != null)
hd.treeify(tab);
}
}
当 tab.length < 64时,调用resize() 扩容
if (tab == null || (n = tab.length) < MIN_TREEIFY_CAPACITY) // n = tab.length = 64 【MIN_TREEIFY_CAPACITY=64】
resize();
当 tab.length >= 64时,才调用 treeify(tab) 进行树化
treeifyBin(tab, hash) --> replacementTreeNode(e, null) ---> treeify(tab)
else if ((e = tab[index = (n - 1) & hash]) != null) {
TreeNode<K,V> hd = null, tl = null;
do {
TreeNode<K,V> p = replacementTreeNode(e, null); // 替换树
if (tl == null)
hd = p;
else {
p.prev = tl;
tl.next = p;
}
tl = p;
} while ((e = e.next) != null);
if ((tab[index] = hd) != null)
hd.treeify(tab);
}
// For treeifyBin
TreeNode<K,V> replacementTreeNode(Node<K,V> p, Node<K,V> next) {
return new TreeNode<>(p.hash, p.key, p.value, next);
}
/**
         * Forms tree of the nodes linked from this node.
         * 从此节点链接的节点的表单树
         */
final void treeify(Node<K,V>[] tab) {
    TreeNode<K,V> root = null;
    for (TreeNode<K,V> x = this, next; x != null; x = next) {
        next = (TreeNode<K,V>)x.next;
        x.left = x.right = null;
        if (root == null) {
            x.parent = null;
            x.red = false;
            root = x;
        }
        else {
            K k = x.key;
            int h = x.hash;
            Class<?> kc = null;
            for (TreeNode<K,V> p = root;;) {
                int dir, ph;
                K pk = p.key;
                if ((ph = p.hash) > h)
                    dir = -1;
                else if (ph < h)
                    dir = 1;
                else if ((kc == null &&
                          (kc = comparableClassFor(k)) == null) ||
                         (dir = compareComparables(kc, k, pk)) == 0)
                    dir = tieBreakOrder(k, pk);

                TreeNode<K,V> xp = p;
                if ((p = (dir <= 0) ? p.left : p.right) == null) {
                    x.parent = xp;
                    if (dir <= 0)
                        xp.left = x;
                    else
                        xp.right = x;
                    root = balanceInsertion(root, x);
                    break;
                }
            }
        }
    }
    moveRootToFront(tab, root);
}
关于红黑树,还有个剪枝的概念
已经是红黑树了,逐渐删除,越来越少了,到一定量的时候,就会将这棵树重新转成一个链表
- 认为你的数据量并不大,没有必要用树这种结构了
9. HashTable
-
底层有数组 Hashtable$Entry[] ,初始化大小为:11
-
临界值 threshold 8 = 11 * 0.75
-
扩容:按照自己的扩容机制来进行 【2 * oldCapacity + 1】
-
执行 方法 addEntry(hash, key, value, index); 添加 K - V 封装到 Entry
-
按照 int newCapacity = (oldCapacity << 1) + 1; 的大小扩容
if (count >= threshold) {   满足时,就进行扩容
//            // Rehash the table if the threshold is exceeded
//            rehash();
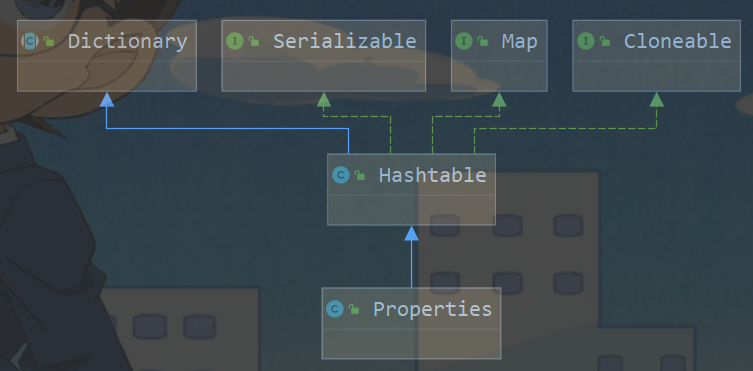
基本介绍
- 存放的元素是键值对:即K-V
- hashtable的键和值都 不能为null ,否则会抛出 NullPointerException
- hashTable使用方法基本上和HashMap-样
- hashTable是线程安全的,hashMap是线程不安全的
- 简单看下底层结构
synchronized V put(K key, V value) 方法
public synchronized V put(K key, V value) {
    // Make sure the value is not null
    if (value == null) {
        throw new NullPointerException();
    }

    // Makes sure the key is not already in the hashtable.
    Entry<?,?> tab[] = table;
    int hash = key.hashCode();	//	key 为 null 的话,会报空指针异常
    int index = (hash & 0x7FFFFFFF) % tab.length;
    @SuppressWarnings("unchecked")
    Entry<K,V> entry = (Entry<K,V>)tab[index];
    for(; entry != null ; entry = entry.next) {
        if ((entry.hash == hash) && entry.key.equals(key)) {
            V old = entry.value;
            entry.value = value;
            return old;
        }
    }

    addEntry(hash, key, value, index);
    return null;
}
addEntry(int hash, K key, V value, int index)
private void addEntry(int hash, K key, V value, int index) {
    Entry<?,?> tab[] = table;
    if (count >= threshold) {
        // Rehash the table if the threshold is exceeded
        rehash();

        tab = table;
        hash = key.hashCode();
        index = (hash & 0x7FFFFFFF) % tab.length;
    }

    // Creates the new entry.
    @SuppressWarnings("unchecked")
    Entry<K,V> e = (Entry<K,V>) tab[index];
    tab[index] = new Entry<>(hash, key, value, e);
    count++;
    modCount++;
}
rehash() 方法
protected void rehash() {
    int oldCapacity = table.length;	//	记录数组旧容量
    Entry<?,?>[] oldMap = table;

    // overflow-conscious code
    int newCapacity = (oldCapacity << 1) + 1;	//	扩容 = 就容量 * 2 + 1
    if (newCapacity - MAX_ARRAY_SIZE > 0) {
        if (oldCapacity == MAX_ARRAY_SIZE)
            // Keep running with MAX_ARRAY_SIZE buckets
            return;
        newCapacity = MAX_ARRAY_SIZE;
    }
    Entry<?,?>[] newMap = new Entry<?,?>[newCapacity];

    modCount++;
    threshold = (int)Math.min(newCapacity * loadFactor, MAX_ARRAY_SIZE + 1);
    table = newMap;

    for (int i = oldCapacity ; i-- > 0 ;) {	//	将旧表内容,经过计算后,拷贝到 新表
        for (Entry<K,V> old = (Entry<K,V>)oldMap[i] ; old != null ; ) {
            Entry<K,V> e = old;
            old = old.next;

            int index = (e.hash & 0x7FFFFFFF) % newCapacity;
            e.next = (Entry<K,V>)newMap[index];
            newMap[index] = e;
        }
    }
}
Hashtable 和 HashMap 对比
| 版本 | 线程安全(同步) | 效率 | 允许null和null 值 | |
|---|---|---|---|---|
| HashMap | 1.2 | 不安全 | 高(没有锁,红黑树,取模获取槽位) | 可以 |
| Hashtable | 1.0 | 安全 | 较低(位运算获取槽位) | 不可以 |
10. LinkedHashMap
11. TreeMap
红黑树
/** From CLR */
private void fixAfterInsertion(Entry<K,V> x) {
    x.color = RED;

    while (x != null && x != root && x.parent.color == RED) {
        if (parentOf(x) == leftOf(parentOf(parentOf(x)))) {
            Entry<K,V> y = rightOf(parentOf(parentOf(x)));
            if (colorOf(y) == RED) {
                setColor(parentOf(x), BLACK);
                setColor(y, BLACK);
                setColor(parentOf(parentOf(x)), RED);
                x = parentOf(parentOf(x));
            } else {
                if (x == rightOf(parentOf(x))) {
                    x = parentOf(x);
                    rotateLeft(x);
                }
                setColor(parentOf(x), BLACK);
                setColor(parentOf(parentOf(x)), RED);
                rotateRight(parentOf(parentOf(x)));
            }
        } else {
            Entry<K,V> y = leftOf(parentOf(parentOf(x)));
            if (colorOf(y) == RED) {
                setColor(parentOf(x), BLACK);
                setColor(y, BLACK);
                setColor(parentOf(parentOf(x)), RED);
                x = parentOf(parentOf(x));
            } else {
                if (x == leftOf(parentOf(x))) {
                    x = parentOf(x);
                    rotateRight(x);
                }
                setColor(parentOf(x), BLACK);
                setColor(parentOf(parentOf(x)), RED);
                rotateLeft(parentOf(parentOf(x)));
            }
        }
    }
    root.color = BLACK;
}
12. Properties
- 继承自 Hastable 类并且实现了 Map 接口,也是使用一种键值对的形式来保存数据
- 特点与Hashtaable 类似
- Properties 还可以用于 从 ×××.properties 文件中,加载数据到 Properties 类对象,并进行读取和修改
- 说明:工作后 ×××.properties 文件通常作为 配置文件(IO流)
public class Properties_ {
    public static void main(String[] args) {

        //  老韩解读
        //  1. Properties 继承了 Hashtable
        //  2. 可以通过 k - v 存放数据,当然 key 和 value 不能为 null

        Properties properties = new Properties();
        properties.put("john", 100);    //  k - v
        properties.put("lucy", 100);    //  k - v
        properties.put("lic", 100);    //  k - v
        properties.put("lic", 88);    //  如果有相同的 key,value也会被替换

        System.out.println("properties=" + properties);


        //  通过k 获取对应 值
        System.out.println(properties.get("lic"));

        //  删除
        properties.remove("lic");
        System.out.println("properties=" + properties);

        //  修改
        properties.put("john", "约翰");
        System.out.println("properties=" + properties);

        //  查
        System.out.println(properties.get("john"));
        System.out.println(properties.getProperty("john"));

    }
}
Java 读写 Properties 配置文件
Properties类继承自Hashtable类并且实现了Map接口,也是使用一种键值对的形式来保存属性集。不过Properties有特殊的地方,就是它的键和值都是字符串类型。
Properties 中主要方法
(1) load(InputStream inStream)
这个方法可以从.properties属性文件对应的文件输入流中,加载属性列表到 Properties类对象。如下面的代码:
Properties pro = new Properties();
FileInputStream in = new FileInputStream("a.properties");
pro.load(in);
in.close();
(2) store(OutputStream out, String comments)
这个方法将Properties类对象的属性列表保存到输出流中。如下面的代码:
FileOutputStream oFile = new FileOutputStream(file, "a.properties");
pro.store(oFile, "Comment");
oFile.close();
如果comments不为空,保存后的属性文件第一行会是#comments,表示注释信息;如果为空则没有注释信息。
注释信息后面是属性文件的当前保存时间信息。
(3) getProperty/setProperty
实际案例:
import java.io.BufferedInputStream;
import java.io.FileInputStream;
import java.io.FileOutputStream;
import java.io.InputStream;
import java.util.Iterator;
import java.util.Properties;

public class PropertyTest {
    public static void main(String[] args) {
        Properties prop = new Properties();
        try{
            //读取属性文件a.properties
            InputStream in = new BufferedInputStream (new FileInputStream("a.properties"));
            prop.load(in);     ///加载属性列表
            Iterator<String> it=prop.stringPropertyNames().iterator();
            while(it.hasNext()){
                String key=it.next();
                System.out.println(key+":"+prop.getProperty(key));
            }
            in.close();

            ///保存属性到b.properties文件
            FileOutputStream oFile = new FileOutputStream("b.properties", true);//true表示追加打开
            prop.setProperty("phone", "10086");
            prop.store(oFile, "The New properties file");
            oFile.close();
        }
        catch(Exception e){
            System.out.println(e);
        }
    }
}
三、开发中如何选择集合实现类
取决于 业务操作特点,然后根据集合实现类特性进行选择
-
先判断存储的类型
- 一组对象【单列】
- 一组键值对【双列】
-
一组对象【单列】:Collection接口
- 允许重复:List
- 增删多:LinkedList【底层维护了一个双向链表】
- 改查多:ArrayList【底层维护 Object 类型的可变数组】
- 不允许重复:Set
- 无序:HashSet【底层是 HashMap,维护了一个哈希表,即(数组 + 链表 + 红黑树)】
- 排序:TreeSet
- 插入he1取出顺序一致:LinkedHashSet【底层LinkedHashMap的底层HashMap】,维护数组 + 双向链表
- 允许重复:List
-
一组键值对:Map
- 键无序:HashMap【底层是:哈希表 jdk7:数组 + 链表,jdk8:数组+链表+红黑树】
- 键无序:TreeMap
- 键插入和取出顺序一致:LinkedHashMap
- 读取文件 Properties
四、注意事项
1. 分析 HashSet 和 TreeSet 如何实现去重的
- HashSet
- haasCode() + equals()
- 底层先通过存入对象,进行运算得到一个 hash值,得到对应索引
- 如果发现table 表索引所在的位置,没有数据,就直接存放
- 如果有数据,就进行 equals 比较【遍历比较】
- 比较后不相同,就加入
- 否则不加入
- TreeSet
- 如果你传入了一个 Comparator匿名对象,就使用实现的 compare方法去重
- 方法返回0,就认为是相同的元素 / 数据,就不添加了
- 如果你没有传入Comparator匿名对象,则以你添加的对象实现的 Comparable 接口的 compareTo 去重
- 如果你传入了一个 Comparator匿名对象,就使用实现的 compare方法去重
public V put(K key, V value) {
    Entry<K,V> t = root;
    if (t == null) {
        compare(key, key); // type (and possibly null) check

        root = new Entry<>(key, value, null);
        size = 1;
        modCount++;
        return null;
    }
    int cmp;
    Entry<K,V> parent;
    // split comparator and comparable paths
    Comparator<? super K> cpr = comparator;
    if (cpr != null) {
        do {
            parent = t;
            cmp = cpr.compare(key, t.key);
            if (cmp < 0)
                t = t.left;
            else if (cmp > 0)
                t = t.right;
            else
                return t.setValue(value);
        } while (t != null);
    }
    else {	//	现在没有传入 Comparactor 对象,代码走的是这部分了
        if (key == null)
            throw new NullPointerException();
        @SuppressWarnings("unchecked")
        Comparable<? super K> k = (Comparable<? super K>) key;	//	接口类型 ---> 实现这个接口的对象【向上转型】
        do {
            parent = t;
            cmp = k.compareTo(t.key);	//	调用了字符串本身的 compareTo() 方法 【动态绑定】
            if (cmp < 0)
                t = t.left;
            else if (cmp > 0)
                t = t.right;
            else
                return t.setValue(value);
        } while (t != null);
    }
    Entry<K,V> e = new Entry<>(key, value, parent);
    if (cmp < 0)
        parent.left = e;
    else
        parent.right = e;
    fixAfterInsertion(e);
    size++;
    modCount++;
    return null;
}
分析下面代码是否会有异常:
//	因为:现在没有传入 Comparactor接口的匿名内部类(对象)
//	所以,在底层会调用 添加的对象实现的 Comparable 接口的 compareTo 去重
//	走到了上述代码
//	即:把 Person 转成 Comparable 类型
//	由于这个 Person() 类不知道有没有实现 Comparable 接口,所以可能报错!!!---> 类型转换失败 ClassCastException
TreeSet treeSet = new TreeSet();
treeSet.add(new Person());	//	报错
注意:第一次添加的时候,也会进行类型转换
//	第一次添加的时候,就会报错,类型转换异常
@SuppressWarnings("unchecked")
final int compare(Object k1, Object k2) {
    return comparator==null ? ((Comparable<? super K>)k1).compareTo((K)k2)
        : comparator.compare((K)k1, (K)k2);
}
2. remove() 方法
2.1 HashSet的 remove() 返回类型为:boolean
//	HashSet 调用 boolean remove(Object o) 方法,底层调用的是 hashmap的 V remove(Object key)
//	根据 key 的 hash 值,会先算出在 table 中的位置,所过table表中该位置为null,则删除失败
//	删除成功的话,会返回 对应的 value 值
set.remove(obj);
public boolean remove(Object o) {
    return map.remove(o)==PRESENT;
}
2.2 HashSet的 remove() 返回类型为:V
public V remove(Object key) {
    Node<K,V> e;
    return (e = removeNode(hash(key), key, null, false, true)) == null ?
        null : e.value;	//	删除成功时,会返回被删掉的 key 对应的 value
}
final Node<K,V> removeNode(int hash, Object key, Object value,
                           boolean matchValue, boolean movable) {
    Node<K,V>[] tab; Node<K,V> p; int n, index;
    if ((tab = table) != null && (n = tab.length) > 0 &&
        (p = tab[index = (n - 1) & hash]) != null) {	//	要删除的位置不为 null
        Node<K,V> node = null, e; K k; V v;
        if (p.hash == hash &&	//	要删除位置的 hash
            ((k = p.key) == key || (key != null && key.equals(k))))
            node = p;
        else if ((e = p.next) != null) {	//	链表的情况
            if (p instanceof TreeNode)
                node = ((TreeNode<K,V>)p).getTreeNode(hash, key);
            else {
                do {
                    if (e.hash == hash &&
                        ((k = e.key) == key ||
                         (key != null && key.equals(k)))) {
                        node = e;
                        break;
                    }
                    p = e;
                } while ((e = e.next) != null);	//	do-while  循环
            }
        }
        if (node != null && (!matchValue || (v = node.value) == value ||
                             (value != null && value.equals(v)))) {
            if (node instanceof TreeNode)
                ((TreeNode<K,V>)node).removeTreeNode(this, tab, movable);
            else if (node == p)
                tab[index] = node.next;
            else
                p.next = node.next;
            ++modCount;
            --size;
            afterNodeRemoval(node);
            return node;
        }
    }
    return null;	//	要删除的位置为 null
}
Collections (工具类)
java.util.Collections
- Collections 是一个操作 Set、List 和 Map 等集合的工具类
- 提供了一些系列静态放法对集合元素进行排序、 查询 和 修改 等操作
//	对象在集合中出现的次数
public static int frequency(Collection<?> c, Object o) {
    int result = 0;
    if (o == null) {
        for (Object e : c)
            if (e == null)
                result++;
    } else {
        for (Object e : c)
            if (o.equals(e))
                result++;
    }
    return result;
}
-
排序操作:(均为 static 方法)
方法名 作用 reverse(List) 反转 List中的元素 shuffle(List) 【扑克牌洗牌】 对 List 集合元素进行随机排序 sort(List) 根据元素的自然顺序对指定 List 集合元素按升序排序 sort(List, Comparator) 根据指定的 Comparator 产生的顺序对 List 集合元素进行排序 swap(List, int, int) 将指定 list 集合中的 i 处元素和 j 处元素进行交换 Object max(Collection) 根据元素的自然顺序,返回给定集合中的最大元素 Object max(Collection, Comparator) 根据 Comparator 指定的顺序,返回给定集合中的最大元素 Object min(Collection) Object min(Collection, Comparator) int frequency(Collection, Object) 返回指定集合中指定元素的出现次数 void copy(List dest, List src) 将 src 中的内容复制到 dest中 boolean replaceAll(List list, Object oldVal, Object newVal) 使用 新值替换 List 对象的所有旧值
Collections.max(list, new Comparator() {

    @Override
    public int compare(Object o1, Object o2) {
        return ((String)o1).length() - ((String)o2).length();
    }
});
//	为了完成一个完整拷贝,我们需要先给 dest 赋值,大小和 list.size() 一样
for(int i = 0; i < list.size(); i++){
    dest.add("");
}


 浙公网安备 33010602011771号