iOS中多控制器的使用
通常情况下,一个app由多个控制器组成,当app中有多个控制器的时候,我们就需要对这些控制器进行管理。
在开发过程中,当有多个View时,可以用一个大的view去管理多个小的view,控制器也是如此,可以用一个控制器去管理多个控制器。
比如,用一个控制器A去管理3个控制器B、C、D,则控制器A是控制器B、C、D的父控制器,控制器B、C、D是控制器A的子控制器。
iOS中提供了2个比较特殊的控制器,可以用来管理多个子控制器,分别是:
UINavigationController 和 UITabBarController。
一: UINavigationController 的简单介绍
UINavigationController 在app 中很常见,其最典型的应用是系统自带的 "设置",如下图:
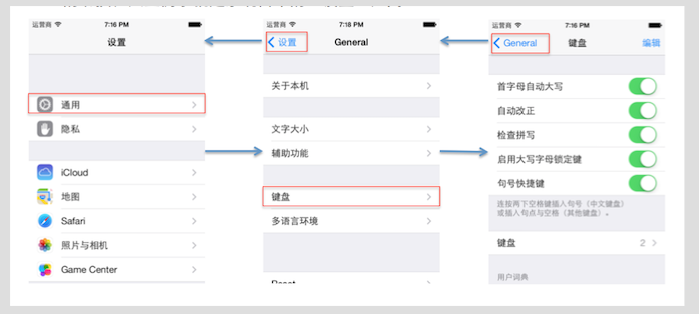
点击"通用",跳到General 控制器,点击“键盘”,跳转到“键盘”控制器,点击左上角的按钮,能够返回到上一个控制器。
UINavigationController 是通过栈的形式来管理子控制器。越先进入栈的控制器,越靠后被弹出。
UINavigationController 使用 push 方法将某个控制器压入栈:
- (void)pushViewController:(UIViewController *)viewController animated:(BOOL)animated;
使用pop方法可以移除控制器,回到某一个控制器有三种情况,分别如下:
(1)将栈顶控制器移除
- (UIViewController *)popViewControllerAnimated:(BOOL)animated;
(2)回到指定的子控制器
- (NSArray *)popToViewController:(UIViewController *)viewController animated:(BOOL)animated;
(3)回到根控制器(栈底控制器)
- (NSArray *)popToRootViewControllerAnimated:(BOOL)animated;
在使用 UINavigationController时,导航栏的内容由栈顶控制器的 navigationItem的属性决定。
UINavigationItem 有以下属性影响着导航栏的内容:
(1)左上角的返回按钮
@property(nonatomic,retain) UIBarButtonItem *backBarButtonItem;
(2)中间的标题视图
@property (nonatomic,retain) UIView *titleView;
(3)中间的标题文字
@property (nonatomic,copy) NSString *title;
(4)左上角的视图
@property (nonatomic,retain) UIBarButtonItem *leftBarButtonItem;
(5)右上角的视图
@property (nonatomic,retain) UIBarButtonItem *rightBarButtonItem;
示例程序:
初始化UINavigationController 并将其设置为窗口的 rootViewController。
- (BOOL)application:(UIApplication *)application didFinishLaunchingWithOptions:(NSDictionary *)launchOptions {
    self.window = [[UIWindow alloc] initWithFrame:[[UIScreen mainScreen] bounds]];
    self.window.backgroundColor = [UIColor whiteColor];

    WMNOneViewController *one = [[WMNOneViewController alloc] init];
    UINavigationController *nav = [[UINavigationController alloc] initWithRootViewController:one];
    self.window.rootViewController = nav;

    [self.window makeKeyAndVisible];
    return YES;
}
UINavigationItem的一些属性使用:
- (void)viewDidLoad {
    [super viewDidLoad];
    self.view.frame = [[UIScreen mainScreen] bounds];
    //设置title
    self.navigationItem.title = @"第一个控制器";
    //设置下一个控制器的返回按钮
    self.navigationItem.backBarButtonItem = [[UIBarButtonItem alloc] initWithTitle:@"返回" style:UIBarButtonItemStyleDone target:nil action:nil];
    //设置当前(栈顶)控制器的左上角视图
    self.navigationItem.leftBarButtonItem = [[UIBarButtonItem alloc] initWithBarButtonSystemItem:UIBarButtonSystemItemCamera target:nil action:nil];
}


- (void)viewDidLoad {
    [super viewDidLoad];
    self.view.frame = [[UIScreen mainScreen] bounds];
    //设置中间的标题视图
    self.navigationItem.titleView = [UIButton buttonWithType:UIButtonTypeContactAdd];
    //设置当前控制器右上角的视图
    self.navigationItem.rightBarButtonItem = [[UIBarButtonItem alloc] initWithBarButtonSystemItem:UIBarButtonSystemItemTrash target:nil action:nil];
}

- (void)viewDidLoad {
    [super viewDidLoad];
    self.view.frame = [[UIScreen mainScreen] bounds];
    UIBarButtonItem *item1 = [[UIBarButtonItem alloc] initWithBarButtonSystemItem:UIBarButtonSystemItemTrash target:nil action:nil];
    UIBarButtonItem *item2 = [[UIBarButtonItem alloc] initWithBarButtonSystemItem:UIBarButtonSystemItemCompose target:nil action:nil];
    //设置当前(栈顶)控制器的右上角视图
    self.navigationItem.rightBarButtonItems = @[item1,item2];
}
跳转到下一个控制器,示例程序如下:
- (IBAction)jumpTwo {
    //跳转到下一个控制器
    WMNTwoViewController *two = [[WMNTwoViewController alloc] init];
    [self.navigationController pushViewController:two animated:YES];
}
返回到上一个控制器或者某一个控制器:
- (IBAction)backToOne {
    //回到根控制器
    //[self.navigationController popToRootViewControllerAnimated:YES];
    //跳转到第一个控制器,之前的控制器全部pop
    [self.navigationController popToViewController:self.navigationController.viewControllers.firstObject animated:YES];
}

- (IBAction)backToTwo {
    //移除栈顶控制器即可
    [self.navigationController popViewControllerAnimated:YES];
}
二: UITabBarController 的简单介绍
和UINavigationController类似,UITabBarController 也可以轻松管理多个子控制器,轻松完成多个控制器之间的切换,典型的例子就是微信、QQ、微博等应用。
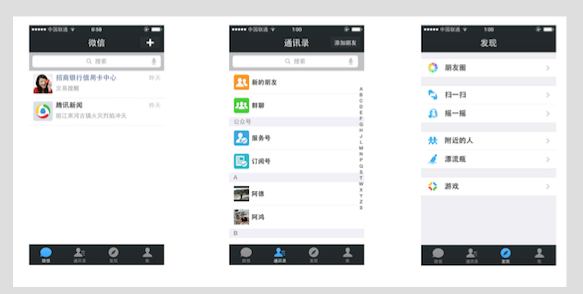
UITabBarController添加控制器的方式有两种,分别是:
(1):添加单个子控制器
- (void)addChildViewController:(UIViewController *)childController;
(2):设置子控制器数组
@property (nonatomic,copy) NSArray *viewControllers;
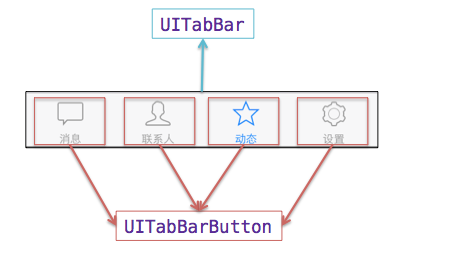
在UITabBarController 中,如果其有N个控制器,则UITabBar内就会有N个UITabBarButton 作为子控件。如果UITab有4个子控制器,那么UITabBar的结构大致如下图所示:
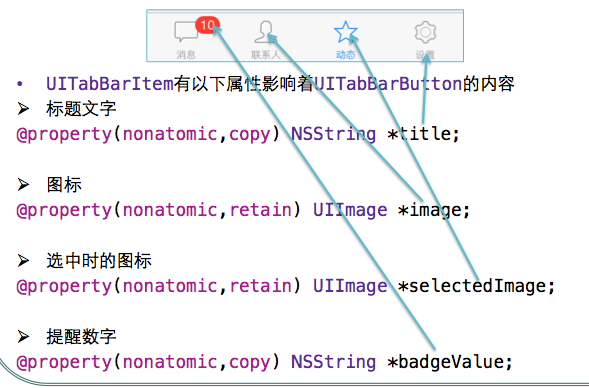
UITabBarButton里面显示什么内容,是由对应子控制器的tabBarItem属性决定。如下图:
UITabBarController 的一个示例程序:
- (BOOL)application:(UIApplication *)application didFinishLaunchingWithOptions:(NSDictionary *)launchOptions {

    self.window = [[UIWindow alloc] initWithFrame:[[UIScreen mainScreen] bounds] ];
    self.window.backgroundColor = [UIColor whiteColor];
    //1.创建 tabbar控制器
    UITabBarController *tabbarVC = [[UITabBarController alloc] init];
    self.window.rootViewController = tabbarVC;

    //2.添加子控制器
    UIViewController *vc1 = [[UIViewController alloc] init];
    vc1.view.backgroundColor = [UIColor grayColor];
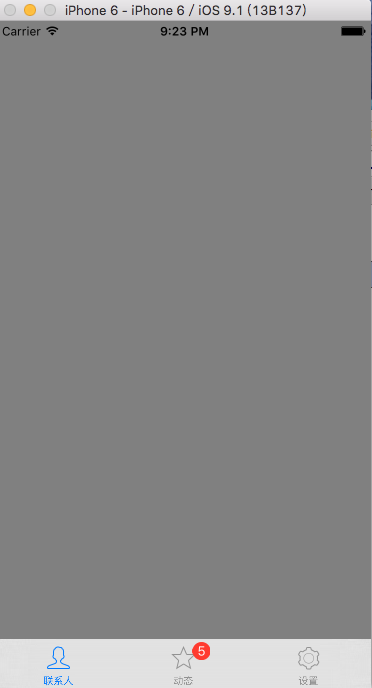
    vc1.tabBarItem.title = @"联系人";
    vc1.tabBarItem.image = [UIImage imageNamed:@"tab_buddy_nor"];

    UIViewController *vc2 = [[UIViewController alloc] init];
    vc2.view.backgroundColor = [UIColor lightGrayColor];
    vc2.tabBarItem.title = @"动态";
    vc2.tabBarItem.image = [UIImage imageNamed:@"tab_qworld_nor"];
    vc2.tabBarItem.badgeValue = @"5";

    UIViewController *vc3 = [[UIViewController alloc] init];
    vc3.view.backgroundColor = [UIColor lightTextColor];
    vc3.tabBarItem.title = @"设置";
    vc3.tabBarItem.image = [UIImage imageNamed:@"tab_me_nor"];

    tabbarVC.viewControllers = @[vc1,vc2,vc3];
    [self.window makeKeyAndVisible];

    return YES;
}
效果图如下:
三:小结
在主流的App中,通常是将 UINavigationController 和 UITabBarController 结合使用。通常情况下,将UITabBarController做为根控制器,UITabBarController的子控制器是 UINavigationController,然后UINavigationController的子控制器又是一个个UIViewController。其结构示意图如下:


 浙公网安备 33010602011771号