4、脚本交互
基础知识
shell登录解读
基础知识
shell配置文件
系统级别生效配置文件
	/etc/profile
		系统的每个用户设置环境信息,当用户第一次登录时,该文件被执行
    /etc/profile.d/*.sh
    	被/etc/profile文件调用,执行当前目录下所有的文件中关于shell的设置
    /etc/bashrc
    	为每一个运行bash shell的用户执行此文件.当bash shell被打开时,该文件被读取。
用户级别生效配置文件
	~/.bash_profile
		设定用户专用的shell信息,当用户登录时,该文件仅仅执行一次
	~/.bashrc
		该文件包含用户专用的bash信息,当登录时以及每次打开新的shell时,该文件被读取
用户退出生效配置文件
	~/.bash_logout: 当每次退出系统(退出bash shell)时,执行该文件.
    ~/.bash_history:
    	用户登录时自动读取其中的内容并加载到内存hiatory记录中
    	logout时将内存中的history记录写入该文件中
shell的登录方式
交互式登录
    方法1:密码登录
        直接通过终端输入账号密码登录
        复制终端
    方法2:su 变更shell操作用户的身份
        su - 用户名
        超级用户除外,需要键入该使用者的密码。
非交互式登录
	方法1:脚本执行
	方法2:su 用户名
登录shell的文件生效流程
	/etc/profile.d/*.sh
		-> /etc/profile
			-> /etc/bashrc
				-> ~/.bashrc
					-> ~/.bash_profile
非登录shell的文件生效流程
	/etc/profile.d/*.sh
		-> /etc/bashrc
			-> ~/.bashrc
注意:
	若多配置文件中设置相同的变量,则后面配置文件中变量的值会覆盖前面配置文件中同一变量的值。
su的相关参数
	-:当前用户不仅切换为指定用户的身份,同时所用的工作环境也切换为此用户的环境。
    -l:同 - 的使用类似,完整切换工作环境,后面需要添加欲切换的使用者账号。
    -p:表示切换为指定用户的身份,但不改变当前的工作环境(不使用切换用户的配置文件)。
    -m:和 -p 一样;
    -c 命令:仅切换用户执行一次命令,执行后自动切换回来,该选项后通常会带有要执行的命令。
配置文件修改后生效的方法
修改profile和bashrc文件后需生效两种方法
    1. 重新启动shell进程
    2. source|. 配置文件

注意:
	source 会在当前shell中执行脚本,所有一般只用于执行置文件,或在脚本中调用另一个脚本的场景
简单实践
准备工作
为所有的shell相关的配置文件添加关键信息
echo "echo '1 - /etc/profile'" >> /etc/profile
echo "echo '2 - /etc/profile.d/2.sh'" >> /etc/profile.d/2.sh
echo "echo '3 - /etc/bashrc'" >> /etc/bashrc
echo "echo '4 - ~/.bash_profile'" >> ~/.bash_profile
echo "echo '5 - ~/.bashrc'" >> ~/.bashrc
非登录效果
[root@localhost ~]# su - python
上一次登录:五 6月 10 16:16:37 CST 2022pts/1 上
2 - /etc/profile.d/2.sh
1 - /etc/profile
3 - /etc/bashrc
[python@localhost ~]$ su root
密码:
2 - /etc/profile.d/2.sh
3 - /etc/bashrc
5 - ~/.bashrc
[root@localhost /home/python]# exit
exit
登录查看效果
切换标准root用户
[python@localhost ~]$ su - root
密码:
上一次登录:日 6月 12 12:41:11 CST 2022pts/2 上
2 - /etc/profile.d/2.sh
1 - /etc/profile
3 - /etc/bashrc
5 - ~/.bashrc
4 - ~/.bash_profile

新建终端效果
Last login: Sun Jun 12 12:35:59 2022 from 10.0.0.1
2 - /etc/profile.d/2.sh
1 - /etc/profile
3 - /etc/bashrc
5 - ~/.bashrc
4 - ~/.bash_profile
[root@localhost ~]#
清理环境
将刚才创建的5条命令执行反向操作
[root@localhost ~]# vim ...

退出当前shell环境
[root@localhost ~]# exit
登出
Session stopped
    - Press <return> to exit tab
    - Press R to restart session
    - Press S to save terminal output to file
子shell基础
基础知识
场景
	之前我们对于环境变量在多个shell环境中的应用进行了学习,那种操作量比较大。对于一些临时性的场景,我们在临时性的环境中,做一些操作,但是不希望对外部的环境造成影响,这个时候我们就涉及到了一些临时shell环境的实践。
	关于临时shell环境的创建,我们可以借助于()方法来实现。
临时shell
临时shell环境 - 启动子shell
	(命令列表),在子shell中执行命令列表,退出子shell后,不影响后续环境操作。
临时shell环境 - 不启动子shell
	{命令列表}, 在当前shell中运行命令列表,会影响当前shell环境的后续操作。
简单实践
() 实践
查看当前shell的pid
[root@localhost ~]#  echo $BASHPID
11413
[root@localhost ~]# ps aux | grep bash
root      11413  0.0  0.0 116724  3160 pts/0    Ss   12:54   0:00 -bash
root      11660  0.0  0.0 112824   984 pts/0    R+   14:49   0:00 grep --color=auto bash

查看子shell的pid
[root@localhost ~]# (echo $BASHPID; echo haha)
11661
haha
[root@localhost ~]# (echo $BASHPID; sleep 30)
11711

另开一个终端查看效果
[root@localhost ~]# pstree | grep sleep
        |-sshd-+-sshd---bash---bash---sleep
结果显示:
	在一个shell内部开启了另一个shell
子shell的操作不影响当前shell环境
[root@localhost ~]# (export SUBSHELL=subshell)
[root@localhost ~]# echo $SUBSHELL

[root@localhost ~]#

子shell中,查看命令执行效果
[root@localhost ~]# (cd /tmp;pwd)
/tmp
[root@localhost ~]# pwd
/root

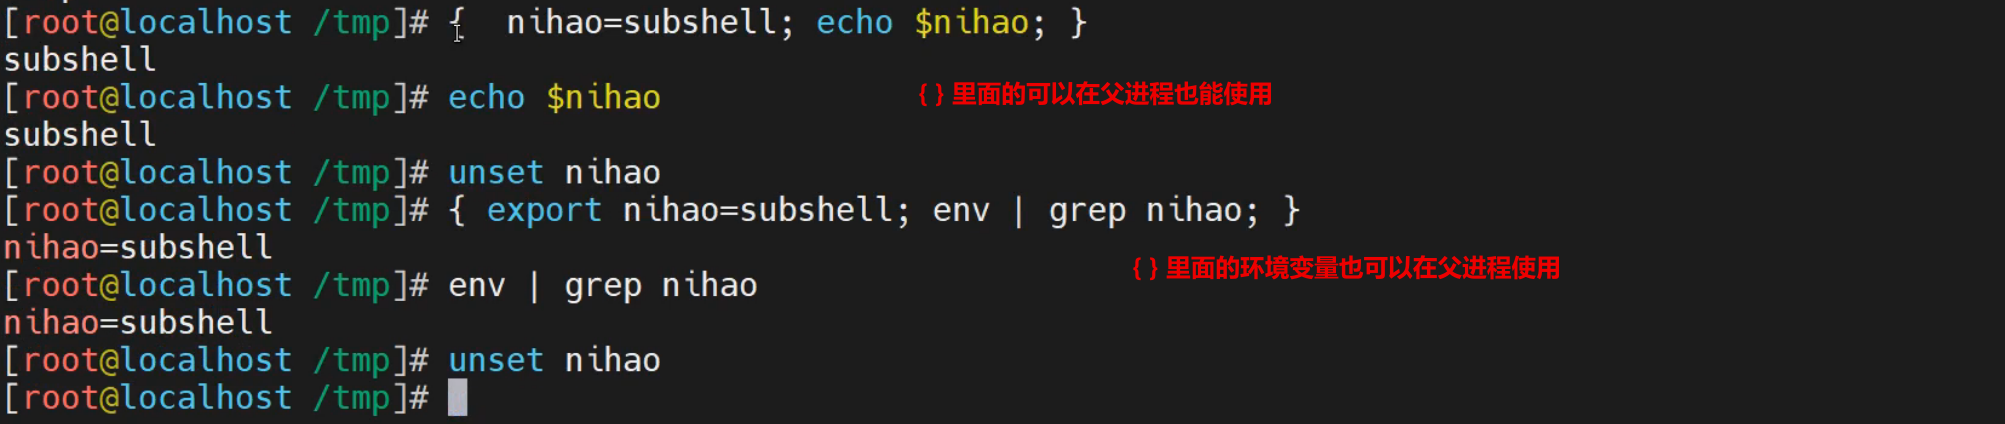
{} 实践
查看当前shell的进程id号
[root@localhost ~]# echo $BASHPID
11676

在{}环境中查看当前shell的进程id号
[root@localhost ~]# { echo $BASHPID; }
11676
{} 环境中,操作命令会影响当前的shell环境
[root@localhost ~]# { export SUBSHELL=subshell; }
[root@localhost ~]# echo $SUBSHELL
subshell

子shell中,查看命令执行效果
[root@localhost ~]# { cd /tmp;pwd; }
/tmp
[root@localhost /tmp]# pwd
/tmp
子shell实践
CA创建
umask基础,文件掩码
umask 解读
	umask指的是文件权限默认的掩码,默认的值是022,也就是说
		默认创建的目录是777-022=755
		默认创建的文件是666-022-544
[root@localhost /data/scripts]# umask
0022
[root@localhost /data/scripts]# mkdir dir
[root@localhost /data/scripts]# touch file
[root@localhost /data/scripts]# ll
总用量 0
drwxr-xr-x 2 root root 6 6月  12 15:18 dir
-rw-r--r-- 1 root root 0 6月  12 15:18 file
CA手工实践
创建临时目录
[root@localhost ~]# mkdir /tmp/CA; cd /tmp/CA
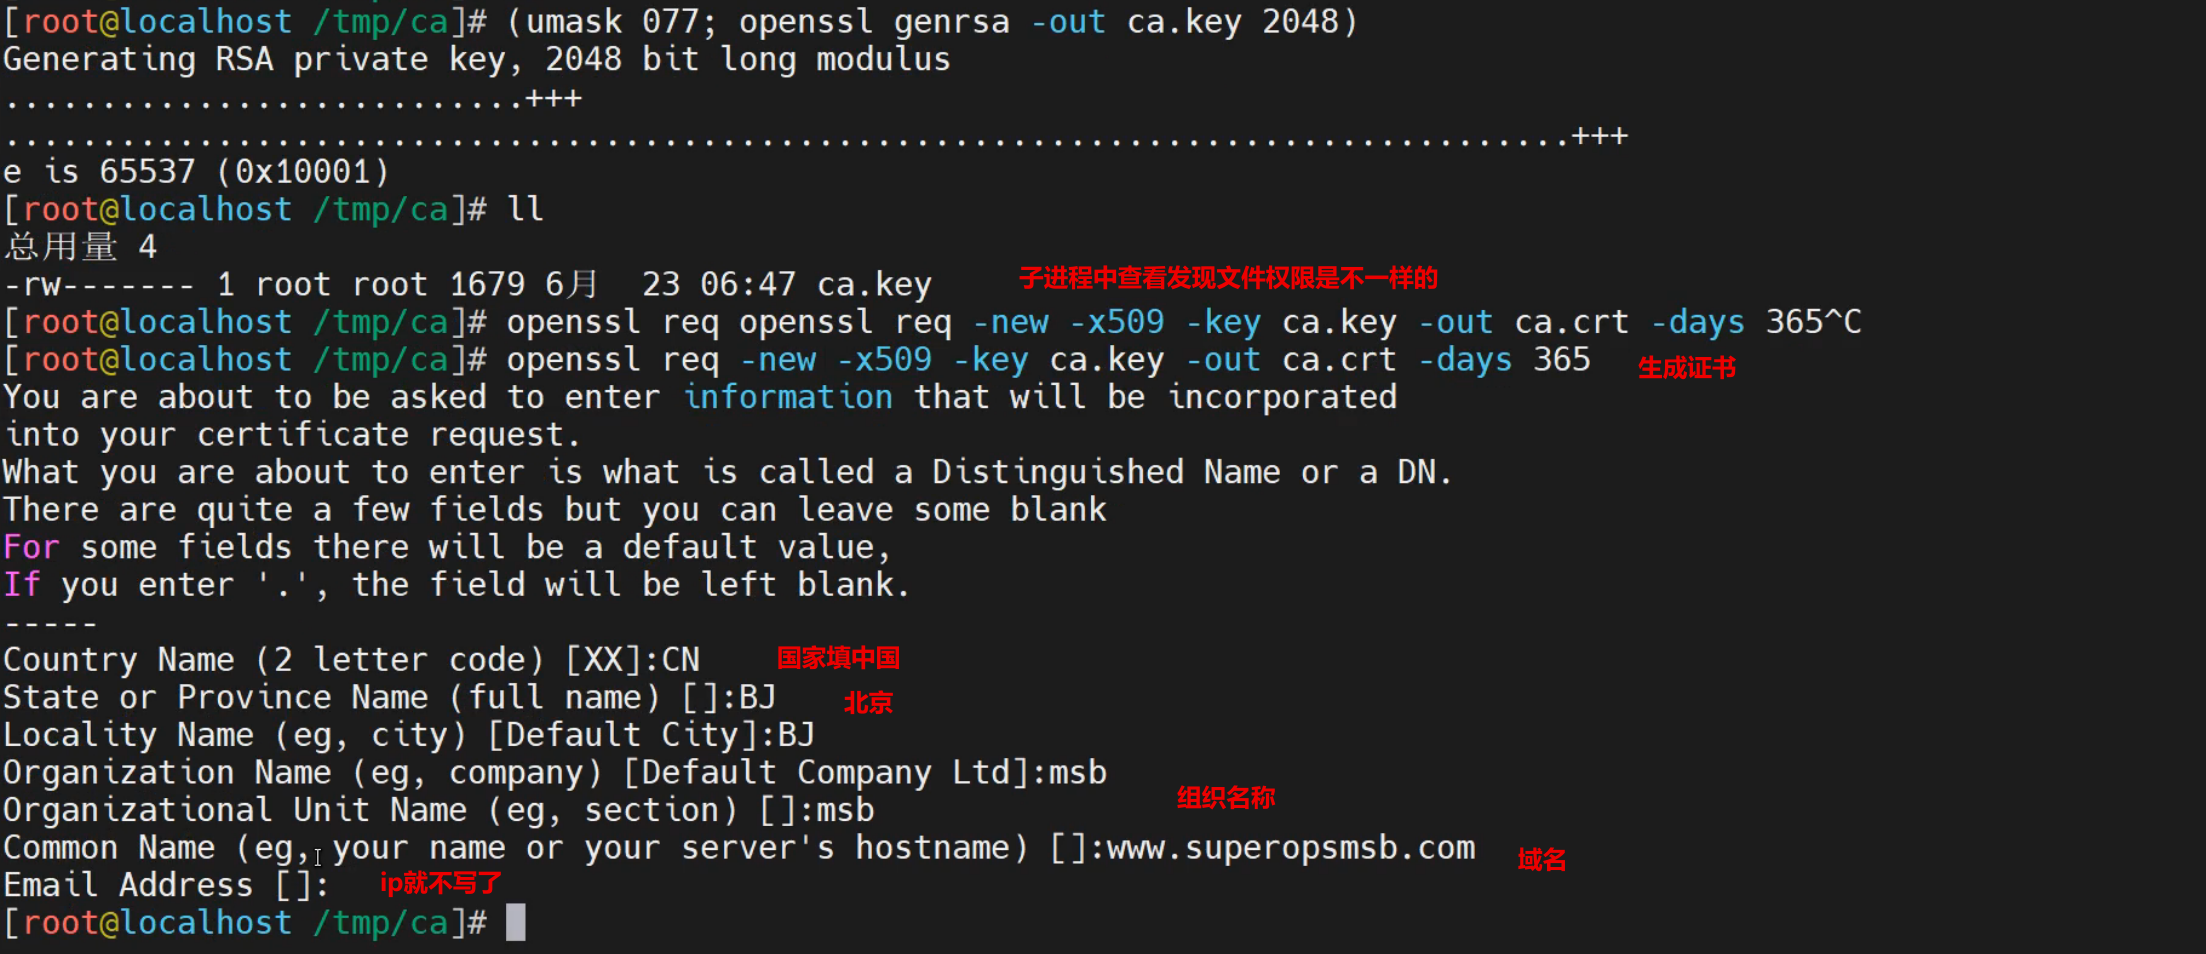
生成私钥
[root@localhost /tmp/CA]# (umask 077;openssl genrsa -out ca.key 2048)
Generating RSA private key, 2048 bit long modulus
.............................................................+++
..................+++
e is 65537 (0x10001)
[root@localhost /tmp/CA]# ll
总用量 4
-rw------- 1 root root 1679 6月 12 15:35 ca.key
生成证书
[root@localhost /tmp/CA]# openssl req -new -x509 -key ca.key -out ca.crt -days 3650
You are about to be asked to enter information that will be incorporated
into your certificate request.
What you are about to enter is what is called a Distinguished Name or a DN.
There are quite a few fields but you can leave some blank
For some fields there will be a default value,
If you enter '.', the field will be left blank.
-----
Country Name (2 letter code) [XX]:CN
State or Province Name (full name) []:BJ
Locality Name (eg, city) [Default City]:BJ
Organization Name (eg, company) [Default Company Ltd]:BJ
Organizational Unit Name (eg, section) []:BJ
Common Name (eg, your name or your server's hostname) []:www.example.com
Email Address []:bj.example.com

查看生成的文件
[root@localhost /tmp/CA]# ls
ca.crt ca.key
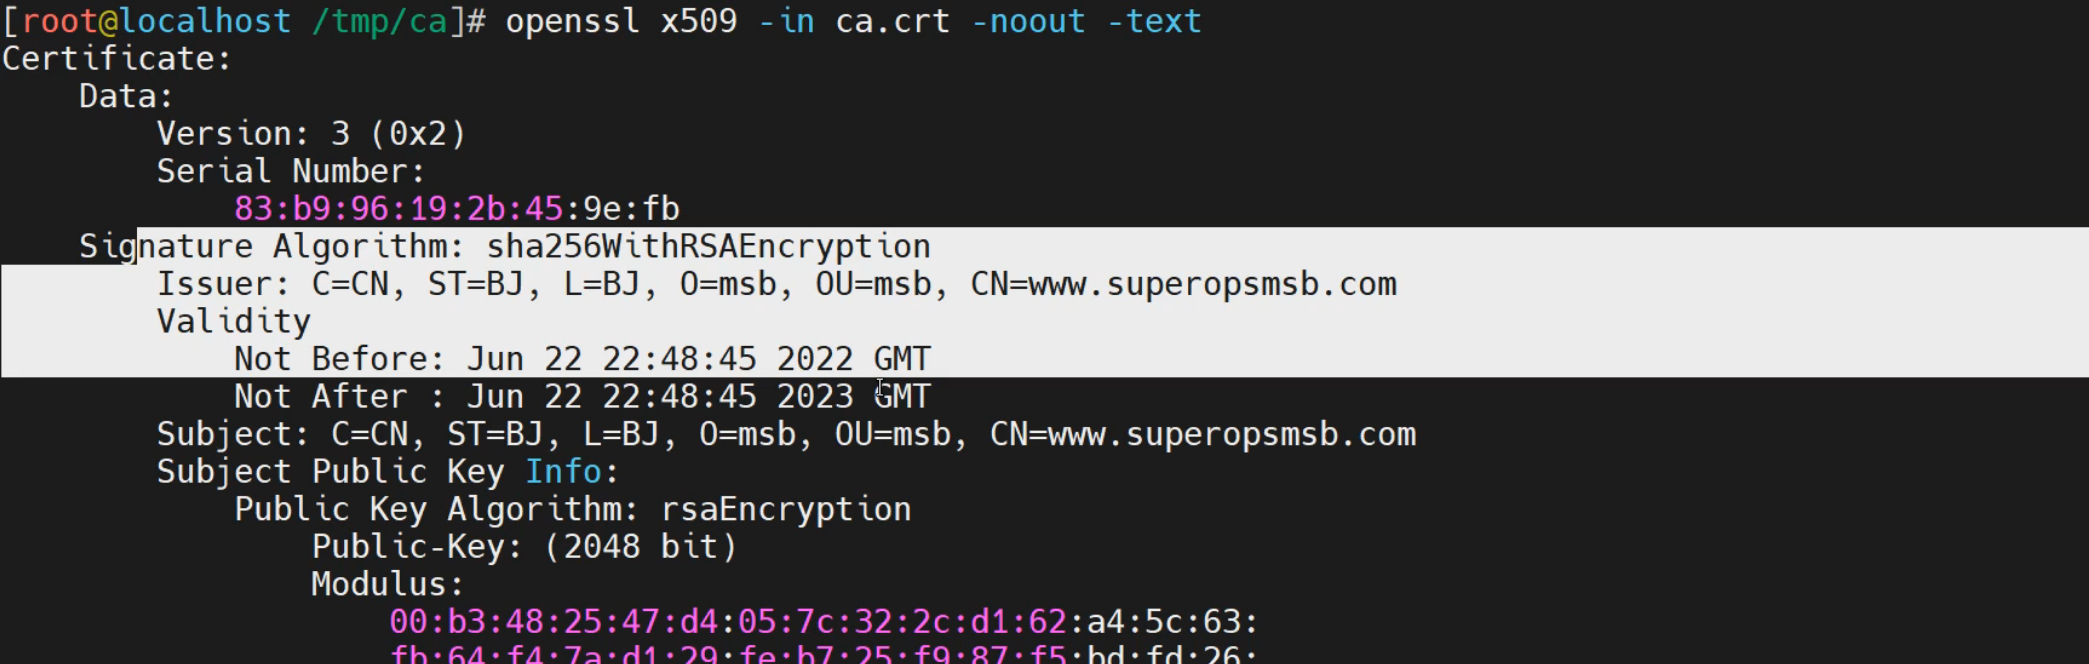
查看证书信息
[root@localhost /tmp/CA]# openssl x509 -in ca.crt -noout -text
Certificate:
Data:
Version: 3 (0x2)
Serial Number:
d6:25:a6:0e:be:98:ec:48
Signature Algorithm: sha256WithRSAEncryption
Issuer: C=CN, ST=BJ, L=BJ, O=BJ, OU=BJ, CN=www.example.com/emailAddress=bj.example.com
脚本实践
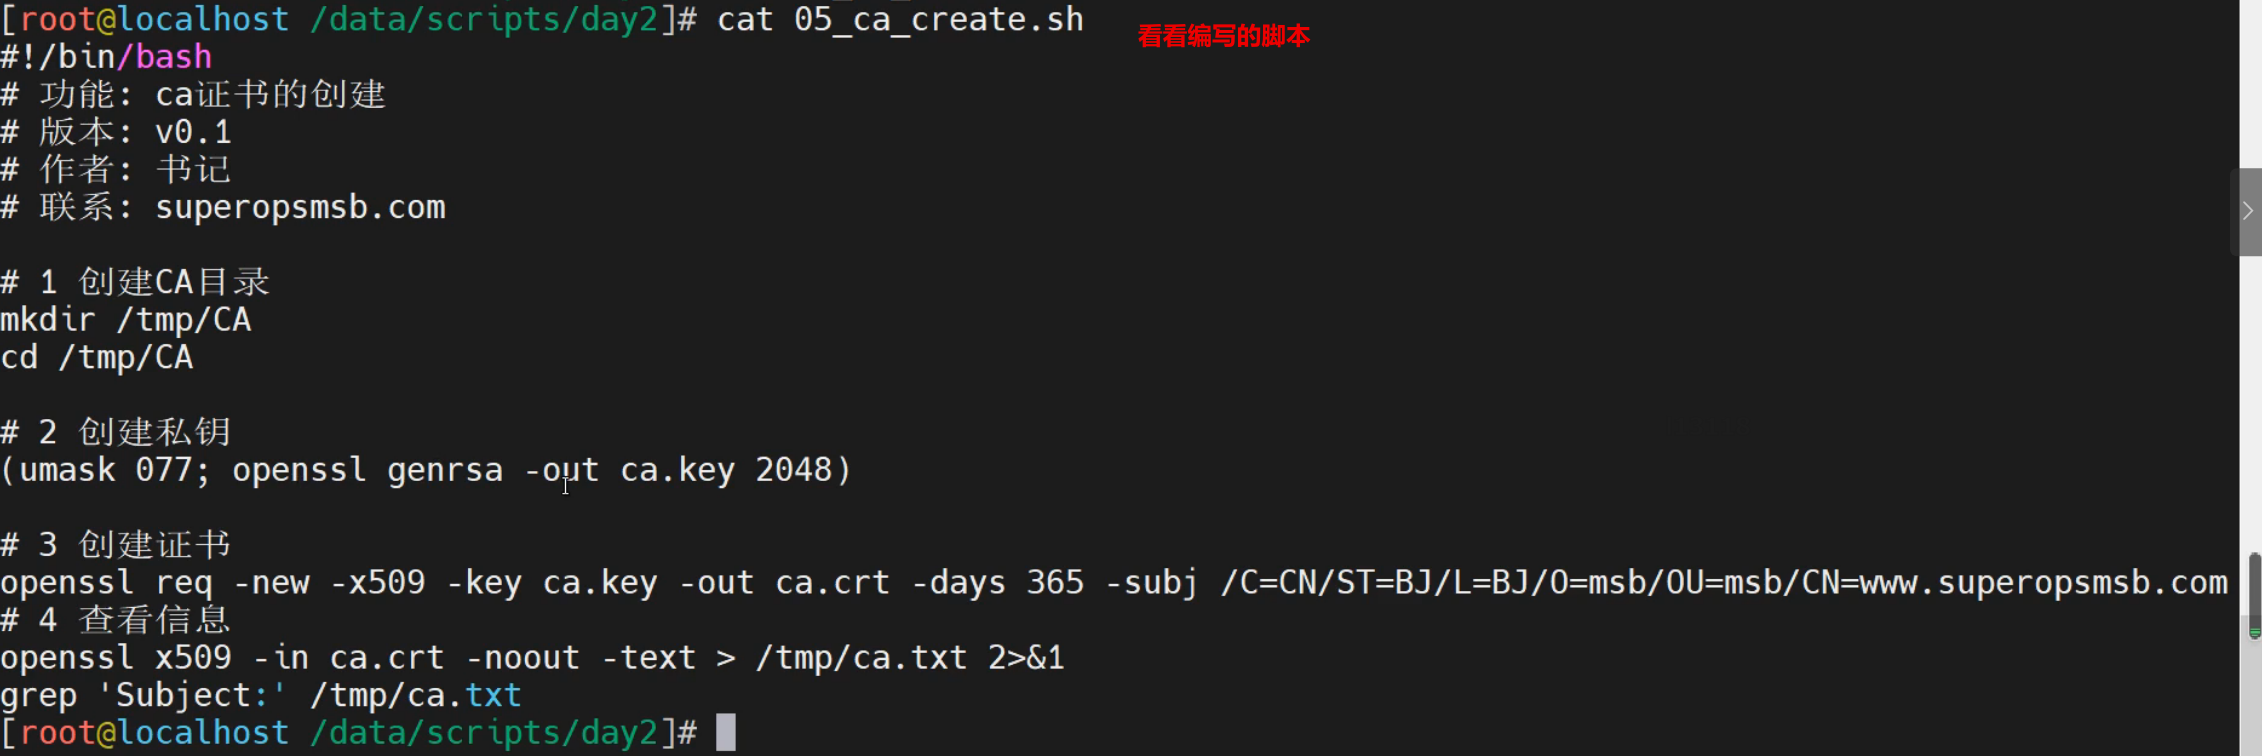
创建脚本
查看脚本定制内容
[root@localhost /data/scripts]# cat ca_create.sh
#!/bin/bash
# 功能: 创建自建CA
# 版本:v0.1
# 作者:书记
# 联系:www.superopsmsb.com

# 定制普通环境变量
CA_DIR="tls"
CA_DOMAIN="$1"
CA_KEY='tls.key'
CA_CRT='tls.crt'

# 创建CA证书
mkdir ${CA_DIR}
(umask 077; cd ${CA_DIR}; openssl genrsa -out tls.key 2048)
openssl req -new -x509 -key ${CA_DIR}/${CA_KEY} -out ${CA_DIR}/${CA_CRT} -subj "/CN=${CA_DOMAIN}" -days 365
执行脚本
[root@localhost /data/scripts]# /bin/bash ca_create.sh www.example.com
Generating RSA private key, 2048 bit long modulus
....+++
.......................................+++
e is 65537 (0x10001)
[root@localhost /data/scripts]# ls tls/
tls.crt  tls.key

确认效果
[root@localhost /data/scripts]# openssl x509 -in tls/tls.crt -noout -text
Certificate:
    Data:
        Version: 3 (0x2)
        Serial Number:
            e1:8b:55:da:65:04:fc:c7
    Signature Algorithm: sha256WithRSAEncryption
        Issuer: CN=www.example.com

脚本外交互
read基础
基础知识
场景需求
	虽然我们可以通过脚本传参的方式实现脚本一定程度的灵活性,但是生产工作中,有很多更加灵活的场景,需要我们在脚本运行的过程中,传递一些用户定制的具体信息。这个时候,普通的脚本参数就无法满足需求了。
	read 命令可以实现我们脚本内外的信息自由传递功能。
命令简介
read命令是用于从终端或者文件中读取输入的内建命令,read命令读取整行输入,每行末尾的换行符不被读入。在read命令后面,如果没有指定变量名,读取的数据将被自动赋值给特定的变量REPLY。常用方式如下:
    read				从标准输入读取一行并赋值给特定变量REPLY。
    read answer			从标准输入读取输入并赋值给变量answer。
    read first last		从标准输入读取内容,将第一个单词放到first中,其他内容放在last中。
    read -s passwd		从标准输入读取内容,写入passwd,不输入效果
    read -n n name		从标准输入读取内容,截取n个字符,写入name,超过n个字符,直接退出
    read -p "prompt"	打印提示,等待输入,并将输入存储在REPLY中。
    read -r line		允许输入包含反斜杠。
    read -t second		指定超时时间,默认是秒,整数
    read -d sper		指定输入信息的截止符号
简单实践
命令操作
交互式接收用户信息
[root@localhost ~]# read
nihao-answer
接收用户输入给一个临时变量
[root@localhost ~]# read answer
nihao-answer
[root@localhost ~]# echo $answer
nihao-answer
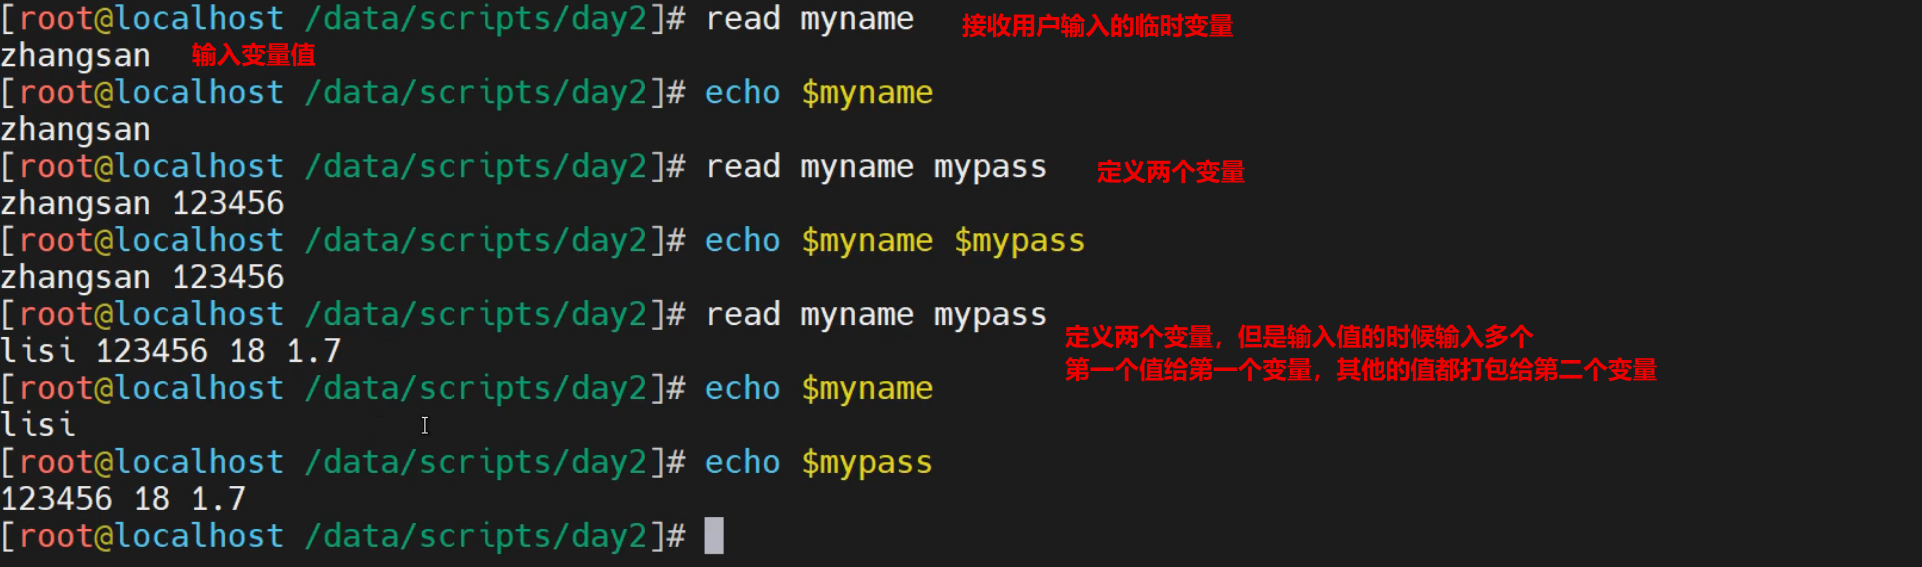
接收多个信息,按照顺序交给不同的临时变量
[root@localhost ~]# read first last
first-1 last-2 end-3
[root@localhost ~]# echo $first
first-1
[root@localhost ~]# echo $last
last-2 end-3
实践2-静默显示
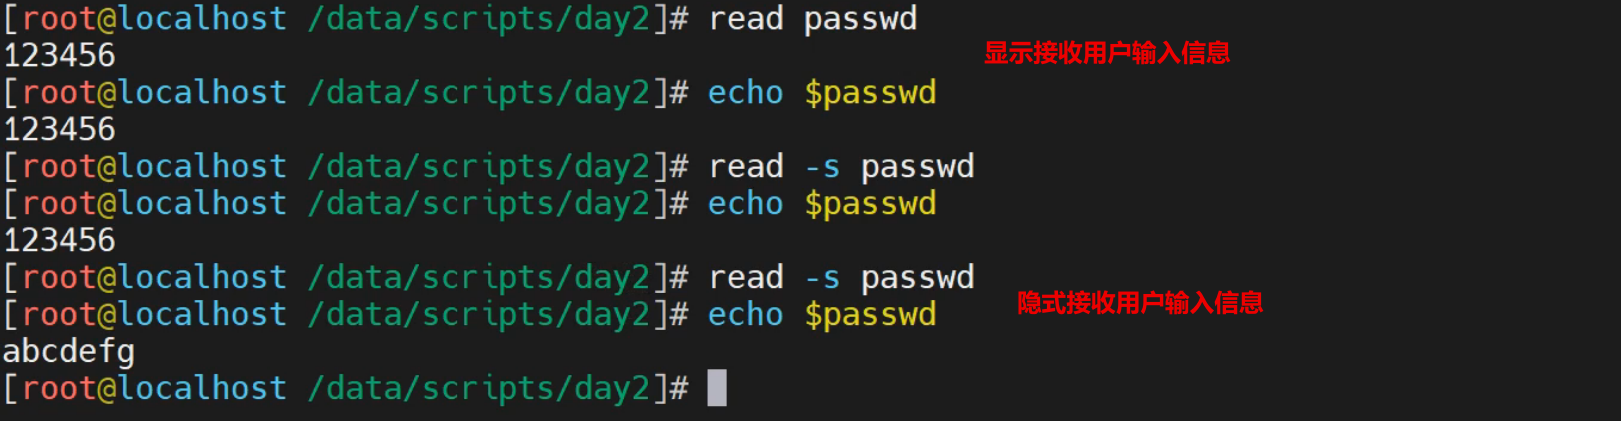
显式接收用户输入信息
[root@localhost ~]# read password
123456
[root@localhost ~]# echo $password
123456

隐式接收用户输入信息
[root@localhost ~]# read -s password
[root@localhost ~]# echo $password
abcdefg
实践3-提示用户输入信息
通过 -p 参数提示用户输入的信息
[root@localhost ~]# read -p "请输入登录用户名: " user
请输入登录用户名: root
[root@localhost ~]# echo $user
root

实践4-限制用户输入信息
[root@localhost ~]# read -n 6 -p "sss: " aaa
sss: 123456[root@localhost ~]# read -n 6 -p "只接收6个字符,超过自动退出: " string
只接收6个字符,超过自动退出: 123456[root@localhost ~]#
[root@localhost ~]# echo $string
123456
注意:
	-p + -s 的组合会导致不会自动换行,可以结合 echo的方式实现换行

实践5-等待时长
[root@localhost ~]# read -t 5 -p "等待5秒后自动退出! " second
等待5秒后自动退出! 4
[root@localhost ~]# echo $second
4
[root@localhost ~]# read -t 5 -p "等待5秒后自动退出! " second
等待5秒后自动退出! [root@localhost ~]#

案例实践
登录模拟
需求
模拟shell终端工具的登录,功能过程如下:
	请输入用户名:
	请输入密码:
	您输入的用户名和密码是: xxx
脚本实践
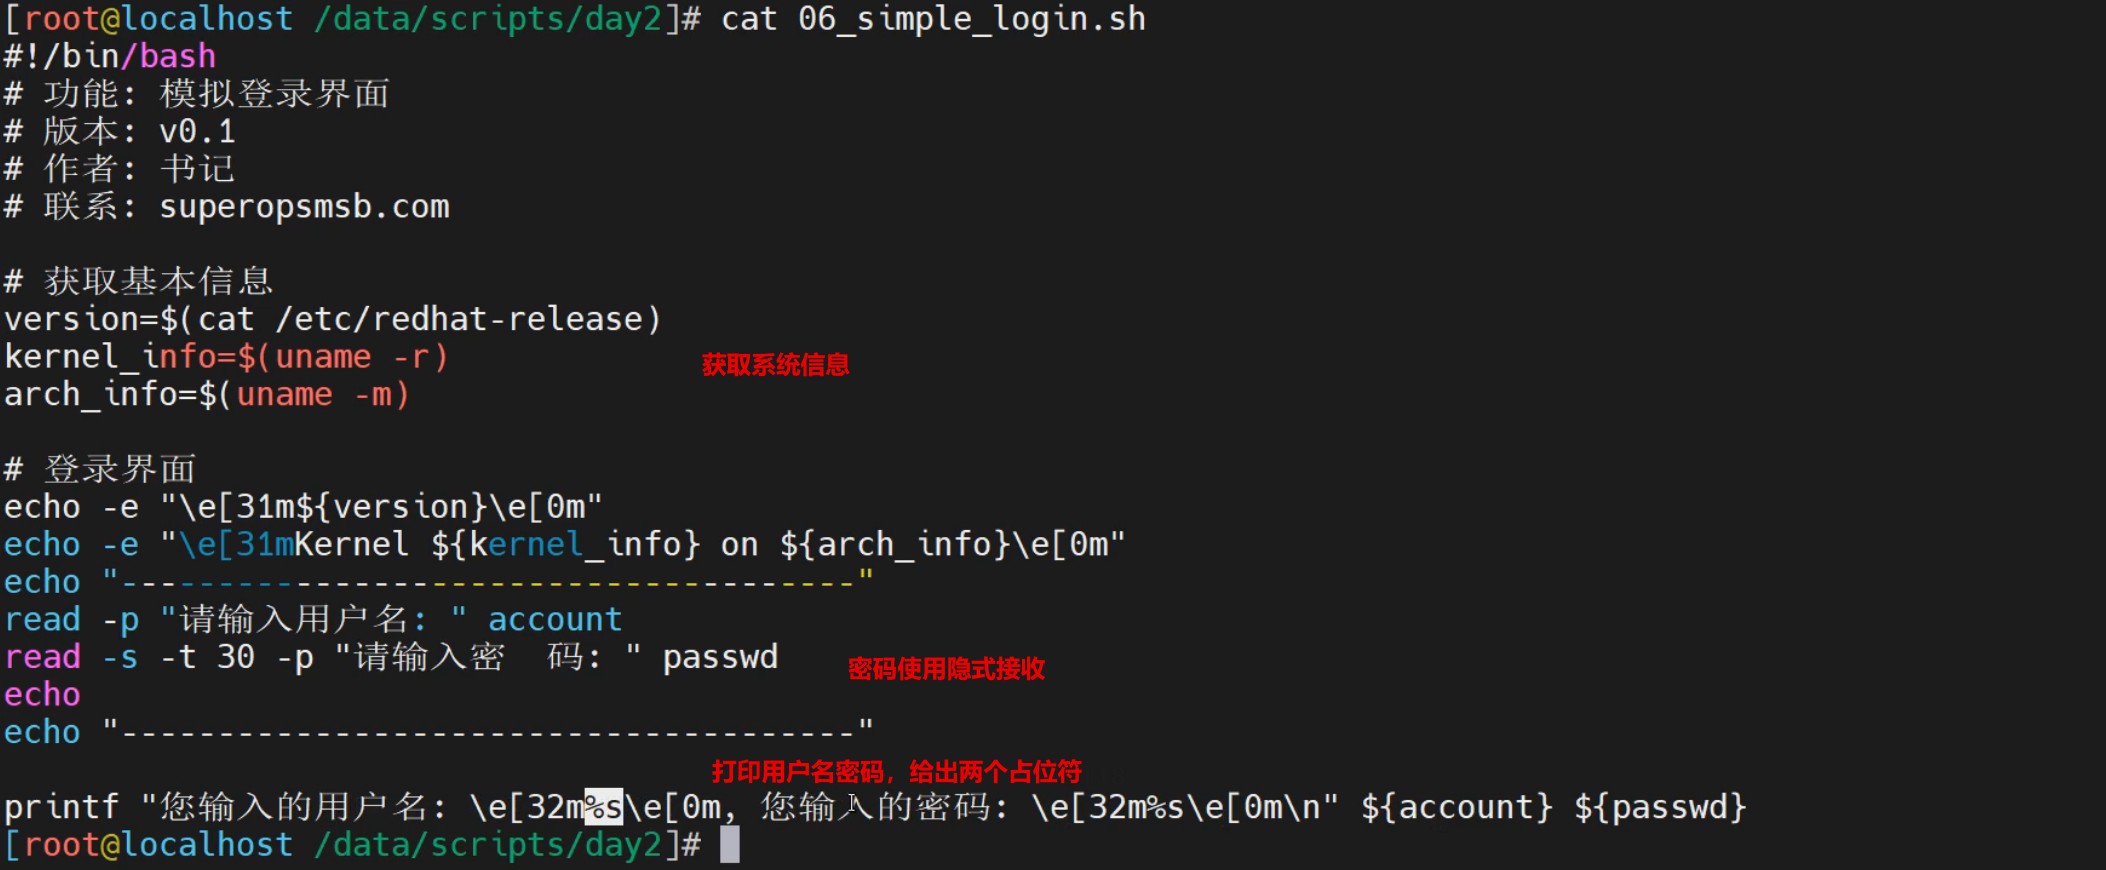
[root@localhost ~]# cat simple_login.sh
#!/bin/bash
# 功能: 模拟shell登录
# 版本:v0.1
# 作者:书记
# 联系:www.superopsmsb.com

# 定制命令变量
OS_INFO=$(cat /etc/redhat-release)
KERNEL_INFO=$(uname -r)
OS_ARCH=$(uname -m)
HOSTNAME=$(hostname)

# 清屏
clear

# 输出提示信息
echo -e "\e[32m${OS_INFO} \e[0m"
echo -e "\e[32mKernel ${KERNEL_INFO} on an ${OS_ARCH} \e[0m"
echo "---------------------------------"
# 交互输入登陆信息
read -p "请输入用户名:" account
read -s -t30 -p "请输入登录密码:" password
echo
echo "---------------------------------"
# 输出用户输入信息
printf "您输入的用户名:\e[31m%s\e[0m您输入的密码:\e[31m%s\e[0m\n" ${account} ${password}
脚本执行效果
[root@10 ~]# /bin/bash simple_login.sh
CentOS Linux release 7.9.2009 (Core)
Kernel 3.10.0-1160.el7.x86_64 on an x86_64
---------------------------------
请输入用户名:root
请输入登录密码:
---------------------------------
您输入的用户名:root您输入的密码:123456

堡垒机实践
功能需求
模拟堡垒机的登录,功能过程如下:
	请选择要登录的主机
	请输入用户名:
	使用指定的用户连接远程主机
脚本实践
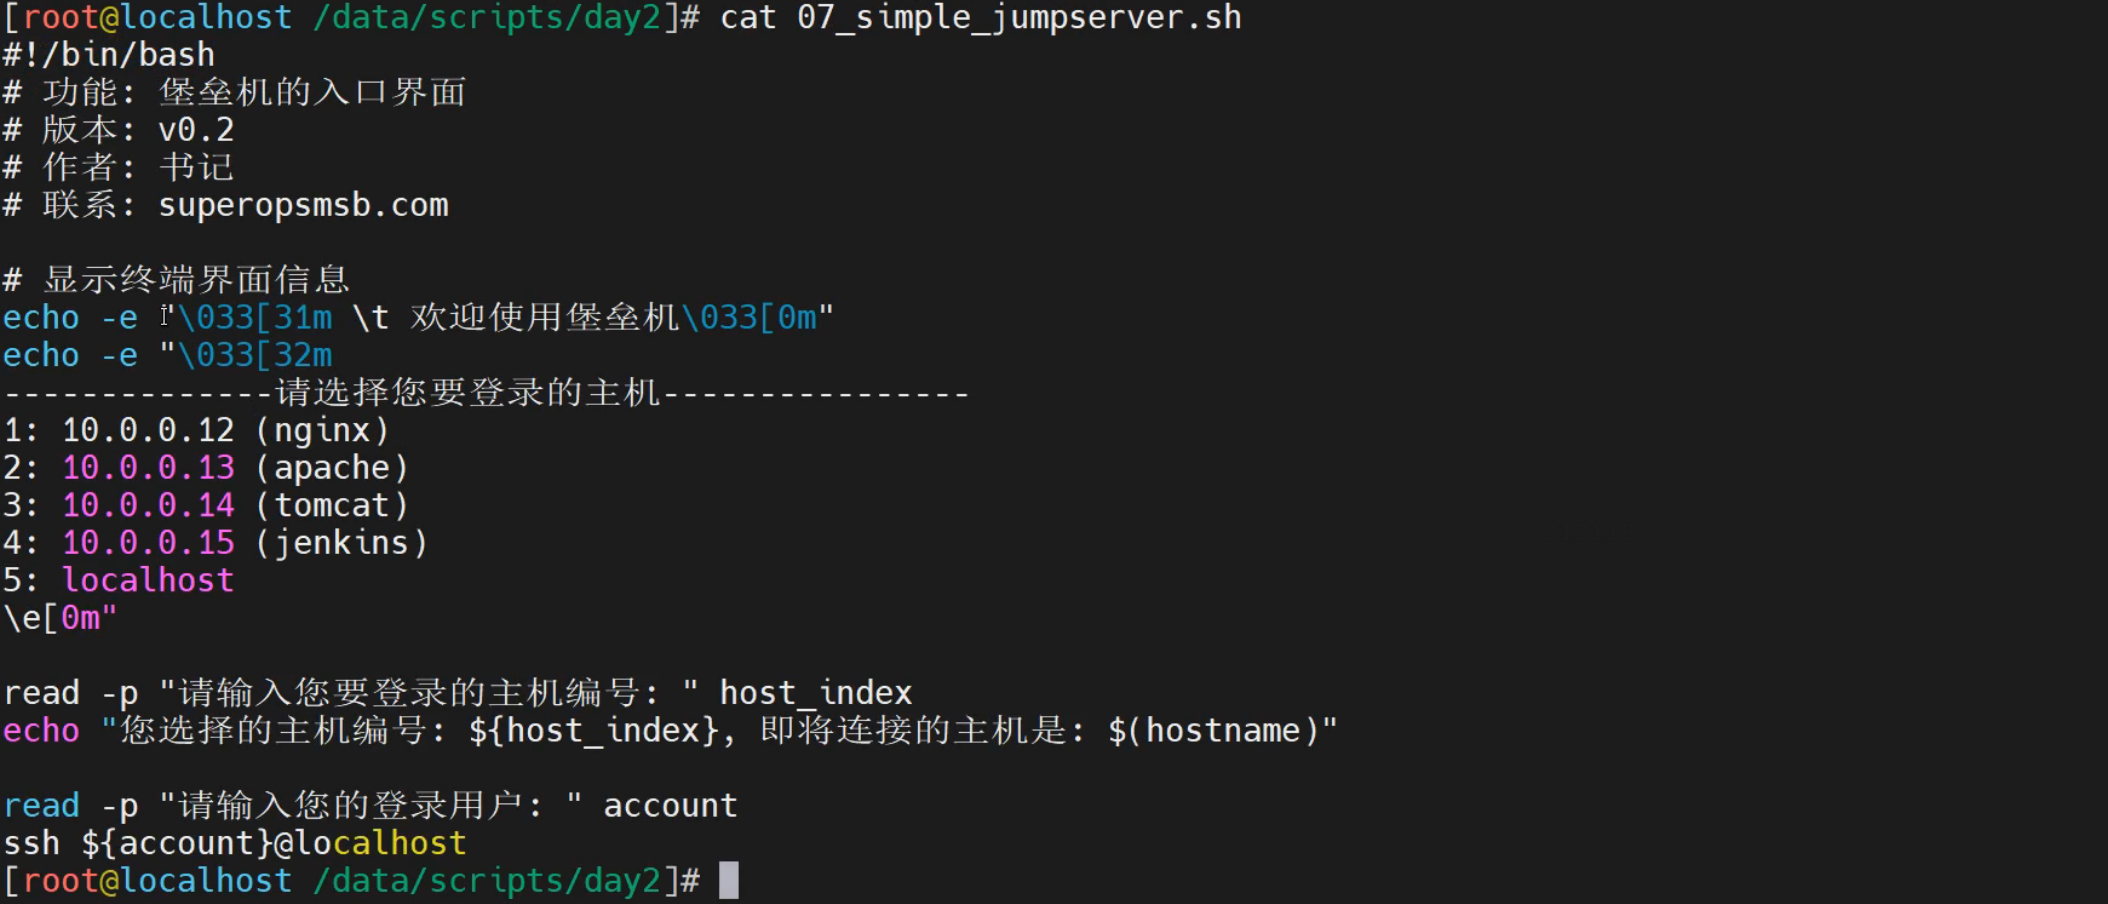
[root@localhost ~]# cat simple_jumpserver.sh
#!/bin/bash
# 功能:定制堡垒机的展示页面
# 版本:v0.2
# 作者:书记
# 联系:www.superopsmsb.com

# 堡垒机的信息提示
echo -e "\e[31m \t\t 欢迎使用堡垒机"

echo -e "\e[32m
-----------请选择你要登录的远程主机-----------
 1: 10.0.0.14 (nginx)
 2: 10.0.0.15 (tomcat)
 3: 10.0.0.19 (apache)
 q: 使用本地主机
----------------------------------------------
"'\033[0m'

# 由于暂时没有学习条件判断,所以暂时选择 q
read -p "请输入您要选择的远程主机编号: " host_index
read -p "请输入登录本地主机的用户名: " user

# 远程连接主机
ssh $user@localhost
脚本执行效果
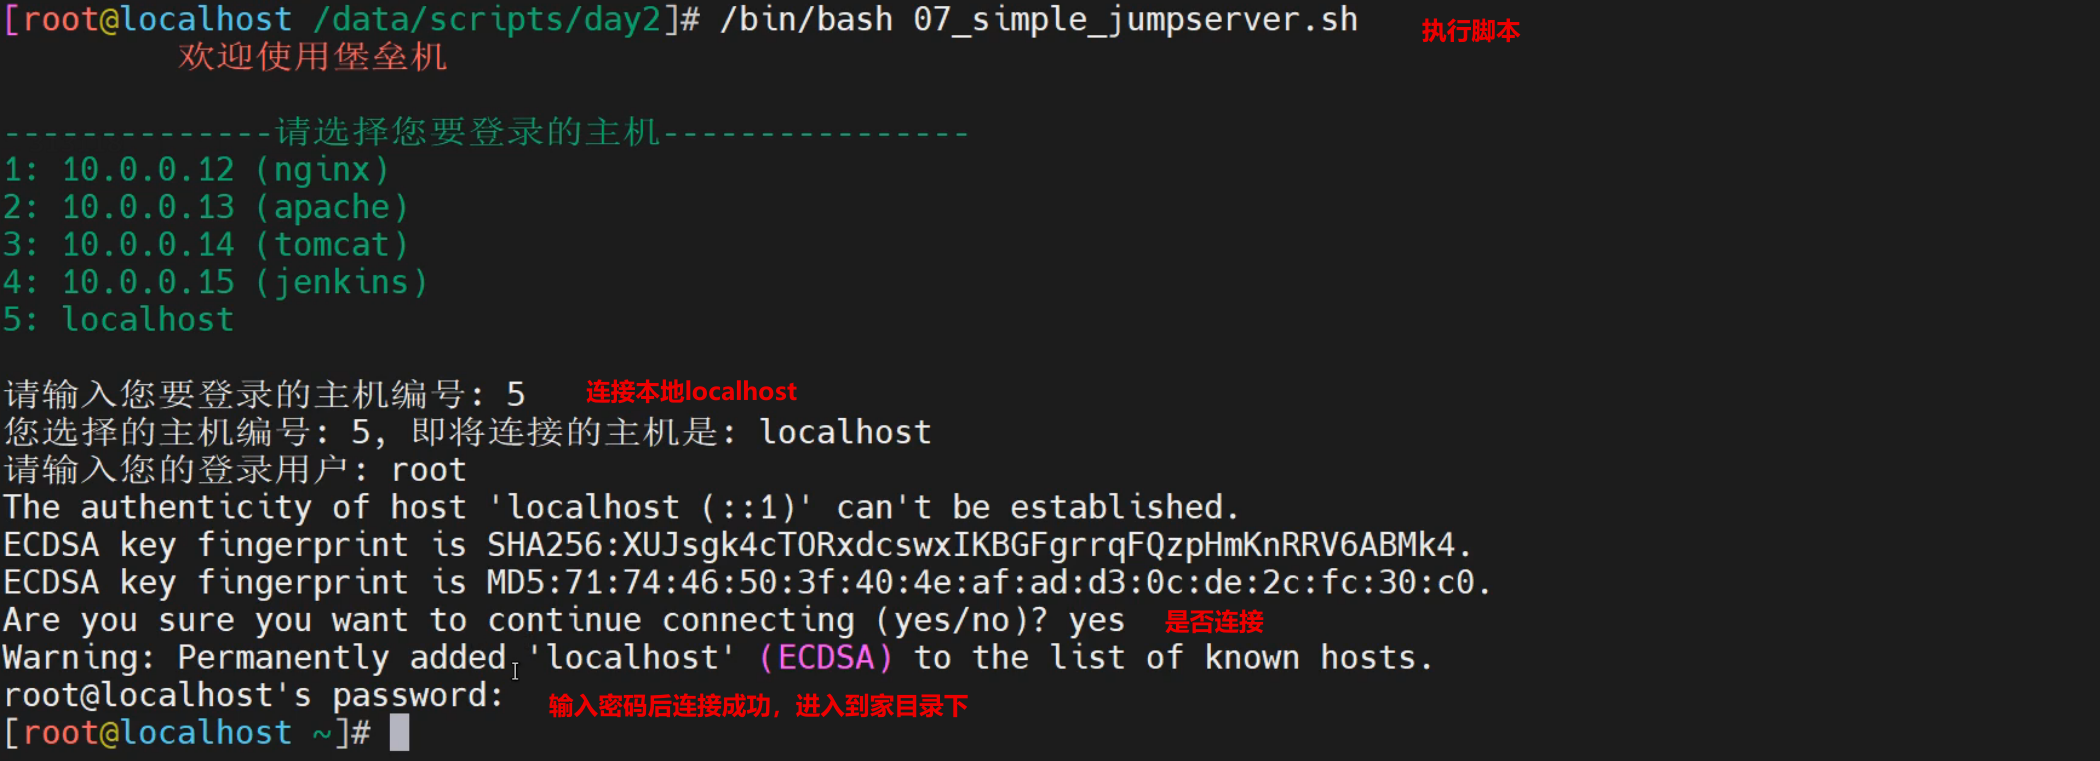
[root@10 ~]# /bin/bash simple_jumpserver.sh
欢迎使用堡垒机
-----------请选择你要登录的远程主机-----------
1: 10.0.0.14 (nginx)
2: 10.0.0.15 (tomcat)
3: 10.0.0.19 (apache)
q: 使用本地主机
----------------------------------------------
请输入您要选择的远程主机编号: p
请输入登录本地主机的用户名: root
The authenticity of host 'localhost (::1)' can't be established.
ECDSA key fingerprint is SHA256:XUJsgk4cTORxdcswxIKBGFgrrqFQzpHmKnRRV6ABMk4.
ECDSA key fingerprint is MD5:71:74:46:50:3f:40:4e:af:ad:d3:0c:de:2c:fc:30:c0.
Are you sure you want to continue connecting (yes/no)? yes
Warning: Permanently added 'localhost' (ECDSA) to the list of known hosts.
root@localhost's password:
Last login: Mon Jun 13 12:19:34 2022 from 10.0.0.1
[root@10 ~]# exit
登出
《三体》中有句话——弱小和无知不是生存的障碍,傲慢才是。
所以我们不要做一个小青蛙

 浙公网安备 33010602011771号