Spring-Cloud-Stream 消息驱动
Spring Cloud Stream本质上就是整合了Spring Boot和Spring Integration,实现了一套轻量级的消息驱动的微服务框架。通过使用Spring Cloud Stream,可以有效地简化开发人员对消息中间件的使用复杂度,让系统开发人员可以有更多的精力关注于核心业务逻辑的处理。
在这里我先放一张官网的图:
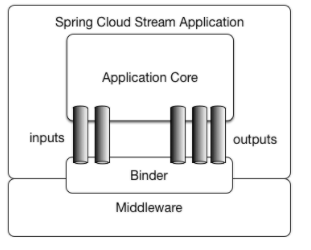
应用程序通过Spring Cloud Stream注入到输入和输出通道与外界进行通信。根据此规则我们很容易的实现消息传递,订阅消息与消息中转。并且当需要切换消息中间件时,几乎不需要修改代码,只需要变更配置就行了。
在用例图中 Inputs代表了应用程序监听消息 、outputs代表发送消息、binder的话大家可以理解为将应用程序与消息中间件隔离的抽象,类似于三层架构下利用dao屏蔽service与数据库的实现的原理。
springcloud默认提供了rabbitmq与kafka的实现。
什么是消息驱动
想一个问题,一个项目里要同时用到rabbitMQ 和 kafka,那么要同时去学习这两个消息中间件,这两个MQ区别还挺大的,rabbitMQ有交换机的概念,kafka只有topic概念,所以就要用到spring cloud stream,它可以简化开发人员对消息中间件使用的复杂度,它就像hibernate一样,可以不用管sql语句,但可以切换不同的数据库,所以springcloud stream 可以平滑迁移使用rabbitmq 或者 kafka,它目前也只支持这两种,也方便项目后期如果切换使用mq。
1、添加gradle依赖:
dependencies{
  compile('org.springframework.cloud:spring-cloud-stream')
  compile('org.springframework.cloud:spring-cloud-stream-binder-kafka')
  compile('org.springframework.kafka:spring-kafka')
}
2、定义一个接口:
spring-cloud-stream已经给我们定义了最基本的输入与输出接口,他们分别是 Source,Sink, Processor
Sink接口:
package org.springframework.cloud.stream.messaging;

import org.springframework.cloud.stream.annotation.Input;
import org.springframework.messaging.SubscribableChannel;

public interface Sink {
   String INPUT = "input";

   @Input("input")
   SubscribableChannel input();
}
Source接口:
package org.springframework.cloud.stream.messaging;

import org.springframework.cloud.stream.annotation.Output;
import org.springframework.messaging.MessageChannel;

public interface Source {
   String OUTPUT = "output";

   @Output("output")
   MessageChannel output();
}
Processor接口:
package org.springframework.cloud.stream.messaging;

public interface Processor extends Source, Sink {

}
这里面Processor这个接口既定义输入通道又定义了输出通道。同时我们也可以自己定义通道接口,代码如下:
import org.springframework.cloud.stream.annotation.Input;
import org.springframework.cloud.stream.annotation.Output;
import org.springframework.messaging.MessageChannel;
import org.springframework.messaging.SubscribableChannel;

public interface ShopChannel {

   /**
    * 发消息的通道名称
    */
   String SHOP_OUTPUT = "shop_output";

   /**
    * 消息的订阅通道名称
    */
   String SHOP_INPUT = "shop_input";

   /**
    * 发消息的通道
    *
    * @return
    */
   @Output(SHOP_OUTPUT)
   MessageChannel sendShopMessage();

   /**
    * 收消息的通道
    *
    * @return
    */
   @Input(SHOP_INPUT)
   SubscribableChannel recieveShopMessage();


}
3、定义服务类
import com.bdqn.lyrk.shop.channel.ShopChannel;
import org.springframework.cloud.stream.annotation.StreamListener;
import org.springframework.messaging.Message;
import org.springframework.messaging.MessageChannel;
import org.springframework.messaging.support.MessageBuilder;
import org.springframework.web.bind.annotation.GetMapping;
import org.springframework.web.bind.annotation.RestController;

import javax.annotation.Resource;

@RestController
public class ShopService {

   @Resource(name = ShopChannel.SHOP_OUTPUT)
   private MessageChannel sendShopMessageChannel;

   @GetMapping("/sendMsg")
   public String sendShopMessage(String content) {
       boolean isSendSuccess = sendShopMessageChannel.
               send(MessageBuilder.withPayload(content).build());
       return isSendSuccess ? "发送成功" : "发送失败";
   }

   @StreamListener(ShopChannel.SHOP_INPUT)
   public void receive(Message<String> message) {
       System.out.println(message.getPayload());
   }
}
这里面大家注意 @StreamListener。这个注解可以监听输入通道里的消息内容,注解里面的属性指定我们刚才定义的输入通道名称,而MessageChannel则可以通过输出通道发送消息。使用@Resource注入时需要指定我们刚才定义的输出通道名称
4、定义启动类
import com.bdqn.lyrk.shop.channel.ShopChannel;
import org.springframework.boot.SpringApplication;
import org.springframework.boot.autoconfigure.SpringBootApplication;
import org.springframework.cloud.stream.annotation.EnableBinding;

@SpringBootApplication
@EnableBinding(ShopChannel.class)
public class ShopServerApplication {

   public static void main(String[] args) {
       SpringApplication.run(ShopServerApplication.class, args);
   }
}
注意@EnableBinding注解,这个注解指定刚才我们定义消息通道的接口名称,当然这里也可以传多个相关的接口
5、定义application.yml文件
spring:
  application:
    name: shop-server
  cloud:
    stream:
      bindings:
        #配置自己定义的通道与哪个中间件交互
        shop_input: #ShopChannel里Input和Output的值
          destination: zhibo #目标主题
        shop_output:
          destination: zhibo
      default-binder: kafka #默认的binder是kafka
  kafka:
    bootstrap-servers: localhost:9092 #kafka服务地址
    consumer:
      group-id: consumer1
    producer:
      key-serializer: org.apache.kafka.common.serialization.ByteArraySerializer
      value-serializer: org.apache.kafka.common.serialization.ByteArraySerializer
      client-id: producer1
server:
  port: 8100
这里是重头戏,我们必须指定所有通道对应的消息主题,同时指定默认的binder为kafka,紧接着定义Spring-kafka的外部化配置,在这里指定producer的序列化类为ByteArraySerializer
启动程序成功后,我们访问 http://localhost:8100/sendMsg?content=2 即可得到如下结果


 浙公网安备 33010602011771号