原型模式
克隆羊问题
现在有一只羊tom,姓名为: tom, 年龄为:1,颜色为:白色,请编写程序创建和tom羊 属性完全相同的5只羊。
传统方式解决克隆羊问题
创建羊这个类
public class Sheep {
    private String name;
    private int age;
    private String color;

    public Sheep(String name, int age, String color) {
        super();
        this.name = name;
        this.age = age;
        this.color = color;
    }
    public String getName() {
        return name;
    }
    public void setName(String name) {
        this.name = name;
    }
    public int getAge() {
        return age;
    }
    public void setAge(int age) {
        this.age = age;
    }
    public String getColor() {
        return color;
    }
    public void setColor(String color) {
        this.color = color;
    }
    @Override
    public String toString() {
        return "Sheep [name=" + name + ", age=" + age + ", color=" + color + "]";
    }


}
new 5只羊
public class Client {

    public static void main(String[] args) {
        // TODO Auto-generated method stub
        //传统的方法
        Sheep sheep = new Sheep("tom", 1, "白色");

        Sheep sheep2 = new Sheep(sheep.getName(), sheep.getAge(), sheep.getColor());
        Sheep sheep3 = new Sheep(sheep.getName(), sheep.getAge(), sheep.getColor());
        Sheep sheep4 = new Sheep(sheep.getName(), sheep.getAge(), sheep.getColor());
        Sheep sheep5 = new Sheep(sheep.getName(), sheep.getAge(), sheep.getColor());

        System.out.println(sheep);
        System.out.println(sheep2);
        System.out.println(sheep3);
        System.out.println(sheep4);
        System.out.println(sheep5);
    }

}
传统的方式的优缺点
1) 优点是比较好理解,简单易操作。
2) 在创建新的对象时,总是需要重新获取原始对象的属性,如果创建的对象比较复杂时,效率较低
3) 总是需要重新初始化对象,而不是动态地获得对象运行时的状态, 不够灵活
4) 改进的思路分析
思路:Java中Object类是所有类的根类,Object类提供了一个clone()方法,该方法可以将一个Java对象复制一份,但是需要实现clone的Java类必须要实现一个接口Cloneable,该接口表示该类能够复制且具有复制的能力 => 原型模式
原型模式-基本介绍
1) 原型模式(Prototype模式)是指:用原型实例指定创建对象的种类,并且通过拷贝这些原型,创建新的对象
2) 原型模式是一种创建型设计模式,允许一个对象再创建另外一个可定制的对象,无需知道如何创建的细节
3) 工作原理是:通过将一个原型对象传给那个要发动创建的对象,这个要发动创建的对象通过请求原型对象拷贝它们自己来实施创建,即 对象.clone()
4) 形象的理解:孙大圣拔出猴毛, 变出其它孙大圣
原型模式原理结构图-uml类图
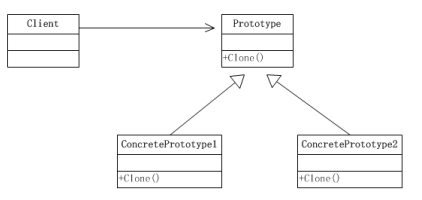
原理结构图说明
1) Prototype : 原型类,声明一个克隆自己的接口
2) ConcretePrototype: 具体的原型类, 实现一个克隆自己的操作
3) Client: 让一个原型对象克隆自己,从而创建一个新的对象(属性一样)
改进后的代码
public class Sheep implements Cloneable {
    private String name;
    private int age;
    private String color;
    private String address = "蒙古羊";  // 默认给添加个属性

    public Sheep(String name, int age, String color) {
        super();
        this.name = name;
        this.age = age;
        this.color = color;
    }
    public String getName() {
        return name;
    }
    public void setName(String name) {
        this.name = name;
    }
    public int getAge() {
        return age;
    }
    public void setAge(int age) {
        this.age = age;
    }
    public String getColor() {
        return color;
    }
    public void setColor(String color) {
        this.color = color;
    }

    @Override
    public String toString() {
        return "Sheep [name=" + name + ", age=" + age + ", color=" + color + ", address=" + address + "]";
    }
    //克隆该实例,使用默认的clone方法来完成
    @Override
    protected Object clone()  {

        Sheep sheep = null;
        try {
            sheep = (Sheep)super.clone();
        } catch (Exception e) {
            // TODO: handle exception
            System.out.println(e.getMessage());
        }
        // TODO Auto-generated method stub
        return sheep;
    }


}
public class Client {

    public static void main(String[] args) {
        System.out.println("原型模式完成对象的创建");
        // TODO Auto-generated method stub
        Sheep sheep = new Sheep("tom", 1, "白色");

        Sheep sheep2 = (Sheep)sheep.clone(); //克隆
        Sheep sheep3 = (Sheep)sheep.clone(); //克隆
        Sheep sheep4 = (Sheep)sheep.clone(); //克隆
        Sheep sheep5 = (Sheep)sheep.clone(); //克隆

        System.out.println("sheep2 =" + sheep2 );
        System.out.println("sheep3 =" + sheep3 );
        System.out.println("sheep4 =" + sheep4 );
        System.out.println("sheep5 =" + sheep5 );
    }

}
原型模式在Spring框架中源码分析
Spring中原型bean的创建,就是原型模式的应用
代码:
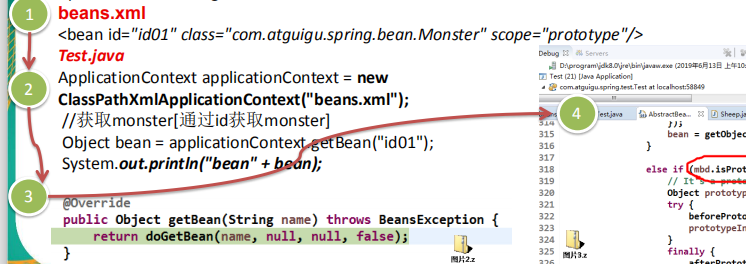
beans.xml
<?xml version="1.0" encoding="UTF-8"?>
<beans xmlns="http://www.springframework.org/schema/beans"
    xmlns:xsi="http://www.w3.org/2001/XMLSchema-instance"
    xmlns:p="http://www.springframework.org/schema/p"
    xmlns:util="http://www.springframework.org/schema/util"
    xmlns:context="http://www.springframework.org/schema/context"
    xsi:schemaLocation="http://www.springframework.org/schema/beans http://www.springframework.org/schema/beans/spring-beans.xsd
        http://www.springframework.org/schema/util http://www.springframework.org/schema/util/spring-util-4.0.xsd
        http://www.springframework.org/schema/context http://www.springframework.org/schema/context/spring-context-4.0.xsd">


 <!-- 这里我们的 scope="prototype" 即 原型模式来创建 -->
 <bean id="id01" class="com.atguigu.spring.bean.Monster"
     scope="prototype"/>


</beans>
Monster类
public class Monster {

    private Integer id = 10 ;
    private String nickname = "牛魔王";
    private String skill = "芭蕉扇";
    public Monster() {

        System.out.println("monster 创建..");
    }
    public Monster(Integer id, String nickname, String skill) {
        //System.out.println("Integer id, String nickname, String skill被调用");
        this.id = id;
        this.nickname = nickname;
        this.skill = skill;
    }

    public Monster( String nickname, String skill,Integer id) {

        this.id = id;
        this.nickname = nickname;
        this.skill = skill;
    }
    public Integer getId() {
        return id;
    }
    public void setId(Integer id) {
        this.id = id;
    }
    public String getNickname() {
        return nickname;
    }
    public void setNickname(String nickname) {
        this.nickname = nickname;
    }
    public String getSkill() {
        return skill;
    }
    public void setSkill(String skill) {
        this.skill = skill;
    }
    @Override
    public String toString() {
        return "Monster [id=" + id + ", nickname=" + nickname + ", skill="
                + skill + "]";
    }


}
测试:
import org.springframework.context.ApplicationContext;
import org.springframework.context.support.ClassPathXmlApplicationContext;

public class ProtoType {

    public static void main(String[] args) {
        // TODO Auto-generated method stub
        ApplicationContext applicationContext = new ClassPathXmlApplicationContext("beans.xml");
        // 获取monster[通过id获取monster]
        Object bean = applicationContext.getBean("id01");
        System.out.println("bean" + bean); // 输出 "牛魔王" .....

        Object bean2 = applicationContext.getBean("id01");

        System.out.println("bean2" + bean2); //输出 "牛魔王" .....

        System.out.println(bean == bean2); // false

        // ConfigurableApplicationContext
    }

}
源码解析:
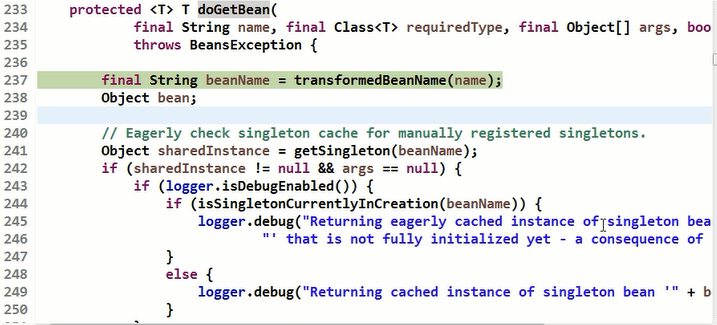
applicationContext.getBean("id01") 这个getBean方法

通过这个getBeanFactory方法,工厂,去getBean的
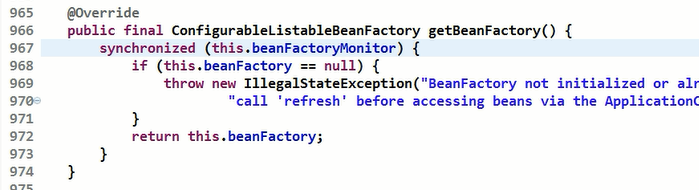
通过这个getBeanFactory是同步的,返回的是bean工厂
再往里面追,找到这个getBean方法

这个doGetBean才是最核心的
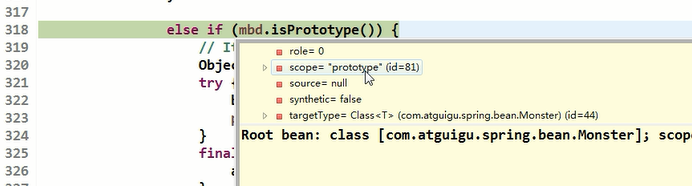
这个doGetBean方法里面有一个判断分支,判断是否是按照原型
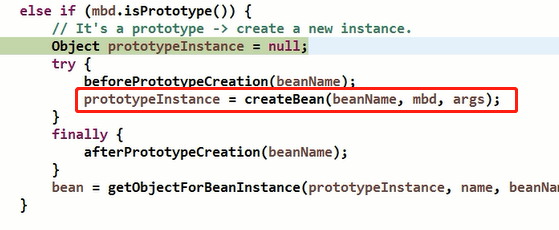
核心代码在这个createBean方法里,返回一个原型实例
浅拷贝和深拷贝
浅拷贝的介绍
1)对于数据类型是基本数据类型的成员变量,浅拷贝会直接进行值传递,也就是将该属性值复制一份给新的对象。
2)对于数据类型是引用数据类型的成员变量,比如说成员变量是某个数组、某个类的对象等,那么浅拷贝会进行引用传递,也就是只是将该成员变量的引用值(内存地址)复制一份给新的对象。因为实际上两个对象的该成员变量都指向同一个实例。在这种情况下,在一个对象中修改该成员变量会影响到另一个对象的该成员变量值
3)前面我们克隆羊就是浅拷贝
4)浅拷贝是使用默认的 clone()方法来实现sheep = (Sheep) super.clone();
比如,在羊的那个类加一个对象的属性
public class Sheep implements Cloneable {
    private String name;
    private int age;
    private String color;
    private String address = "蒙古羊";
    public Sheep friend; //是对象, 克隆是会如何处理
    public Sheep(String name, int age, String color) {
        super();
        this.name = name;
        this.age = age;
        this.color = color;
    }
    public String getName() {
        return name;
    }
    public void setName(String name) {
        this.name = name;
    }
    public int getAge() {
        return age;
    }
    public void setAge(int age) {
        this.age = age;
    }
    public String getColor() {
        return color;
    }
    public void setColor(String color) {
        this.color = color;
    }

    @Override
    public String toString() {
        return "Sheep [name=" + name + ", age=" + age + ", color=" + color + ", address=" + address + "]";
    }
    //克隆该实例,使用默认的clone方法来完成
    @Override
    protected Object clone()  {

        Sheep sheep = null;
        try {
            sheep = (Sheep)super.clone();
        } catch (Exception e) {
            // TODO: handle exception
            System.out.println(e.getMessage());
        }
        // TODO Auto-generated method stub
        return sheep;
    }


}
public class Client {

    public static void main(String[] args) {
        System.out.println("原型模式完成对象的创建");
        // TODO Auto-generated method stub
        Sheep sheep = new Sheep("tom", 1, "白色");

        sheep.friend = new Sheep("jack", 2, "黑色");

        Sheep sheep2 = (Sheep)sheep.clone(); //克隆
        Sheep sheep3 = (Sheep)sheep.clone(); //克隆
        Sheep sheep4 = (Sheep)sheep.clone(); //克隆
        Sheep sheep5 = (Sheep)sheep.clone(); //克隆

        System.out.println("sheep2 =" + sheep2 + "sheep2.friend=" + sheep2.friend.hashCode());
        System.out.println("sheep3 =" + sheep3 + "sheep3.friend=" + sheep3.friend.hashCode());
        System.out.println("sheep4 =" + sheep4 + "sheep4.friend=" + sheep4.friend.hashCode());
        System.out.println("sheep5 =" + sheep5 + "sheep5.friend=" + sheep5.friend.hashCode());
    }

}
得出结果,黑色的羊这个对象并没有进行克隆。
深拷贝基本介绍
1)复制对象的所有基本数据类型的成员变量值
2)为所有引用数据类型的成员变量申请存储空间,并复制每个引用数据类型成员变量所引用的对象,直到该对象可达的所有对象。也就是说,对象进行深拷贝要对整个对象进行拷贝
3)深拷贝实现方式1:重写clone方法来实现深拷贝
4)深拷贝实现方式2:通过对象序列化实现深拷贝(推荐)
示例:实现Serializable 和 Cloneable 接口
import java.io.Serializable;

public class DeepCloneableTarget implements Serializable, Cloneable {

    private static final long serialVersionUID = 1L;

    private String cloneName;

    private String cloneClass;

    //构造器
    public DeepCloneableTarget(String cloneName, String cloneClass) {
        this.cloneName = cloneName;
        this.cloneClass = cloneClass;
    }

    //因为该类的属性,都是String , 因此我们这里使用默认的clone完成即可
    @Override
    protected Object clone() throws CloneNotSupportedException {
        return super.clone();
    }
}
import java.io.ByteArrayInputStream;
import java.io.ByteArrayOutputStream;
import java.io.ObjectInputStream;
import java.io.ObjectOutputStream;
import java.io.Serializable;

public class DeepProtoType implements Serializable, Cloneable{

    public String name; //String 属性
    public DeepCloneableTarget deepCloneableTarget;// 引用类型
    public DeepProtoType() {
        super();
    }

    //深拷贝 - 方式 1 使用clone 方法
    @Override
    protected Object clone() throws CloneNotSupportedException {

        Object deep = null;
        //这里完成对基本数据类型(属性)和String的克隆
        deep = super.clone();
        //对引用类型的属性,进行单独处理,deep是Object类型,所以可以转成DeepProtoType
        DeepProtoType deepProtoType = (DeepProtoType)deep;
        deepProtoType.deepCloneableTarget  = (DeepCloneableTarget)deepCloneableTarget.clone();

        // TODO Auto-generated method stub
        return deepProtoType;
    }

    //深拷贝 - 方式2 通过对象的序列化实现 (推荐)
    public Object deepClone() {

        //创建流对象
        ByteArrayOutputStream bos = null;
        ObjectOutputStream oos = null;
        ByteArrayInputStream bis = null;
        ObjectInputStream ois = null;

        try {
            //序列化
            bos = new ByteArrayOutputStream();
            oos = new ObjectOutputStream(bos);
            oos.writeObject(this); //当前这个对象以对象流的方式输出

            //反序列化
            bis = new ByteArrayInputStream(bos.toByteArray());
            ois = new ObjectInputStream(bis);
            DeepProtoType copyObj = (DeepProtoType)ois.readObject();

            return copyObj;

        } catch (Exception e) {
            // TODO: handle exception
            e.printStackTrace();
            return null;
        } finally {
            //关闭流
            try {
                bos.close();
                oos.close();
                bis.close();
                ois.close();
            } catch (Exception e2) {
                // TODO: handle exception
                System.out.println(e2.getMessage());
            }
        }

    }

}
测试:
public class Client {

    public static void main(String[] args) throws Exception {
        // TODO Auto-generated method stub
        DeepProtoType p = new DeepProtoType();
        p.name = "宋江";
        p.deepCloneableTarget = new DeepCloneableTarget("大牛", "小牛");

        //方式1 完成深拷贝
//        DeepProtoType p2 = (DeepProtoType) p.clone();
//
//        System.out.println("p.name=" + p.name + "p.deepCloneableTarget=" + p.deepCloneableTarget.hashCode());
//        System.out.println("p2.name=" + p.name + "p2.deepCloneableTarget=" + p2.deepCloneableTarget.hashCode());

        //方式2 完成深拷贝
        DeepProtoType p2 = (DeepProtoType) p.deepClone();

        System.out.println("p.name=" + p.name + "p.deepCloneableTarget=" + p.deepCloneableTarget.hashCode());
        System.out.println("p2.name=" + p.name + "p2.deepCloneableTarget=" + p2.deepCloneableTarget.hashCode());

    }

}
原型模式的注意事项和细节
1) 创建新的对象比较复杂时,可以利用原型模式简化对象的创建过程,同时也能够提高效率
2) 不用重新初始化对象,而是动态地获得对象运行时的状态
3) 如果原始对象发生变化(增加或者减少属性),其它克隆对象的也会发生相应的变化,无需修改代码
4) 在实现深克隆的时候可能需要比较复杂的代码
5) 缺点:需要为每一个类配备一个克隆方法,这对全新的类来说不是很难,但对已有的类进行改造时,需要修改其源代码,违背了ocp原则,这点注意.
《三体》中有句话——弱小和无知不是生存的障碍,傲慢才是。
所以我们不要做一个小青蛙

 浙公网安备 33010602011771号