Centos 8部署openstack u 版 (一)
网络规划:
仅使用 10.10.14.0, 192.168.10.0 ,192.168.100.0 三个网络, 分别为 外部网络, 隧道网络,管理网络。
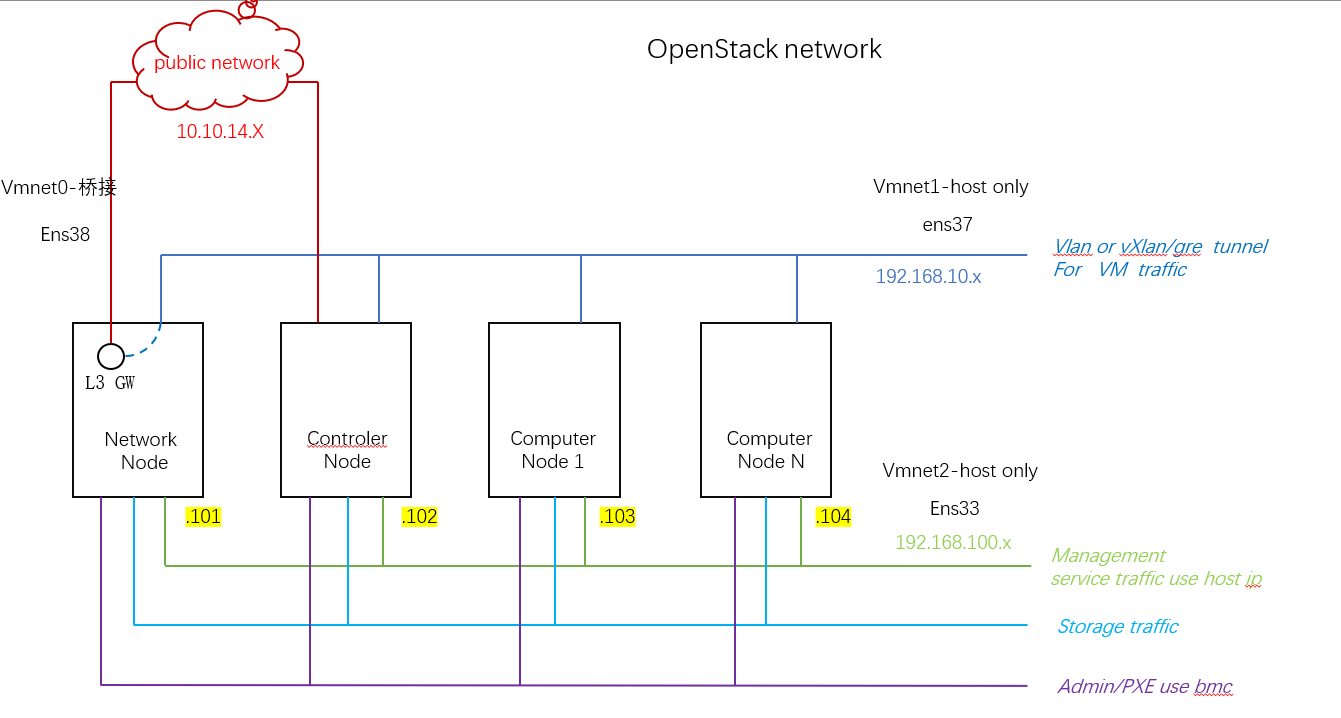
vm-workstation:使用三块网卡,分别为 vmnet1-hostonly,vmnet2-hostonly,vmnet0 桥接模式

4台主机centos 8系统,ip地址最后一位分别为 101 102 103 104 , 主机network ip地址如下,controller 类似, computer没有ens38。
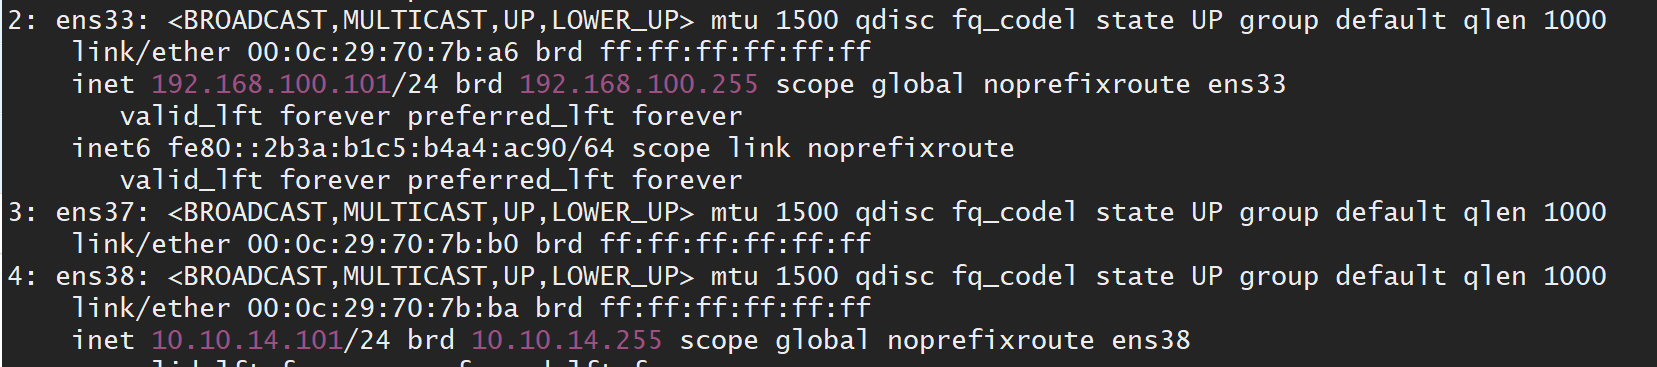
第一部分:基础环境配置:
    1  所有主机:关闭selinux, firewalld,清空iptables, 添加主机hosts文件,ping测试ok
        hosts, 配置时区,ntp
            hosts:
            192.168.100.101 network
            192.168.100.102 controller
            192.168.100.103 computer1
    2 安装 openstack 基础包  (u版!!)
        启用源  extras和 PowerTools
     # yum config-manager --set-enabled PowerTools
       # yum install centos-release-openstack-ussuri


        升级系统
        # yum upgrade

        升级内核,reboot

        安装客户端
        # yum install python3-openstackclient


    3  sql dabase:   controller node 上,     network node 先不装

        yum install mariadb mariadb-server python2-PyMySQL

            vim /etc/my.cnf.d/openstack.cnf

                [mysqld]
                bind-address =192.168.100.102

                default-storage-engine = innodb
                innodb_file_per_table = on
                max_connections = 4096
                collation-server = utf8_general_ci
                character-set-server = utf8

            systemctl enable mariadb.service
            systemctl start mariadb.service

    4 Message queue:   controller node 上
        //install the package
        #yum install centos-release-openstack-train -y
        #yum install rabbitmq-server

        # systemctl enable rabbitmq-server.service
        # systemctl start rabbitmq-server.service

        //Add the openstack user:   密码为 RABBIT_PASS
        #rabbitmqctl add_user openstack RABBIT_PASS

        //Permit configuration, write, and read access for the openstack user:
        #rabbitmqctl set_permissions openstack ".*" ".*" ".*"

       //创建管理账号,非必须
       # rabbitmqctl  add_user admin admin
       # rabbitmqctl set_user_tags admin administrator
       # rabbitmq-plugins enable rabbitmq_management
        http://192.168.100.102:15672/


    5 Memcached :controller node 上

        # yum install memcached python3-memcached

        vi /etc/sysconfig/memcached
            OPTIONS="-l 127.0.0.1,::1,controller"

        # systemctl enable memcached.service
        # systemctl start memcached.service

    6 Etcd :controller node 上

        # yum install etcd

            vim  /etc/etcd/etcd.conf
                    #[Member]
                ETCD_DATA_DIR="/var/lib/etcd/default.etcd"
                ETCD_LISTEN_PEER_URLS="http://192.168.100.102:2380"
                ETCD_LISTEN_CLIENT_URLS="http://192.168.100.102:2379"
                ETCD_NAME="controller"

                #[Clustering]
                ETCD_INITIAL_ADVERTISE_PEER_URLS="http://192.168.100.102:2380"
                ETCD_ADVERTISE_CLIENT_URLS="http://192.168.100.102:2379"
                ETCD_INITIAL_CLUSTER="controller=http://192.168.100.102:2380"
                ETCD_INITIAL_CLUSTER_TOKEN="etcd-cluster-01"
                ETCD_INITIAL_CLUSTER_STATE="new"

        # systemctl enable etcd
        # systemctl start etcd


---------------------------------------------------------------------------------------------------------------------
第二部分: Minimal deployment for Ussuri:

        Identity service – keystone installation for Ussuri

        Image service – glance installation for Ussuri

        Placement service – placement installation for Ussuri

        Compute service – nova installation for Ussuri

        Networking service – neutron installation for Ussuri

    We advise to also install the following components after you have installed the minimal deployment services:

        Dashboard – horizon installation for Ussuri

        Block Storage service – cinder installation for Ussuri


一 : Install OpenStack services  keystone :

    1  create a database

        $ mysql -u root -p
         MariaDB [(none)]> CREATE DATABASE keystone;
         MariaDB [(none)]> GRANT ALL PRIVILEGES ON keystone.* TO 'keystone'@'localhost'  IDENTIFIED BY 'KEYSTONE_DBPASS';
         MariaDB [(none)]> GRANT ALL PRIVILEGES ON keystone.* TO 'keystone'@'%' IDENTIFIED BY 'KEYSTONE_DBPASS';
      MariaDB [(none)]> GRANT ALL PRIVILEGES ON keystone.* TO 'keystone'@'controller'  IDENTIFIED BY 'KEYSTONE_DBPASS';
         // 密码为 KEYSTONE_DBPASS

    2 Install and configure components

        #yum install openstack-keystone httpd
            # vi  /etc/keystone/keystone.conf
                [database]
                connection = mysql+pymysql://keystone:KEYSTONE_DBPASS@controller/keystone
                [token]
                provider = fernet

        #yum install python3-mod_wsgi   可能名字不一样


    3 Populate the Identity service database:  等一会,初始化表
        # su -s /bin/sh -c "keystone-manage db_sync" keystone

        检查数据表创建完成,及权限
       # mysql -ukeystone -pKEYSTONE_DBPASS -e "show tables from keystone;"

    4 Initialize Fernet key repositories:
        # keystone-manage fernet_setup --keystone-user keystone --keystone-group keystone
        # keystone-manage credential_setup --keystone-user keystone --keystone-group keystone


    5 Bootstrap the Identity service:
            keystone-manage bootstrap --bootstrap-password ADMIN_PASS \
            --bootstrap-admin-url http://controller:5000/v3/ \
            --bootstrap-internal-url http://controller:5000/v3/ \
            --bootstrap-public-url http://controller:5000/v3/ \
            --bootstrap-region-id RegionOne

    6 Configure the Apache HTTP server

        # vi /etc/httpd/conf/httpd.conf
        ServerName controller
        # ln -s /usr/share/keystone/wsgi-keystone.conf /etc/httpd/conf.d/

        # systemctl enable httpd.service
        # systemctl start httpd.service

    7  Create OpenStack client environment scripts ,管理脚本
            vi openstack-admin.sh  ,并source
                export OS_USERNAME=admin
                export OS_PASSWORD=ADMIN_PASS
                export OS_PROJECT_NAME=admin
                export OS_USER_DOMAIN_NAME=Default
                export OS_PROJECT_DOMAIN_NAME=Default
                export OS_AUTH_URL=http://controller:5000/v3
                export OS_IDENTITY_API_VERSION=3

    8   Create service Project

        openstack project create --domain default --description "Service Project" service

        创建测试projects, users, and roles
        openstack project create --domain default  --description "Demo Project" myproject
        openstack user create --domain default --password-prompt myuser    #密码为myuser
        openstack role create myrole
        openstack role add --project myproject --user myuser myrole

        vi openstack-myuser.sh     #myuser 脚本
            export OS_PROJECT_DOMAIN_NAME=Default
            export OS_USER_DOMAIN_NAME=Default
            export OS_PROJECT_NAME=myproject
            export OS_USERNAME=myuser
            export OS_PASSWORD=myuser
            export OS_AUTH_URL=http://controller:5000/v3
            export OS_IDENTITY_API_VERSION=3
            export OS_IMAGE_API_VERSION=2

        openstack token issue

        以下非必须
        openstack domain create --description "An Example Domain" example


二: 安装glance :

    //create a database.
    1 mysql -u root -p
        CREATE DATABASE glance;
        GRANT ALL PRIVILEGES ON glance.* TO 'glance'@'localhost' IDENTIFIED BY 'GLANCE_DBPASS';
        GRANT ALL PRIVILEGES ON glance.* TO 'glance'@'%' IDENTIFIED BY 'GLANCE_DBPASS';

    2   openstack user create --domain default --password-prompt GLANCE_PASS    #密码为GLANCE_PASS
        openstack role add --project service --user glance admin
        openstack service create --name glance --description "OpenStack Image" image

        openstack endpoint create --region RegionOne image public http://controller:9292
        openstack endpoint create --region RegionOne image internal http://controller:9292
        openstack endpoint create --region RegionOne image admin http://controller:9292

        yum install openstack-glance
        vim /etc/glance/glance-api.conf
            [database]
            connection = mysql+pymysql://glance:GLANCE_DBPASS@controller/glance

            [keystone_authtoken]
            www_authenticate_uri  = http://controller:5000
            auth_url = http://controller:5000
            memcached_servers = controller:11211
            auth_type = password
            project_domain_name = Default
            user_domain_name = Default
            project_name = service
            username = glance
            password = GLANCE_PASS

            [paste_deploy]
            flavor = keystone

            [glance_store]

            [glance.store.http.store]
            stores = file,http
            default_store = file
            filesystem_store_datadir = /var/lib/glance/images/

    3  初始化数据库
    su -s /bin/sh -c "glance-manage db_sync" glance

    4  启动
    # systemctl enable openstack-glance-api.service
    # systemctl start openstack-glance-api.service

    5 Verify operation :

        wgethttp://download.cirros-cloud.net/0.5.1/cirros-0.5.1-x86_64-disk.img    #下载不下来,手动去下载

        glance image-create --name "cirros" \
        --file cirros-0.5.1-x86_64-disk.img \
        --disk-format qcow2 --container-format bare \
        --visibility=public

        # glance image-list     # 镜像创建成功
        +--------------------------------------+--------+
        | ID                                   | Name   |
        +--------------------------------------+--------+
        | 2145e257-44ca-4160-a770-7d278b5b448a | cirros |
        +--------------------------------------+--------+


三: placement   编排resources.

     create a database, service credentials, and API endpoints
     configure the placement service


    1   Create the placement database:
            $ mysql -u root -p
            mysql -uplacement -pPLACEMENT_DBPASS
            MariaDB [(none)]> CREATE DATABASE placement;

            //Grant proper access to the database:
            MariaDB [(none)]> GRANT ALL PRIVILEGES ON placement.* TO 'placement'@'localhost' IDENTIFIED BY 'PLACEMENT_DBPASS';
            MariaDB [(none)]> GRANT ALL PRIVILEGES ON placement.* TO 'placement'@'%' IDENTIFIED BY 'PLACEMENT_DBPASS';
    2   Configure User and Endpoints

        openstack user create --domain default --password-prompt placement     # 密码为:PLACEMENT_PASS
        openstack role add --project service --user placement admin
        openstack service create --name placement  --description "Placement API" placement

    3 Create the Placement API service endpoints:
        openstack endpoint create --region RegionOne  placement public http://controller:8778
        openstack endpoint create --region RegionOne placement internal http://controller:8778
        openstack endpoint create --region RegionOne  placement admin http://controller:8778

    4 nstall and configure components
        # yum install openstack-placement-api
        vim /etc/placement/placement.conf

        [placement_database]
        connection = mysql+pymysql://placement:PLACEMENT_DBPASS@controller/placement

        [api]
        # ...
        auth_strategy = keystone

        [keystone_authtoken]
        # ...
        auth_url = http://controller:5000/v3
        memcached_servers = controller:11211
        auth_type = password
        project_domain_name = Default
        user_domain_name = Default
        project_name = service
        username = placement
        password = PLACEMENT_PASS


        //初始化数据库
        # su -s /bin/sh -c "placement-manage db sync" placement

        //查看数据库
        mysql -uplacement -pPLACEMENT_DBPASS -e 'use placement;show tables;'


        # systemctl restart httpd

----------------------------------------------
若计算服务检查时将会报错,可以添加配置如下:
[root@controller ~]# vim /etc/httpd/conf.d/00-placement-api.conf
.....
  <Directory /usr/bin>
   <IfVersion >= 2.4>
     Require all granted
  </IfVersion>
  <IfVersion < 2.4>
     Order allow,deny
     Allow from all
  </IfVersion>
 </Directory>
.....
----------------------------------------------
四: nova installation

    4.1 Install and configure controller node

        4.1.1 数据库
            $ mysql -u root -p
            MariaDB [(none)]> CREATE DATABASE nova_api;
            MariaDB [(none)]> CREATE DATABASE nova;
            MariaDB [(none)]> CREATE DATABASE nova_cell0;

            MariaDB [(none)]> GRANT ALL PRIVILEGES ON nova_api.* TO 'nova'@'localhost' \
            IDENTIFIED BY 'NOVA_DBPASS';
            MariaDB [(none)]> GRANT ALL PRIVILEGES ON nova_api.* TO 'nova'@'%' \
            IDENTIFIED BY 'NOVA_DBPASS';

            MariaDB [(none)]> GRANT ALL PRIVILEGES ON nova.* TO 'nova'@'localhost' \
            IDENTIFIED BY 'NOVA_DBPASS';
            MariaDB [(none)]> GRANT ALL PRIVILEGES ON nova.* TO 'nova'@'%' \
            IDENTIFIED BY 'NOVA_DBPASS';

            MariaDB [(none)]> GRANT ALL PRIVILEGES ON nova_cell0.* TO 'nova'@'localhost' \
            IDENTIFIED BY 'NOVA_DBPASS';
            MariaDB [(none)]> GRANT ALL PRIVILEGES ON nova_cell0.* TO 'nova'@'%' \
            IDENTIFIED BY 'NOVA_DBPASS';

        4.1.2 Create the Compute service credentials:
            $ openstack user create --domain default --password-prompt nova
            $ openstack role add --project service --user nova admin
            $ openstack service create --name nova --description "OpenStack Compute" compute

        4.1.3 Create the Compute API service endpoints:
            $ openstack endpoint create --region RegionOne compute public http://controller:8774/v2.1
            $ openstack endpoint create --region RegionOne compute internal http://controller:8774/v2.1
            $ openstack endpoint create --region RegionOne compute admin http://controller:8774/v2.1

        4.1.4 Install and configure components

            # yum install openstack-nova-api openstack-nova-conductor openstack-nova-novncproxy openstack-nova-scheduler

            [DEFAULT]
            enabled_apis = osapi_compute,metadata
            transport_url = rabbit://openstack:RABBIT_PASS@controller:5672/
            my_ip = 192.168.100.102

            [api_database]
            # ...
            connection = mysql+pymysql://nova:NOVA_DBPASS@controller/nova_api

            [database]
            # ...
            connection = mysql+pymysql://nova:NOVA_DBPASS@controller/nova

            [api]
            connection = mysql+pymysql://nova:NOVA_DBPASS@controller/nova_api
            auth_strategy = keystone

            [vnc]
            enabled = true
            server_listen = $my_ip
            server_proxyclient_address = $my_ip

            [keystone_authtoken]
            www_authenticate_uri = http://controller:5000/
            auth_url = http://controller:5000/
            memcached_servers = controller:11211
            auth_type = password
            project_domain_name = Default
            user_domain_name = Default
            project_name = service
            username = nova
            password = NOVA_PASS

        4.1.5 Populate the  database:

        # su -s /bin/sh -c "nova-manage api_db sync" nova
        # su -s /bin/sh -c "nova-manage cell_v2 map_cell0" nova
        # su -s /bin/sh -c "nova-manage cell_v2 create_cell --name=cell1 --verbose" nova
        # su -s /bin/sh -c "nova-manage db sync" nova
        // 验证:
        # su -s /bin/sh -c "nova-manage cell_v2 list_cells" nova

        4.1.6 Finalize installation :start the Compute services and configure them to start when the system boots:

            # systemctl enable \
        openstack-nova-api.service \
        openstack-nova-scheduler.service \
        openstack-nova-conductor.service \
        openstack-nova-novncproxy.service
        # systemctl start \
        openstack-nova-api.service \
        openstack-nova-scheduler.service \
        openstack-nova-conductor.service \
        openstack-nova-novncproxy.service

    4.2 Install and configure a compute node

        4.2.1 Install the packages:
            # yum install openstack-nova-compute
              vim /etc/nova/nova.conf
            [DEFAULT]
            enabled_apis = osapi_compute,metadata
            transport_url = rabbit://openstack:RABBIT_PASS@controller
            my_ip = MANAGEMENT_INTERFACE_IP_ADDRESS

            [api]
            auth_strategy = keystone

            [keystone_authtoken]
            www_authenticate_uri = http://controller:5000/
            auth_url = http://controller:5000/
            memcached_servers = controller:11211
            auth_type = password
            project_domain_name = Default
            user_domain_name = Default
            project_name = service
            username = nova
            password = NOVA_PASS

            [vnc]
            enabled = true
            server_listen = 0.0.0.0
            server_proxyclient_address = $my_ip
            novncproxy_base_url = http://controller:6080/vnc_auto.html

            [glance]
            api_servers = http://controller:9292

            [oslo_concurrency]
            lock_path = /var/lib/nova/tmp

            [placement]
            region_name = RegionOne
            project_domain_name = Default
            project_name = service
            auth_type = password
            user_domain_name = Default
            auth_url = http://controller:5000/v3
            username = placement
            password = PLACEMENT_PASS

        4.2.2   Finalize installation
            $ egrep -c '(vmx|svm)' /proc/cpuinfo  如果输出 0 ,做如下配置,配置不需要
                    vim /etc/nova/nova.conf
                        [libvirt]
                        # ...
                        virt_type = qemu

            # systemctl enable libvirtd.service openstack-nova-compute.service
            # systemctl start libvirtd.service openstack-nova-compute.service

    4.3 Add the compute node to the cell database :  controller 上

        发现计算节点:
        # openstack compute service list --service nova-compute
        #su -s /bin/sh -c "nova-manage cell_v2 discover_hosts --verbose" nova

        vim   /etc/nova/nova.conf  设置发现间隔:
        [scheduler]
        discover_hosts_in_cells_interval = 300

  4.4  验证和问题:
# openstack endpoint list
+----------------------------------+-----------+--------------+--------------+---------+-----------+-----------------------------+
| ID                               | Region    | Service Name | Service Type | Enabled | Interface | URL                         |
+----------------------------------+-----------+--------------+--------------+---------+-----------+-----------------------------+
| 099c80bcea68401d86471c09d2f1b57e | RegionOne | nova         | compute      | True    | public    | http://controller:8774/v2.1 |
| 11c9e23af0224034ab9f6af2143c8307 | RegionOne | keystone     | identity     | True    | internal  | http://controller:5000/v3/  |
| 21ad5b9aba014a5c99b52decf6f61679 | RegionOne | placement    | placement    | True    | public    | http://controller:8778      |
| 2c545d3e79c640c19ede4f5b854a33d2 | RegionOne | glance       | image        | True    | public    | http://controller:9292      |
| 30501a7df370474498c7e843b448c6d9 | RegionOne | keystone     | identity     | True    | public    | http://controller:5000/v3/  |
| 57c392ef6b144133ab53c7b3611b56c7 | RegionOne | nova         | compute      | True    | internal  | http://controller:8774/v2.1 |
| 7c19e39dbcec44898aaeb4574cb9baed | RegionOne | glance       | image        | True    | internal  | http://controller:9292      |
| 8924213ae9784594afecf393ee5afb15 | RegionOne | placement    | placement    | True    | admin     | http://controller:8778      |
| c325f59fcb8341e08cbc745bc617655d | RegionOne | nova         | compute      | True    | admin     | http://controller:8774/v2.1 |
| c5a88398a55c45448345dbec2acc9af2 | RegionOne | keystone     | identity     | True    | admin     | http://controller:5000/v3/  |
| d343fa620f74454ba1b98d015a0ead96 | RegionOne | glance       | image        | True    | admin     | http://controller:9292      |
| ecaaa2cbcbb7431a9380c5cc06f55f6f | RegionOne | placement    | placement    | True    | internal  | http://controller:8778      |
+----------------------------------+-----------+--------------+--------------+---------+-----------+-----------------------------+

# openstack service list
+----------------------------------+-----------+-----------+
| ID                               | Name      | Type      |
+----------------------------------+-----------+-----------+
| 494947c2afbb421182cb7f670c526371 | glance    | image     |
| 6a59654779434e6a8721a3b8dd5debd9 | nova      | compute   |
| c7849d58f53f4678b81887d317b52847 | placement | placement |
| e18bf498b5bc4ee8ae48c2f33b4020a5 | keystone  | identity  |
+----------------------------------+-----------+-----------+
//检查数据库,确保三个数据库初始化完成。 官方文档有个坑,缺少一个connec,我已经颜色标注了。
mysql -uroot -p***  -e "show databases;"
mysql -uroot -p***  -e "use nova;  show tables"
nova_api           nova_cell0


//检查是否发现coputer

# openstack compute service list
+----+----------------+------------+----------+---------+-------+----------------------------+
| ID | Binary         | Host       | Zone     | Status  | State | Updated At                 |
+----+----------------+------------+----------+---------+-------+----------------------------+
|  3 | nova-scheduler | controller | internal | enabled | up    | 2020-07-03T15:38:14.000000 |
|  6 | nova-conductor | controller | internal | enabled | up    | 2020-07-03T15:38:14.000000 |
|  8 | nova-compute   | computer1  | nova     | enabled | up    | 2020-07-03T15:38:13.000000 |
+----+----------------+------------+----------+---------+-------+----------------------------+

第二遍装,仍然还是不小心出了各种问题, 务必验证好。

#  无法创建实例的故障排除:
# vim /etc/httpd/conf.d/00-placement-api.conf

<Directory /usr/bin>

   <IfVersion >= 2.4>

      Require all granted

   </IfVersion>

   <IfVersion < 2.4>

      Order allow,deny

      Allow from all

   </IfVersion>

</Directory>

 浙公网安备 33010602011771号