Nginx静态资源站点
Nginx虚拟主机

【搭建静态资源网站】
准备好资源文件目录,内容自定义
[root@chaogelinux website]# pwd
/website
[root@chaogelinux website]# ls
index.html  pic

1.修改nginx.conf
server {
          listen       80;
          server_name  localhost;
          #默认编码
          charset utf-8;
          access_log  logs/host.access.log  main;
        location / {
              #定义虚拟主机的资源目录,
            root   /website/;
            #定义首页文件的名字
            index  index.html index.htm;
        }

      }

2.重载nginx配置文件
nginx -s reload
【静态资源压缩】
nginx支持gzip对资源压缩传输,经过gzip压缩后的页面大小可以为原本的30%甚至更小,用户浏览体验会快很多。
nginx.conf开启gzip压缩功能,添加如下语句,针对静态资源压缩

        gzip on;
        gzip_http_version 1.1;
        gzip_comp_level 4;
        gzip_types text/plain application/javascript application/x-javascript text/css application/xml text/javascript application/x-httpd-php image/jpeg image/gif image/png;

#重载nginx
nginx -s reload
开启了gzip压缩后,整体的传输资源大小,以及相应速度,都大幅度提高了。
【基于IP的多虚拟主机】
准备环境
添加ip别名
[root@bogon ~]# ifconfig ens33:1 192.168.178.200 broadcast 192.168.178.255 netmask 255.255.255.0 up

#此时机器有2个ip,确保都可以通信即可
[root@bogon ~]# ifconfig |grep 192
        inet 192.168.178.181  netmask 255.255.255.0  broadcast 192.168.178.255
        inet 192.168.178.200  netmask 255.255.255.0  broadcast 192.168.178.255

[root@bogon ~]# curl   192.168.178.200
[root@bogon ~]# curl   192.168.178.181
修改nginx.conf支持多虚拟主机
    #第一个虚拟主机
    server {
        #监听的端口和ip
        listen       192.168.178.181:80;
        #主机域名
        server_name  192.168.178.181;

        charset utf-8;

        access_log  logs/host.access.log;
        #url匹配
        location / {
            #HTML文件存放的目录
            root   /website/s1;
            #默认首页文件,从左往右寻找,index.html或是index.htm文件
            index  index.html index.htm;
            }
        }
   #第二个ip虚拟主机
   #第二个虚拟主机
server {
listen 192.168.178.200:80;
server_name 192.168.178.200;
location / {
        index index.html index.htm;
        root /website/s2;
}

}
准备好网站资源
[root@bogon nginx]# echo "我是来自于192.168.178.181的站点 s1.html" > /website/s1/index.html
[root@bogon nginx]# echo "我是来自于192.168.178.200的站点 s2.html" > /website/s2/index.html
访问即可
【基于域名的多虚拟主机】
1.在本地hosts文件中,添加对应的解析记录,由于测试使用
[root@bogon ~]# cat /etc/hosts|grep 127.0.0.1
127.0.0.1   localhost localhost.localdomain localhost4 localhost4.localdomain4
127.0.0.1 www.chaogenginx.com
127.0.0.1 www.chaogelinux.com
修改nginx.conf支持多域名的虚拟主机
1.第一个server{}指令块的配置
    server {
        #监听的端口和ip
        listen       80;
        #主机域名
        server_name  www.chaogelinux.com;

        charset utf-8;

        access_log  logs/host.access.log;
        #url匹配
        location / {
            #HTML文件存放的目录
            root   /website/s1;
            #默认首页文件,从左往右寻找,index.html或是index.htm文件
            index  index.html index.htm;
        }
     }

 2.第二个server{}的配置
 #第二个虚拟主机
server {
listen 80;
server_name www.chaogenginx.com;
location / {
    index index.html index.htm;
    root /website/s2;
}

}

3.生成2个站点的首页
  echo "我是多域名虚拟主机,来自于域名www.chaogelinux.com" > /website/s1/index.html
  echo "我是来自于域名www.chaogenginx.com的多域名虚拟主机" > /website/s2/index.html
测试访问多域名
[root@bogon ~]# curl www.chaogelinux.com
我是多域名虚拟主机,来自于域名www.chaogelinux.com
[root@bogon ~]#
[root@bogon ~]# curl www.chaogenginx.com
我是来自于域名www.chaogenginx.com的多域名虚拟主机
[root@bogon ~]#
[root@bogon ~]#
[root@bogon ~]# curl 127.0.0.1  #默认server{}匹配顺序,自上而下
我是多域名虚拟主机,来自于域名www.chaogelinux.com
【基于端口的多虚拟主机】
1.第一个虚拟主机
server {
#监听的端口和ip
listen 80;
#主机域名
server_name www.chaogelinux.com;
access_log logs/www.chaogelinux.log;
charset utf-8;
#url匹配
location / {
#HTML文件存放的目录
root /website/s1/;
#默认首页文件,从左往右寻找,index.html或是index.htm文件
index index.html index.htm;
#autoindex off;
}
}
2.#第二个虚拟主机
server {
listen 81;
server_name www.chaogenginx.com;
access_log logs/www.chaogenginx.com;
charset utf-8;
location / {
index index.html index.htm;
root /website/s2;
#autoindex on;
}
}
3.nginx -s reload
4.访问80、81端口
[root@bogon nginx]# curl 127.0.0.1:81
我是来自于域名www.chaogenginx.com的多域名虚拟主机
[root@bogon nginx]# curl 127.0.0.1:80
我是多域名虚拟主机,来自于域名www.chaogelinux.com
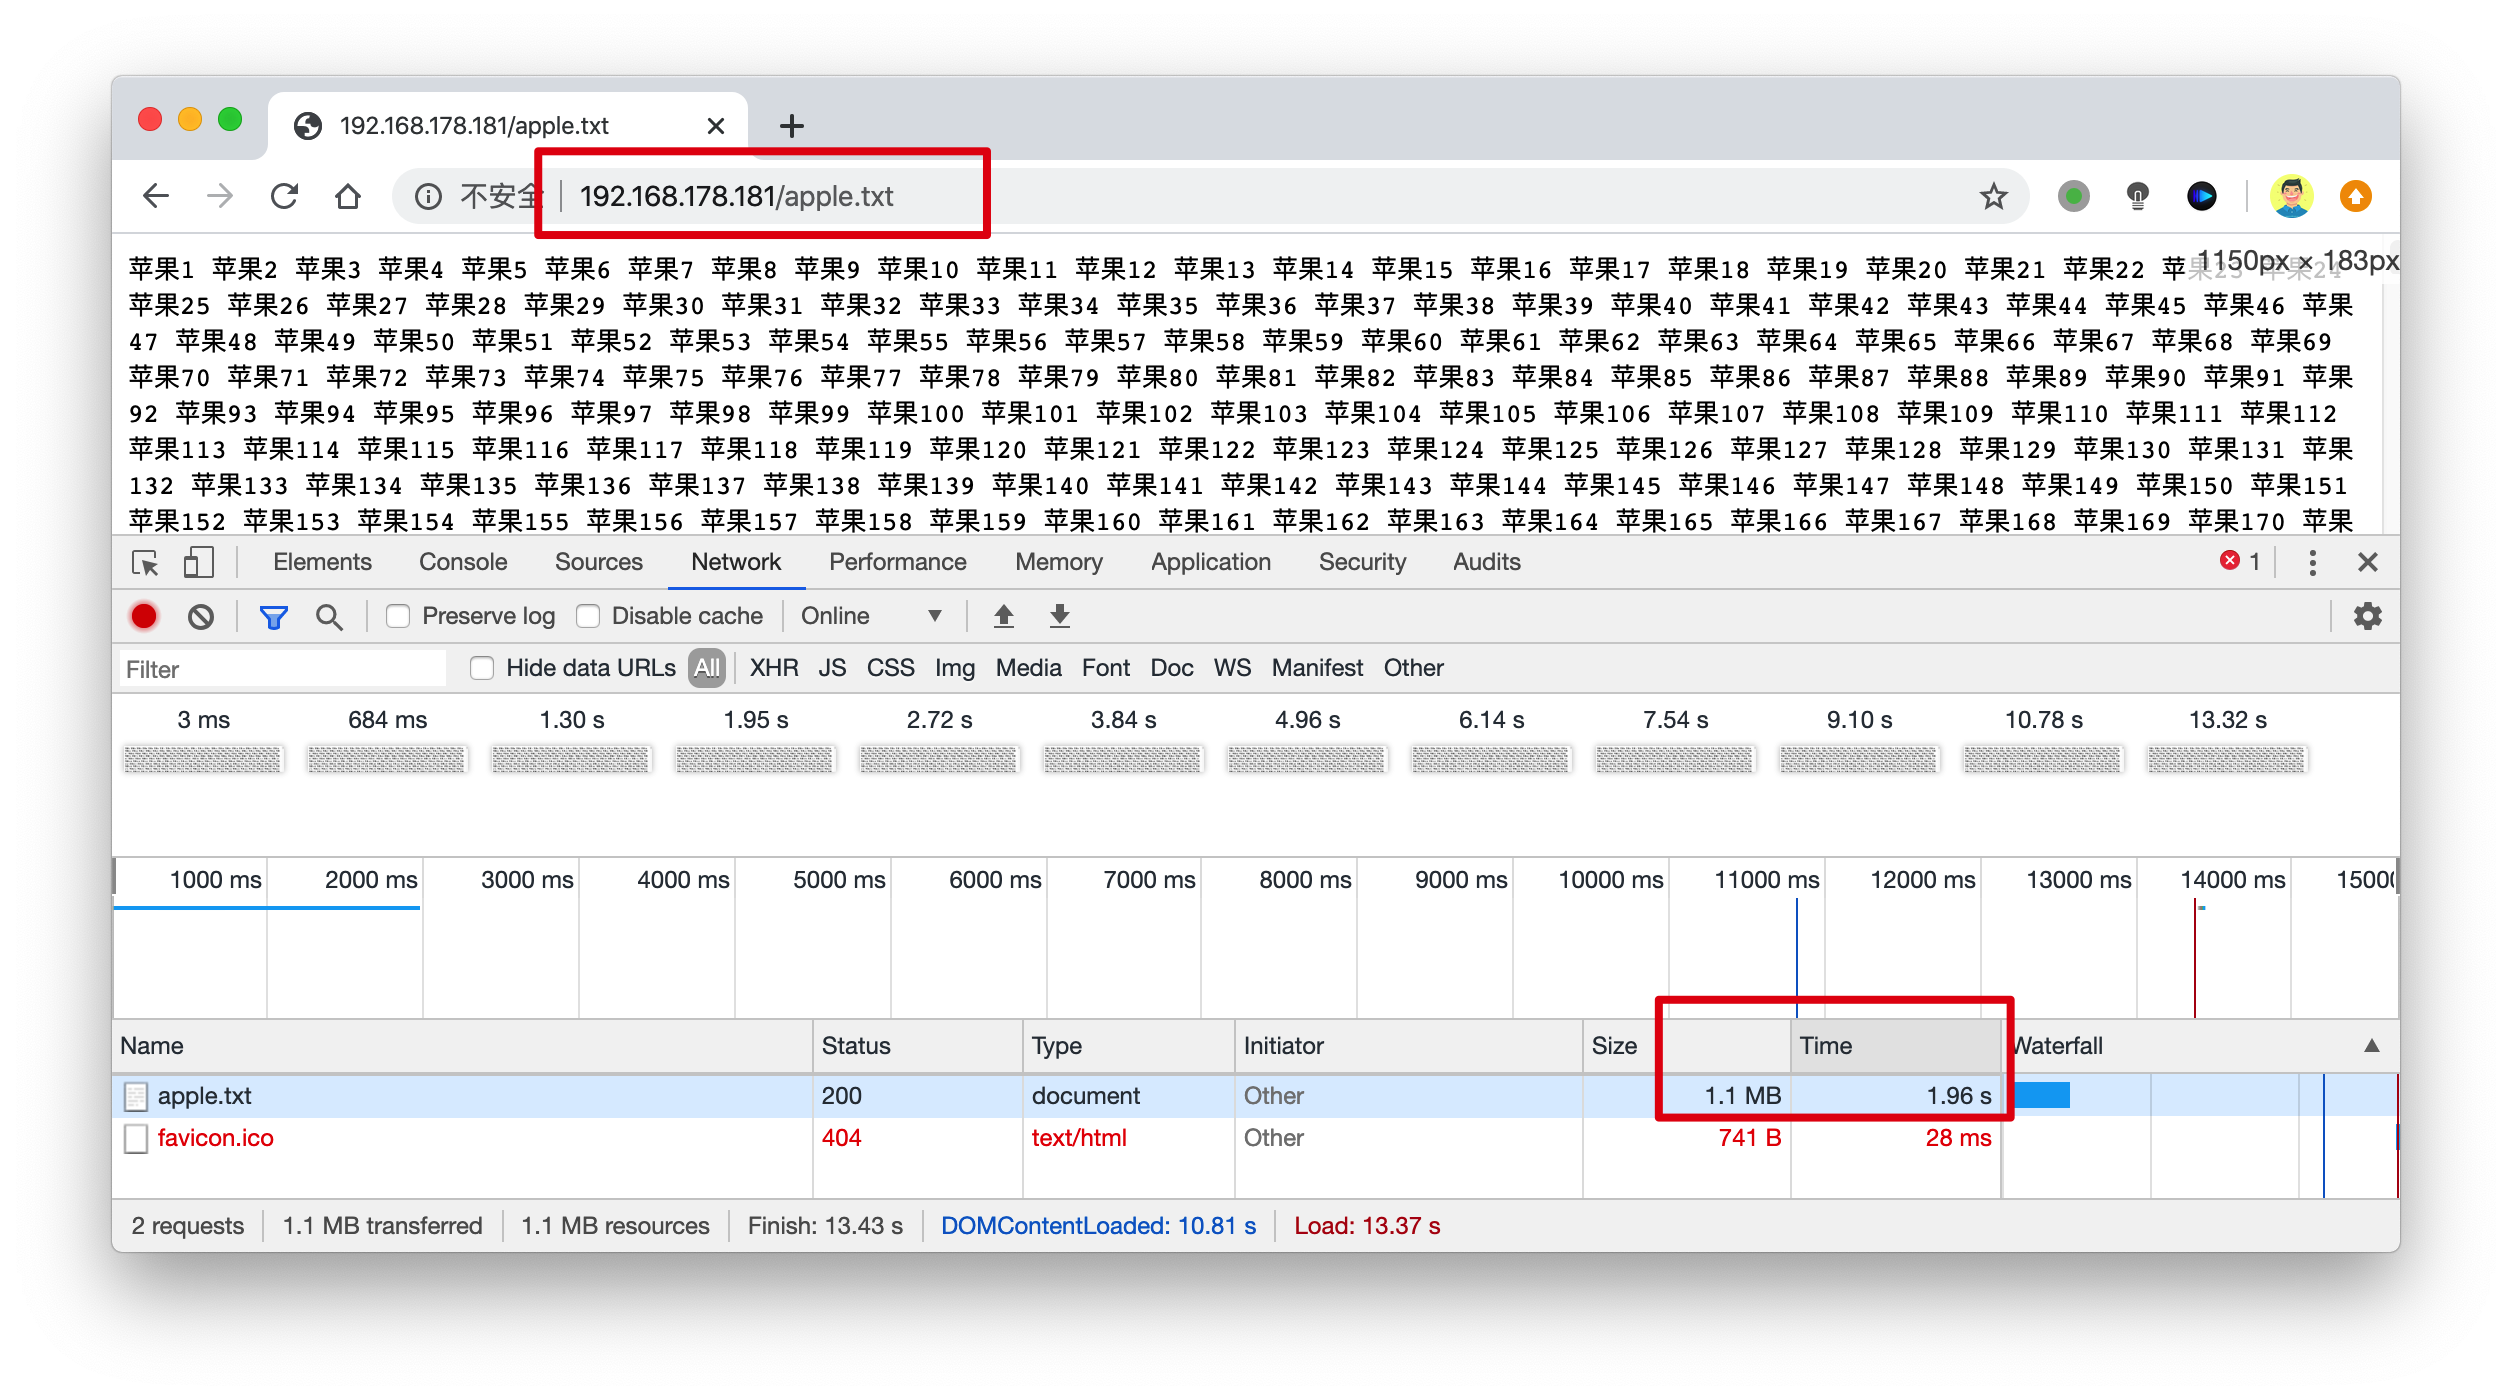
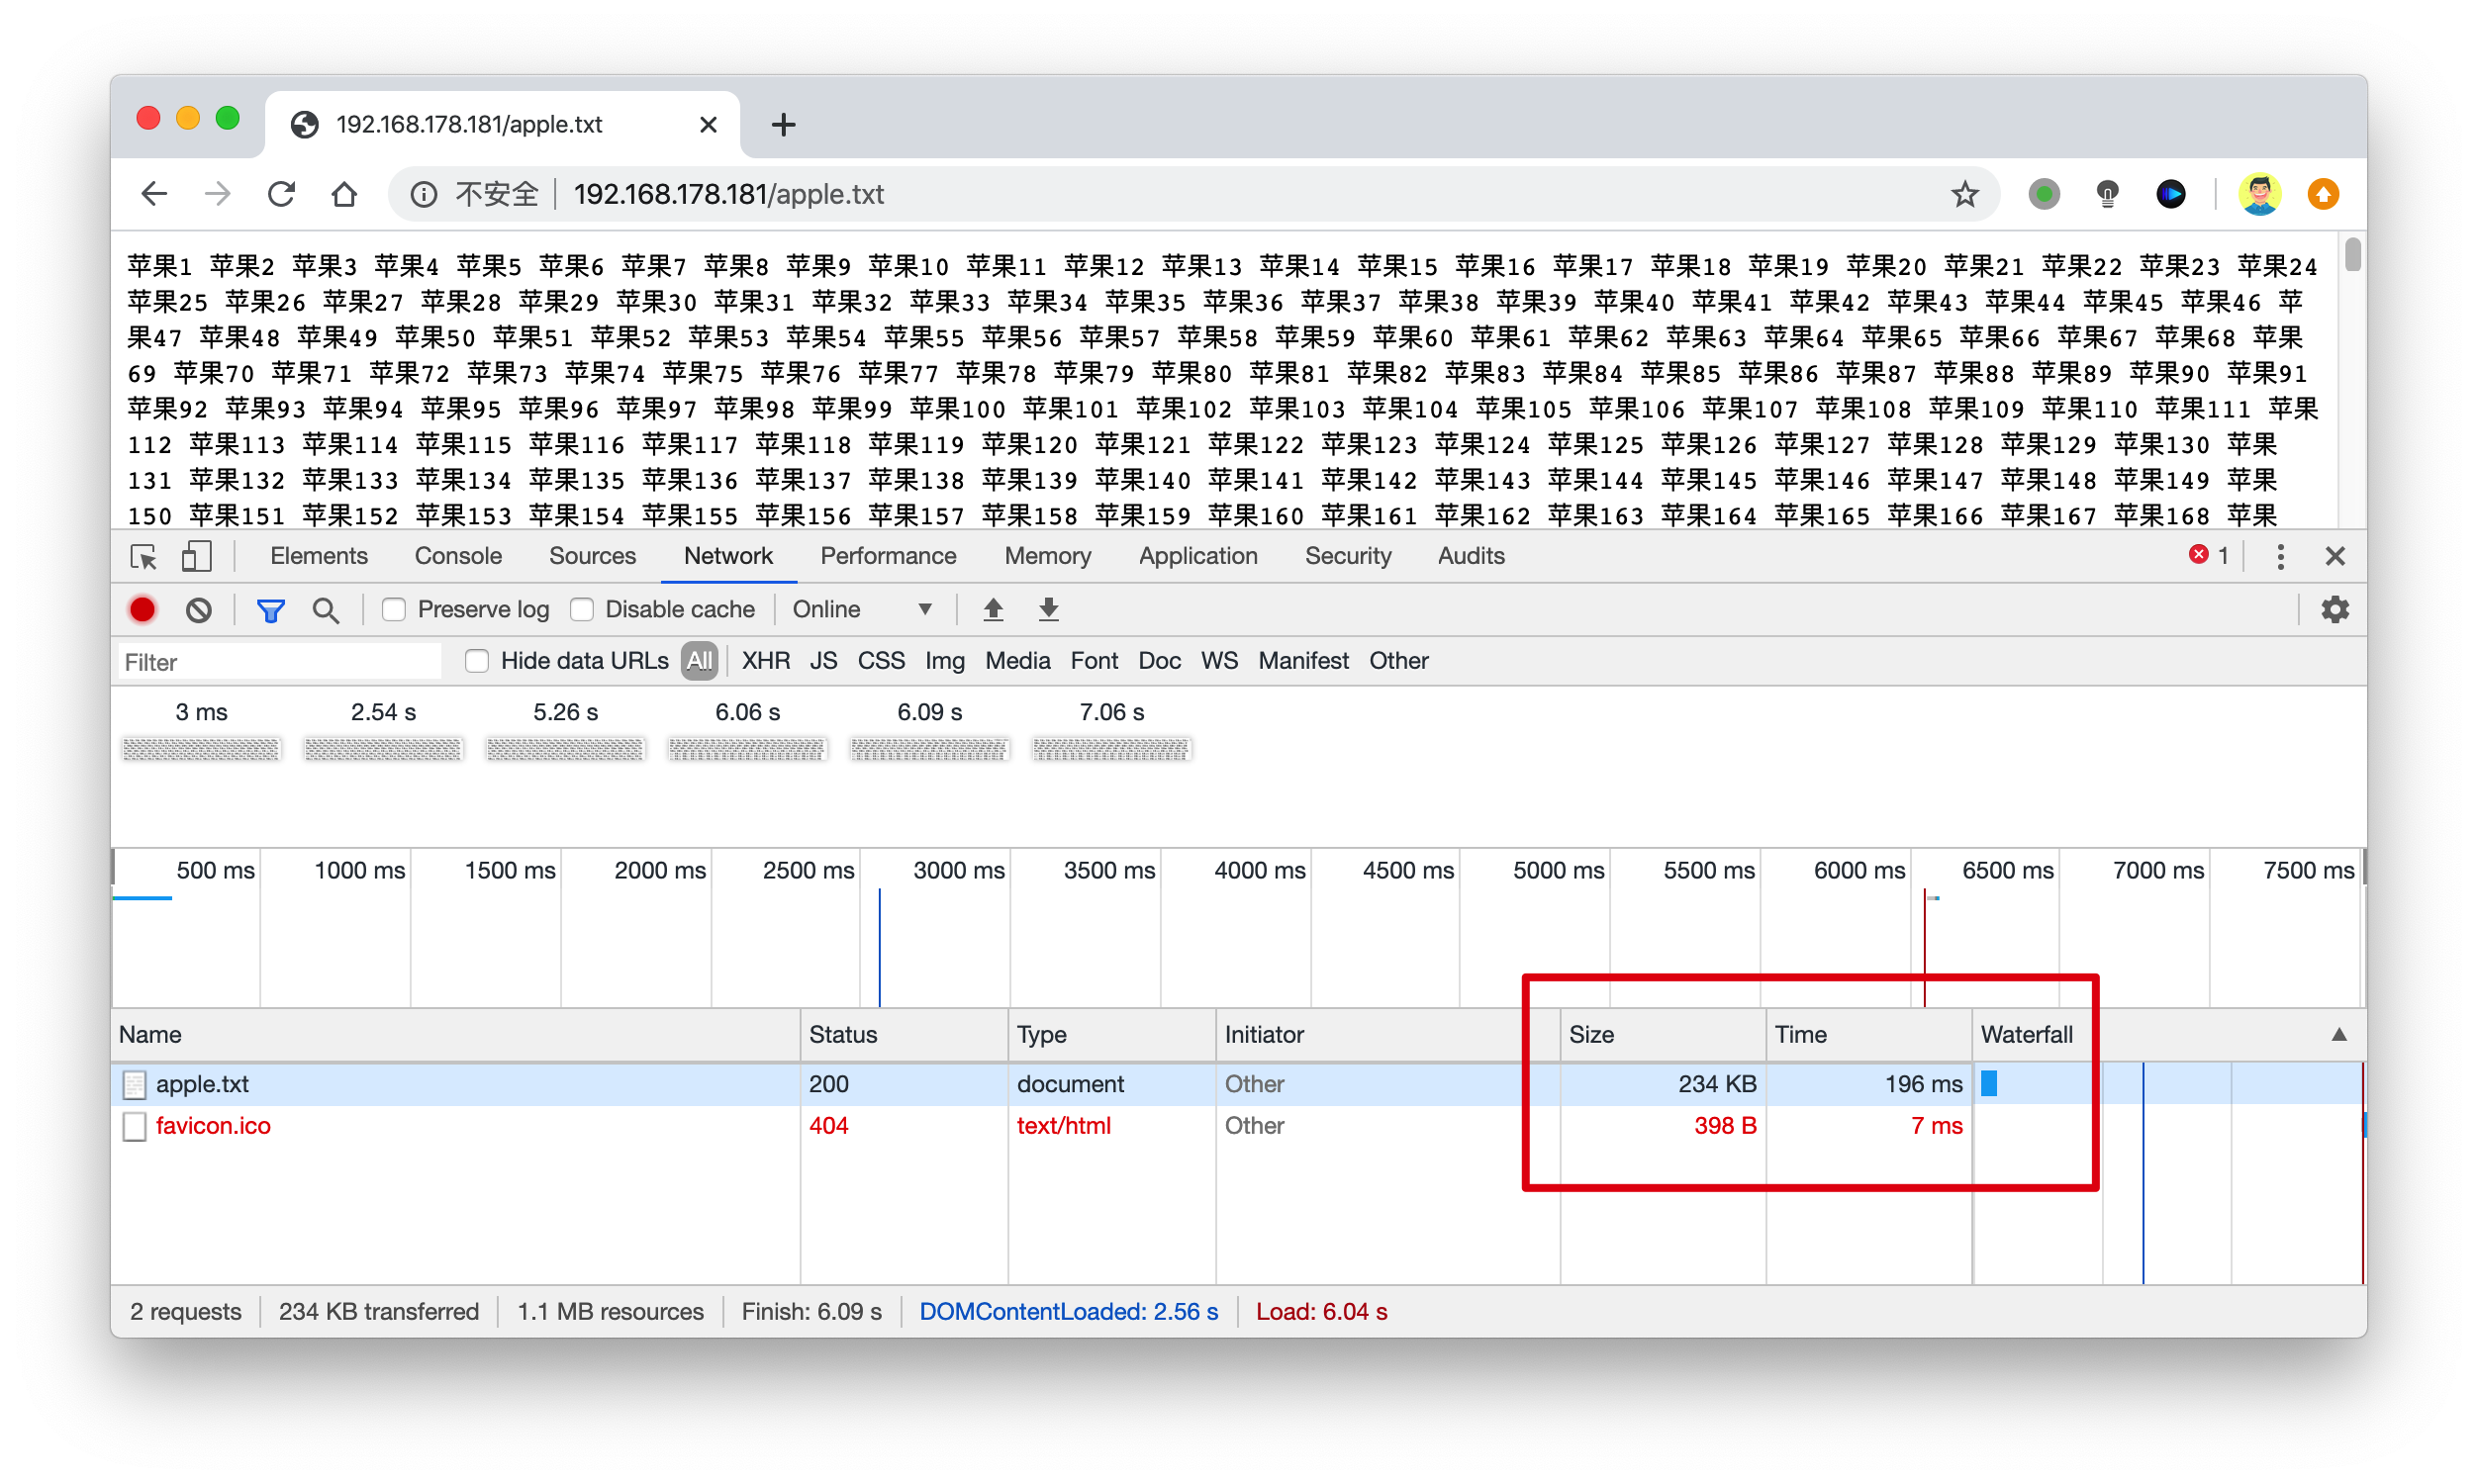
<img src="./1.jpg">
<img src="./2.jpg">
<img src="./3.jpg">
<head>
<link rel="shortcut icon" href="#"/>
</head>
【nginx的访客日志功能】
nginx日志功能需要在nginx.conf中打开相关指令log_format,设置日志格式,以及设置日志的存储位置access_log,指定日志
的格式,路径,缓存大小。
nginx.conf中有关访客日志定义如下
 #a
log_format  main  '$remote_addr - $remote_user [$time_local] "$request" '
                      '$status $body_bytes_sent "$http_referer" '
                    '"$http_user_agent" "$http_x_forwarded_for"';

 access_log  logs/access.log  main;

参数解释
$remote_addr :记录访问网站的客户端地址
$remote_user :记录远程客户端用户名称
$time_local :记录访问时间与时区
$request :记录用户的 http 请求起始行信息
$status :记录 http 状态码,即请求返回的状态,例如 200 、404 、502 等
$body_bytes_sent :记录服务器发送给客户端的响应 body 字节数
$http_referer :记录此次请求是从哪个链接访问过来的,可以根据 referer 进行防盗链设置
$http_user_agent :记录客户端访问信息,如浏览器、手机客户端等
$http_x_forwarded_for :当前端有代理服务器时,设置 Web 节点记录客户端地址的配
置,此参数生效的前提是代理服务器上也进行了相关的 x_forwarded_for 设置
查看日志格式
tail -2 logs/access.log

192.168.178.1 - - [11/Feb/2020:19:24:37 +0800] "GET / HTTP/1.1" 304 0 "-" "Mozilla/5.0 (Macintosh; Intel Mac OS X 10_15_3) AppleWebKit/537.36 (KHTML, like Gecko) Chrome/79.0.3945.130 Safari/537.36"
127.0.0.1 - - [12/Feb/2020:10:26:26 +0800] "GET / HTTP/1.1" 200 65 "-" "curl/7.29.0"
【多虚拟主机定义日志】
由于nginx支持多虚拟主机,日志功能也是可以区分开的,用access_log定义存储位置。
日志指令语法
access_log  path  [format  buffer=size  | off]
path代表日志存放路径
关闭日志
access_log off;
多虚拟主机的访客日志
1.虚拟主机1
 server {
        #监听的端口和ip
        listen       80;
        #主机域名
        server_name  www.chaogelinux.com;
        access_log logs/www.chaogelinux.log;
        charset utf-8;

        #url匹配
        location / {
            #HTML文件存放的目录
            root   /website/s1;
            #默认首页文件,从左往右寻找,index.html或是index.htm文件
            index  index.html index.htm;
        }
     }

2.虚拟主机2
server {
listen 80;
server_name www.chaogenginx.com;
access_log logs/www.chaogenginx.com;
location / {
        index index.html index.htm;
        root /website/s2;
}

}

3.重载nginx
nginx -s reload

4.分别发送请求,检测日志动态
[root@bogon logs]# pwd
/opt/nginx/logs
[root@bogon logs]# ls
error.log  nginx.pid  www.chaogelinux.log  www.chaogenginx.com

[root@bogon ~]# curl www.chaogenginx.com
我是来自于域名www.chaogenginx.com的多域名虚拟主机

[root@bogon ~]# curl www.chaogelinux.com
我是多域名虚拟主机,来自于域名www.chaogelinux.com
【Nginx目录浏览功能】
    server {
        #监听的端口和ip
        listen       80;
        #主机域名
        server_name  www.chaogelinux.com;
        access_log logs/www.chaogelinux.log;
        #目录有中文的时候,这里必须改
        charset utf-8;

        #url匹配
        location / {
            #需要列出目录索引的位置
            root   /;
            #开启目录索引功能
                        autoindex on;
        }
【Nginx的浏览器缓存】
配置浏览器缓存可以加速静态资源的访问,浏览器对用户访问的资源进行存储,下次访问,不用再去向服务器寻求资料,
直接本地显示,加速访问体验,节省网络资源,提高效率。
Nginx通过expires指令配置缓存,可以控制HTTP响应中的Expires和Cache-Control的头部信息,用来控制页面缓存
例如HTML页面经常引用JavaScript以及图片等文件,这些文件很少被修改,可以设置浏览器对该类资源在本地缓存
定期的时间。
# nginx.conf 修改server{}语句块

        location ~ .*\.(gif|jpg|jpeg|png|bmp|swf)$ {
            root /website/s1/;
            expires 30d;
}
        location ~ .*\.(js|css)?$ {
             root /website/s1/;
             expires 1h;
}
【规范nginx.conf】
对于nginx的使用,需要反复修改nginx.conf,修改次数多了之后,就难以观看了,nginx提供了include指令,可以
将其他目录的配置文件,导入进主配置文件nginx.conf中。
include        mime.types;
include        fastcgi_params;
include                 vhosts/*.conf;
nginx.conf主配置文件,修改为如下简略信息
1.创建统一管理配置文件目录
mkdir -p /opt/nginx/conf/extra

2.读取nginx.conf配置文件,将第一个server{}虚拟主机配置导出为bbs.conf
[root@bogon conf]# sed -n '29,87p' nginx.conf > extra/bbs.conf

3.删除原有的配置
[root@bogon conf]# sed -i  '29,87d' nginx.conf

4.生成第二个blog.conf,导出第二个虚拟主机的配置
[root@bogon conf]# sed -n '29,41p' nginx.conf > extra/blog.conf
[root@bogon conf]# sed -i '29,41d' nginx.conf #删除主配置文件的参数

5.主配置文件,添加include配置
http {
    include       mime.types;
    default_type  application/octet-stream;

    log_format  main  '$remote_addr - $remote_user [$time_local] "$request" '
                      '$status $body_bytes_sent "$http_referer" '
                      '"$http_user_agent" "$http_x_forwarded_for"';

    sendfile        on;
    tcp_nopush     on;
    include extra/*.conf;
}

6.此时nginx的两个虚拟主机任然可以用
[root@bogon conf]# curl 127.0.0.1
我是多域名虚拟主机,来自于域名www.chaogelinux.com
<img src="./1.jpg">
<img src="./2.jpg">
<img src="./3.jpg">
<head>
<link rel="shortcut icon" href="#"/>
</head>
[root@bogon conf]# curl 127.0.0.1:81
我是来自于域名www.chaogenginx.com的多域名虚拟主机


实现了配置文件拆分,方便可观
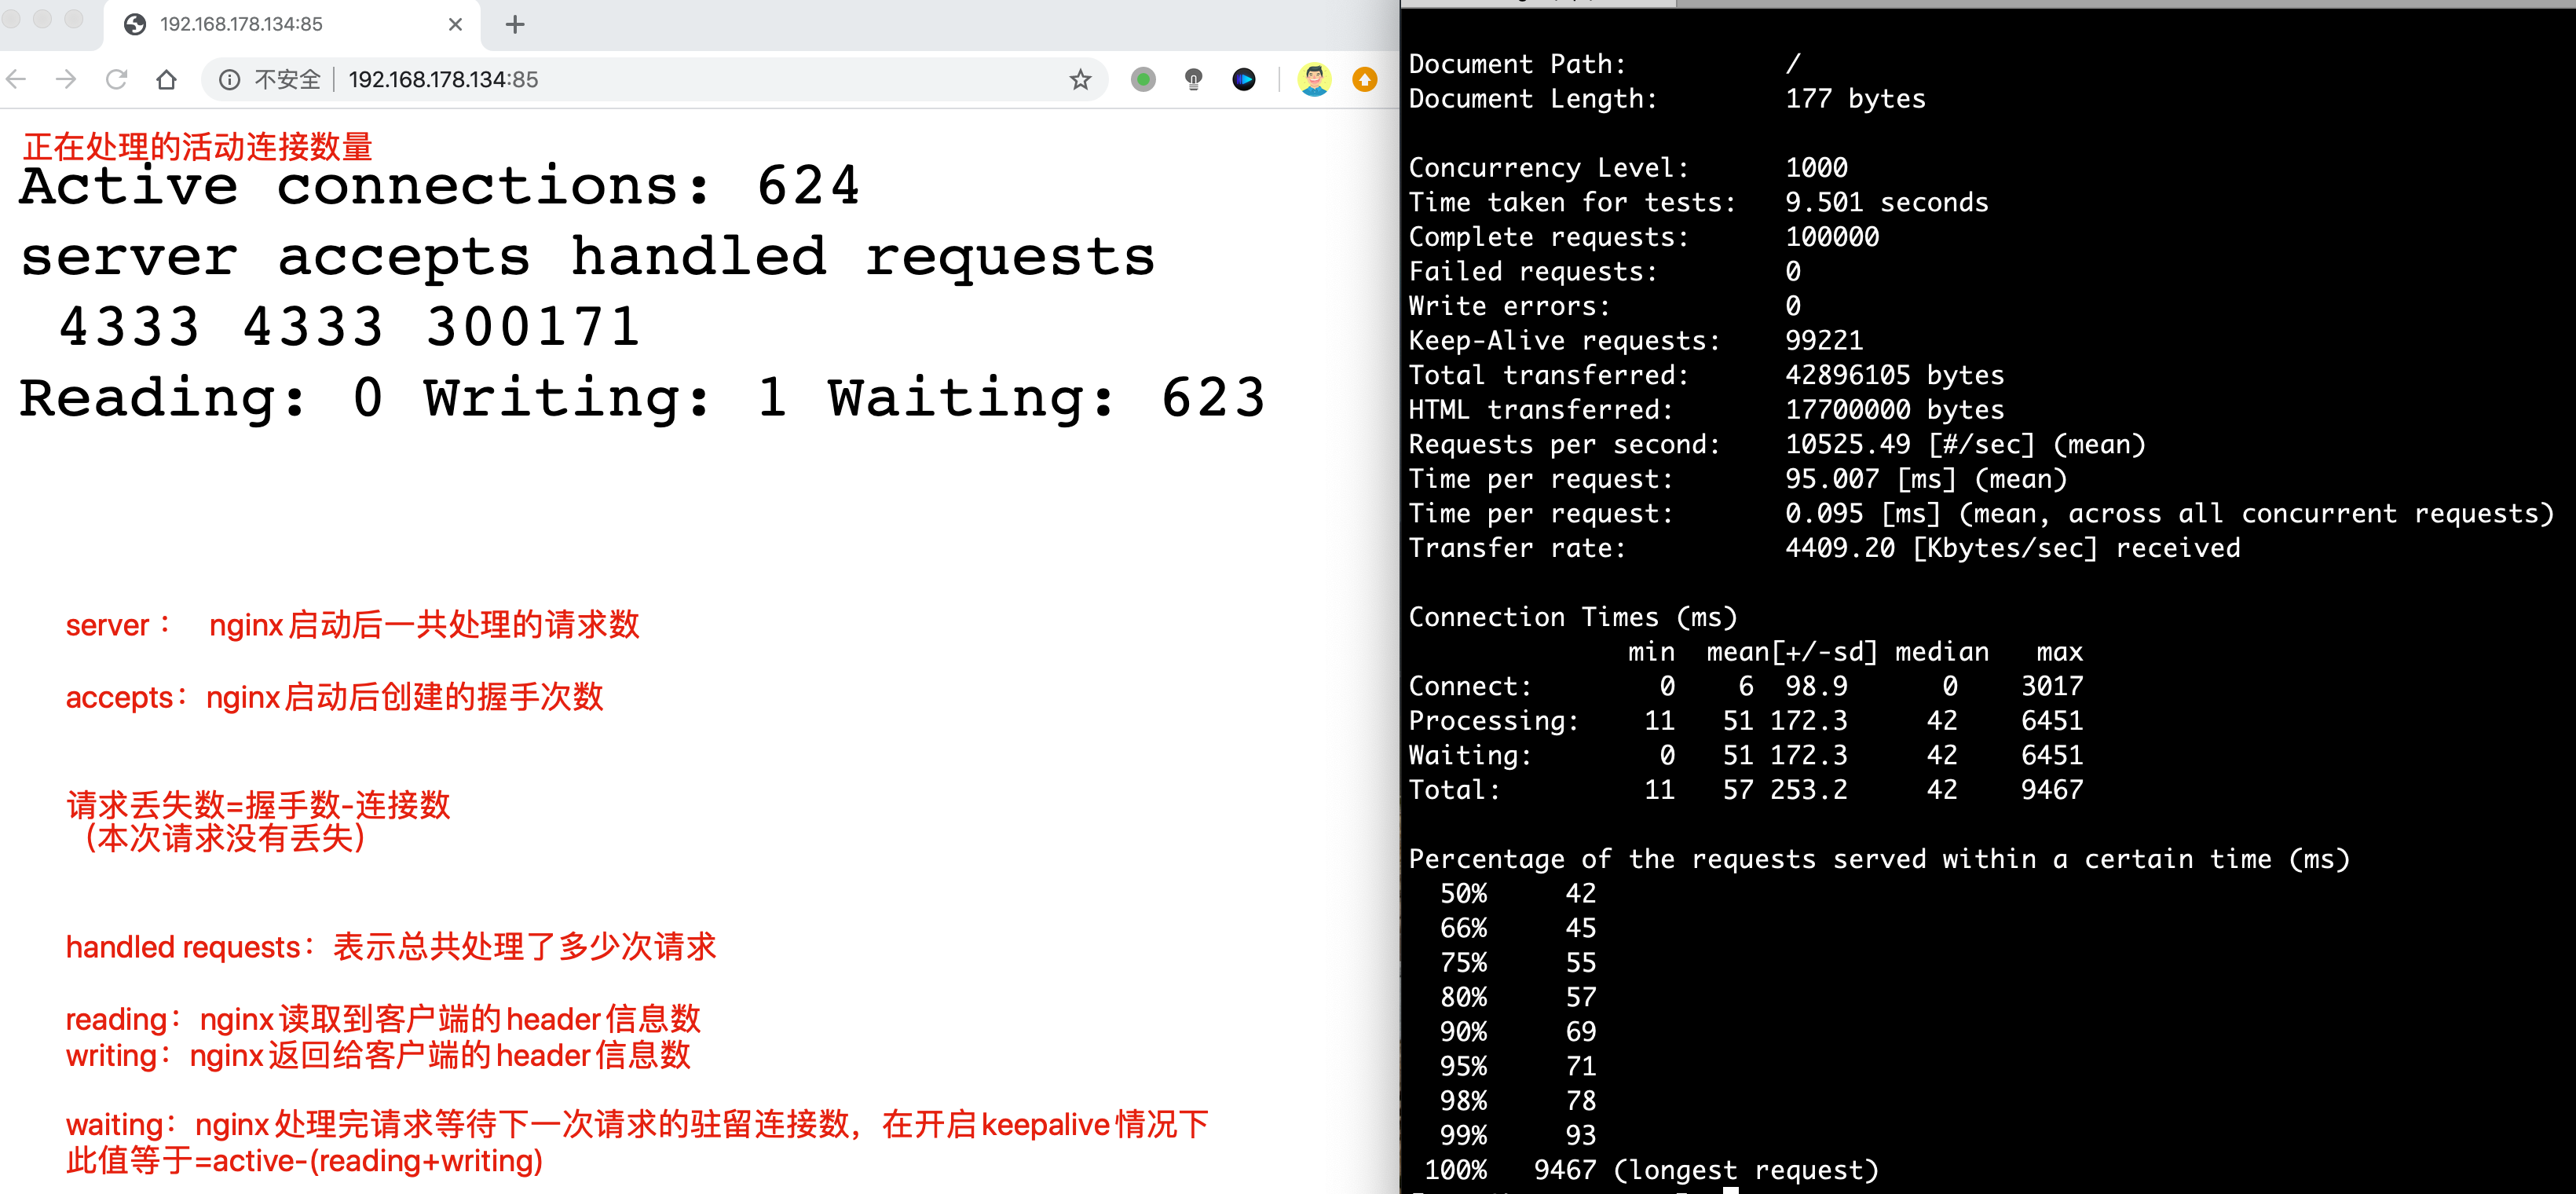
【nginx状态信息功能】
查看是否开启nginx的status页面功能, --with-http_stub_status_module 参数启用此功能
检查Nginx是否开启此功能
[root@bogon conf]# nginx -V
nginx version: nginx/1.14.0
built by gcc 4.8.5 20150623 (Red Hat 4.8.5-39) (GCC)
built with OpenSSL 1.0.2k-fips  26 Jan 2017
TLS SNI support enabled
configure arguments: --prefix=/opt/nginx/ --with-http_ssl_module --with-http_flv_module --with-http_gzip_static_module --with-http_stub_status_module --with-threads --with-file-aio
配置一个server用于查看status页面
[root@bogon extra]# cat status.conf
  server {
  listen 85;
  location / {
         stub_status on;
         access_log off;
}
}


nginx -s reload
使用ab命令,进行压力测试
yum -y install httpd-tools

ab -kc 1000 -n 100000 http://127.0.0.1/  #开启会话保持,1000个并发,发送十万个请求

-n requests #执行的请求数,即一共发起多少请求。
-c concurrency #请求并发数。
-k #启用HTTP KeepAlive功能,即在一个HTTP会话中执行多个请求。
【Nginx错误日志】
可以放在http{}全局中,也可以为单独为虚拟主机记录
语法:
error_log file  level;

日志级别在乎debug|info|notice|warn|error|crit|alert|emerg
级别越高,日志记录越少,生产常用模式是warn|error|crit级别
日志的记录,会给服务器增加额外大量的IO消耗,按需修改
修改配置文件
#修改配置文件
[root@bogon extra]# cat blog.conf
#第二个虚拟主机
server {
listen 81;
server_name www.chaogenginx.com;
access_log logs/www.chaogenginx.com;
charset utf-8;
error_log logs/blog.error.log;  #添加本行即可
location / {
    index index.html index.htm;
    root /website/s2;
}

}

#检查日志
[root@bogon extra]# nginx -s reload
[root@bogon extra]#
[root@bogon extra]#
[root@bogon extra]# ls ../../logs/
access.log  blog.error.log  error.log  nginx.pid  www.chaogelinux.log  www.chaogenginx.com
【Nginx的Location作用】
针对用户请求的网站URL进行匹配,匹配成功后进行对应的操作
nginx.conf中server{}指令块的location指令如下

        location / {
            root   html;
            index  index.html index.htm;
        }


        location = /50x.html {
            root   html;
        }
location [ = | ~| ~* | ^~ ]  url {
    #指定对应的动作
}

#正则表达式解释
匹配符 匹配规则 优先级
=    精确匹配    1
^~    以某个字符串开头,不做正则    2
~*    正则匹配    3
/blog/ 匹配常规字符串,有正则就优先正则 4
/    通用匹配,不符合其他location的默认匹配    5
【Nginx地址重写】
Nginx rewrite技术主要是实现URL地址重写,且支持正则表达式的规则。
rewrite ^/(.*) http://192.168.178.134/$1 permanent;
#解释
rewrite是指令,开启一个跳转规则
正则是 ^/(.*) 表示匹配所有,匹配成功后跳转到后面的url地址
$1 表示取出前面正则括号里的内容
permanent表示 301 重定向的标记re
rewrite的结尾参数flag标记
| 标记 | 解释 |
| last | 规则匹配完成后,继续向下匹配新的location |
| break | 本条规则完成匹配后,立即停止 |
| redirect | 返回302临时重定向,浏览器地址栏显示跳转后的URL |
| permanent | 返回301永久重定向,浏览器地址显示跳转后的URL |
实现301跳转
#请求直接跳转到百度
[root@bogon extra]# cat learn_rewrite.conf

server {
listen 90;
server_name _;
rewrite ^/(.*) http://www.baidu.com/$1 permanent;
}
【Nginx访问认证】
有时候,我们一些站点内容想要进行授权查看,只能输入账号密码之后才能访问,例如一些重要的内网平台,CRM
CMDB,企业内部WIKI等等。
htpasswd是Apache密码生成工具,Nginx支持auth_basic认证,因此我门可以将生成的密
码用于Nginx中,输入一行命令即可安装:yum -y install httpd-tools ,参数如下:

-c 创建passwdfile.如果passwdfile 已经存在,那么它会重新写入并删去原有内容.
-n 不更新passwordfile,直接显示密码
-m 使用MD5加密(默认)
-d 使用CRYPT加密(默认)
-p 使用普通文本格式的密码
-s 使用SHA加密
-b 命令行中一并输入用户名和密码而不是根据提示输入密码,可以看见明文,不需要交互
-D 删除指定的用户

#接认证文件,htpasswd -bc .access username password  #在当前目录生成.access文
件,用户名username,密码:password,默认采用MD5加密方式。
nginx的认证模块指令,语法:
location / {

    auth_basic "string"; 可以填写off或是string
    auth_basic_user_file conf/htpasswd;
}
案例
[root@chaogelinux extra]# cat www.conf

server {

    listen 80;
    server_name _;
    location / {
    root html/www;
    index index.html;
    auth_basic    "learn nginx auth_module";
    #nginx会去这个文件中验证账号密码
    auth_basic_user_file /home/Learn_Nginx/nginx/conf/extra/htpasswd;
    }
}

[root@chaogelinux www]# cat index.html
<meta charset=utf8>
只有正确输入了账号密码,才能看到此页面

重启nginx
nginx -s reload
生成密码文件
[root@chaogelinux extra]# htpasswd -bc ./htpasswd  chaoge  666
Adding password for user chaoge
【root和alias区别】

 浙公网安备 33010602011771号