图像ocr识别(一)
研究了点OCR识别,本文讲下opencv方式-找出字符区域,虽然还不完善,但是记录下,后续往CNN+RNN+CTC方向走,此处就作为练手了。
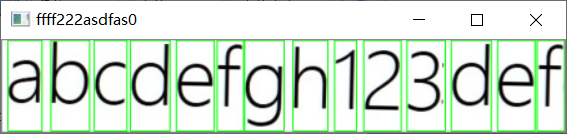
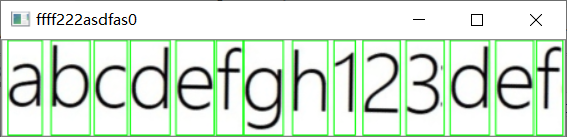
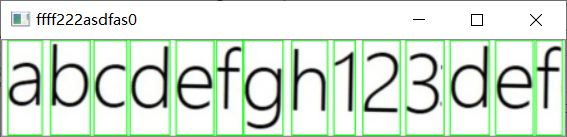
效果1:
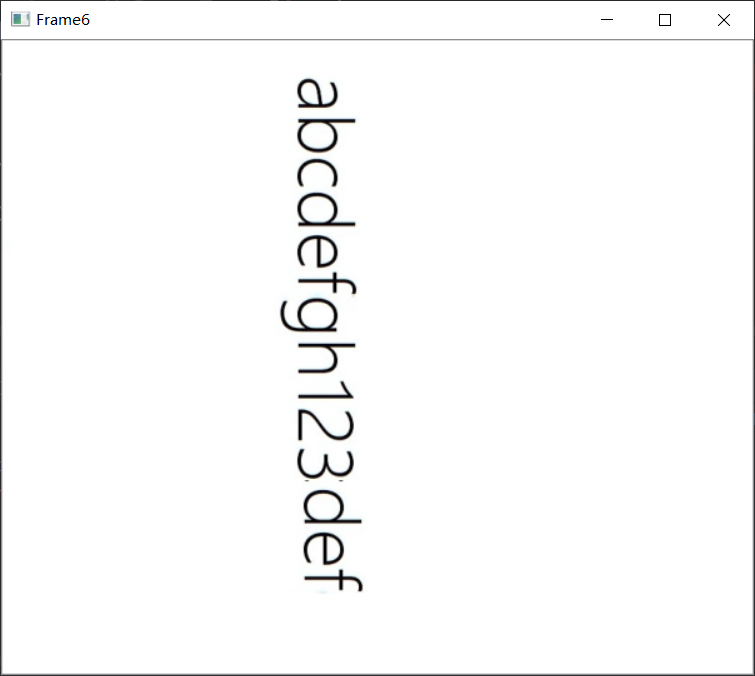
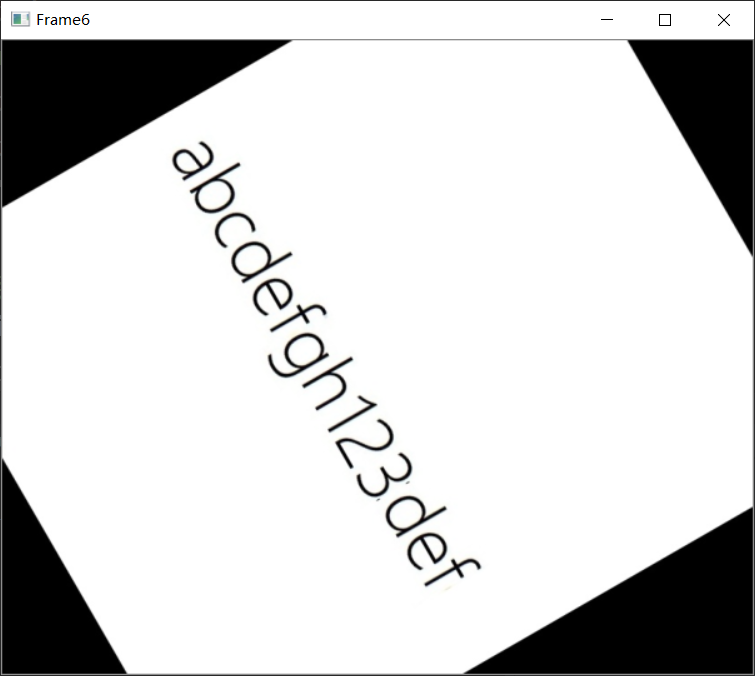
效果2:
效果3:

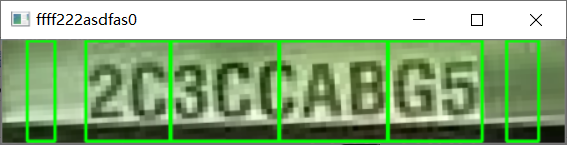
效果4(识别率不太好,只把大框识别了,字符的分割有问题):
import cv2
import imutils
import numpy as np
from imageio import imread
import math
import matplotlib.pyplot as plt
def point_distance(p1, p2):
return math.sqrt(math.pow(p2[0] - p1[0], 2) + math.pow(p2[1] - p1[1], 2))
def calc_height_width(box):
width = point_distance(box[1], box[0])
height = point_distance(box[0], box[3])
return (width, height)
fileName = 'test1'
img = imread('imgs\\' + fileName + '.jpg')
img = imutils.resize(img, width=1920, height=2080)
cannyImg = cv2.Canny(img, 200, 200)
kernel = cv2.getStructuringElement(cv2.MORPH_RECT, (3, 3))
closed = cv2.morphologyEx(img, cv2.MORPH_CLOSE, kernel)
eroded = cv2.erode(closed, kernel)
cannyImg = cv2.Canny(eroded, 200, 200)
blurred = cv2.GaussianBlur(cannyImg, (105, 105), 0)
# blurred = cv2.GaussianBlur(cannyImg, (15, 15),0)
_, skin = cv2.threshold(blurred, 0, 255, cv2.THRESH_BINARY + cv2.THRESH_OTSU)
contours, hierarchy = cv2.findContours(skin, cv2.RETR_TREE, cv2.CHAIN_APPROX_SIMPLE)
contours = sorted(contours, key=cv2.contourArea, reverse=True)
boxes = []
for i in range(len(contours)):
c = contours[i]
rect = cv2.minAreaRect(c)
box = np.int0(cv2.boxPoints(rect))
(w, h) = calc_height_width(box)
if w == 0 or h == 0:
continue
if w < 20 or h < 20:
continue
# boxes.append(box)
rate1 = h / w * 100
rate2 = w / h * 100
if (10 <= rate1 <= 20) or (10 <= rate2 <= 20):
print((w, h), '--------', rate1, '%', rate2, '%')
boxes.append(box)
img = img.copy()
i = 0
def parse_chars(positions, min_thresh, min_range, max_range):
charInfos = []
begin = 0
end = 0
for idx in range(len(positions)):
if positions[idx] > min_thresh and begin == 0:
begin = idx
elif positions[idx] > min_thresh and begin != 0:
if idx - begin > max_range:
charInfo = {'begin': begin, 'end': idx}
charInfos.append(charInfo)
begin = 0
end = 0
continue
elif positions[idx] < min_thresh and begin != 0:
end = idx
if end - begin >= min_range:
charInfo = {'begin': begin, 'end': end}
charInfos.append(charInfo)
begin = 0
end = 0
elif positions[idx] < min_thresh or begin == 0:
continue
return charInfos
def process_more(windowName, imgSrc):
ori_imgSrc = imgSrc.copy()
# cv2.imshow(windowName+'111', ori_imgSrc)
kernel = cv2.getStructuringElement(cv2.MORPH_CROSS, (3, 3))
closed = cv2.morphologyEx(imgSrc, cv2.MORPH_CLOSE, kernel)
imgSrc = cv2.erode(closed, kernel)
imgSrc = cv2.Canny(imgSrc, 300, 300)
kernel = np.ones((5, 5), np.uint8)
imgSrc = cv2.dilate(imgSrc, kernel, iterations=1)
_, imgSrc = cv2.threshold(imgSrc, 0, 255, cv2.THRESH_BINARY + cv2.THRESH_OTSU)
# rows---> ori_imgSrc.shape[0]
# cols---> ori_imgSrc.shape[1]
rows = ori_imgSrc.shape[0]
cols = ori_imgSrc.shape[1]
tags = np.zeros((cols))
for row in range(rows):
for col in range(cols):
if imgSrc[row][col] == 255:
tags[col] += 1
char_positions = parse_chars(positions=tags, min_thresh=8, min_range=25, max_range=100)
print(len(char_positions))
for p in char_positions:
leftTop = (p['begin'], 0)
rightBottom = (p['end'], rows - 2)
cv2.rectangle(ori_imgSrc, (leftTop[0], leftTop[1]), (rightBottom[0], rightBottom[1]), (0, 255, 0), 2)
ori_imgSrc = imutils.resize(ori_imgSrc, width=450)
cv2.imshow(windowName, ori_imgSrc)
for box in boxes:
# img = cv2.drawContours(img, [box], -1, (0, 0, 255), 3)
x_from = np.min(box[:, 1])
x_end = np.max(box[:, 1])
y_from = np.min(box[:, 0])
y_end = np.max(box[:, 0])
if x_from < 0:
x_from = 0
if y_from < 0:
y_from = 0
img_tmp = img[x_from:x_end, y_from:y_end]
# cv2.imshow("ffff111" + str(i), img_tmp)
(w, h) = calc_height_width(box)
if w > h:
# 左上角, 左下角,右上角
# 3,2,4
matSrc = np.float32([
[box[2][0], box[2][1]],
[box[1][0], box[1][1]],
[box[3][0], box[3][1]]
])
matDst = np.float32([
[0, 0],
[0, h],
[w, 0]
])
matAffine = cv2.getAffineTransform(matSrc, matDst)
dst = cv2.warpAffine(img, matAffine, (int(w), int(h)))
else:
# 左上角, 左下角,右上角
# 右上角, 左上角, 右下角
# 3,2,4
# 4,3,1
matSrc = np.float32([
[box[3][0], box[3][1]],
[box[2][0], box[2][1]],
[box[0][0], box[0][1]]
])
matDst = np.float32([
[0, 0],
[0, w],
[h, 0]
])
matAffine = cv2.getAffineTransform(matSrc, matDst)
dst = cv2.warpAffine(img, matAffine, (int(h), int(w)))
process_more("ffff222asdfas" + str(i), dst.copy())
i += 1
img = imutils.resize(img, width=600, height=600)
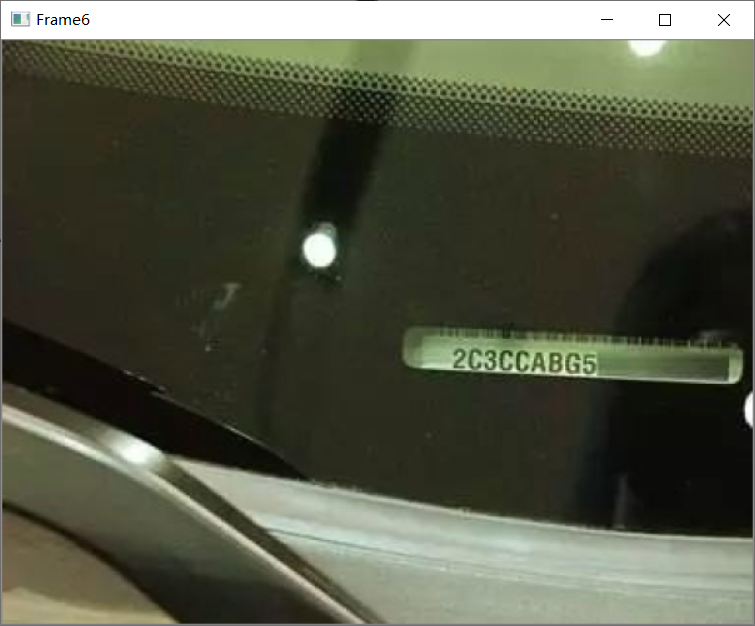
cv2.imshow("Frame6", img)
cv2.waitKey(100000) & 0xFF
cv2.destroyAllWindows()
自省推动进步,视野决定未来。
心怀远大理想。
为了家庭幸福而努力。
商业合作请看此处:https://www.magicube.ai
心怀远大理想。
为了家庭幸福而努力。
商业合作请看此处:https://www.magicube.ai

 浙公网安备 33010602011771号