Web布局中的几种宽高自适应
前言
打开浏览器,输入一个网址,显示一个页面,页面最基本的布局和框架用户一目了然。但是用户所用的浏览器、显示器、分辨率大多都是不一样的,如何确保不同用户持有不同设备所看到同一个网址的页面显示内容相同呢?当然像亚马逊首页那一种布局会更个性化一些,它会根据用户持有设备的屏幕大小而现实内容。例如:一部PC机上可能一排现实5个商品,一部iPad上可能显示3个商品,而一部手机上可能一排只显示1个商品。至少不要 出现如下这种情况,在符合W3C标准的浏览器中显示正常,而在IE6,7中页面乱套,因为IE6,7仍然拥有很庞大的用户群;即使你做的Web应用是面向某些企业用户的,这种情况下用户较少,但你也不能强求用户使用哪一种浏览器。要解决这个问题,这就需要用到页面布局中的自适应,虽然这个问题看起来很简单。
我在这里将会介绍三种我最近在项目中用到的自适应:
- 页面整体宽度自适应
- iframe宽高自适应
- jqgrid高度自适应
页面整体宽度自适应
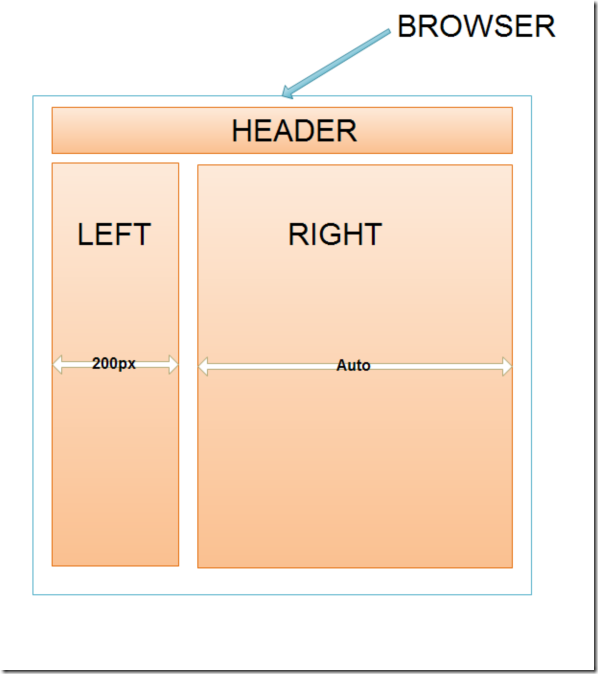
先看看下面的页面基本布局图
页面分为三个部分:
(1) Header,这一部分宽度自适应
(2) Left 左边栏,为定宽200px,一般为菜单或导航
(3) Right右侧主内容区域,宽度自适应
既然做了分解,我们就把它当做需求来一步一步实现它吧,首先是Header区域。
请看代码1:
<style type="text/css">
body{
font-family: Arial, Helvetica, sans-serif;
margin: 0;
padding: 0;
}
#header
{
height: 70px;
 margin: 20px 30px;
padding: 0;
border: 1px solid #ccc;
}
</style>
</head>
<body>
<div id="header">
<img src="http://images.cnblogs.com/logo_small.gif" />
</div>
</body>
关键的代码只有一行,我已经标出。
现在有一个问题了,如果Header的内容也比较丰富,可能Logo + Banner的总宽度为1000px了,但有些小屏幕却看不完整,这时我们得为这个Header 加个最小宽度限制。在IE 7 +和W3C浏览器中,拥有一个min-width属性可以实现这个效果,但是IE6不支持(参照各版本IE浏览器CSS兼容性列表)。不过css expression可以帮我们解决这个问题,请看代码2:
<!DOCTYPE html PUBLIC "-//W3C//DTD XHTML 1.0 Transitional//EN" "http://www.w3.org/TR/xhtml1/DTD/xhtml1-transitional.dtd">
<html xmlns="http://www.w3.org/1999/xhtml">
<head>
<meta http-equiv="Content-Type" content="text/html; charset=utf-8" />
<title>Header自适应</title>
<style type="text/css">
body{
font-family: Arial, Helvetica, sans-serif;
margin: 0;
padding: 0;
}
#header
{
/* IE6 不支持min-width属性,但是IE7+和W3C支持 */
min-width:1000px;
/* 用CSS表达式让IE6也支持最小宽度 */
_width:expression((document.documentElement.clientWidth||document.body.clientWidth)<1000?"1000px":"");
height: 70px;
 padding-left: 30px;
padding-right: 30px;
}
#header_content{
width: 100%;
border: 1px solid #ccc;
height: 100%;
}
</style>
</head>
<body>
<div id="header">
<div id="header_content">
<img src="http://images.cnblogs.com/logo_small.gif" />
</div>
</div>
</div>
</body>
</html>
在代码2中我并没有直接更改#header用margin属性来控制,虽说margin:0 auto可以来控制居中自适应,但是如果需要页边距为30像素时用margin: 0 30px则不行了了(在Firefox满屏是可以的,但浏览器缩小时,左侧nargin是存在的,而右侧被吃掉了)
OK,现在已经实现Header部分的居中自适应了,下面的Left和Right也不会麻烦。虽然上面的Header层使用了expression来实现宽度自适应,但是下面的Right层则不能使用同样的方式,因为Header层依赖的是body,而Right层则不是。如果不考虑IE6的存在,则用如下代码就可以实现本文开头的布局图。请看代码3:
<style type="text/css">
body{
font-family: Arial, Helvetica, sans-serif;
margin: 0;
padding: 0;
}
#header
{
/* IE6 不支持min-width属性,但是IE7+和W3C支持 */
min-width:1000px;
/* 用CSS表达式让IE6也支持最小宽度 */
_width:expression((document.documentElement.clientWidth||document.body.clientWidth)<1000?"1000px":"");
height: 70px;
padding-left: 30px;
padding-right: 30px;
}
#header_content{
width: 100%;
border: 1px solid #ccc;
height: 100%;
}
#main{
/* IE6 不支持min-width属性,但是IE7+和W3C支持 */
min-width:1000px;
/* 用CSS表达式让IE6也支持最小宽度 */
_width:expression((document.documentElement.clientWidth||document.body.clientWidth)<1000?"1000px":"");
height: 70px;
padding-left: 30px;
padding-right: 30px;
margin-top: 20px;
}
#left{
border: 1px solid #ccc;
float: left;
vertical-align:middle;
text-align:center;
width: 200px;
}
#right{
border: 1px solid #ccc;
 float: right;
position: absolute;
left: 240px;
right: 30px;
min-width: 790px;
vertical-align:middle;
text-align:center;
overflow: hidden;
}
</style>
</head>
<body>
<div id="header">
<div id="header_content">
<img src="http://images.cnblogs.com/logo_small.gif" />
</div>
</div>
<div id="main">
<div id="left">
<h2>Left</h2>
</div>
<div id="right">
<h2>Right</h2>
</div>
</div>
</body>
红色部分标出的是关键代码,又回到之前的问题了,min-width属性在IE6中不支持,所以你在IE6中运行代码3将得不到我们预期的结果。那么,现在就要借助js来实现这个效果了。请看代码4:
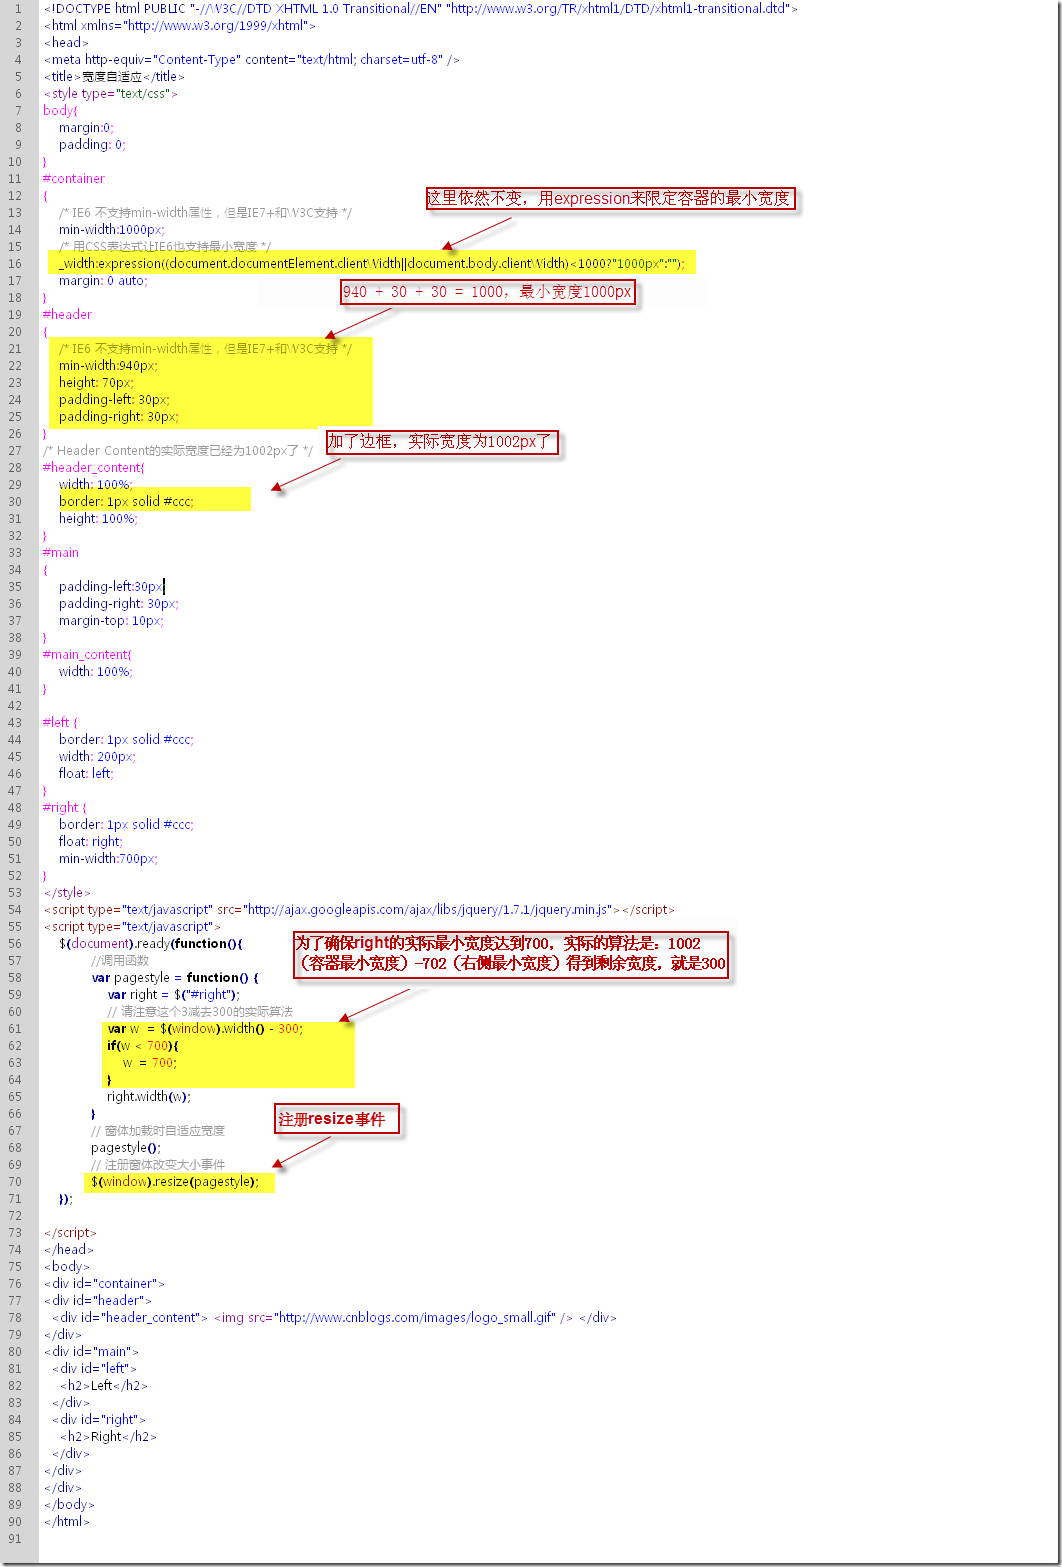
<DIV class=cnblogs_code onclick="cnblogs_code_show('d604edb5-b6c0-422e-ae1e-fdb13734bf43')"><IMG id=code_img_closed_d604edb5-b6c0-422e-ae1e-fdb13734bf43 class=code_img_closed alt="" src="http://images.cnblogs.com/OutliningIndicators/ContractedBlock.gif"><IMG style="DISPLAY: none" id=code_img_opened_d604edb5-b6c0-422e-ae1e-fdb13734bf43 class=code_img_opened onclick="cnblogs_code_hide('d604edb5-b6c0-422e-ae1e-fdb13734bf43',event)" src="http://images.cnblogs.com/OutliningIndicators/ExpandedBlockStart.gif"><SPAN class=cnblogs_code_collapse>View Code </SPAN><DIV id=cnblogs_code_open_d604edb5-b6c0-422e-ae1e-fdb13734bf43 class=cnblogs_code_hide><DIV><style type=<SPAN style="COLOR: #800000">"</SPAN><SPAN style="COLOR: #800000">text/css</SPAN><SPAN style="COLOR: #800000">"</SPAN>><BR>body {<BR> margin:<SPAN style="COLOR: #800080">0</SPAN>;<BR> padding: <SPAN style="COLOR: #800080">0</SPAN>;<BR>}<BR>#container {<BR> <SPAN style="COLOR: #008000">/*</SPAN><SPAN style="COLOR: #008000"> IE6 不支持min-width属性,但是IE7+和W3C支持 </SPAN><SPAN style="COLOR: #008000">*/</SPAN><BR> min-width:1000px;<BR> <SPAN style="COLOR: #008000">/*</SPAN><SPAN style="COLOR: #008000"> 用CSS表达式让IE6也支持最小宽度 </SPAN><SPAN style="COLOR: #008000">*/</SPAN><BR> _width:expression((document.documentelement.clientwidth||document.body.clientwidth)<<SPAN style="COLOR: #800080">1000</SPAN>?<SPAN style="COLOR: #800000">"</SPAN><SPAN style="COLOR: #800000">1000px</SPAN><SPAN style="COLOR: #800000">"</SPAN>:<SPAN style="COLOR: #800000">""</SPAN>);<BR> margin: <SPAN style="COLOR: #800080">0</SPAN> auto;<BR>}<BR>#header {<BR> <SPAN style="COLOR: #008000">/*</SPAN><SPAN style="COLOR: #008000"> IE6 不支持min-width属性,但是IE7+和W3C支持 </SPAN><SPAN style="COLOR: #008000">*/</SPAN><BR> min-width:940px;<BR> height: 70px;<BR> padding-left: 30px;<BR> padding-right: 30px;<BR>}<BR><SPAN style="COLOR: #008000">/*</SPAN><SPAN style="COLOR: #008000"> Header Content的实际宽度已经为1002px了 </SPAN><SPAN style="COLOR: #008000">*/</SPAN><BR>#header_content {<BR> width: <SPAN style="COLOR: #800080">100</SPAN>%;<BR> border: 1px solid #ccc;<BR> height: <SPAN style="COLOR: #800080">100</SPAN>%;<BR>}<BR>#main {<BR> padding-left:30px;<BR> padding-right: 30px;<BR> margin-top: 10px;<BR>}<BR>#main_content {<BR> width: <SPAN style="COLOR: #800080">100</SPAN>%;<BR>}<BR>#left {<BR> border: 1px solid #ccc;<BR> width: 200px;<BR> <SPAN style="COLOR: #0000ff">float</SPAN>: left;<BR>}<BR>#right {<BR> border: 1px solid #ccc;<BR> <SPAN style="COLOR: #0000ff">float</SPAN>: right;<BR> min-width:700px;<BR>}<BR></style><BR><script type=<SPAN style="COLOR: #800000">"</SPAN><SPAN style="COLOR: #800000">text/javascript</SPAN><SPAN style="COLOR: #800000">"</SPAN> src=<SPAN style="COLOR: #800000">"</SPAN><SPAN style="COLOR: #800000">http://ajax.googleapis.com/ajax/libs/jquery/1.7.1/jquery.min.js</SPAN><SPAN style="COLOR: #800000">"</SPAN>></script><BR><script type=<SPAN style="COLOR: #800000">"</SPAN><SPAN style="COLOR: #800000">text/javascript</SPAN><SPAN style="COLOR: #800000">"</SPAN>><BR> $(document).ready(function(){<BR> <SPAN style="COLOR: #008000">//</SPAN><SPAN style="COLOR: #008000">调用函数</SPAN><SPAN style="COLOR: #008000"><BR></SPAN> <SPAN style="COLOR: #0000ff">var</SPAN> pagestyle = function() {<BR> <SPAN style="COLOR: #0000ff">var</SPAN> right = $(<SPAN style="COLOR: #800000">"</SPAN><SPAN style="COLOR: #800000">#right</SPAN><SPAN style="COLOR: #800000">"</SPAN>);<BR> <SPAN style="COLOR: #008000">//</SPAN><SPAN style="COLOR: #008000"> 请注意这个3减去300的实际算法</SPAN><SPAN style="COLOR: #008000"><BR></SPAN> <SPAN style="COLOR: #0000ff">var</SPAN> w = $(window).width() - <SPAN style="COLOR: #800080">300</SPAN>;<BR> <SPAN style="COLOR: #0000ff">if</SPAN>(w < <SPAN style="COLOR: #800080">700</SPAN>){<BR> w = <SPAN style="COLOR: #800080">700</SPAN>;<BR> }<BR> right.width(w);<BR> }<BR> <SPAN style="COLOR: #008000">//</SPAN><SPAN style="COLOR: #008000"> 窗体加载时自适应宽度</SPAN><SPAN style="COLOR: #008000"><BR></SPAN> pagestyle();<BR> <SPAN style="COLOR: #008000">//</SPAN><SPAN style="COLOR: #008000"> 注册窗体改变大小事件 </SPAN><SPAN style="COLOR: #008000"><BR></SPAN> $(window).resize(pagestyle);<BR> });<BR> <BR></script><BR><div id=<SPAN style="COLOR: #800000">"</SPAN><SPAN style="COLOR: #800000">container</SPAN><SPAN style="COLOR: #800000">"</SPAN>><BR> <div id=<SPAN style="COLOR: #800000">"</SPAN><SPAN style="COLOR: #800000">header</SPAN><SPAN style="COLOR: #800000">"</SPAN>><BR> <div id=<SPAN style="COLOR: #800000">"</SPAN><SPAN style="COLOR: #800000">header_content</SPAN><SPAN style="COLOR: #800000">"</SPAN>> <img src=<SPAN style="COLOR: #800000">"</SPAN><SPAN style="COLOR: #800000">http://images.cnblogs.com/logo_small.gif</SPAN><SPAN style="COLOR: #800000">"</SPAN> alt=<SPAN style="COLOR: #800000">""</SPAN>> </div><BR> </div><BR> <div id=<SPAN style="COLOR: #800000">"</SPAN><SPAN style="COLOR: #800000">main</SPAN><SPAN style="COLOR: #800000">"</SPAN>><BR> <div id=<SPAN style="COLOR: #800000">"</SPAN><SPAN style="COLOR: #800000">left</SPAN><SPAN style="COLOR: #800000">"</SPAN>><BR> <h2>Left</h2><BR> </div><BR> <div style=<SPAN style="COLOR: #800000">"</SPAN><SPAN style="COLOR: #800000">width: 1049px; </SPAN><SPAN style="COLOR: #800000">"</SPAN> id=<SPAN style="COLOR: #800000">"</SPAN><SPAN style="COLOR: #800000">right</SPAN><SPAN style="COLOR: #800000">"</SPAN>><BR> <h2>Right</h2><BR> </div><BR> </div></DIV></DIV></DIV> 代码中有几处要注意的地方,我在下图中有标注出来,要查看运行结果,请复制上面的代码保存为html,所有url都是外部链接。 |
第一部分终于讲完了,呼~~~。
iframe宽高自适应
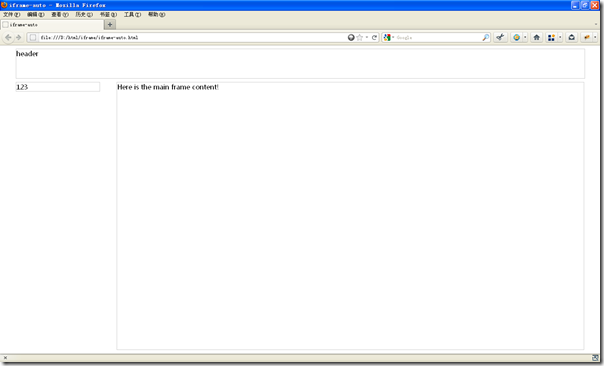
有了前面的基础,要做iframe的宽高自适应就很简单了。iframe高度自适应是根据屏幕的高度来的(无滚动条),宽度自适应已经通过前面的方式实现了,高度自适应只需要对height属性进行计算处理就可以实现。
根据上面提供的代码,要更改的地方很少。这里有一个完整的iframe例子下载:iframe auto width and height demo,代码可以直接看里面的。
无图无真相,还是截个图看看吧。
jqgrid高度自适应
jqgrid是一个较为强大的表格控件,对于它的介绍为不再赘述,至于它的用法和结合asp.net进行ajax分页的方式我将在下一篇讲述(不是loading once的方式,loading once存在一些bug)。由于上面的iframe高度已经根据屏幕的高度做了限制,而jqgrid提供了一页显示10,20,30条这种类似的选项,原有的高度是不可能让30条数据显示完全的。这就需要为jqgrid限制一个最大高度,例如300px,当内容的高度超出300px时,jqgrid就得以竖向滚动条滑动来显示内容。
假定我们已经为jqgrid绑定好数据源,jqgrid的高度为360px。要实现兼容所有浏览器的jqgrid高度自适应,我们现在还需借助一个东西,http://noteslog.com/post/how-to-fix-the-resize-event-in-ie/,其实还是为了解决IE resize的bug。
<!DOCTYPE html PUBLIC "-//W3C//DTD XHTML 1.0 Transitional//EN" "http://www.w3.org/TR/xhtml1/DTD/xhtml1-transitional.dtd">
<html xmlns="http://www.w3.org/1999/xhtml">
<head>
<meta http-equiv="Content-Type" content="text/html; charset=utf-8" />
<title></title>
<script type="text/javascript" src="http://ajax.googleapis.com/ajax/libs/jquery/1.7.1/jquery.min.js">
</script>
<script type="text/javascript" src="js/jquery.wresize.js"></script>
<script type="text/javascript">
/* jqgrid绑定数据源,设置属性*/
$(function() {
$("#gridTable").jqGrid({
url: "...",
datatype: "json",
shrinkToFit: true,
width: "836",
height: "360",
colNames: [...],
colModel: [
...
],
jsonReader: {
...
},
prmNames: {
page: 'PageNumber',
rows: 'PageSize',
sort: 'OrderBy',
order: 'Sort'
},
loadonce: false,
sortname: 'FullDateTime',
sortorder: 'desc',
viewrecords: true,
rowNum: 10,
rowList: [10, 20, 30],
pager: "#gridPager"
}).navGrid('#pager2', { edit: false, add: false, del: false });
});
</script>
<script type="text/javascript">
$(document).ready(function() {
function content_resize() {
var grid = $("#gridTable");
var h = $(window).height() - grid.offset().top - 30;
$('.ui-jqgrid-bdiv').css("height", h);
}
// 借助wresize插件解决IE resize的bug.
$(window).wresize(content_resize);
content_resize();
});
</script>
</head>
<body>
<table id="gridTable">
</table>
<div id="gridPager"> </div>
</body>
</html>
还是截两个效果图,图1每页显示10条,图2每页显示30条。
总结
Always keep dream, keep thinking, keep moving, even if the road obstacles , the one more important thing is that always be a pig for you, that's keep fool.


