FAS2720 配置
FAS 2720配置操作
第1章 初始化
1.1设备物理安装
1.1.1组件介绍
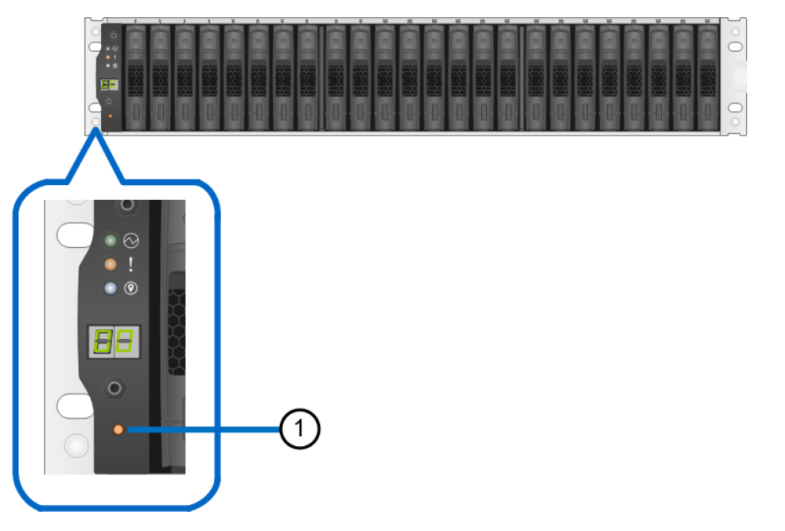
机头FAS 2720 (2U)
前面板

后面

1.1.2准备工作
(1)工具准备
螺丝刀、网线、Console线、轧带
授权文件——Mysupport注册产品下载
(2)客户提供信息
|
类型 |
值 |
备注 |
|
集群IP、名称 |
|
IP默认169.254.x.x、名称字母开头 |
|
集群管理地址、掩码、网关 |
|
提供集群管理 |
|
DNS名称、DNS地址 |
|
提供解析服务 |
|
节点管理地址、掩码、网关 |
|
提供节点管理 |
|
NTP地址 |
|
时间影响CIFS协议 |
|
邮件服务器地址、告警邮箱 |
|
提供邮件告警 |
|
Syslog服务器地址 |
|
日志记录 |
|
Snmp地址 |
|
监控告警 |
|
数据接口IP |
|
按规划情况 |
1.2系统初始化
1.2.1控制器初始化
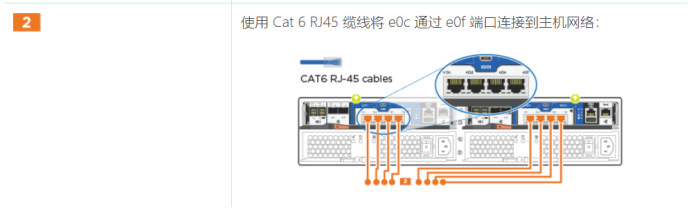
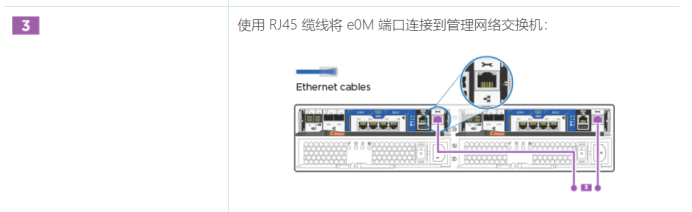
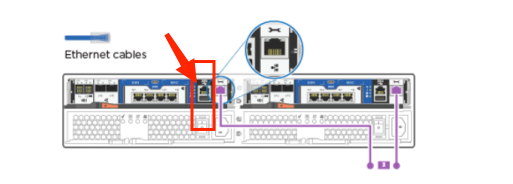
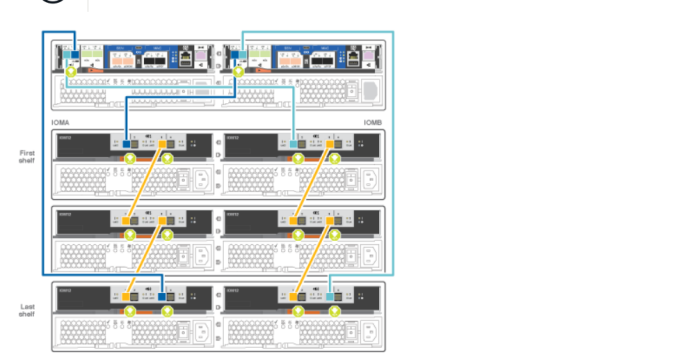
(1)控制器连线
为双节点有交换机集群布线,以太网网络配置
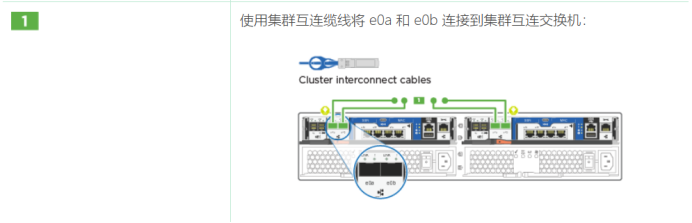
此时请勿插入电源线。
(2)连接node1 Console
(3)系统初始化
(4)打开电源,启动系统,按照初始化向导配置IP

(5)配置集群
1.2.2模拟器配置向导
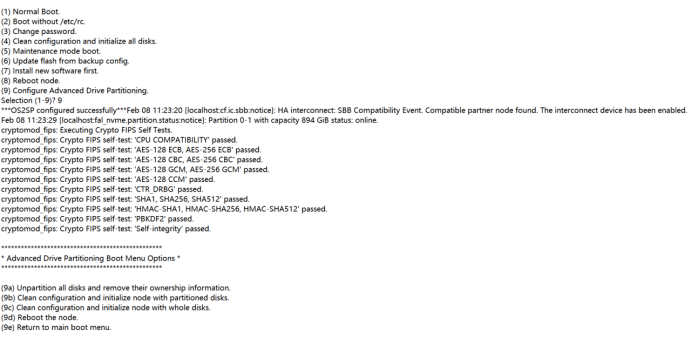
按 Ctrl-C 进入启动菜单。

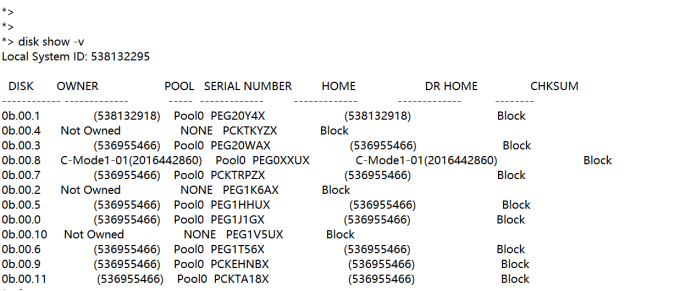
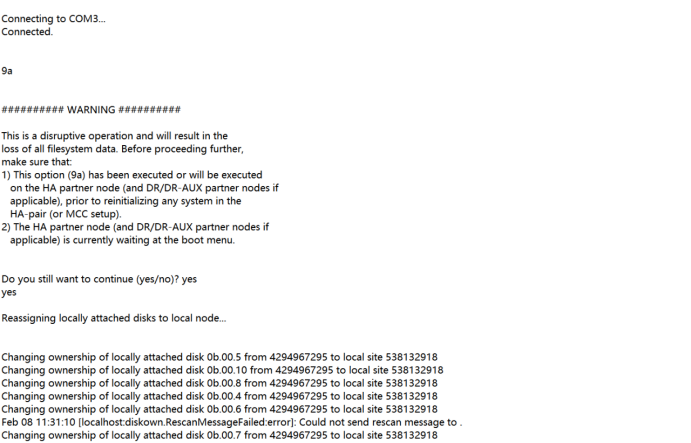
我们先进维护模式看下磁盘情况,出现boot菜单有1-9选项。输入5进入维护模式
输入命令 disk show -v 查看到现在是磁盘有ownership信息。
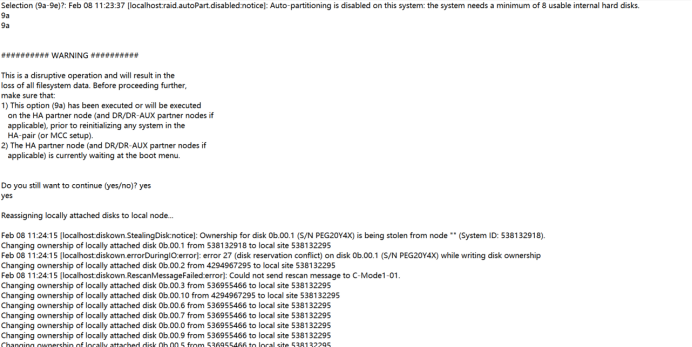
需要先去除磁盘的ownership才能初始化系统。这时我们返回到boot菜单,这里注意两个控制器基本同时进行这个操作:回到boot菜单,输入9,输入,输入9a(去除磁盘的ownership)。去除完ownership后开始初始化操作。回到boot菜单,输入9,9b,开始进行初始化操作。
Console线接在左边控制器上
Console线接入右边控制器操作
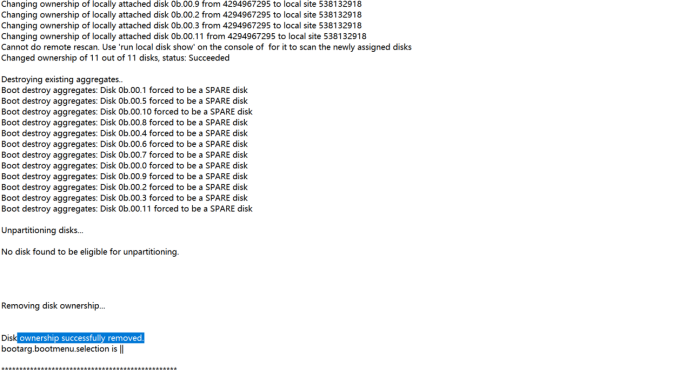
磁盘的ownership成功移除。接下来在左边控制器上输入9b进行初始化
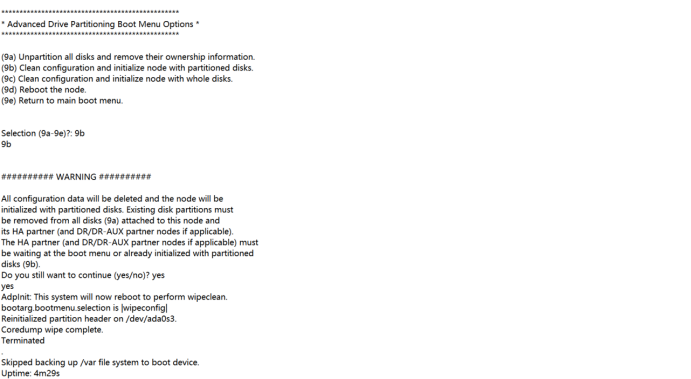
接入右边控制器输入9b
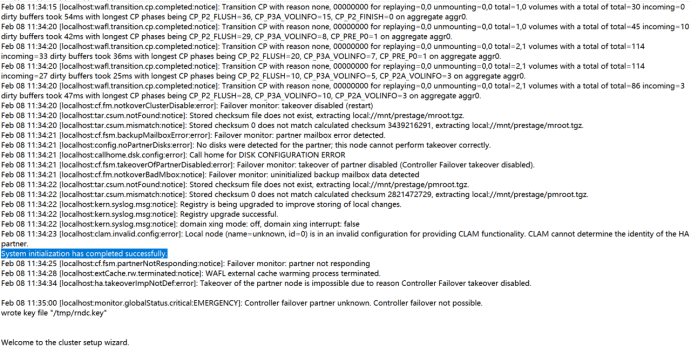
然后接回左边控制器会看到开始进行集群设置
然后
Type yes to confirm and continue {yes}: yes
Enter the node management interface port [e0M]:
Enter the node management interface IP address [192.168.1.205]:
Enter the node management interface netmask [255.255.255.0]:
Enter the node management interface default gateway [192.168.1.1]:
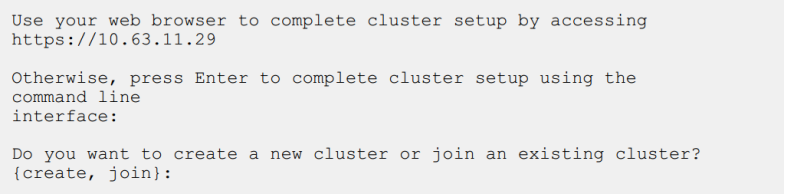
Use your web browser to complete cluster setup by accessing
https://192.168.1.205
Otherwise, press Enter to complete cluster setup using the command line
interface:
Do you want to create a new cluster or join an existing cluster? {create, join}
[create]:
Do you intend for this node to be used as a single node cluster? {yes, no} [no]:
Existing cluster interface configuration found:
Port MTU IP Netmask
e0a 9000 169.254.81.223 255.255.0.0
e0b 9000 169.254.185.125 255.255.0.0
Do you want to use this configuration? {yes, no} [yes]: yes
Step 1 of 5: Create a Cluster
You can type "back", "exit", or "help" at any question.
Enter the cluster name: fas2720-A
Creating cluster fas2720-A
Starting cluster support services ..
Cluster fas2720-A has been created.
Step 2 of 5: Add Feature License Keys
You can type "back", "exit", or "help" at any question.
Enter an additional license key []:
Step 3 of 5: Set Up a Vserver for Cluster Administration
You can type "back", "exit", or "help" at any question.
Enter the cluster management interface port: e0M
Enter the cluster management interface IP address: 192.168.1.210
Enter the cluster management interface netmask: 255.255.255.0
Enter the cluster management interface default gateway [192.168.1.1]:
A cluster management interface on port e0M with IP address 192.168.1.210 has been created. You can use
Enter the DNS domain names:
Step 4 of 5: Configure Storage Failover (SFO)
You can type "back", "exit", or "help" at any question.
SFO will be enabled when the partner joins the cluster.
Step 5 of 5: Set Up the Node
You can type "back", "exit", or "help" at any question.
Where is the controller located []: ShangHai
Cluster "fas2720-A" has been created.
To complete cluster setup, you must join each additional node to the cluster
by running "system node show-discovered" and "cluster add-node" from a node in the cluster.
To complete system configuration, you can use either OnCommand System Manager
or the Data ONTAP command-line interface.
To access OnCommand System Manager, point your web browser to the cluster
management IP address (https://192.168.1.210).
To access the command-line interface, connect to the cluster management
IP address (for example, ssh admin@192.168.1.210).
Mon Feb 13 10:48:45 UTC 2023
login: admin
Password:
******************************************************
* This is a serial console session. Output from this *
* session is mirrored on the SP console session. *
******************************************************
fas2720-A::> disk show -v
DISK OWNER POOL SERIAL NUMBER HOME DR HOME
---------- ------------ ------ ------------- ---------------- ---------------
Info: This cluster has partitioned disks. To get a complete list of spare disk
capacity use "storage aggregate show-spare-disks".
1.0.0 (538132295) Pool0 PEG1J1GX (538132295) -
1.0.1 fas2720-A- Pool0 PEG20Y4X fas2720-A- -
01(538132918) 01(538132918)
1.0.2 (538132295) Pool0 PEG1K6AX (538132295) -
1.0.3 fas2720-A- Pool0 PEG20WAX fas2720-A- -
01(538132918) 01(538132918)
1.0.4 (538132295) Pool0 PCKTKYZX (538132295) -
1.0.5 fas2720-A- Pool0 PEG1HHUX fas2720-A- -
01(538132918) 01(538132918)
1.0.6 (538132295) Pool0 PEG1T56X (538132295) -
1.0.7 fas2720-A- Pool0 PCKTRPZX fas2720-A- -
01(538132918) 01(538132918)
1.0.8 (538132295) Pool0 PEG0XXUX (538132295) -
1.0.9 fas2720-A- Pool0 PCKEHNBX fas2720-A- -
01(538132918) 01(538132918)
1.0.10 (538132295) Pool0 PEG1V5UX (538132295) -
1.0.11 fas2720-A- Pool0 PCKTA18X fas2720-A- -
01(538132918) 01(538132918)
Press <space> to page down, <return> for next line, or 'q' to quit...
Enter the node management interface IP address: q
the value "q" is invalid for type <Host Ip Address>
The user-defined IP address for the node management LIF.
You can type "back", "exit", or "help" at any question.
Enter the node management interface IP address: back
Welcome to the cluster setup wizard.
You can enter the following commands at any time:
"help" or "?" - if you want to have a question clarified,
"back" - if you want to change previously answered questions, and
"exit" or "quit" - if you want to quit the cluster setup wizard.
Any changes you made before quitting will be saved.
You can return to cluster setup at any time by typing "cluster setup".
To accept a default or omit a question, do not enter a value.
This system will send event messages and periodic reports to NetApp Technical
Support. To disable this feature, enter
autosupport modify -support disable
within 24 hours.
Enabling AutoSupport can significantly speed problem determination and
resolution should a problem occur on your system.
For further information on AutoSupport, see:
http://support.netapp.com/autosupport/
Type yes to confirm and continue {yes}: yes
Enter the node management interface port [e0M]:
Enter the node management interface IP address: 192.168.1.206
Enter the node management interface netmask: 255.2555.255.0
the value "255.2555.255.0" is invalid for type <Host Netmask>
The user-defined subnet mask that defines the range of valid IP addresses on
the node management network.
You can type "back", "exit", or "help" at any question.
Enter the node management interface netmask: 255.255.255.0
Enter the node management interface default gateway: 192.168.1.1
A node management interface on port e0M with IP address 192.168.1.206 has been created.
Use your web browser to complete cluster setup by accessing
https://192.168.1.206
Otherwise, press Enter to complete cluster setup using the command line
interface:
This node's storage failover partner is already a member of a cluster.
Storage failover partners must be members of the same cluster.
The cluster setup wizard will default to the cluster join dialog.
Do you want to create a new cluster or join an existing cluster? {join}:
join
Existing cluster interface configuration found:
Port MTU IP Netmask
e0a 9000 169.254.195.170 255.255.0.0
e0b 9000 169.254.29.32 255.255.0.0
Do you want to use this configuration? {yes, no} [yes]: yes
Step 1 of 3: Join an Existing Cluster
You can type "back", "exit", or "help" at any question.
Enter the IP address of an interface on the private cluster network from the
cluster you want to join: 169.254.81.223
Joining cluster at address 169.254.81.223
Starting cluster support services
This node has joined the cluster fas2720-A.
Step 2 of 3: Configure Storage Failover (SFO)
You can type "back", "exit", or "help" at any question.
SFO is enabled.
Step 3 of 3: Set Up the Node
You can type "back", "exit", or "help" at any question.
This node has been joined to cluster "fas2720-A".
To complete cluster setup, you must join each additional node to the cluster
by running "system node show-discovered" and "cluster add-node" from a node in the cluster.
To complete system configuration, you can use either OnCommand System Manager
or the Data ONTAP command-line interface.
To access OnCommand System Manager, point your web browser to the cluster
management IP address (https://192.168.1.210).
To access the command-line interface, connect to the cluster management
IP address (for example, ssh admin@192.168.1.210).
Notice: HA is configured in management.
Mon Feb 13 10:51:55 UTC 2023
login: admin
Password:
******************************************************
* This is a serial console session. Output from this *
* session is mirrored on the SP console session. *
******************************************************
fas2720-A::> disk show -v
DISK OWNER POOL SERIAL NUMBER HOME DR HOME
---------- ------------ ------ ------------- ---------------- ---------------
Info: This cluster has partitioned disks. To get a complete list of spare disk
capacity use "storage aggregate show-spare-disks".
1.0.0 fas2720-A- Pool0 PEG1J1GX fas2720-A- -
02(538132295) 02(538132295)
1.0.1 fas2720-A- Pool0 PEG20Y4X fas2720-A- -
01(538132918) 01(538132918)
1.0.2 fas2720-A- Pool0 PEG1K6AX fas2720-A- -
02(538132295) 02(538132295)
1.0.3 fas2720-A- Pool0 PEG20WAX fas2720-A- -
01(538132918) 01(538132918)
1.0.4 fas2720-A- Pool0 PCKTKYZX fas2720-A- -
02(538132295) 02(538132295)
1.0.5 fas2720-A- Pool0 PEG1HHUX fas2720-A- -
01(538132918) 01(538132918)
1.0.6 fas2720-A- Pool0 PEG1T56X fas2720-A- -
02(538132295) 02(538132295)
1.0.7 fas2720-A- Pool0 PCKTRPZX fas2720-A- -
01(538132918) 01(538132918)
1.0.8 fas2720-A- Pool0 PEG0XXUX fas2720-A- -
02(538132295) 02(538132295)
DISK OWNER POOL SERIAL NUMBER HOME DR HOME
---------- ------------ ------ ------------- ---------------- ---------------
1.0.9 fas2720-A- Pool0 PCKEHNBX fas2720-A- -
01(538132918) 01(538132918)
1.0.10 fas2720-A- Pool0 PEG1V5UX fas2720-A- -
02(538132295) 02(538132295)
1.0.11 fas2720-A- Pool0 PCKTA18X fas2720-A- -
01(538132918) 01(538132918)
12 entries were displayed.
fas2720-A::> aggr show
Aggregate Size Available Used% State #Vols Nodes RAID Status
--------- -------- --------- ----- ------- ------ ---------------- ------------
aggr0_fas2720_A_01
159.9GB 7.75GB 95% online 1 fas2720-A-01 raid_dp,
normal
aggr0_fas2720_A_02
159.9GB 7.75GB 95% online 1 fas2720-A-02 raid_dp,
normal
2 entries were displayed.
初始化完成。其余更改可在web端配置
1.2.3扩展柜初始化
(1)打开扩展柜电源
(2)更改扩展柜ID
(3)关闭扩展柜
(4)控制器扩展柜连线
第2章 系统配置
2.1确认时间同步问题
查看时间信息
cluster data show
更改时区为GMT
cluster date modify -timezone GMT
2.2查看NTP
cluster time-service ntp server show
设置NTP服务器
cluster time-service ntp server create -server server_name
设置有身份认证的NTP服务器
cluster time-service ntp server create -server server_ip_address -keyid key_id
2.3配置事件邮件告警
event config modify -mail-server mailhost.your_domain -mail-from cluster_admin@your_domain
event notification destination create -name storage-admins - email your_email@your_domain
event notification create -filter-name important-events -destinations storage_admins
2.4配置syslog服务器地址,启用重要事件告警
event notification destination create -name syslog-ems -syslog syslogserver-address
event notification create -filter-name important-events -destinations syslog-ems
2.5配置snmp服务器地址
system snmp traphost add -peer-address snmp_traphost_name
第3章 存储配置
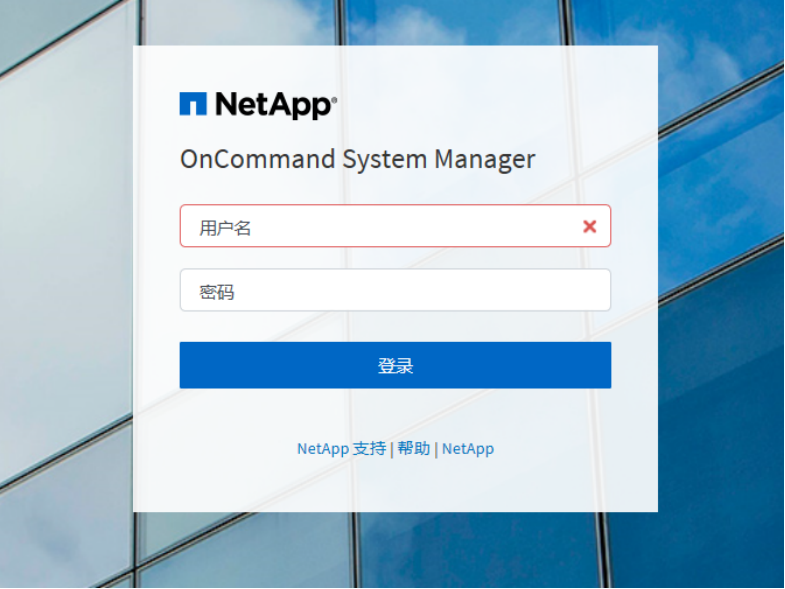
3.1登陆界面
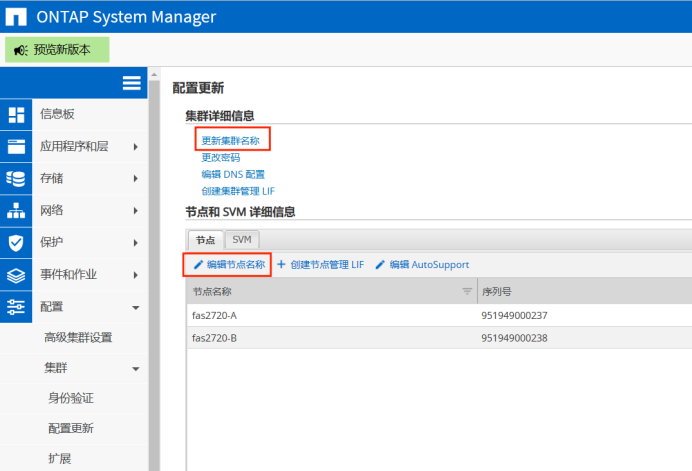
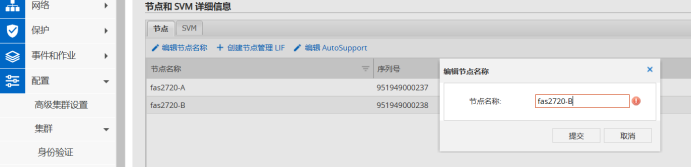
3.2更新集群和节点名称
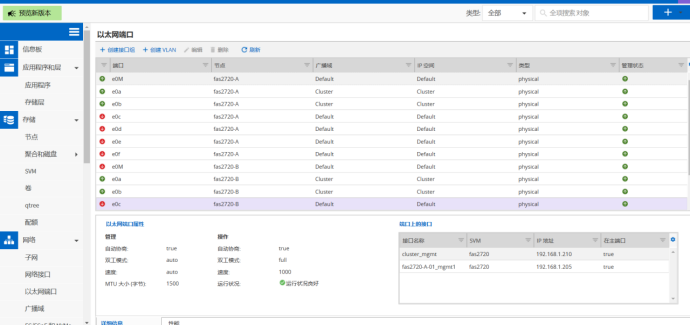
3.3网络配置

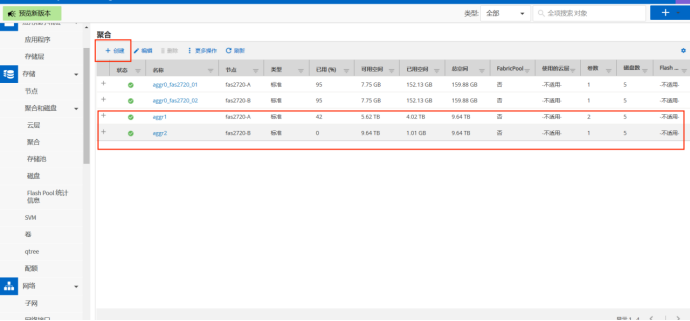
3.4创建聚合
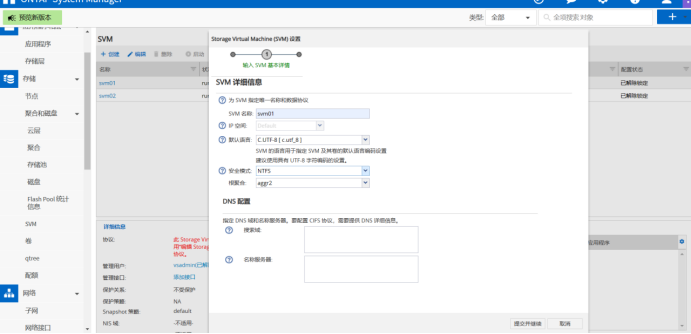
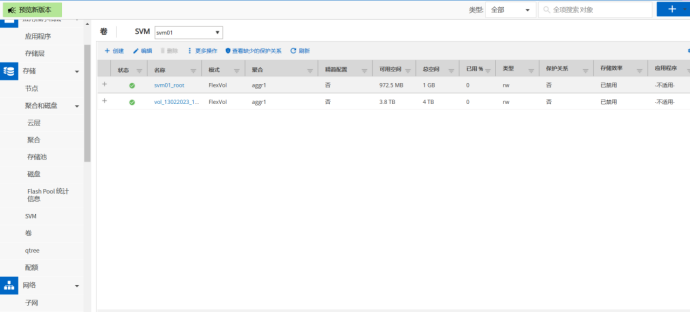
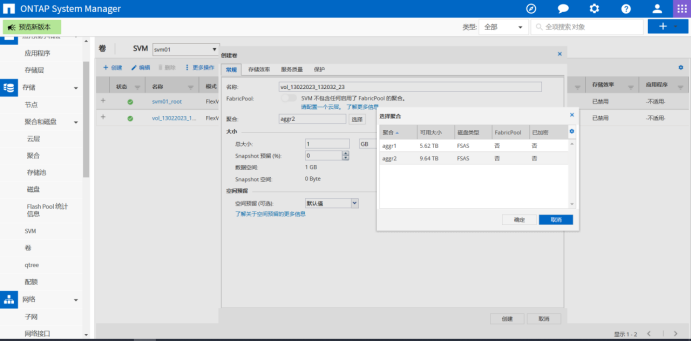
3.5创建SVM

 浙公网安备 33010602011771号