

一、环境
| 服务器名称 | 配置 | IP地址 | 备注 |
| hdp-161-141 | 8核/16G内存/300G SSD硬盘 | 10.32.161.141 | MGR/Agent |
| hdp-161-142 | 8核/16G内存/300G SSD硬盘 | 10.32.161.142 | Agent |
| hdp-161-143 | 8核/16G内存/300G SSD硬盘 | 10.32.161.143 | Agent |
二、服务器初始化
1、配置服务器之间免密登录
ssh-keygen -q -N ''
ssh-copy-id 10.32.161.141
ssh-copy-id 10.32.161.142
ssh-copy-id 10.32.161.143
#不知道root密码的情况
复制当前主机/root/.ssh/id_rsa.pub的内容到其他主机的authorized_keys文件
2、主机名配置
hostnamectl set-hostname hdp-161-141    #其他主机参照设置,注意主机名称
# vim /etc/hosts
10.32.161.141 hdp-161-141
10.32.161.142 hdp-161-142
10.32.161.143 hdp-161-143
3、优化
# vim /etc/rc.local
echo never > /sys/kernel/mm/transparent_hugepage/enabled
echo never > /sys/kernel/mm/transparent_hugepage/defrag
# vim /etc/sysctl.conf
vm.swappiness = 10
三、数据库准备
1、部署数据库
设置repo源
yum -y install http://mirrors.ustc.edu.cn/mysql-repo/mysql57-community-release-el7.rpm
----------------------------------------
安装MySQL
yum install -y mysql-community-server
----------------------------------------
配置MySQL
if [ ! "$(cat /usr/bin/mysqld_pre_systemd | grep -v ^\# | grep initialize-insecure )" ]; then
    sed -i "s@--initialize @--initialize-insecure @g" /usr/bin/mysqld_pre_systemd
fi
----------------------------------------
配置文件修改
# vim /etc/my.cnf
[client]
port = 3306
socket = /var/lib/mysql/mysql.sock
default-character-set = utf8mb4

[mysql]
prompt="MySQL [\d]> "
no-auto-rehash

[mysqld]
port = 3306
socket = /var/lib/mysql/mysql.sock

datadir = /var/lib/mysql/
pid-file = /var/run/mysqld/mysqld.pid
user = mysql
bind-address = 0.0.0.0
server-id = 1

init-connect = 'SET NAMES utf8mb4'
character-set-server = utf8mb4

skip-name-resolve
#skip-networking
back_log = 300

max_connections = 3783
max_connect_errors = 6000
open_files_limit = 65535
table_open_cache = 1024
max_allowed_packet = 500M
binlog_cache_size = 1M
max_heap_table_size = 8M
tmp_table_size = 128M

read_buffer_size = 2M
read_rnd_buffer_size = 8M
sort_buffer_size = 8M
join_buffer_size = 8M
key_buffer_size = 256M

thread_cache_size = 64

query_cache_type = 1
query_cache_size = 64M
query_cache_limit = 2M

ft_min_word_len = 4

log_bin = mysql-bin
binlog_format = row
expire_logs_days = 7

log_error = /var/log/mysqld.log
slow_query_log = 1
long_query_time = 1
slow_query_log_file = /var/lib/mysql/slow.log

performance_schema = 0
explicit_defaults_for_timestamp

lower_case_table_names = 1

skip-external-locking

default_storage_engine = InnoDB
#default-storage-engine = MyISAM
innodb_file_per_table = 1
innodb_open_files = 500
innodb_buffer_pool_size = 1024M
innodb_write_io_threads = 4
innodb_read_io_threads = 4
innodb_thread_concurrency = 0
innodb_purge_threads = 1
innodb_flush_log_at_trx_commit = 2
innodb_log_buffer_size = 2M
innodb_log_file_size = 32M
innodb_log_files_in_group = 3
innodb_max_dirty_pages_pct = 90
innodb_lock_wait_timeout = 120

bulk_insert_buffer_size = 8M
myisam_sort_buffer_size = 64M
myisam_max_sort_file_size = 10G
myisam_repair_threads = 1

interactive_timeout = 28800
wait_timeout = 28800

binlog_rows_query_log_events = 1
log_bin_trust_function_creators = 1
log_timestamps = SYSTEM

sql_mode = NO_AUTO_VALUE_ON_ZERO

[mysqldump]
quick
max_allowed_packet = 500M

[myisamchk]
key_buffer_size = 256M
sort_buffer_size = 8M
read_buffer = 4M
write_buffer = 4M
----------------------------------------
启动MySQL
systemctl enable mysqld --now
----------------------------------------
配置root密码
> update mysql.user set authentication_string=password('Demo2@22-#') where User='root';
> flush privileges;

或者可以通过自动的安全配置工具设置
# mysql_secure_installation
2、创建数据库及用户和权限
> CREATE DATABASE ambari;
> use ambari;
> source /var/lib/ambari-server/resources/Ambari-DDL-MySQL-CREATE.sql;
> GRANT ALL ON ambari.* TO 'ambari'@'10.32.161.%' IDENTIFIED BY 'Demo-123';
四、准备HDP程序
1、安装httpd
yum -y install httpd createrepo
rm -f /etc/httpd/conf.d/welcome.conf
2、修改/etc/httpd/conf/httpd.conf
vim /etc/httpd/conf/httpd.conf
ServerName localhost:80    #95行
AllowOverride All    #151行
DirectoryIndex index.html index.cgi index.php    #164行
ServerTokens Prod    #最后添加
3、启动服务
systemctl enable httpd --now
4、上传HDP压缩包至/var/www/html目录并解压
mkdir /var/www/html/{ambari,hdp,hdp-utils} -p

tar xf ambari-2.7.6.0-22-centos7_8-x86_64.tar.gz -C /var/www/html/ambari
tar xf HDP-3.3.1.0-001-centos7_8-x86_64.tar.gz -C /var/www/html/hdp
tar xf HDP-UTILS-1.1.0.22-centos7_8-x86_64.tar.gz -C /var/www/html/hdp-utils

chown -R apache.apache /var/www/html
五、安装Ambari
1、配置安装源
# vim /etc/yum.repos.d/ambari.repo
[ambari]
name=ambari
baseurl=http://10.32.161.141/ambari/2.7.6.0-22/
enabled=1
gpgcheck=0
2、安装jdk及Ambari Server
yum localinstall /usr/local/src/jdk-8u181-linux-x64.rpm -y    #所有主机都需要安装

mkdir /usr/share/java -p
cp mysql-connector-java-5.1.49.jar /usr/share/java/mysql-connector-java.jar    #所有主机

yum install -y ambari-server
3、初始化并启动服务
# 初始化
# ambari-server setup
Using python  /usr/bin/python
Setup ambari-server
Checking SELinux...
SELinux status is 'disabled'
Customize user account for ambari-server daemon [y/n] (n)? y
Enter user account for ambari-server daemon (root):
Adjusting ambari-server permissions and ownership...
Checking firewall status...
Checking JDK...
[1] Oracle JDK 1.8 + Java Cryptography Extension (JCE) Policy Files 8
[2] Custom JDK
==============================================================================
Enter choice (1): 2
WARNING: JDK must be installed on all hosts and JAVA_HOME must be valid on all hosts.
WARNING: JCE Policy files are required for configuring Kerberos security. If you plan to use Kerberos,please make sure JCE Unlimited Strength Jurisdiction Policy Files are valid on all hosts.
Path to JAVA_HOME: /usr/java/jdk1.8.0_181-amd64
Validating JDK on Ambari Server...done.
Check JDK version for Ambari Server...
JDK version found: 8
Minimum JDK version is 8 for Ambari. Skipping to setup different JDK for Ambari Server.
Checking GPL software agreement...
GPL License for LZO: https://www.gnu.org/licenses/old-licenses/gpl-2.0.en.html
Enable Ambari Server to download and install GPL Licensed LZO packages [y/n] (n)?
Completing setup...
Configuring database...
Enter advanced database configuration [y/n] (n)? y
Configuring database...
==============================================================================
Choose one of the following options:
[1] - PostgreSQL (Embedded)
[2] - Oracle
[3] - MySQL / MariaDB
[4] - PostgreSQL
[5] - Microsoft SQL Server (Tech Preview)
[6] - SQL Anywhere
[7] - BDB
==============================================================================
Enter choice (1): 3
Hostname (localhost): 10.32.161.141
Port (3306):
Database name (ambari):
Username (ambari):
Enter Database Password (bigdata):
Re-enter password:
Configuring ambari database...
Should ambari use existing default jdbc /usr/share/java/mysql-connector-java.jar [y/n] (y)?
Configuring remote database connection properties...
WARNING: Before starting Ambari Server, you must run the following DDL directly from the database shell to create the schema: /var/lib/ambari-server/resources/Ambari-DDL-MySQL-CREATE.sql
Proceed with configuring remote database connection properties [y/n] (y)?
Extracting system views...
.ambari-admin-2.7.6.0.0.jar
.
Ambari repo file doesn't contain latest json url, skipping repoinfos modification
Adjusting ambari-server permissions and ownership...
Ambari Server 'setup' completed successfully.

# 启动
# ambari-server start
Using python  /usr/bin/python
Starting ambari-server
Ambari Server running with administrator privileges.
Organizing resource files at /var/lib/ambari-server/resources...
Ambari database consistency check started...
Server PID at: /var/run/ambari-server/ambari-server.pid
Server out at: /var/log/ambari-server/ambari-server.out
Server log at: /var/log/ambari-server/ambari-server.log
Waiting for server start.....................................................
Server started listening on 8080

DB configs consistency check: no errors and warnings were found.
Ambari Server 'start' completed successfully.
六、服务集群部署
1、控制台
http://10.32.161.141:8080/
默认账号:admin
默认密码:admin
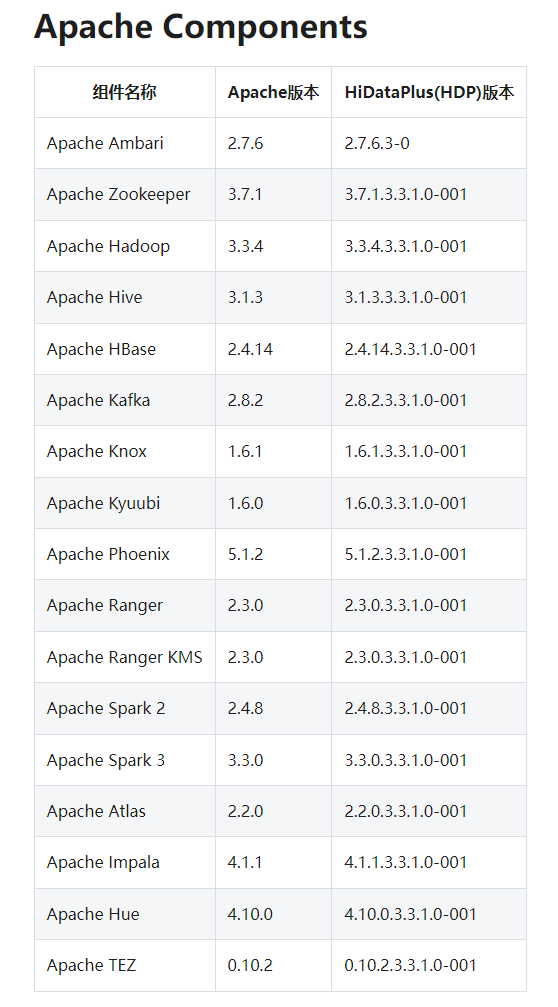
2、组件版本情况
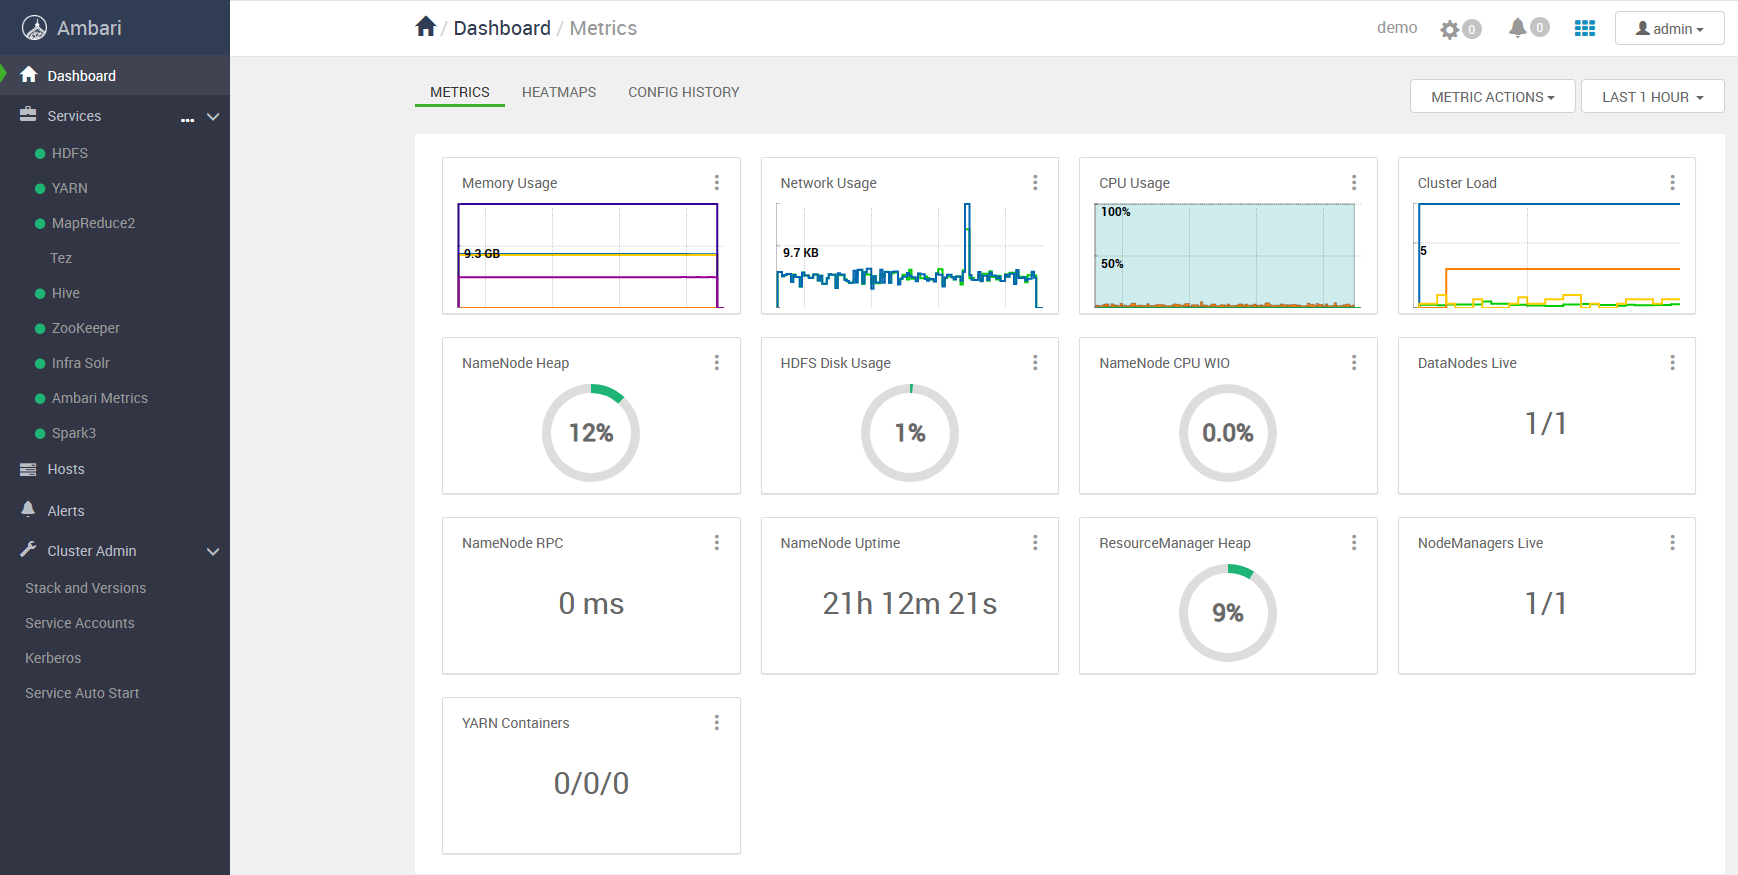
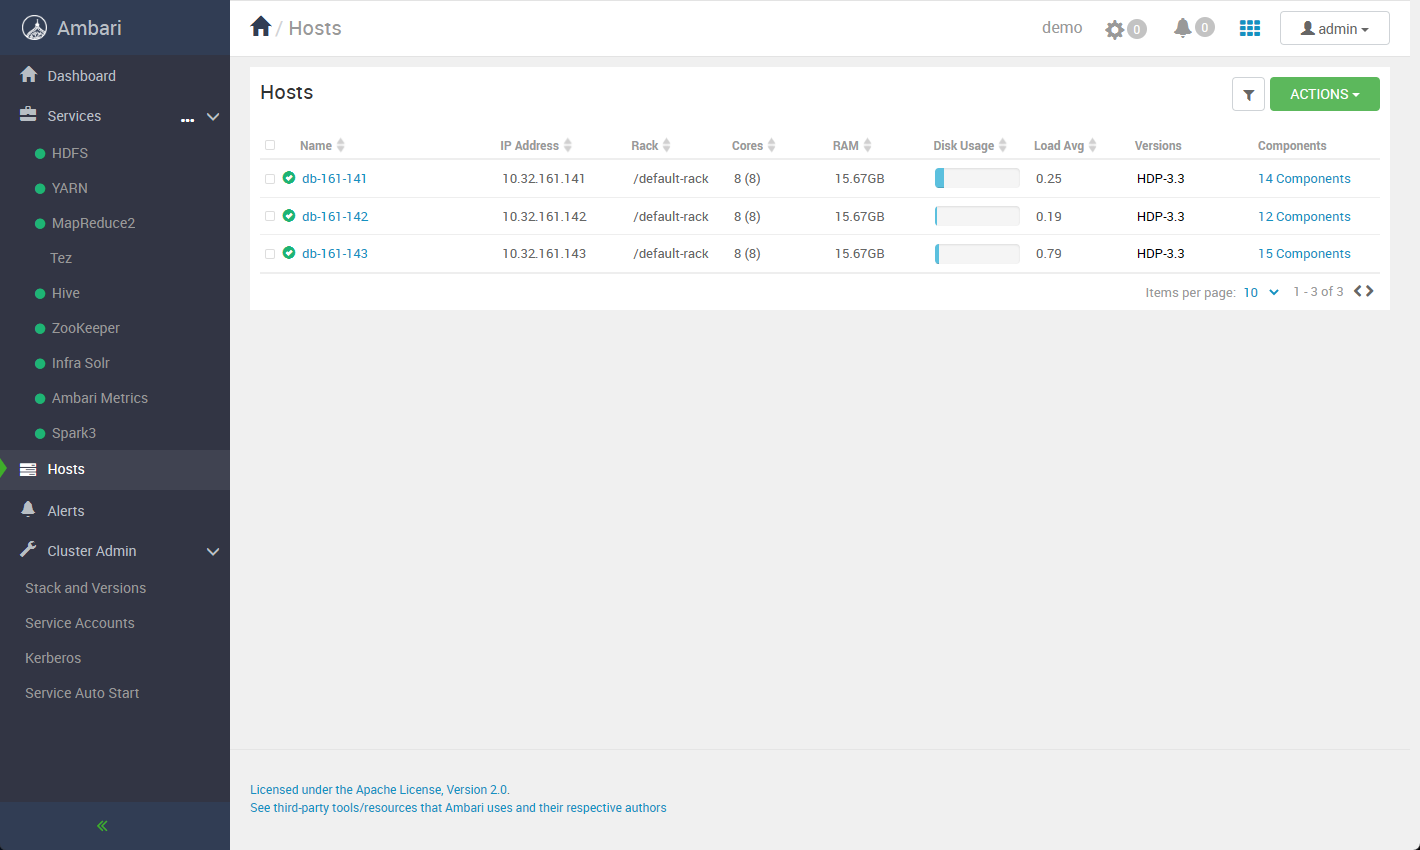
3、部署完成后的集群
参考:
http://hdp.link/documentation/
https://mp.weixin.qq.com/s/KrhgKnbca1IuSR65UcbCzQ
