tomcat 的Connector 有三种模式:bio,nio.apr;下面来说一下他们各自的特性:
Java BIO、NIO、AIO
同步 : 自己亲自出马持银行卡到银行取钱(使用同步IO时,Java自己处理IO读写)。
异步 : 委托一小弟拿银行卡到银行取钱,然后给你(使用异步IO时,Java将IO读写委托给OS处理,需要将数据缓冲区地址和大小传给OS(银行卡和密码),OS需要支持异步IO操作API)。
阻塞 : ATM排队取款,你只能等待(使用阻塞IO时,Java调用会一直阻塞到读写完成才返回)。
非阻塞 : 柜台取款,取个号,然后坐在椅子上做其它事,等号广播会通知你办理,没到号你就不能去,你可以不断问大堂经理排到了没有,大堂经理如果说还没到你就不能去(使用非阻塞IO时,如果不能读写Java调用会马上返回,当IO事件分发器会通知可读写时再继续进行读写,不断循环直到读写完成)。
Java对BIO、NIO、AIO的支持:
Java BIO : 同步并阻塞,服务器实现模式为一个连接一个线程,即客户端有连接请求时服务器端就需要启动一个线程进行处理,如果这个连接不做任何事情会造成不必要的线程开销,当然可以通过线程池机制改善。
Java NIO : 同步非阻塞,服务器实现模式为一个请求一个线程,即客户端发送的连接请求都会注册到多路复用器上,多路复用器轮询到连接有I/O请求时才启动一个线程进行处理。
Java AIO(NIO.2) : 异步非阻塞,服务器实现模式为一个有效请求一个线程,客户端的I/O请求都是由OS先完成了再通知服务器应用去启动线程进行处理
BIO、NIO、AIO适用场景分析:
BIO方式适用于连接数目比较小且固定的架构,这种方式对服务器资源要求比较高,并发局限于应用中,JDK1.4以前的唯一选择,但程序直观简单易理解。
NIO方式适用于连接数目多且连接比较短(轻操作)的架构,比如聊天服务器,并发局限于应用中,编程比较复杂,JDK1.4开始支持。
AIO方式使用于连接数目多且连接比较长(重操作)的架构,比如相册服务器,充分调用OS参与并发操作,编程比较复杂,JDK7开始支持。
好,下面来看看tomcat 的 bio、nio、apr 模式
bio
bio(blocking I/O),顾名思义,即阻塞式I/O操作,表示Tomcat使用的是传统的Java I/O操作(即java.io包及其子包)。Tomcat在默认情况下,就是以bio模式运行的。遗憾的是,就一般而言,bio模式是三种运行模式中性能最低的一种。我们可以通过Tomcat Manager来查看服务器的当前状态。
nio
是Java SE 1.4及后续版本提供的一种新的I/O操作方式(即java.nio包及其子包)。Java nio是一个基于缓冲区、并能提供非阻塞I/O操作的Java
API,因此nio也被看成是non-blocking I/O的缩写。它拥有比传统I/O操作(bio)更好的并发运行性能。
apr
(Apache Portable Runtime/Apache可移植运行库),是Apache HTTP服务器的支持库。你可以简单地理解为,Tomcat将以JNI的形式调用Apache HTTP服务器的核心动态链接库来处理文件读取或网络传输操作,从而大大地提高Tomcat对静态文件的处理性能。 Tomcat apr也是在Tomcat上运行高并发应用的首选模式。
在这之前,我们先把tomcat管理界面配置起来,以便等下能更方便的观察我们的bio、nio、apr 模式
添加manager/status用户
<code class="hljs lasso has-numbering" style="display: block; padding: 0px; color: inherit; box-sizing: border-box; font-family: 'Source Code Pro', monospace;font-size:undefined; white-space: pre; border-radius: 0px; word-wrap: normal; background: transparent;">vim /usr/<span class="hljs-built_in" style="color: rgb(102, 0, 102); box-sizing: border-box;">local</span>/apache<span class="hljs-attribute" style="box-sizing: border-box;">-tomcat</span><span class="hljs-subst" style="color: rgb(0, 0, 0); box-sizing: border-box;">-</span><span class="hljs-number" style="color: rgb(0, 102, 102); box-sizing: border-box;">7.0</span><span class="hljs-number" style="color: rgb(0, 102, 102); box-sizing: border-box;">.47</span>/conf/tomcat<span class="hljs-attribute" style="box-sizing: border-box;">-users</span><span class="hljs-built_in" style="color: rgb(102, 0, 102); box-sizing: border-box;">.</span><span class="hljs-built_in" style="color: rgb(102, 0, 102); box-sizing: border-box;">xml</span> <span class="hljs-subst" style="color: rgb(0, 0, 0); box-sizing: border-box;"><</span>role rolename<span class="hljs-subst" style="color: rgb(0, 0, 0); box-sizing: border-box;">=</span><span class="hljs-string" style="color: rgb(0, 136, 0); box-sizing: border-box;">"manager-gui"</span><span class="hljs-subst" style="color: rgb(0, 0, 0); box-sizing: border-box;">/</span><span class="hljs-subst" style="color: rgb(0, 0, 0); box-sizing: border-box;">></span> <span class="hljs-subst" style="color: rgb(0, 0, 0); box-sizing: border-box;"><</span>user username<span class="hljs-subst" style="color: rgb(0, 0, 0); box-sizing: border-box;">=</span><span class="hljs-string" style="color: rgb(0, 136, 0); box-sizing: border-box;">"tomcat"</span> password<span class="hljs-subst" style="color: rgb(0, 0, 0); box-sizing: border-box;">=</span><span class="hljs-string" style="color: rgb(0, 136, 0); box-sizing: border-box;">"15715746746"</span> roles<span class="hljs-subst" style="color: rgb(0, 0, 0); box-sizing: border-box;">=</span><span class="hljs-string" style="color: rgb(0, 136, 0); box-sizing: border-box;">"manager-gui"</span><span class="hljs-subst" style="color: rgb(0, 0, 0); box-sizing: border-box;">/</span><span class="hljs-subst" style="color: rgb(0, 0, 0); box-sizing: border-box;">></span></code><ul class="pre-numbering" style="box-sizing: border-box; position: absolute; width: 50px; top: 0px; left: 0px; margin: 0px; padding: 6px 0px 40px; border-right-width: 1px; border-right-style: solid; border-right-color: rgb(221, 221, 221); list-style: none; text-align: right; background-color: rgb(238, 238, 238);"><li style="box-sizing: border-box; padding: 0px 5px;">1</li><li style="box-sizing: border-box; padding: 0px 5px;">2</li><li style="box-sizing: border-box; padding: 0px 5px;">3</li></ul><ul class="pre-numbering" style="box-sizing: border-box; position: absolute; width: 50px; top: 0px; left: 0px; margin: 0px; padding: 6px 0px 40px; border-right-width: 1px; border-right-style: solid; border-right-color: rgb(221, 221, 221); list-style: none; text-align: right; background-color: rgb(238, 238, 238);"><li style="box-sizing: border-box; padding: 0px 5px;">1</li><li style="box-sizing: border-box; padding: 0px 5px;">2</li><li style="box-sizing: border-box; padding: 0px 5px;">3</li></ul>
配置完重启,通过ip:port/manager/status 就可以看tomcat状态了,里面有服务器的信息及tomcat信息。
bio server.xml 配置 (重启生效)
<code class="hljs xml has-numbering" style="display: block; padding: 0px; color: inherit; box-sizing: border-box; font-family: 'Source Code Pro', monospace;font-size:undefined; white-space: pre; border-radius: 0px; word-wrap: normal; background: transparent;"> <span class="hljs-tag" style="color: rgb(0, 102, 102); box-sizing: border-box;"><<span class="hljs-title" style="box-sizing: border-box; color: rgb(0, 0, 136);">Connector</span> <span class="hljs-attribute" style="box-sizing: border-box; color: rgb(102, 0, 102);">port</span>=<span class="hljs-value" style="box-sizing: border-box; color: rgb(0, 136, 0);">"8080"</span> <span class="hljs-attribute" style="box-sizing: border-box; color: rgb(102, 0, 102);">protocol</span>=<span class="hljs-value" style="box-sizing: border-box; color: rgb(0, 136, 0);">"HTTP/1.1"</span> <span class="hljs-attribute" style="box-sizing: border-box; color: rgb(102, 0, 102);">connectionTimeout</span>=<span class="hljs-value" style="box-sizing: border-box; color: rgb(0, 136, 0);">"20000"</span> <span class="hljs-attribute" style="box-sizing: border-box; color: rgb(102, 0, 102);">redirectPort</span>=<span class="hljs-value" style="box-sizing: border-box; color: rgb(0, 136, 0);">"8443"</span> /></span></code><ul class="pre-numbering" style="box-sizing: border-box; position: absolute; width: 50px; top: 0px; left: 0px; margin: 0px; padding: 6px 0px 40px; border-right-width: 1px; border-right-style: solid; border-right-color: rgb(221, 221, 221); list-style: none; text-align: right; background-color: rgb(238, 238, 238);"><li style="box-sizing: border-box; padding: 0px 5px;">1</li><li style="box-sizing: border-box; padding: 0px 5px;">2</li><li style="box-sizing: border-box; padding: 0px 5px;">3</li></ul><ul class="pre-numbering" style="box-sizing: border-box; position: absolute; width: 50px; top: 0px; left: 0px; margin: 0px; padding: 6px 0px 40px; border-right-width: 1px; border-right-style: solid; border-right-color: rgb(221, 221, 221); list-style: none; text-align: right; background-color: rgb(238, 238, 238);"><li style="box-sizing: border-box; padding: 0px 5px;">1</li><li style="box-sizing: border-box; padding: 0px 5px;">2</li><li style="box-sizing: border-box; padding: 0px 5px;">3</li></ul>
nio server.xml 配置 (重启生效)
<code class="hljs xml has-numbering" style="display: block; padding: 0px; color: inherit; box-sizing: border-box; font-family: 'Source Code Pro', monospace;font-size:undefined; white-space: pre; border-radius: 0px; word-wrap: normal; background: transparent;"> <span class="hljs-tag" style="color: rgb(0, 102, 102); box-sizing: border-box;"><<span class="hljs-title" style="box-sizing: border-box; color: rgb(0, 0, 136);">Connector</span> <span class="hljs-attribute" style="box-sizing: border-box; color: rgb(102, 0, 102);">port</span>=<span class="hljs-value" style="box-sizing: border-box; color: rgb(0, 136, 0);">"8080"</span> <span class="hljs-attribute" style="box-sizing: border-box; color: rgb(102, 0, 102);">protocol</span>=<span class="hljs-value" style="box-sizing: border-box; color: rgb(0, 136, 0);">"org.apache.coyote.http11.Http11NioProtocol"</span> <span class="hljs-attribute" style="box-sizing: border-box; color: rgb(102, 0, 102);">connectionTimeout</span>=<span class="hljs-value" style="box-sizing: border-box; color: rgb(0, 136, 0);">"20000"</span> <span class="hljs-attribute" style="box-sizing: border-box; color: rgb(102, 0, 102);">redirectPort</span>=<span class="hljs-value" style="box-sizing: border-box; color: rgb(0, 136, 0);">"8443"</span> /></span></code><ul class="pre-numbering" style="box-sizing: border-box; position: absolute; width: 50px; top: 0px; left: 0px; margin: 0px; padding: 6px 0px 40px; border-right-width: 1px; border-right-style: solid; border-right-color: rgb(221, 221, 221); list-style: none; text-align: right; background-color: rgb(238, 238, 238);"><li style="box-sizing: border-box; padding: 0px 5px;">1</li><li style="box-sizing: border-box; padding: 0px 5px;">2</li><li style="box-sizing: border-box; padding: 0px 5px;">3</li></ul><ul class="pre-numbering" style="box-sizing: border-box; position: absolute; width: 50px; top: 0px; left: 0px; margin: 0px; padding: 6px 0px 40px; border-right-width: 1px; border-right-style: solid; border-right-color: rgb(221, 221, 221); list-style: none; text-align: right; background-color: rgb(238, 238, 238);"><li style="box-sizing: border-box; padding: 0px 5px;">1</li><li style="box-sizing: border-box; padding: 0px 5px;">2</li><li style="box-sizing: border-box; padding: 0px 5px;">3</li></ul>
apr server.xml 配置 (重启生效)
<code class="hljs xml has-numbering" style="display: block; padding: 0px; color: inherit; box-sizing: border-box; font-family: 'Source Code Pro', monospace;font-size:undefined; white-space: pre; border-radius: 0px; word-wrap: normal; background: transparent;"> <span class="hljs-tag" style="color: rgb(0, 102, 102); box-sizing: border-box;"><<span class="hljs-title" style="box-sizing: border-box; color: rgb(0, 0, 136);">Connector</span> <span class="hljs-attribute" style="box-sizing: border-box; color: rgb(102, 0, 102);">port</span>=<span class="hljs-value" style="box-sizing: border-box; color: rgb(0, 136, 0);">"8080"</span> <span class="hljs-attribute" style="box-sizing: border-box; color: rgb(102, 0, 102);">protocol</span>=<span class="hljs-value" style="box-sizing: border-box; color: rgb(0, 136, 0);">"org.apache.coyote.http11.Http11AprProtocol"</span> <span class="hljs-attribute" style="box-sizing: border-box; color: rgb(102, 0, 102);">connectionTimeout</span>=<span class="hljs-value" style="box-sizing: border-box; color: rgb(0, 136, 0);">"20000"</span> <span class="hljs-attribute" style="box-sizing: border-box; color: rgb(102, 0, 102);">redirectPort</span>=<span class="hljs-value" style="box-sizing: border-box; color: rgb(0, 136, 0);">"8443"</span> /></span></code><code class="hljs xml has-numbering" style="display: block; padding: 0px; color: inherit; box-sizing: border-box; font-family: 'Source Code Pro', monospace;font-size:undefined; white-space: pre; border-radius: 0px; word-wrap: normal; background: transparent;"> </code>
-
<span style="color: rgb(51, 51, 51); line-height: 17.4px; white-space: nowrap; background-color: rgb(240, 240, 240);">tomcat 支持apr步骤</span>
-
1.下载相关的工具包
-
-
wget http://mirrors.aliyun.com/apache/apr/apr-1.5.2.tar.gz
-
-
wget http://mirrors.aliyun.com/apache/apr/apr-util-1.5.4.tar.gz
-
-
tomcat的bin目录下的tomcat-native.tar.gz文件复制到
-
/usr/local/apr
-
-
2. 安装
-
-
#tar zxvf apr-1.5.2.tar.gz
-
#cd apr-1.5.2
-
#./configure --prefix=/usr/local/apr ;make;make install
-
-
#tar zxvf apr-util-1.5.4.tar.gz
-
#cd apr-util-1.5.4
-
#./configure --prefix=/usr/local/apr/apr-util --with-apr=/usr/local/apr;make;make install
-
-
tar zxvf tomcat-native-1.1.20-src.tar.gz
-
cd tomcat-native-1.1.20-src/jni/native
-
./configure --with-apr=/usr/local/apr;make;make install
-
-
-
3设置 Tomcat 整合 APR
-
修改 tomcat 的启动 shell (startup.sh),在该文件中加入启动参数:
-
CATALINA_OPTS="$CATALINA_OPTS -Djava.library.path=/usr/local/apr/lib" 。
-
-
4判断安装成功:
-
如果看到下面的启动日志,表示成功。
-
2016 11:11:41 上午 org.apache.coyote.AbstractProtocol start Starting ProtocolHandler ["http-apr-8280"]
-
-
-
ps : apr安装目录为啥是/usr/local/apr,我最早安装在 /opt/apr 目录下,我们生产环境java相关的都在这个目录,但最后安装tomcat-native时,<span style="font-family: Arial, Helvetica, sans-serif;">他将所有的jar都安装到了/usr/local/apr/lib 目录下,为了前后目录的统一,最后都安装在/usr/local/apr目录下</span>
到这里大致的配置就结束了,建议在做实验之前,先了解清楚java的 bio 、nio 、aio特性,在web服务器上阻塞IO(BIO)与NIO一个比较重要的不同是,客户系统使用BIO的时候往往会为每一个web请求引入多线程,每个web请求一个单独的线程,所以并发量一旦上去了,线程数就上去了,CPU就忙着线程切换,所以BIO不合适高吞吐量、高可伸缩的web服务器;而NIO则是使用单线程(单个CPU)或者只使用少量的多线程(多CPU)来接受Socket,而由线程池来处理堵塞在pipe或者队列里的请求.这样的话,只要OS可以接受TCP的连接,web服务器就可以处理该请求。大大提高了web服务器的可伸缩性。
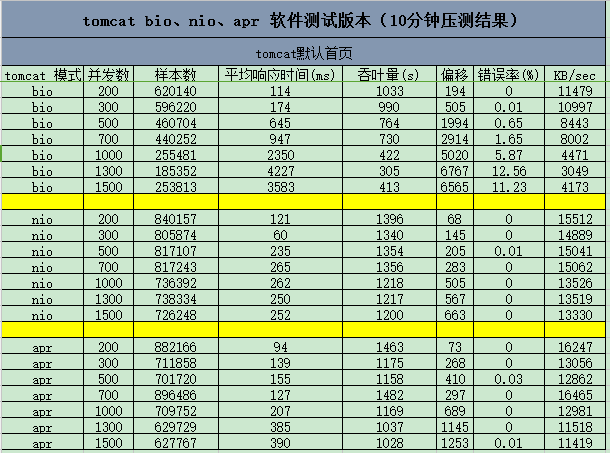
下面是我自己的一些性能测试表格,通过jmeter压测软件(jmeter软件使用自行百度)在本地测试的(为了数据的有效以及准确性,我没测试10分钟,也就是进行一次测试,都会重启Linux主机及重新打开jmeter软件。),当然你也可以选择通过
云主机、自己机房的服务器以及虚拟机等测试,测试当中会涉及到很多点,例如(磁盘io、带宽、内存、cpu、以及内核配置中的tcp各种状态,甚至是各种打开文件限制,都会影响到我们的测试结果)

可以看到,随着线程的不断增多,bio 模式性能越来越差,就算是在本地,错误率和响应时间都在明显的增加、而吞吐量、样本数和每秒传输速率都在下降(当然,如果是生产环境,我们肯定通过nginx web 软件进行反向代理,提供多个tomcat 节点来提供更稳定的服务。)
而 bio 和 apr模式基本上没有变化太多,都保持在一个稳定的状态。
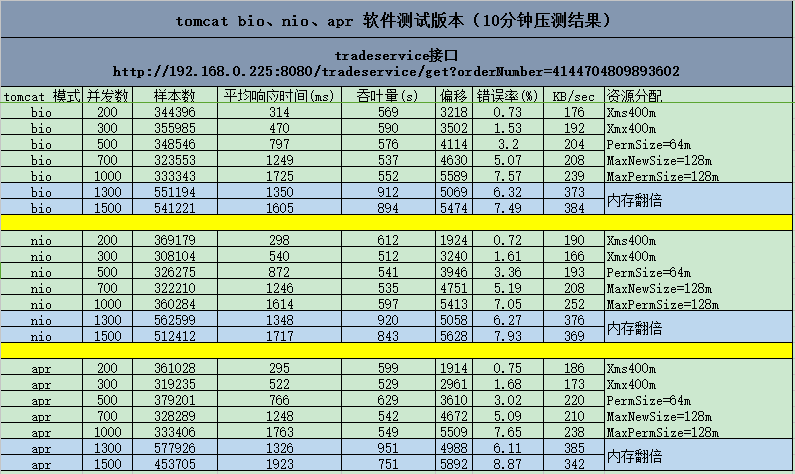
而后来当我进行一些 service 后端程序的测试时,发现 tomcat 性能并没有大幅度的提升,甚至会有下降的趋势。(该接口不是在同网段测试,而是跨越路由器,在网络传输中会有损耗方面,性能跟本地测试也会有所差异)

总结:
个人觉得在 tomcat bio、nio、apr 模式中,每种都会有各自适用的场合,apr其实也是nio只不过他是操作系统级别的支持,nio是由java本身的nio支持的,也不能说哪个好那个不好。就像
tomcat 内存方面的配置,如果内存设置的过大,gc 垃圾回收机制就会变慢;如果内存设置的过小,tomcat又会出现内存溢出的情况,所以设置在一个合适的范围很重要,不仅不会出错,并且gc回收频繁使性能达到一个最优的结果。当然,这也需要根据不同的场合进行不同的测试才能产生最优的结果!
转自 http://blog.csdn.net/hxyerui/article/details/52448387


