我应该是最后一个知道 WSL 的吧!
前言
前段时间,我买了块固态硬盘给我的笔记本电脑装上(因为它太慢了,影响我游戏学习)。同时也重装了系统,以前一直在用 Win8.1,在上面构建了我的开发环境:在 Win8.1 上安装了 VMvare,在 VMware 上安装了 Centos,在 Centos 上安装了 Docker,然后在 Win8.1 上通过 Xshell 来连接虚拟机 Centos 控制 Docker 进行开发学习。

这次安装的是 Win10,真香,win10 支持了 WSL,直接可以在 Win10 上安装 Docker、Linux系统等,因此重新搭建了我的开发环境,首先把 Git 配置好。
什么是 WSL
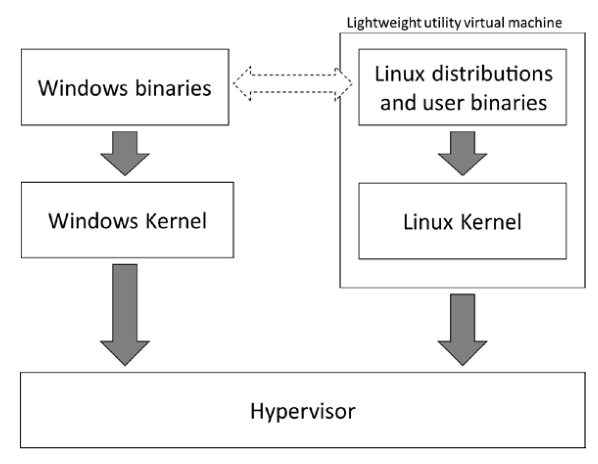
WSL 是 Windows Subsystem for Linux 的缩写,意思是 linux 版的 window 子系统。
引用自:微软官网 https://docs.microsoft.com/zh-cn/windows/wsl/about
The Windows Subsystem for Linux lets developers run a GNU/Linux environment -- including most command-line tools, utilities, and applications -- directly on Windows, unmodified, without the overhead of a virtual machine.
You can:
- Choose your favorite GNU/Linux distributions from the Microsoft Store.
- Run common command-line tools such as grep, sed, awk, or other ELF-64 binaries.
- Run Bash shell scripts and GNU/Linux command-line applications including:
- Install additional software using own GNU/Linux distribution package manager.
- Invoke Windows applications using a Unix-like command-line shell.
- Invoke GNU/Linux applications on Windows.
简单的说就是,Linux 的 Windows 子系统让开发人员无需虚拟机就可以直接在 Windows 上运行 Linux 环境,包括大多数命令行工具、程序和应用。
使用 WSL 的好处是:
- 与在虚拟机下使用 Linux 相比,WSL 占用资源更少,更加流畅;
- WSL 可以对 Windows 文件系统下的文件直接进行读写,文件传输更方便;
- 剪贴板互通,可以直接在 Windows 下其它地方复制文本内容,粘贴到 WSL;

WSL 安装 Ubuntu
-
通过
Microsoft Store下载,自动安装

-
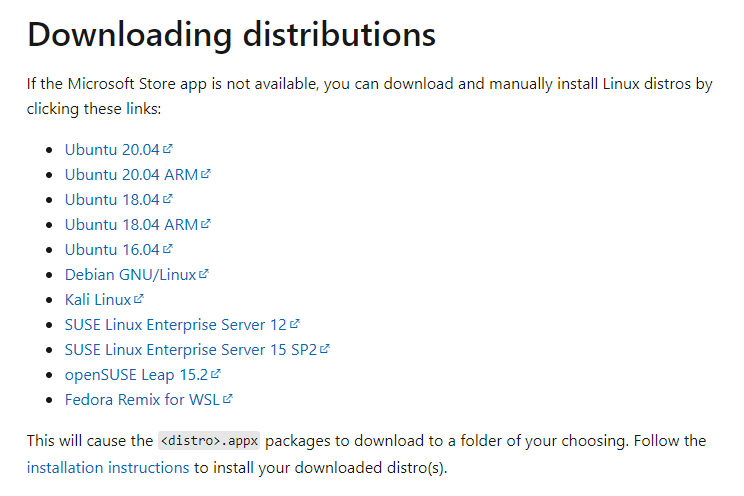
自己去官网下载,防止 C 盘容量太大
去官网

下载后复制到D盘,将后缀名改成.zip,然后解压,执行里面的exe文件,进行安装
安装后在powershell或者windows terminal(Microsoft Store上的另一个宝藏应用,直接去搜扫安装就行了)
执行命令wsl -l -v 列出所有子系统
PS C:\Users\Administrator> wsl -l -v
  NAME                   STATE           VERSION
* Ubuntu-20.04           Running         2
  docker-desktop         Stopped         2
  docker-desktop-data    Stopped         2
执行命令wslconfig /setdefault Ubuntu-20.04将Ubunru-20.04设为默认子系统
PS C:\Users\Administrator> wslconfig /setdefault Ubuntu-20.04
执行命令wsl进入子系统
PS C:\Users\Administrator> wsl
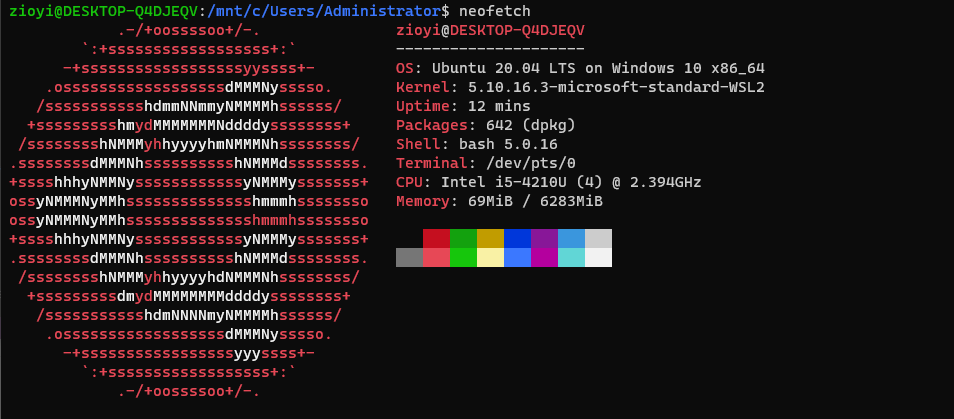
zioyi@DESKTOP-Q4DJEQV:/mnt/c/Users/Administrator$ neofetch

配置 zsh
查看一下
zioyi@DESKTOP-Q4DJEQV:/mnt/c/Users/Administrator$ cat /etc/shells
# /etc/shells: valid login shells
/bin/sh
/bin/bash
/usr/bin/bash
/bin/rbash
/usr/bin/rbash
/bin/dash
/usr/bin/dash
/usr/bin/tmux
/usr/bin/screen
安装 zsh
zioyi@DESKTOP-Q4DJEQV:/mnt/c/Users/Administrator$ sudo apt-get install zsh
zioyi@DESKTOP-Q4DJEQV:/mnt/c/Users/Administrator$ cat /etc/shells
# /etc/shells: valid login shells
/bin/sh
/bin/bash
/usr/bin/bash
/bin/rbash
/usr/bin/rbash
/bin/dash
/usr/bin/dash
/usr/bin/tmux
/usr/bin/screen
/bin/zsh
/usr/bin/zsh
将 zsh 设为默认 shell
zioyi@DESKTOP-Q4DJEQV:/mnt/c/Users/Administrator$ sudo chsh -s /bin/zsh
推出再重新进入
zioyi@DESKTOP-Q4DJEQV:/mnt/c/Users/Administrator$ exit
logout
PS C:\Users\Administrator> wsl
➜  Administrator neofetch
配置 Git
- 安装 git
➜ Administrator sudo apt-get install git
- 配置你的用户名
➜ Administrator git config --global user.name xxx
- 配置你的邮箱地址
➜ Administrator git config --global user.email xxx@xxx.com
- 生产SSH密钥
➜  Administrator ssh-keygen -t rsa -C "xxx@xxx.com"
➜  Administrator cat ~/.ssh/id_rsa.pub
ssh-rsa AAAAB3NzaC12sKF6l8CKsYjrWCruS3fqPhSHExo6pcvzCRUYMotqY7KJvhIG45xGALedXn8ow8+jBfC6r9CpO6mzCpf18WsGf7omBvoQJa3rQeuO1KvZ7Ctd/EH+jJndLoFisH76vY4gm2OR0UU= xxx@xxx.com
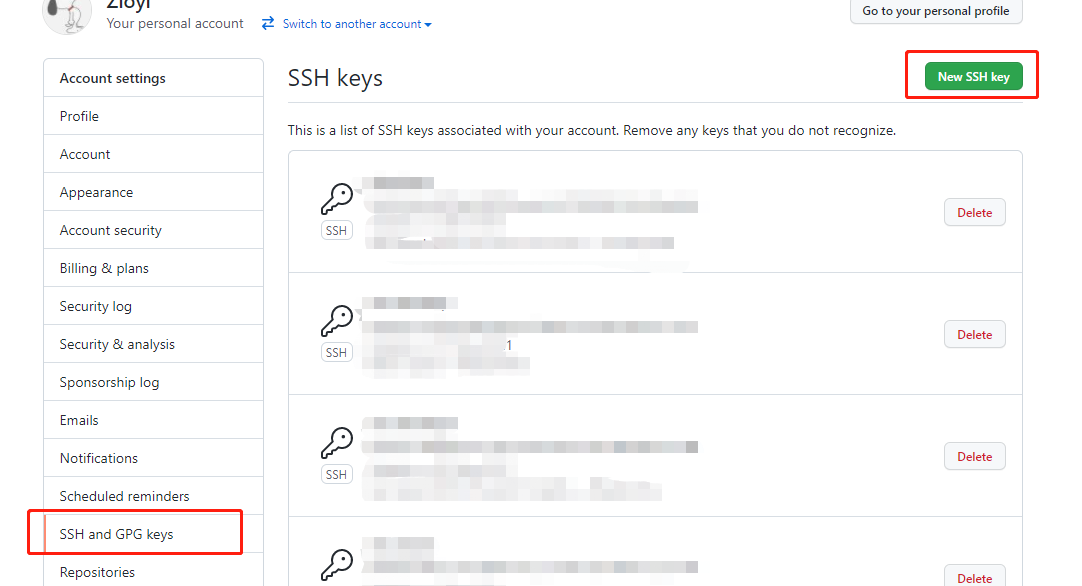
- 复制公钥的内容并且打开你的 github 设置界面,找到 SSHkey 设置,点击右上角的New SSH key

6.测试
➜  Administrator ssh git@github.com
PTY allocation request failed on channel 0
Hi Zioyi! You've successfully authenticated, but GitHub does not provide shell access.
Connection to github.com closed.
总结
本篇对 WSL 进行了简单介绍,尝试基于 WSL 安装了 Ubuntu 系统,并在系统中安装 zsh 和 git 工具,打造新时代的 Windows 开发环境。
相比于原来 Win8 的开发环境,这套真的好很多,在便捷性、资源使用、性能上都有很大的提升。

