

黑马瑞吉外卖
前言
- 今天开始做一个黑马的瑞吉外卖项目🚀
- 本博客用来记录项目中遇到的问题与bug,以及项目中的难点与亮点技术😎
- 通过编写此博客进行每日的项目复盘💕
- 感兴趣的小伙伴可以和我交流一起沟通技术😊
- 我将会连日更新,直至项目做完😒
- 前端技术H5、VUE、Element UI、
- 项目技术大概Spring、SpringBoot、MyBatis-Plus、lombok、MySQL、
- 后续优化Redis、项目前后端分离Swagger、Nginx
一、静态资源映射
- 由于项目中没有在resources目录下 创建static和templates文件,所以需要配置资源映射。
二、MyBatis-Plus相关技术
@Slf4j可以直接使用日志输出log.info()@RestController是@Controller和@ResponseBody的组合
- 记录MyBatis-Plus基本操作
三、后台登陆与退出
3.1 登录
- 设计了一个通用类,用于返回结果。
- 使用了
DigestUtils.md5DigestAsHex()对密码进行了md5加密,转为16进制,提高安全性
- 采用了MyBatis-Plus的用法
- 将员工信息存入session中,方便取信息,也为后续退出功能优化做铺垫
3.2 退出
- 退出设计的很简单,直接清楚session就ok了
3.3 完善登录功能
- 这里使用的是Servlet的过滤器,有@WebFilter注解,需要在启动类加入@ServletComponentScan注解扫描。
四、员工新增与分页
4.1 员工新增
- 员工新增就是简单的crud,但是用到了字段自动填充,这样就不用我们自己去写重复的代码了,也是说MyBatis-Plus真香😂
- 但是我们还需要自定义一下元数据对象处理器
-
在员工新增的时候,可能会出现名字重复的情况,

-
所以在这里创建了一个全局异常处理器
-
加入通知注解@ControllerAdvice(annotations={RestController.class,Controller.class})
4.2 员工分页查询
- 分页用了MyBatis-Plus的分页插件
4.3 优化
- 由于无法在自定义元数据处理器中,获取session对象,所以我们拿不到想要的数据。
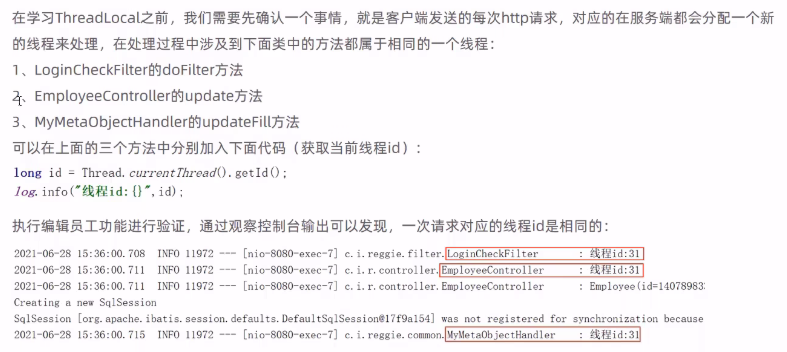
- 但是对于这些通用的类,他们都共用同一个线程,所以我们可以将数据放入当前线程中传过去。
- 设计非常巧妙,思想值得学习!😶🌫️
- 但是Long型id过长,传到前端是json形式的字符串,会存在精度丢失问题。
五、分类功能
- 分类的删除功能由于在一个分类中可能和菜品与套餐有着关联的关系,可能会导致我们无法删除。(外键?)
- 所以就通过关联的共同值id进行查询,如果有关联,则无法删除
- 同时根据他们抛出的异常,自定义了异常类
- 又将异常放入到了全局异常处理器当中
六、文件的上传与下载
6.1 文件的上传
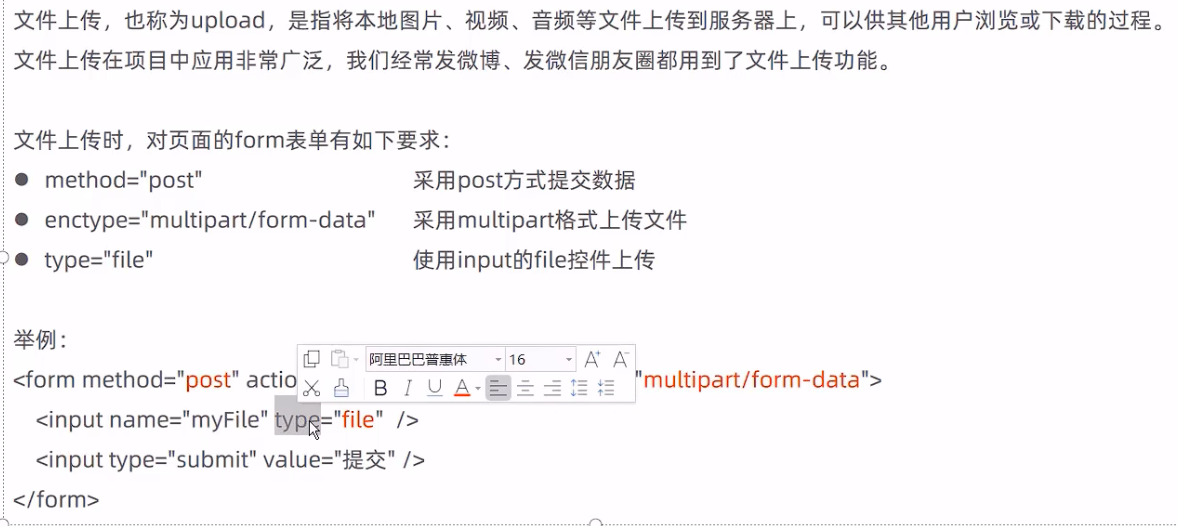
- 在前端文件上传必须要按照这个格式来
- 这里的参数必须使用
MultipartFile file,并且我们传过来的文件会随着请求结束就自动删除,所以我们必须把他保存起来。 - 利用字符串截取与UUID防止图片名字重复,创建一个目录
- 通过
file.transferTo(new File(basePath + fileName));将我们的临时文件转存到指定的位置。
6.2 文件的下载
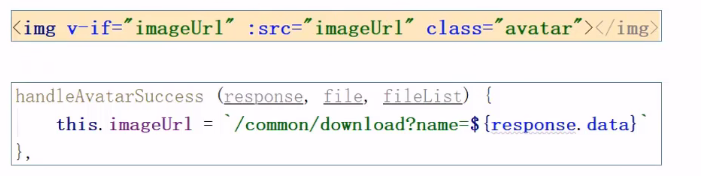
- 我们通过将文件下载到指定位置,然后再浏览器的页面中渲染出来。
- 就是基本的操作,读取文件信息,将文件写入到浏览器中。
- 这里也理解了为什么上传与下载需要成套出现~,因为我们上传是暂时保存在了本地的服务器中,而从我们本地服务器中下载出来,才能到我们的页面里渲染。
七、结尾
- 对于瑞吉外卖项目内容就总结这么多,若想深入学习等待后续更新。
- 我将会继续更新关于Java方向的学习知识,感兴趣的小伙伴可以关注一下。
- 文章写得比较走心,用了很长时间,绝对不是copy过来的!
- 尊重每一位学习知识的人,同时也尊重每一位分享知识的人。
- 如果有什么错误请大家积极批评指正,我们第一时间更改。
- 😎你的点赞与关注,是我努力前行的无限动力。🤩


【推荐】国内首个AI IDE,深度理解中文开发场景,立即下载体验Trae
【推荐】编程新体验,更懂你的AI,立即体验豆包MarsCode编程助手
【推荐】抖音旗下AI助手豆包,你的智能百科全书,全免费不限次数
【推荐】轻量又高性能的 SSH 工具 IShell:AI 加持,快人一步
· TypeScript + Deepseek 打造卜卦网站:技术与玄学的结合
· 阿里巴巴 QwQ-32B真的超越了 DeepSeek R-1吗?
· 【译】Visual Studio 中新的强大生产力特性
· 10年+ .NET Coder 心语 ── 封装的思维:从隐藏、稳定开始理解其本质意义
· 【设计模式】告别冗长if-else语句:使用策略模式优化代码结构