云服务器初始化配置 CentOS 7
2021-08-23 更新 zk、kafka
2021-08-18 更新 ssh
2021-07-08 更新 python 安装
2021-06-24 更新
基础配置
终端配色(PS1 变量设置)
更新 /root/.bashrc 文件,在末尾添加 export PS1="\[\e[31m\][\u@\H \W]#\[\e[0m\] "
ssh 相关
1. 免密登陆
首先在自己电脑上生成公私钥文件(已经生成过的可以省略),使用
ssh-keygen -t rsa [-C "your-email-address”] -f ~/.ssh/id_xxx
- -f 参数指定密钥文件名
- -t 指定密钥类型,默认是 rsa ,可以省略。
- -C 设置注释文字,比如邮箱。
利用 SSH RSA 公钥和私钥体系来验证身份,它的原理其实是把自己的公钥,复制到目标服务器的 ~/.ssh/authorized_keys 文件内
brew install ssh-copy-id
ssh-copy-id root@1.2.3.4
等价于下面这个命令,省掉了两个默认参数
ssh-copy-id -i ~/.ssh/id_rsa.pub root@100.100.100.100 -p 22
最后在本机的 .ssh/config 文件中,添加上述配置
# 该文件用于配置私钥对应的服务器
Host cloudServer
  HostName xxx
  Port 22
  User root
  IdentityFile ~/.ssh/id_cloudServer
2. 修改默认端口
2020-08-18 更新
最近薅了个谷歌云,在改完配置文件重启 sshd 时,报了个错,在这里记录下解决方案。
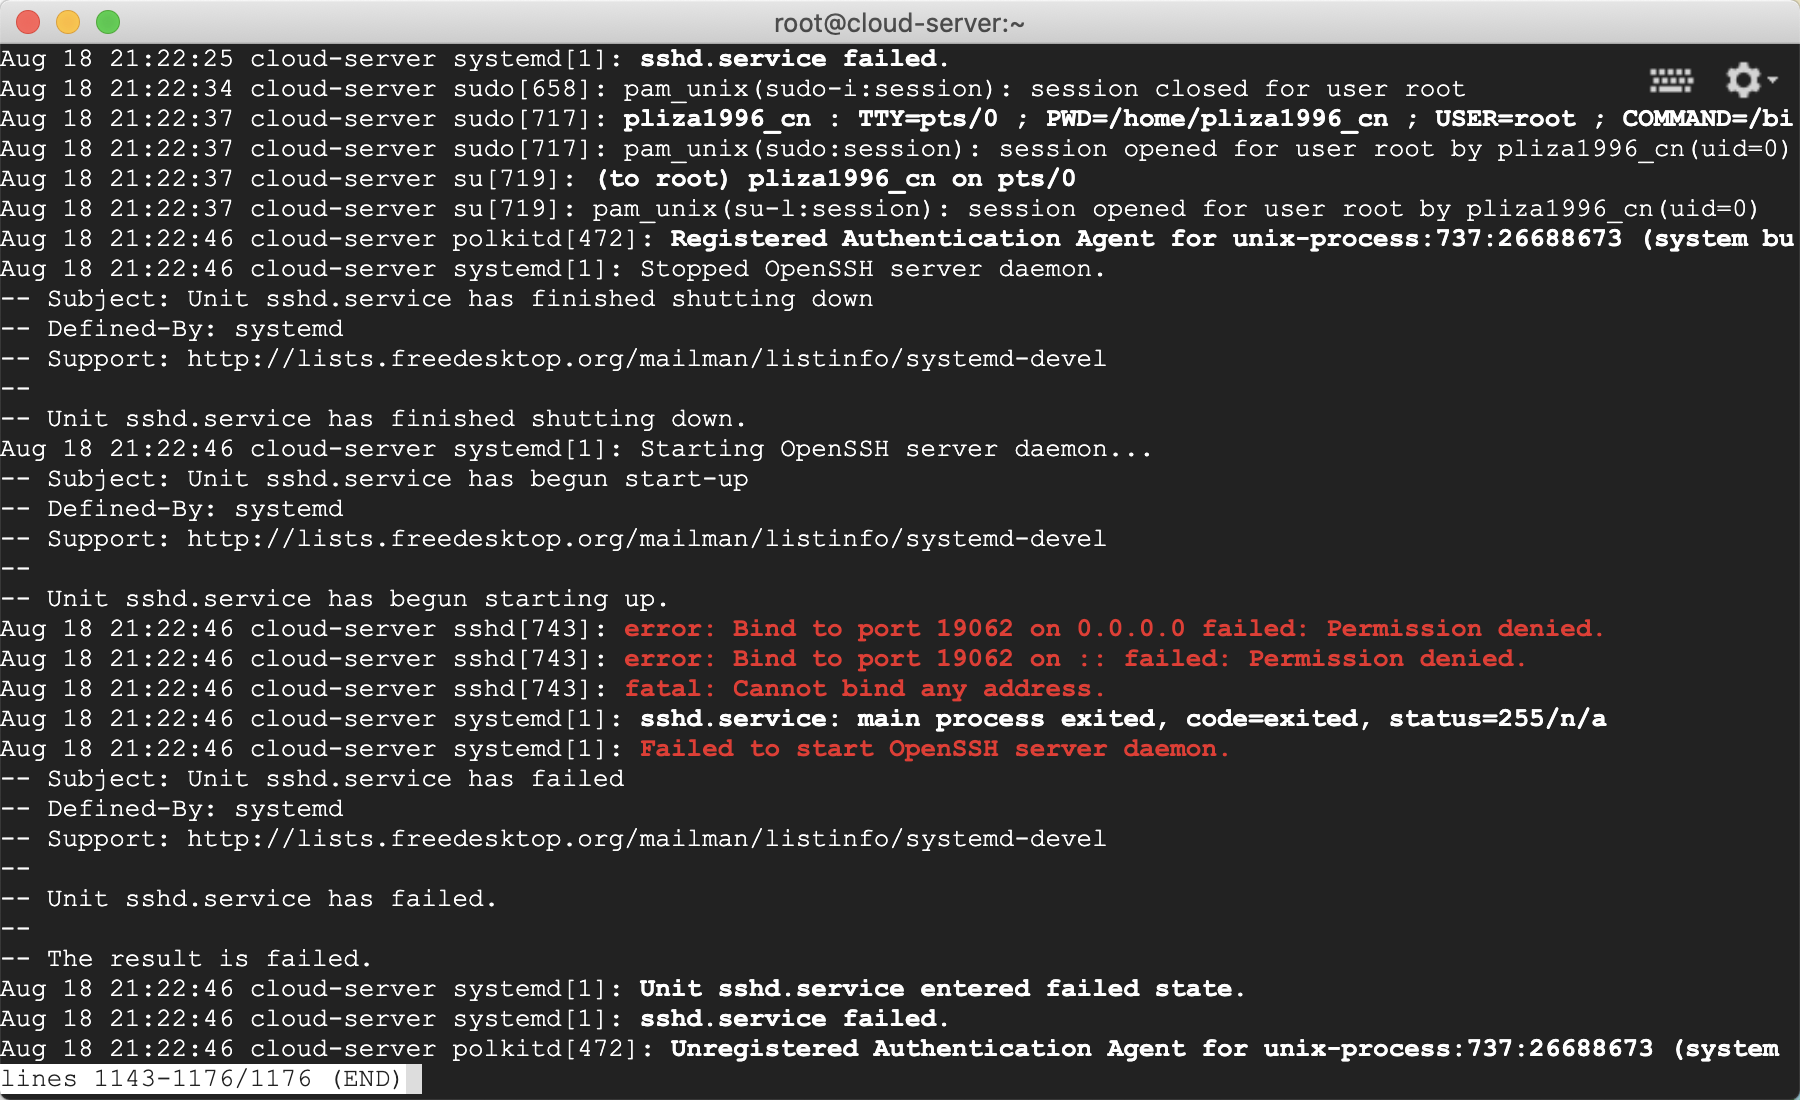
参考文章 link
上文有提到 SELinux,之前没听说过,又搜了一波,红帽 what-is-selinux,就是指定了一系列的安全策略,来控制用户对系统上的应用、进程和文件的访问权限。
我登陆谷歌云是直接在页面上点的 ssh 登陆按钮,然后弹出一个跟 iTterm 很像的页面,总感觉每次想登陆了还得打开网页再点一下,也想搞成免密登陆,不啰嗦了直接给出参考文档。
安装 JDK、Maven、lrzsz、nodejs
# yum install java-1.8.0-openjdk
# update 上面这个没有安装全,一些命令如 jps 等都没安装到,应该安装 devl,然后在修改 /etc/profile 文件
yum install java-1.8.0-openjdk-devel.x86_64
yum install maven
yum install lrzsz
jdk_devl 安装参考 link
yum 安装的 maven 版本较低,推荐手动安装 link。
nodejs 下载指定版本 link,安装参考 link。
Mac 安装 Java8(通过 Homebrew)
# brew install openjdk@8
For the system Java wrappers to find this JDK, symlink it with
  sudo ln -sfn /usr/local/opt/openjdk@8/libexec/openjdk.jdk /Library/Java/JavaVirtualMachines/openjdk-8.jdk

openjdk@8 is keg-only, which means it was not symlinked into /usr/local,
because this is an alternate version of another formula.

If you need to have openjdk@8 first in your PATH, run:
  echo 'export PATH="/usr/local/opt/openjdk@8/bin:$PATH"' >> ~/.zshrc

For compilers to find openjdk@8 you may need to set:
  export CPPFLAGS="-I/usr/local/opt/openjdk@8/include"

==> Summary
🍺  /usr/local/Cellar/openjdk@8/1.8.0+302: 782 files, 193.0MB
==> Caveats
==> openjdk@8
For the system Java wrappers to find this JDK, symlink it with
  sudo ln -sfn /usr/local/opt/openjdk@8/libexec/openjdk.jdk /Library/Java/JavaVirtualMachines/openjdk-8.jdk

openjdk@8 is keg-only, which means it was not symlinked into /usr/local,
because this is an alternate version of another formula.

If you need to have openjdk@8 first in your PATH, run:
  echo 'export PATH="/usr/local/opt/openjdk@8/bin:$PATH"' >> ~/.zshrc

For compilers to find openjdk@8 you may need to set:
  export CPPFLAGS="-I/usr/local/opt/openjdk@8/include"
安装 python3
参考文章
修改 /bin/python 软链接到 /bin/python3,之后 yum 会出个异常(yum 不支持 python3),解决方法
推荐自己编译安装 link
安装 gcc
常用中间件
MySQL
云服务器安装 Mysql 5.7
监控待补充
Redis
单机版 centos7 修改完密码后,连接后需要输入 auth #{passwd}
安装
- 掘金 redis 单机安装
- 集群待补充
ZK 与 Kafka
方法一:各自安装启动
这里用的是 zookeeper-3.5.9、kafka_2.11-2.0.1,zk 配置文件如下(修改了 数据目录、日志目录),先把 zk 以 standalone 模式启起来
[root@cloudserver zookeeper-3.5.9]# cat conf/zoo.cfg
# The number of milliseconds of each tick
tickTime=2000
# The number of ticks that the initial
# synchronization phase can take
initLimit=10
# The number of ticks that can pass between
# sending a request and getting an acknowledgement
syncLimit=5

# the directory where the snapshot is stored.
# do not use /tmp for storage, /tmp here is just
# example sakes.
# 数据目录
dataDir=/opt/log/zk/data
# 日志目录
dataLogDir=/opt/log/zk/dataLog

# the port at which the clients will connect
clientPort=2181
# the maximum number of client connections.
# increase this if you need to handle more clients
#maxClientCnxns=60
#
# Be sure to read the maintenance section of the
# administrator guide before turning on autopurge.
#
# http://zookeeper.apache.org/doc/current/zookeeperAdmin.html#sc_maintenance
#
# The number of snapshots to retain in dataDir
#autopurge.snapRetainCount=3
# Purge task interval in hours
# Set to "0" to disable auto purge feature
#autopurge.purgeInterval=1

[root@cloudserver zookeeper-3.5.9]# bin/zkServer.sh status
ZooKeeper JMX enabled by default
Using config: /opt/zookeeper-3.5.9/bin/../conf/zoo.cfg
Client port found: 2181. Client address: localhost. Client SSL: false.
Mode: standalone
接着再来配置 kafka,配置文件如下(注意 listeners、advertised.listeners 这两项配置,还修改了 zookeeper.connect 地址,我这里加了个 /kafka):
############################# Server Basics #############################

# The id of the broker. This must be set to a unique integer for each broker.
broker.id=0

############################# Socket Server Settings #############################

# *注意这里配置 ifconfig eth0 对应的本地 ip
listeners=PLAINTEXT://#{localIp}:9092

# Hostname and port the broker will advertise to producers and consumers. If not set,
# it uses the value for "listeners" if configured.  Otherwise, it will use the value
# returned from java.net.InetAddress.getCanonicalHostName().
# *注意:如果想要外网访问,比如我这个是阿里云的机器,需要在我调试代码的时候,能在公网访问到这台机器上的 kafka server,就需要把公网 ip 配置在这里
# *公网 ip 可以通过后台管理页面查看,或者直接 curl cip.cc 查看
advertised.listeners=PLAINTEXT://#{公网ip}:9092

# Maps listener names to security protocols, the default is for them to be the same. See the config documentation for more details
#listener.security.protocol.map=PLAINTEXT:PLAINTEXT,SSL:SSL,SASL_PLAINTEXT:SASL_PLAINTEXT,SASL_SSL:SASL_SSL

# The number of threads that the server uses for receiving requests from the network and sending responses to the network
num.network.threads=3

# The number of threads that the server uses for processing requests, which may include disk I/O
num.io.threads=8

# The send buffer (SO_SNDBUF) used by the socket server
socket.send.buffer.bytes=102400

# The receive buffer (SO_RCVBUF) used by the socket server
socket.receive.buffer.bytes=102400

# The maximum size of a request that the socket server will accept (protection against OOM)
socket.request.max.bytes=104857600


############################# Log Basics #############################

# 存放消息日志文件的地址(数据日志,存放 Topic 中存储的数据) A comma separated list of directories under which to store log files
log.dirs=/opt/log/kafka/data-log

# The default number of log partitions per topic. More partitions allow greater
# parallelism for consumption, but this will also result in more files across
# the brokers.
num.partitions=1

# The number of threads per data directory to be used for log recovery at startup and flushing at shutdown.
# This value is recommended to be increased for installations with data dirs located in RAID array.
num.recovery.threads.per.data.dir=1

############################# Internal Topic Settings  #############################
# The replication factor for the group metadata internal topics "__consumer_offsets" and "__transaction_state"
# For anything other than development testing, a value greater than 1 is recommended for to ensure availability such as 3.
offsets.topic.replication.factor=1
transaction.state.log.replication.factor=1
transaction.state.log.min.isr=1

############################# Log Flush Policy #############################

# Messages are immediately written to the filesystem but by default we only fsync() to sync
# the OS cache lazily. The following configurations control the flush of data to disk.
# There are a few important trade-offs here:
#    1. Durability: Unflushed data may be lost if you are not using replication.
#    2. Latency: Very large flush intervals may lead to latency spikes when the flush does occur as there will be a lot of data to flush.
#    3. Throughput: The flush is generally the most expensive operation, and a small flush interval may lead to excessive seeks.
# The settings below allow one to configure the flush policy to flush data after a period of time or
# every N messages (or both). This can be done globally and overridden on a per-topic basis.

# The number of messages to accept before forcing a flush of data to disk
#log.flush.interval.messages=10000

# The maximum amount of time a message can sit in a log before we force a flush
#log.flush.interval.ms=1000

############################# Log Retention Policy #############################

# The following configurations control the disposal of log segments. The policy can
# be set to delete segments after a period of time, or after a given size has accumulated.
# A segment will be deleted whenever *either* of these criteria are met. Deletion always happens
# from the end of the log.

# The minimum age of a log file to be eligible for deletion due to age
log.retention.hours=168

# A size-based retention policy for logs. Segments are pruned from the log unless the remaining
# segments drop below log.retention.bytes. Functions independently of log.retention.hours.
#log.retention.bytes=1073741824

# The maximum size of a log segment file. When this size is reached a new log segment will be created.
log.segment.bytes=1073741824

# The interval at which log segments are checked to see if they can be deleted according
# to the retention policies
log.retention.check.interval.ms=300000

############################# Zookeeper #############################

# Zookeeper connection string (see zookeeper docs for details).
# This is a comma separated host:port pairs, each corresponding to a zk
# server. e.g. "127.0.0.1:3000,127.0.0.1:3001,127.0.0.1:3002".
# You can also append an optional chroot string to the urls to specify the
# root directory for all kafka znodes.
zookeeper.connect=localhost:2181/kafka

# Timeout in ms for connecting to zookeeper
zookeeper.connection.timeout.ms=6000


############################# Group Coordinator Settings #############################

# The following configuration specifies the time, in milliseconds, that the GroupCoordinator will delay the initial consumer rebalance.
# The rebalance will be further delayed by the value of group.initial.rebalance.delay.ms as new members join the group, up to a maximum of max.poll.interval.ms.
# The default value for this is 3 seconds.
# We override this to 0 here as it makes for a better out-of-the-box experience for development and testing.
# However, in production environments the default value of 3 seconds is more suitable as this will help to avoid unnecessary, and potentially expensive, rebalances during application startup.
group.initial.rebalance.delay.ms=0

# 后台启动
[root@cloudserver kafka_2.11-2.0.1]# bin/kafka-server-start.sh config/server.properties &
[1] 17803
最后来用自带的脚本生产、消费消息,来测试一下(注意经过上述配置后,broker 地址就不能写 localhost:9092 了,要写成本地 eth0 的 ip 地址):
# 1、创建 Topic
sh bin/kafka-topics.sh --zookeeper localhost:2181/kafka --create --replication-factor 1 --partitions 2 --topic test


# 2、生产消息
[root@cloudserver kafka_2.11-2.0.1]# sh bin/kafka-console-producer.sh --broker-list #{localIp}:9092 --topic test
>dfafsa
>dfsafds
>fdsafsa
>你好
>


# 3、消费消息
[root@cloudserver kafka_2.11-2.0.1]# sh bin/kafka-console-consumer.sh --bootstrap-server #{localIp}:9092 --topic test --from-beginning
[2021-08-23 12:45:45,320] INFO [GroupCoordinator 0]: Preparing to rebalance group console-consumer-99431 with old generation 0 (__consumer_offsets-37) (kafka.coordinator.group.GroupCoordinator)
[2021-08-23 12:45:45,325] INFO [GroupCoordinator 0]: Stabilized group console-consumer-99431 generation 1 (__consumer_offsets-37) (kafka.coordinator.group.GroupCoordinator)
[2021-08-23 12:45:45,330] INFO [GroupCoordinator 0]: Assignment received from leader for group console-consumer-99431 for generation 1 (kafka.coordinator.group.GroupCoordinator)
dfsafds
dfafsa
fdsafsa
你好
[2021-08-23 12:47:53,590] INFO [GroupMetadataManager brokerId=0] Removed 0 expired offsets in 2 milliseconds. (kafka.coordinator.group.GroupMetadataManager)
其他
- 管理 Github star,里面第一步应该是
pip3 install starred。``

 浙公网安备 33010602011771号